Before you start: what you have matters
Wallpaper comes off in two totally different moods: either it peels politely, or it fights you until you pick the right method. The fastest way to avoid wall damage is to spend five minutes figuring out the wallpaper type and what the wall is underneath.
Quick safety check
- Turn off power at the breaker if you will spray heavily or steam near outlets and switches. Confirm it is off with a tester before you start.
- Older homes: If your home was built before 1978, assume there could be lead paint somewhere in the paint history. Avoid aggressive dry sanding, contain dust, and consider testing if you will be sanding or disturbing a lot of painted surface.
- PPE: Eye protection and gloves at minimum. Add a respirator and dust control if you will sand or skim coat.
Quick wallpaper type check
- Peel-and-stick (removable): Often newer. You can lift a corner and it stretches a bit. The backing usually comes with it.
- Vinyl-coated: Looks slightly shiny or has a wipeable surface. Usually has a vinyl face over a paper backing. The face may peel off first, leaving backing behind.
- Traditional paste wallpaper: Older paper look and feel, sometimes fragile. Typically needs water, steam, or wallpaper remover to release the adhesive.
Drywall vs plaster: why it matters
- Drywall (especially unprimed or poorly painted): Easy to gouge and easy to soak. Too much water can bubble the paper facing or soften joint compound.
- Plaster (common in older homes): More water-tolerant and tougher to gouge, but it can crack or flake if the surface is already failing.
If you only remember one thing: with drywall, use the least moisture and least aggression that still works. With plaster, you can lean a little more on steam and remover, but still keep your scraper angle gentle.
Tools and supplies (and what you can skip)
You do not need a garage full of gadgets. You need a clean way to wet the adhesive, a way to let moisture in, and a way to scrape without digging craters.
Basics
- Drop cloths or rosin paper
- Painters tape (protect trim, outlets, and baseboards)
- Wide putty knife or wallpaper scraper (3 to 6 inches)
- Spray bottle or pump sprayer
- Bucket, sponge, microfiber rags
- Step stool
- Gloves and eye protection
- Non-contact voltage tester or outlet tester
Helpful upgrades
- Wallpaper scoring tool: Makes tiny perforations so remover can reach the glue.
- Wallpaper steamer: Best for stubborn paste or multiple layers, especially on plaster.
- Gel wallpaper remover: Clings to walls longer than plain water. Great for vinyl backing and heavy paste.
- Plastic scraper: Safer on drywall when you are learning.
What I skip
- Razor blades: They feel efficient until you slice drywall paper or gouge plaster.
- Over-scoring: Too many passes can tear drywall paper under the wallpaper.

Room prep that saves your floors
Wallpaper removal is wet work. It drips, it runs, and it turns old paste into something that feels like pancake batter. A little prep makes cleanup fast and prevents damage to trim and floors.
- Turn off power to the room at the breaker if you are going to spray heavily or steam near outlets and switches. Verify with a tester.
- Remove cover plates and tape over the openings.
- Protect floors with rosin paper or drop cloths. Add a towel line along baseboards to catch drips.
- Protect trim and ceilings: run painters tape along baseboards and at the ceiling line if you tend to overspray. Keep remover off stained wood when possible, and do not flood crown molding or window casings.
- Work methodically: one wall at a time, top to bottom for wetting, and keep a trash bag nearby for soggy strips.
- Ventilate if using a commercial remover. Open windows and run a fan.
Method 1: Peel-and-stick
Peel-and-stick wallpaper can be a dream, or it can leave adhesive behind like it is trying to keep a souvenir. The goal is to pull slow and low so you do not yank drywall paper.
Step-by-step
- Warm the surface lightly with a hair dryer or heat gun on low. Keep it moving and do not cook the paint.
- Lift a corner with your fingernail or a plastic putty knife.
- Peel slowly at a low angle, keeping the wallpaper close to the wall as you pull.
- If it starts tearing or pulling paint, add a little more heat, reduce your pull angle even more, and peel in smaller sections.
- Deal with leftover adhesive using warm soapy water first. If it smears and stays sticky, use a wallpaper adhesive remover per the label, then rinse.
- Final wipe-down with clean water and let the wall dry.
Drywall warning sign
If drywall paper starts tearing, stop and change tactics. Sometimes a little warmth plus remover (and patience) saves you from a big patch job later.
Method 2: Vinyl wallpaper
Vinyl is often the reason people say, “I tried everything.” The trick is understanding it may come off in layers.
Step-by-step
- Test for a peelable face: pick a seam and try to peel the top vinyl layer. If it comes off in large sheets, keep going.
- Now you are staring at the backing. This paper layer is where the glue lives.
- Score the backing lightly with a scoring tool. One or two passes is enough. You are making pinholes, not plowing fields.
- Apply remover (or hot water) with a pump sprayer. Let it soak 10 to 15 minutes. Keep it wet, do not let it dry back out.
- Scrape gently with a wide knife, keeping the blade angle low (almost flat to the wall). Work in small sections.
- Repeat as needed. Most vinyl jobs are multiple rounds, not one heroic scrape.
- Rinse the wall with clean water to remove residue.
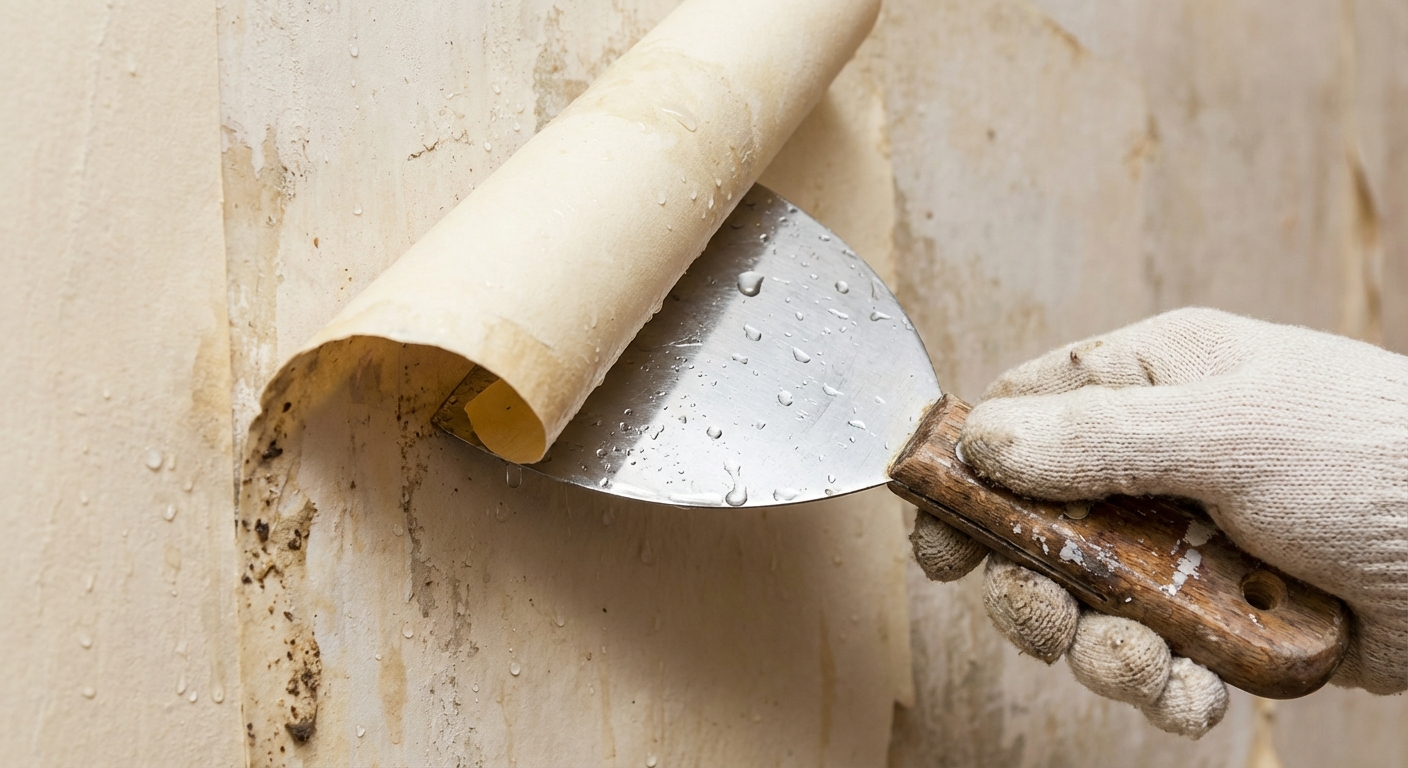
Method 3: Paste wallpaper
This is the most common situation in older homes: paper wallpaper, paste glue, and possibly a few decades of repainting around it. Here is how to remove it without turning your wall into a patching marathon.
Step-by-step
- Dry peel first: try lifting a seam. If the paper wants to come off in sheets, take the win. If it tears into confetti, move on.
- Score lightly to help moisture reach the adhesive.
- Soak with warm water or wallpaper remover. I like a pump sprayer because it wets evenly. Let it dwell 10 to 20 minutes.
- Test scrape a small area. If it resists, soak longer instead of scraping harder.
- Scrape with a low angle. Many people like bottom-up scraping because you are less likely to catch and undercut drywall paper. For wetting, top-down usually controls drips better. Use the combo that keeps you neat and gentle.
- Second soak for stubborn spots and corners.
- Rinse thoroughly to remove adhesive residue, then let dry fully.
DIY remover option
For light-duty paste, a mix of warm water plus a small amount of dish soap can help it wet out. Some people add vinegar. It can work, but for heavy paste I have had better luck with a store-bought wallpaper remover because it stays active longer. Whatever you use, always rinse afterward.
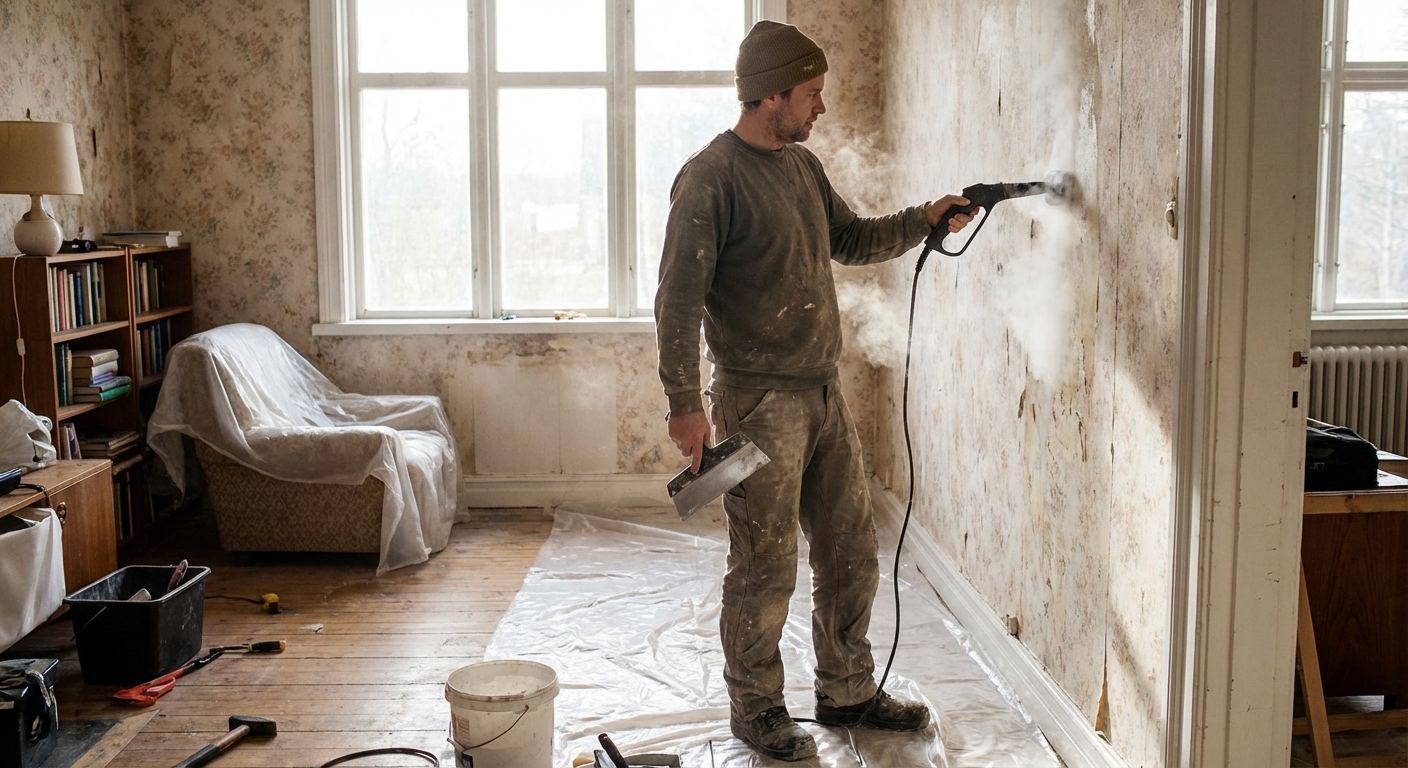
Method 4: Steaming
Steam is the sledgehammer, but you still have to swing it carefully. It is great for thick paste, multiple layers, and older homes where the wallpaper has fused to the wall over time. It can also be the fastest way to damage drywall if you overdo it.
When I choose steam
- Multiple layers of wallpaper
- Old, rock-hard paste that barely reacts to remover
- Plaster walls that can tolerate more moisture
Step-by-step steaming
- Score first unless the paper is already porous. Vinyl almost always needs scoring before steam.
- Work in small zones, about 2 to 3 square feet.
- Hold the steamer plate against the wallpaper for 10 to 20 seconds, then move it.
- Scrape immediately while the paste is soft.
- Do not linger with the steamer on drywall. If the surface feels spongy or the paint starts bubbling, stop and let it dry out.
- Rinse when you are done to remove glue residue.
My hard-learned lesson: the moment you think “I will just give it another 30 seconds,” that is usually when drywall paper starts to lift. More dwell time is not always better.
Drywall vs plaster: tweaks
If your walls are drywall
- Use minimal scoring. Too much scoring can shred the paper facing once it gets wet.
- Favor remover and short, controlled steam bursts. Most removers are still water-based, so the win is controlled exposure, not flooding the wall.
- Scrape flatter. Think “shave” not “chisel.”
- Stop if drywall paper tears and switch tactics. Sometimes you need to re-wet and let the glue do the work.
If your walls are plaster
- You can use more steam, but still avoid soaking electrical boxes and trim.
- Watch for loose finish coats. If plaster is already flaking, aggressive scraping will take it with the wallpaper.
- Let the wall tell you what is happening. Hollow-sounding or cracking areas need a gentler approach.
Troubleshooting
It only comes off in tiny pieces
- Soak longer. Reapply remover before it dries.
- Switch to steam for short bursts.
- Use a wider scraper to reduce gouges from repetitive scraping.
The top layer peels but backing will not budge
- That is normal for vinyl. Score the backing and use remover with dwell time.
The wall feels slimy after removal
- That is adhesive residue. Wash with warm water and a sponge, then rinse with clean water.
- Do not paint over it. Paint can fish-eye or peel later.
Drywall paper tore and it looks fuzzy
- Stop adding water.
- Let it dry completely.
- Seal damaged areas with a problem-surface sealer made for torn drywall paper (a Gardz-type sealer), then skim coat and sand smooth before priming.
I found mold behind the wallpaper
- Pause the project and address moisture first. Wallpaper often hides moisture problems, and trapped moisture plus paste can contribute to mold growth.
- If the area is extensive or you have health concerns, consider a professional assessment.
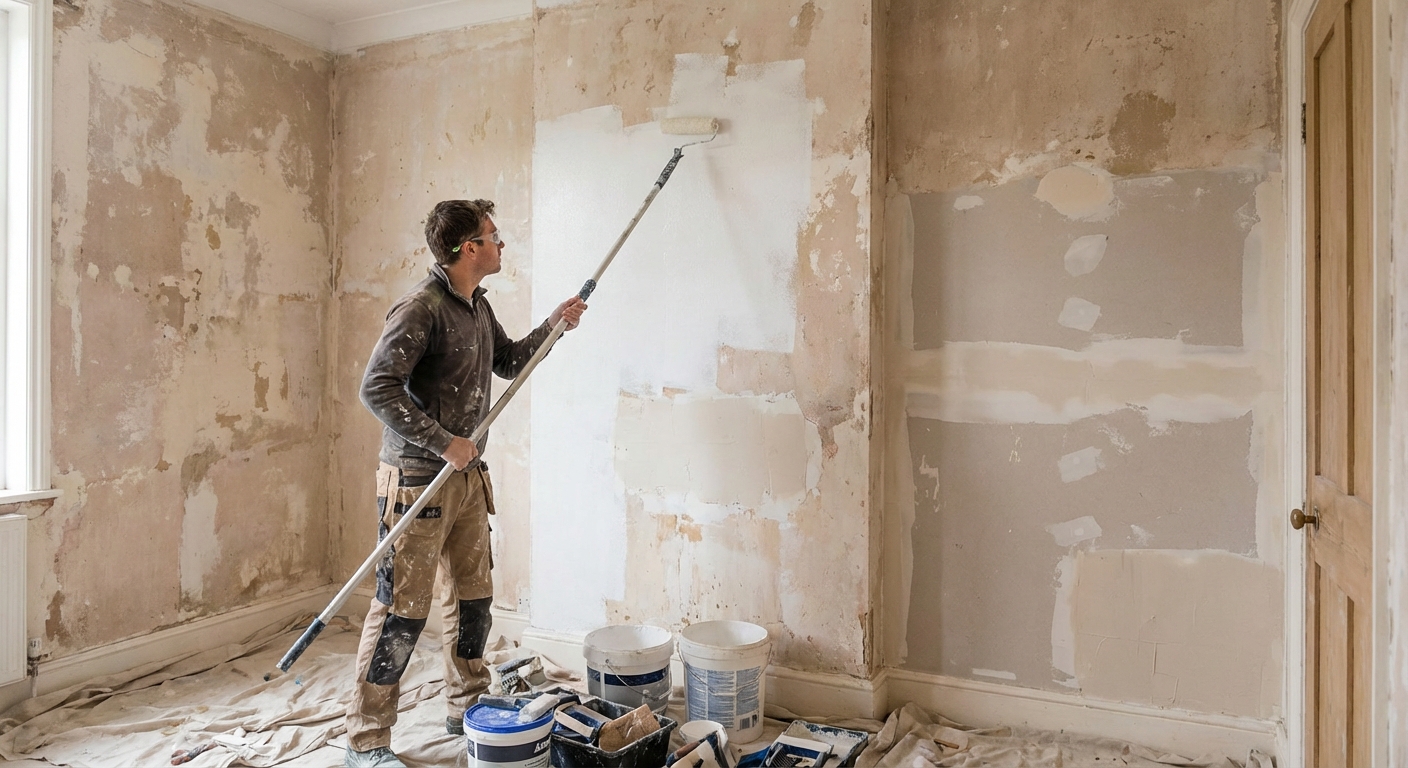
Prep for paint after removal
This is where a lot of DIY paint jobs go sideways. Even if the wallpaper is gone, the wall is not automatically paint-ready. A little prep here makes the difference between a smooth finish and a wall that shows every scar under sunlight.
Step 1: wash off all adhesive
- Wipe with warm water and a sponge, changing water often.
- Rinse with clean water.
- Let the wall dry completely. Overnight is best.
- Only if needed: If the wall feels greasy or you used a heavy-duty remover, follow product directions for cleanup. A TSP substitute can help in some cases, but follow the label and do not leave residue behind.
Step 2: inspect and repair
- Small gouges: patch with lightweight spackle.
- Uneven areas: skim coat with joint compound using a wide knife.
- Loose paint: scrape it now, not after you prime.
Step 3: sand for flat
- Use a sanding sponge or pole sander.
- Feather patch edges so you cannot feel a ridge with your fingers.
- Vacuum dust and wipe with a damp microfiber cloth.
- If you suspect older paint layers, keep sanding minimal and control dust.
Step 4: prime the right way
- Use a quality primer before paint. This helps lock down any remaining residue and evens out porosity from patches.
- If you had torn drywall paper, spot-seal those areas first with a torn-drywall sealer, then prime the whole wall.
- If stains are present, use a stain-blocking primer that matches the stain. Water-based can handle mild stains; oil or shellac is better for stubborn water stains or odor issues.
Step 5: paint
Once primed, you can paint like normal. In rooms with a lot of wall texture issues, a lower-sheen finish (like eggshell instead of semi-gloss) can be a little more forgiving.
Cleanup and disposal
- Bag soggy wallpaper as you go. It gets heavy fast and loves to drip across the room.
- Do not dump paste sludge down a sink. Scrape it into the trash. If you rinse tools in a utility sink, use plenty of water and wipe out solids first so you do not build a glue situation in your drain.
- Wipe trim and floors before remover dries. Dried paste is like boogers with a college degree.
My simple decision tree
- If it is peel-and-stick and it releases cleanly: peel slow and low, then wash residue.
- If it is vinyl: peel the face layer, score the backing, then remover with dwell time.
- If it is traditional paper: score lightly, soak, scrape gently, repeat.
- If it laughs at remover: bring in steam, but keep sessions short and controlled on drywall.
If you want the cleanest walls, do not measure success by how fast the paper comes off. Measure it by how little patching you have to do when the room is finally bare.
FAQ
Do I need to score every time?
No. If the wallpaper is already porous and soaking through, scoring may be unnecessary. Vinyl and anything with a washable surface usually needs scoring so moisture can reach the adhesive.
Can I paint over wallpaper?
You can, but it often telegraphs seams and can fail later if the glue reactivates. If you want the best long-term paint finish, removal plus proper priming is the safer bet.
How do I know if all the glue is gone?
Run your hand over the wall after it dries. If it feels tacky or slick, there is still residue. Another clue: rinse water beads strangely on the surface instead of wetting evenly.
What is the safest scraper angle?
Keep the blade almost flat to the wall and push with steady pressure. A steep angle is what causes gouges and torn drywall paper.
About Marcus Vance
Content Creator @ Grit & Home
Marcus Vance is a lifelong DIY enthusiast and self-taught home renovator who has spent the last decade transforming a dilapidated 1970s ranch into his family's dream home. He specializes in budget-friendly carpentry, room-by-room renovations, and demystifying power tools for beginners. Through his writing, Marcus shares practical tutorials and hard-learned lessons to help homeowners tackle their own projects with confidence.