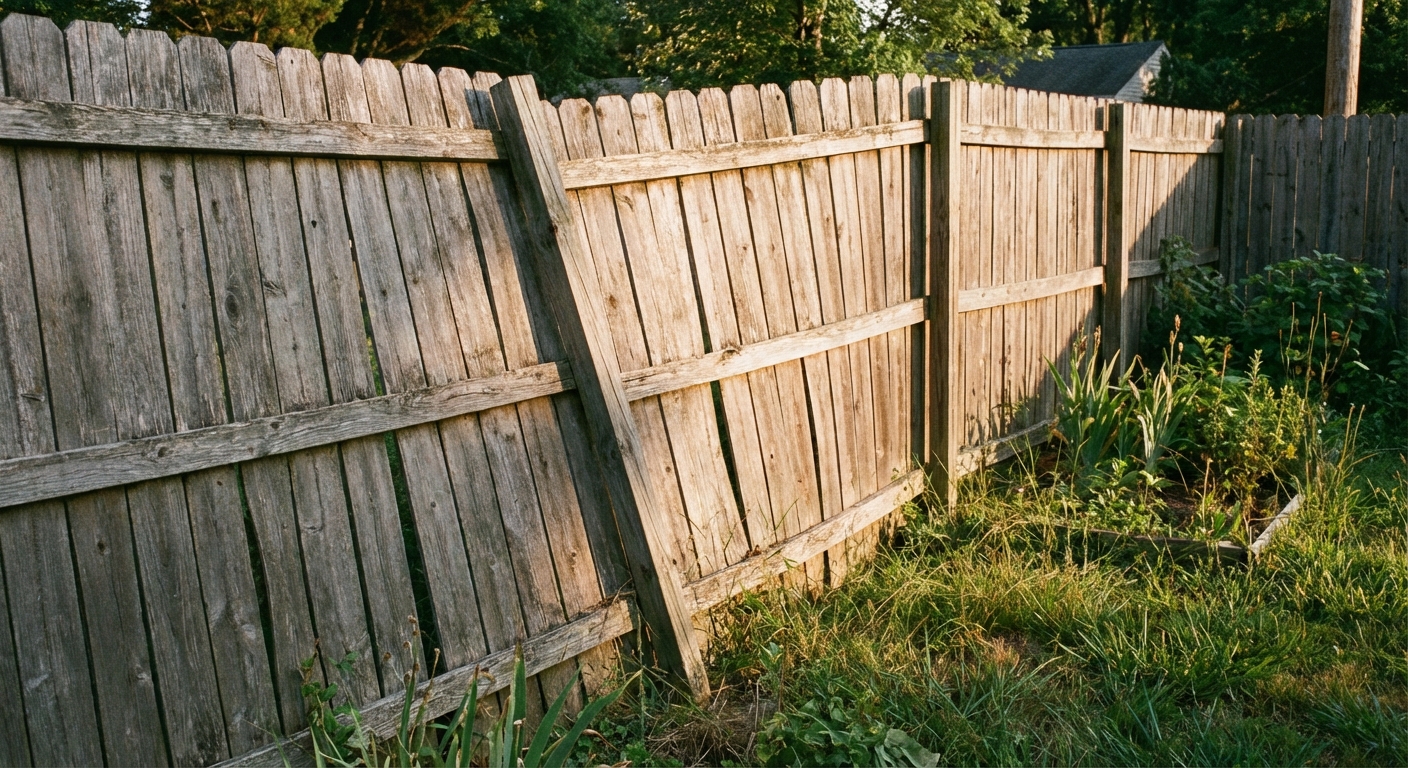
After a windy week or a wet spring, a fence can go from “totally fine” to “why is that post doing the limbo?” fast. The good news is most fence problems are very repairable if you catch them early and tackle the root cause instead of just patching the symptoms.
Below is how I approach the most common fence repairs: resetting leaning posts, replacing broken pickets, fixing sagging gates, and reinforcing wind-damaged sections. I will cover wood and vinyl, and I will be straight with you about when it is smarter to replace a section rather than sink more time and money into repairs.
Quick safety and “call before you dig” notes
- Call 811 before digging if you are resetting posts or adding new footings. Utility lines are not always where you think they are.
- Wear eye and hearing protection when cutting boards, grinding screws, or drilling metal gate hardware.
- Gloves are your friend for splinters, sharp hardware, and handling wet concrete (it is caustic).
- Watch for rot and splinters on older wood fences. Gloves help, but do not make you invincible.
- Mind the load when bracing sections. A shifting fence panel can pinch fingers quickly.
Before you start: lines, rules, and neighbors
- Confirm the property line before moving posts or rebuilding a run. A “quick fix” can become a boundary argument.
- Check HOA and local rules. Some areas require permits for fence replacement or changes in height, even if you are “just repairing.”
- Talk to the neighbor if the fence is shared. It saves headaches later.
Diagnose the problem before you buy anything
A leaning fence is rarely “just leaning.” Usually it is one of these:
- Post failure: rot at ground line, loose concrete, undersized post, or shallow footing.
- Hardware failure: nails pulling out, screws snapped, hinges loose, latch dragging.
- Soil and water: saturated soil, erosion, or freeze and thaw movement.
- Wind load: solid privacy panels acting like sails, especially when posts are spaced too far apart.
My rule: if the post is moving, fix the post. Replacing pickets on a wobbly post is like putting new tires on a car with a broken axle.
Fast checks that tell you what is really going on
- Push test: Grab the post and shove. If the post moves at the ground, your footing is the problem.
- Probe for rot: Use a screwdriver at ground line. If it sinks in easily, the post is compromised.
- Look for racking: Fence panels “diamond” out of square when rails loosen or posts tilt.
- Gate gap check: If the latch side is sagging and rubbing, you likely need hinge and bracing work.
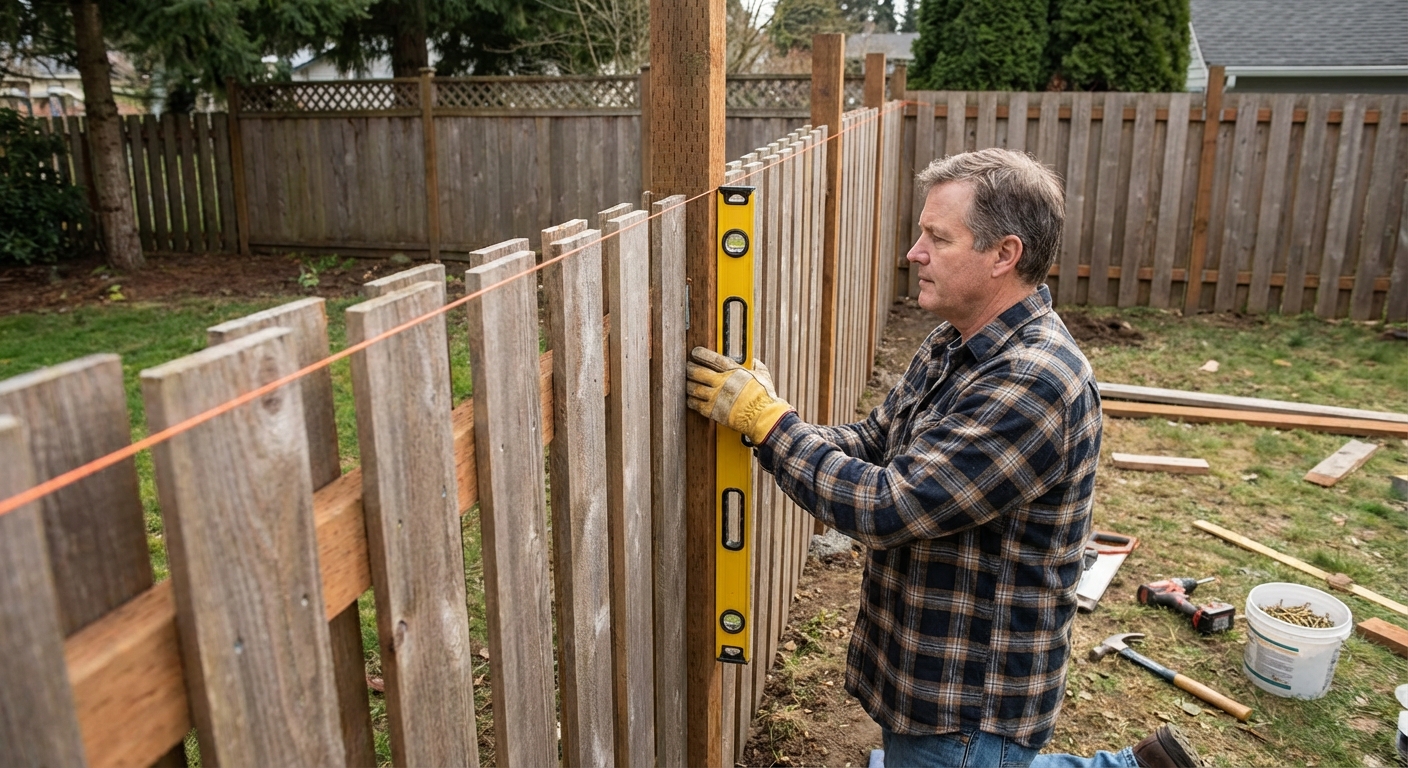
Reset a leaning wood fence post
This is the repair that saves the most fences. If the post is sound but the footing shifted, you can often reset it and get years more life. The key is being honest about the existing concrete. Sometimes you can reuse it. Sometimes you have to break it out and start fresh.
Tools and materials
- Post level or 4-foot level
- Shovel and digging bar (or post hole digger)
- 2x4s for temporary braces and deck screws
- Concrete mix (fast-setting is convenient, regular mix is fine)
- Gravel (optional, see note below)
- Water, bucket or hose
Step-by-step
- Remove the load. If a full panel is attached, temporarily unscrew one rail or detach brackets so you are not fighting tension while leveling the post.
- Expose the base. Dig around the post and existing concrete so you can see what you are working with.
- Decide if the post is worth saving.
- If the post is rotted, cracked, or termite-eaten at ground level, skip to replacement. Concrete will not fix a rotten stick.
- If the post is solid, keep going.
- Decide what to do with the old concrete.
- If the old concrete is crumbled, undersized, or loose, plan to remove it and repour.
- If the old concrete is a solid plug but it shifted, you will usually need to break it up or dig it out enough to reset properly. Just burying it in more concrete rarely fixes the underlying problem.
- Plumb the post. Use a level on two adjacent faces. Adjust until it is straight.
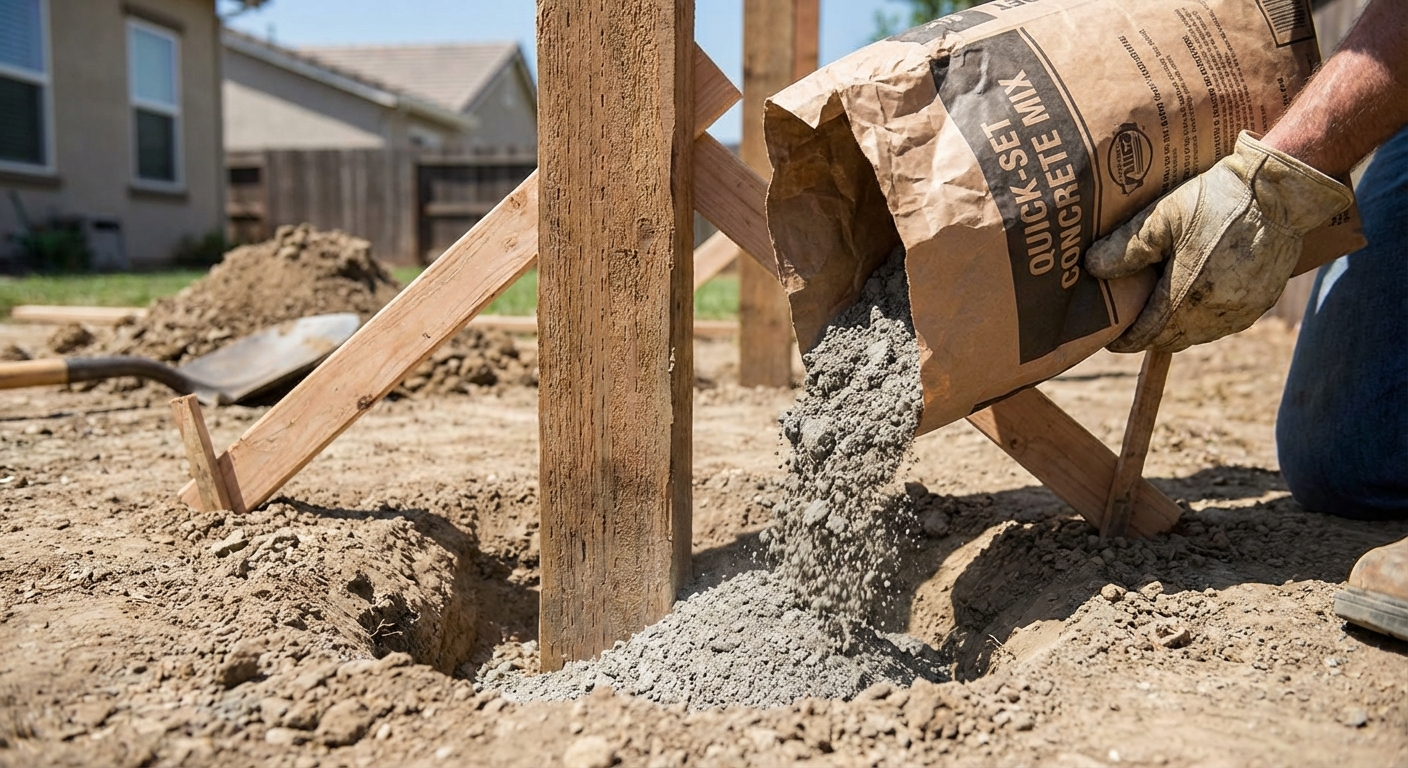
- Brace it. Screw 2x4 braces to the post and stake them into the ground so the post cannot drift while the concrete sets.
- Add drainage (optional). If you have room, a few inches of gravel under the concrete can help with drainage in some soils. The bigger win for wood posts is still a crowned concrete cap and grading soil so water sheds away from the post.
- Pour concrete. Fill the hole, leaving the top slightly mounded and sloped away from the post so water runs off.
- Fast-setting concrete is convenient. Follow the bag instructions exactly.
- With traditional mix, aim for thick and workable, not soup.
- Re-check plumb. Concrete has a way of nudging things. Adjust while it is still workable.
- Let it set and cure. Follow the bag, but as a general reality check: you might get initial set in an hour or two, but I like to wait at least 24 to 48 hours before putting real load back on it (especially a gate). Full cure takes longer, so be kind to it early.
Depth and diameter basics: “One-third of the post length in the ground” is a decent starting point, but it is not a magic number. A better rule is deep enough for the fence load and below your local frost line, whichever is deeper. For example, a 6-foot privacy fence in a mild climate is often set around 24 to 30 inches, while cold climates may need 30 to 48 inches or more depending on frost depth. If your original post hole is clearly too shallow, consider a full post replacement with a deeper footing rather than patching.
Post hole width: A common DIY guideline is a hole about 3 times the post width. So a 4x4 post often lands in a 10 to 12 inch diameter hole, and a 6x6 often needs something like 16 to 18 inches. More wind and taller fences typically mean bigger footings, not just more concrete on top.
Common mistakes I have made so you do not have to
- Skipping braces. I have “held it straight” for a few minutes, walked away, and come back to a post that crept off-level.
- Not sloping the concrete cap. Flat concrete holds water at the post and speeds up rot.
- Reattaching panels too soon. The post feels firm, but the concrete is still gaining strength.
Replace a rotten or broken wood post
If the post is soft at ground line, replacement is the only real fix. The easiest method depends on how the fence is built, but either way, plan for the most annoying part: the old footing.
Two common approaches
- Full post replacement: Remove rails and panels at that post, dig out the old footing, set a new post, then reattach everything.
- Steel post repair spike (temporary or limited use): In some situations you can use a post anchor or “repair spur,” but for tall privacy fences or gate posts I prefer a proper footing.
Reality check: Removing an old concrete footing can be brutally labor-intensive. Sometimes it comes out with a digging bar and patience. Sometimes you end up breaking the concrete apart, or digging a slightly offset hole next to the old one (then adjusting rails) because the original plug is basically a buried boulder.
For a standard wood privacy fence, use pressure-treated rated for ground contact. If your fence is tall or sees heavy wind, upgrading from a 4x4 to a 6x6 for gate posts can be worth every penny.
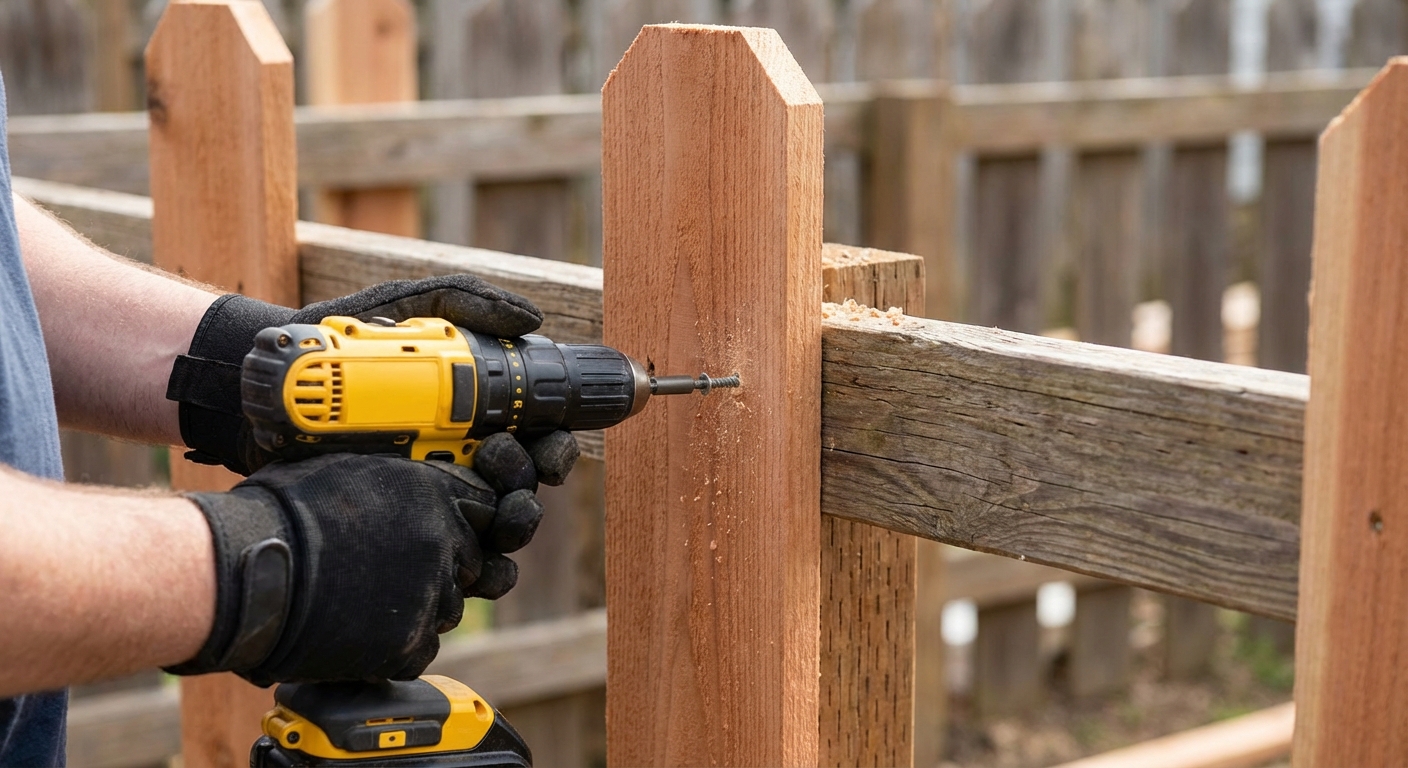
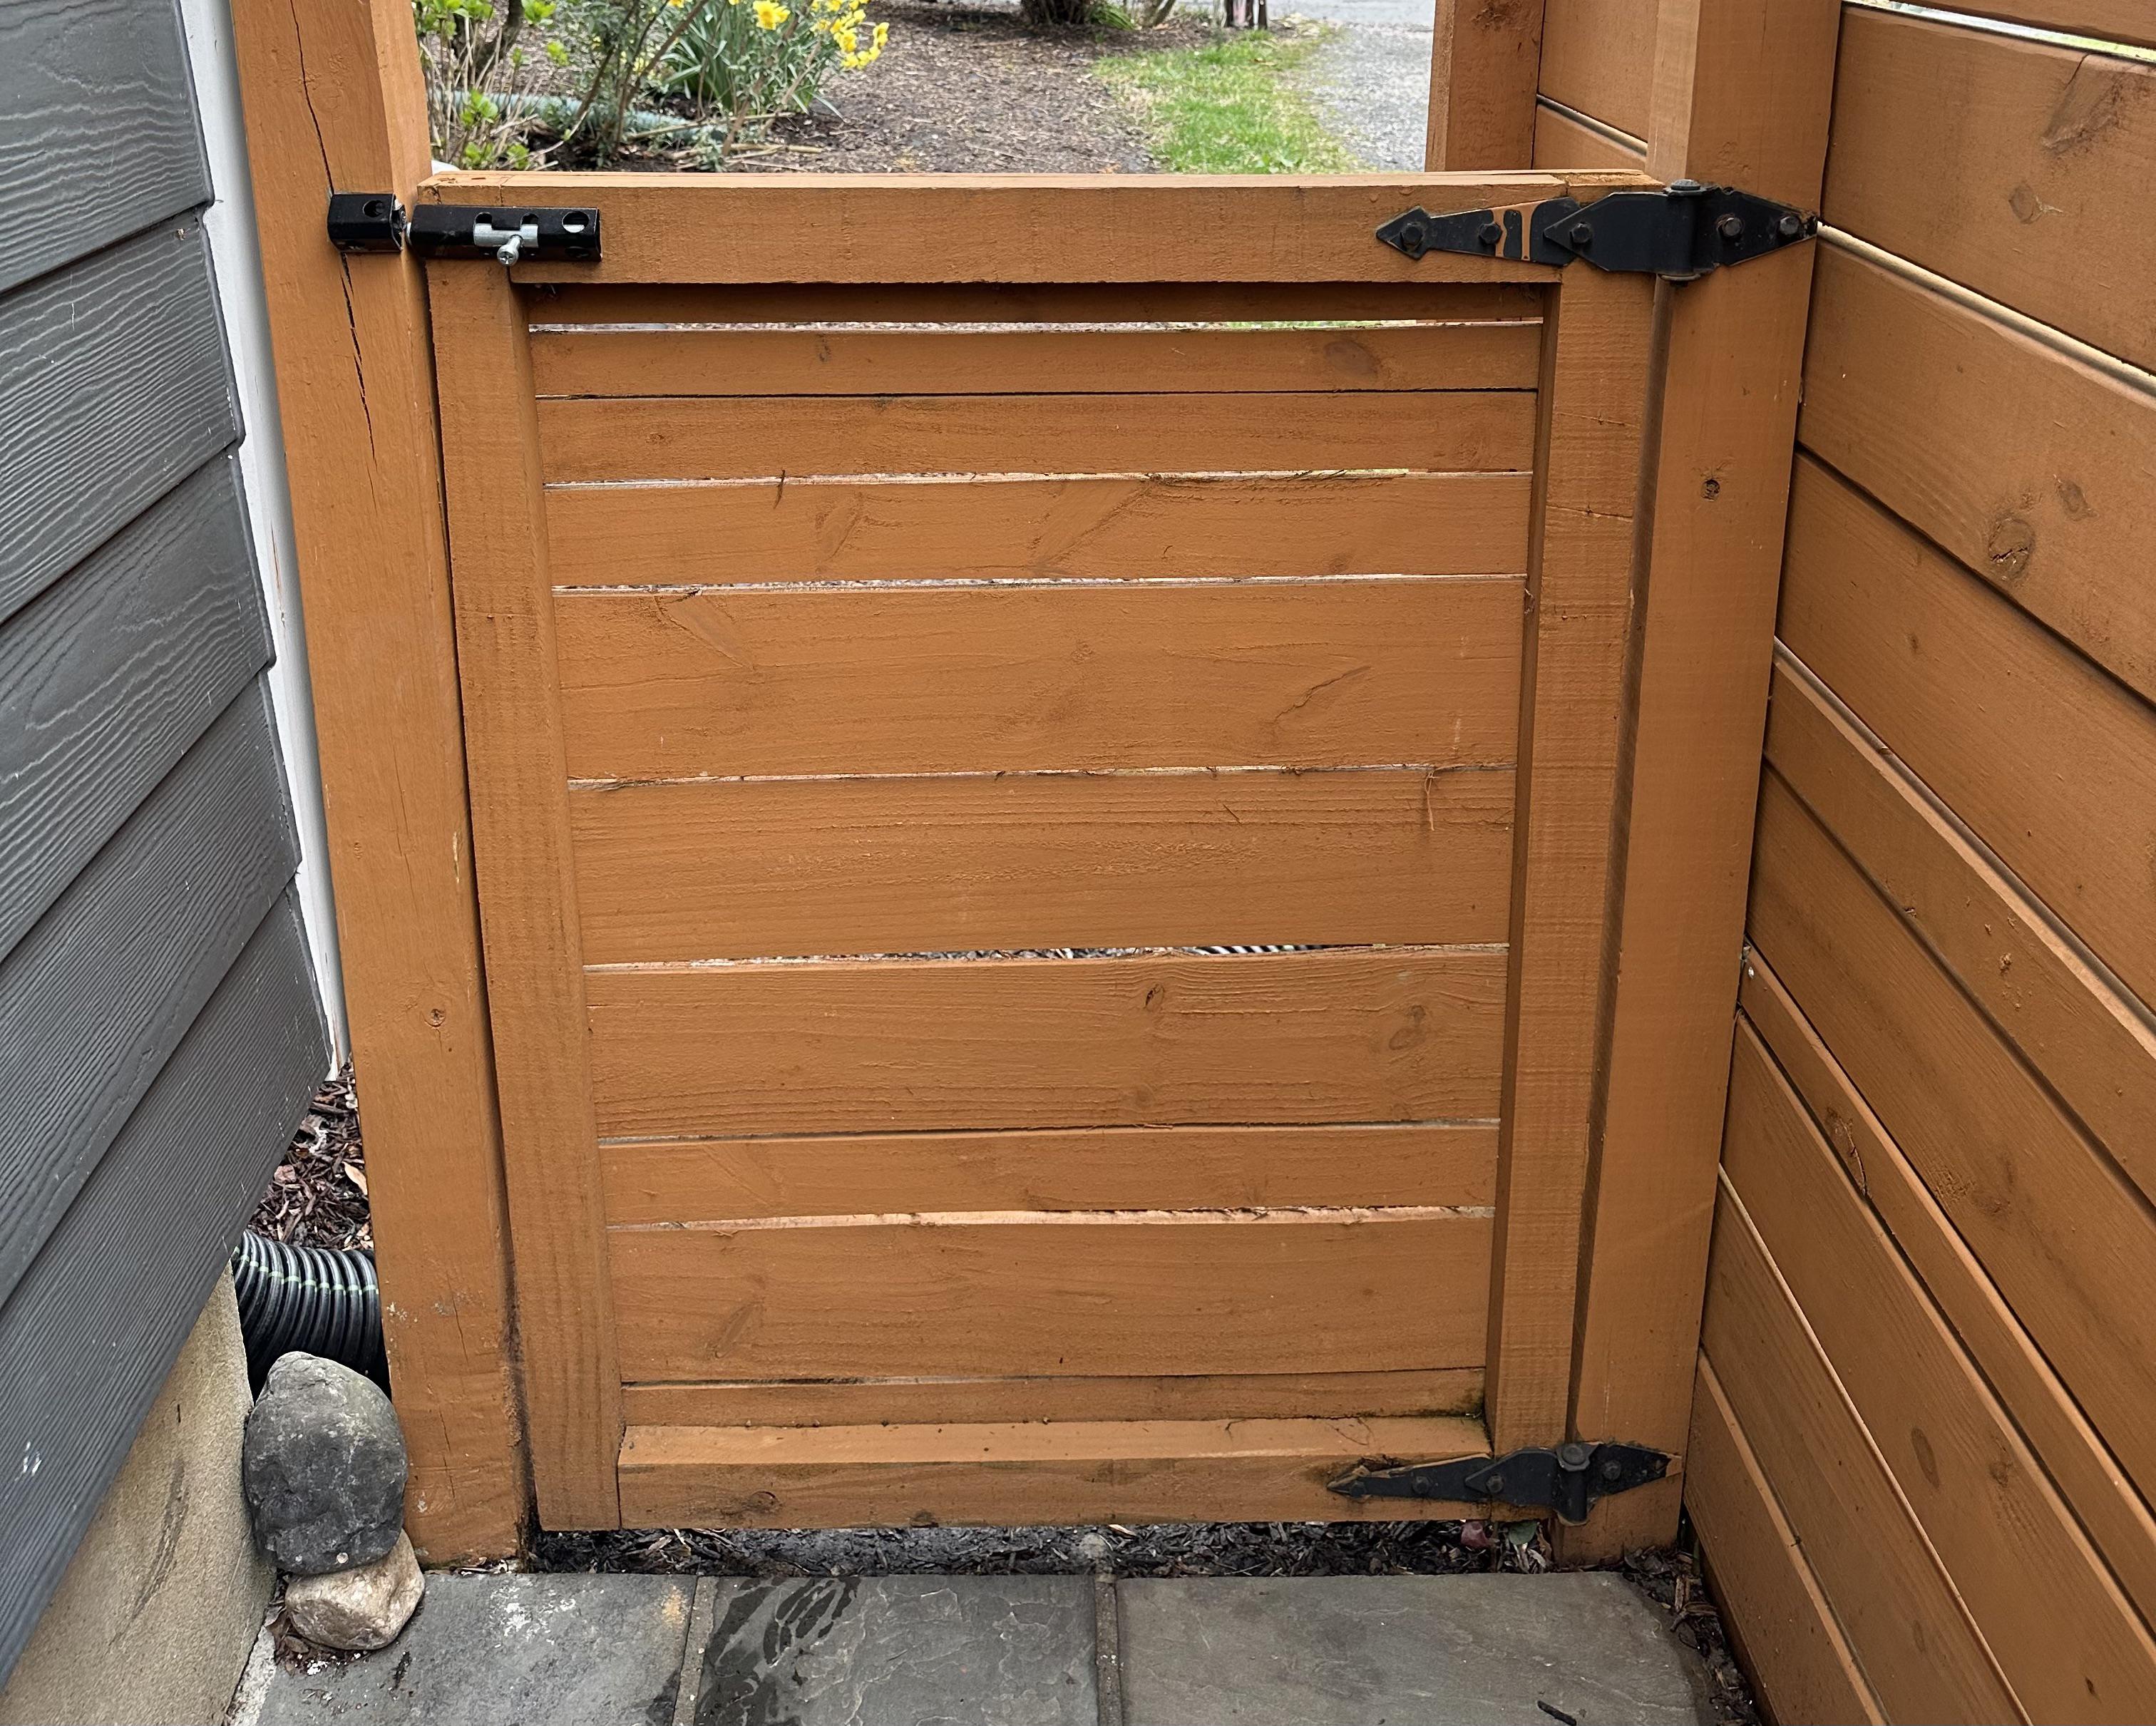
Replace broken pickets or rails
Once the posts are solid, pickets and rails are the fun part. This is a high-visual-impact repair that makes the whole yard look cared for.
What you need
- Matching pickets or fence boards
- Exterior-rated fasteners: hot-dipped galvanized or stainless (especially important with modern pressure-treated lumber)
- Pry bar and hammer
- Circular saw or miter saw for clean cuts
- Exterior stain or paint (optional but recommended to blend)
Steps
- Remove the damaged board. Pry carefully so you do not crack neighboring pickets.
- Check the rails. If the rail behind the picket is split or rotted, replace or sister it now.
- Cut the new picket to match. Match height, top profile, and spacing. A spacer block makes this faster.
- Fasten with the right hardware. Screws hold well and make future repairs easier. Nails are faster if you use the right type.
- Seal or stain. New wood will stand out. Even a quick coat on the new pieces helps them weather more evenly.
One small compatibility note: Cedar and pressure-treated lumber can live together just fine in a fence, but do not cheap out on fasteners. The wrong screws can corrode fast, stain the wood, and fail early.
Fix a sagging gate
Gates sag for two reasons: the hinges move, or the gate frame racks out of square. Sometimes it is both. Start with the easy stuff and work up.
Step 1: Tighten and upgrade hinge fasteners
- Tighten loose screws and replace stripped ones with longer exterior screws that bite into the post.
- If the hinge-side post is a little soft, move the hinge up or down slightly to catch solid wood.
- For heavy gates, consider through-bolts with washers.
Step 2: Add or fix gate bracing
This is where people get tripped up because wood braces and cable kits do not “work” in the same direction.
- Diagonal wood brace (compression): Install it from the bottom hinge corner up to the opposite top corner (top latch side). That brace works in compression and keeps the gate from sagging.
- Anti-sag kit with cable and turnbuckle (tension): The cable should run from the top hinge corner down to the bottom latch corner. The cable is the tension member, so this “opposite diagonal” orientation is what actually lifts the latch side when tightened.
Step 3: Check the gate post
If the gate post leans even a little, the gate will never behave. Gate posts take the most stress, so resetting or replacing the post is sometimes the real fix.
Reinforce wind-damaged sections
If a storm pushed your fence over, you usually have a combination of loose posts, pulled fasteners, and rails that popped free. Here is how to stabilize it without rebuilding the entire yard boundary.
Re-square and reattach
- Brace the section upright with temporary 2x4s.
- Reset any loose posts first. A fence is only as strong as the posts.
- Replace split rails and use exterior screws for stronger connections.
- Add blocking or brackets at rail-to-post connections if your design allows it.
Reduce “sail” effect
- Allow wind relief with small gaps between pickets (where style permits).
- Use stronger posts or closer spacing in the windiest runs.
- Stiffen the gate area, since that is where movement tends to start.
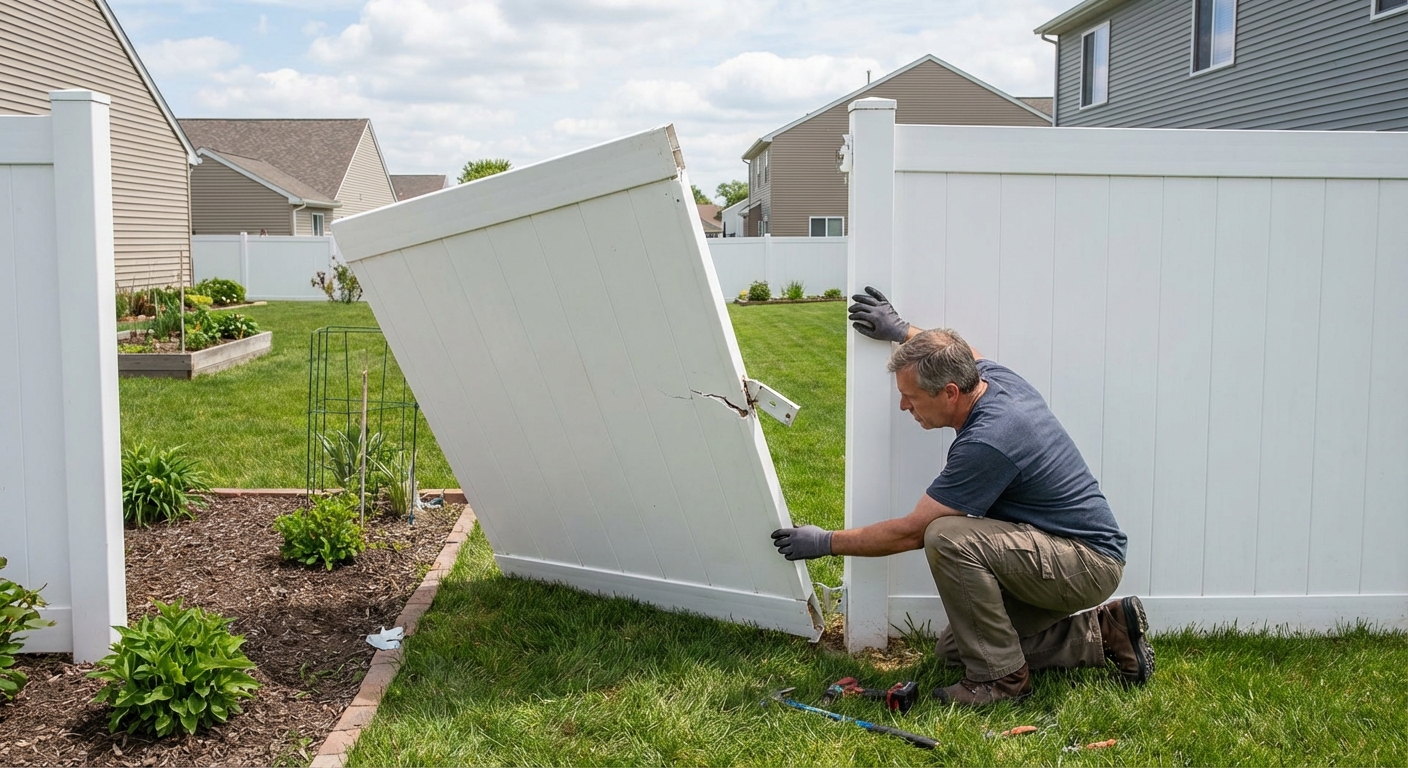
Vinyl fence repairs
Vinyl fencing is great until it takes a hit. It does not rot, but it can crack, pop out of rails, or get wobbly if the post sleeve is no longer supported. The big difference is that many vinyl systems are modular, so you often replace parts rather than “fix” the damaged piece.
Common vinyl fixes
- Panel popped out: Re-seat the rails into the routed posts and confirm the locking tabs or brackets are engaged.
- Cracked picket or rail: Replace the damaged component. Unless the manufacturer specifies an adhesive or cement for your system, replacement is usually more reliable than gluing stressed vinyl parts.
- Leaning vinyl section: The issue is usually the post under the vinyl sleeve. If the internal post is loose in concrete, you may need to reset that post just like wood.
Tips that save time
- Identify the manufacturer or system if possible so you can buy matching rails and pickets. Profiles vary.
- Work on warm days. Vinyl is less brittle when it is not cold.
- Do not overdrive screws into vinyl components. You want snug, not crushed.
When replacement beats repair
I love fixing things. But fences are long, repetitive structures, and sometimes repair becomes a slow-motion rebuild. Here is when I stop patching and start planning replacement.
- Multiple posts are failing, especially from rot at ground line. Replacing pickets will not stop the chain reaction.
- More than 20 to 30 percent of a section is damaged after a storm. You will spend almost replacement money in labor and hardware.
- The fence is badly out of line across several bays and cannot be straightened without rebuilding footings.
- Gate area is compromised and the gate post is rotted. Gates stress the system daily.
- Vinyl components are discontinued and you cannot match parts. A mismatched patch can look worse than a clean new run.
If you are on the fence (sorry, I had to), price it both ways. Add up concrete, posts, hardware, pickets, and your time. Replacement can be the cheaper one-and-done answer.
Fence repair shopping list
Leaning post
- Concrete mix, 2x4 braces, exterior screws
- Gravel (optional)
Broken pickets
- Matching pickets, hot-dipped galvanized or stainless screws or nails, stain or sealer
Sagging gate
- Heavy-duty hinges, longer screws or through-bolts, diagonal brace or anti-sag kit, new latch if needed
Wind damage
- Replacement rails, structural exterior screws, post brackets (optional), extra posts for reinforcement (as needed)
My “do this first” order
If you are staring at three different fence issues and do not know where to begin, here is the order that prevents rework:
- Posts and footings
- Rails and structural connections
- Gate alignment and bracing
- Pickets and cosmetic fixes
- Seal, stain, or paint
Take it one post, one panel, one win at a time. Fence repair is repetitive, but it is also one of the most satisfying outdoor projects because the results are immediate. You walk outside and the whole yard feels “buttoned up” again.
About Marcus Vance
Content Creator @ Grit & Home
Marcus Vance is a lifelong DIY enthusiast and self-taught home renovator who has spent the last decade transforming a dilapidated 1970s ranch into his family's dream home. He specializes in budget-friendly carpentry, room-by-room renovations, and demystifying power tools for beginners. Through his writing, Marcus shares practical tutorials and hard-learned lessons to help homeowners tackle their own projects with confidence.