What you can replace in one trip to the store
Door hardware looks complicated until you take one apart. Most homes use the same handful of standards, which means replacing a doorknob or deadbolt is usually a straightforward swap. The trick is buying the right style and taking 2 minutes to measure before you start.
I have replaced plenty of knobs the hard way, meaning I tried to “make it fit” and ended up with a latch that dragged and a door that would not close cleanly. This guide is the calmer version of that story.
- Interior passage knob: no lock, used for closets and hallways
- Privacy knob: push button or turn lock, used for bathrooms and bedrooms
- Exterior keyed entry knob: key outside, thumb turn or button inside
- Deadbolt: separate lock above the knob for exterior doors
Tools and supplies
You do not need a workshop for this. A basic screwdriver handles most installs, and a tape measure keeps you from buying the wrong set.
- #2 Phillips screwdriver (a stubby one helps)
- Flathead screwdriver (optional for pry points)
- Tape measure
- Small container for screws
- Pencil
- Optional: drill/driver with Phillips bit
- Optional: wood glue and toothpicks (for stripped screw holes)
- Optional: chisel (if you are changing to a larger faceplate)
Safety note: If this is an exterior door, keep the door open while you work, or leave a key in your pocket. It is surprisingly easy to lock yourself out mid-install.
Choose the right replacement
1) Match your door thickness
Most residential doors are 1-3/8 inch (common interior) or 1-3/4 inch (common exterior). Most new locksets adjust to both, but double-check the package.
Quick caveat: Some exterior and solid wood doors are thicker (like 1-13/16 inch or 2 inches). If yours is, you may need a thick door kit or a lockset rated for thicker doors.
2) Measure the backset
Backset is the distance from the edge of the door (where the latch bolt comes out) to the center of the knob or deadbolt hole. In most homes it is either 2-3/8 inches or 2-3/4 inches.
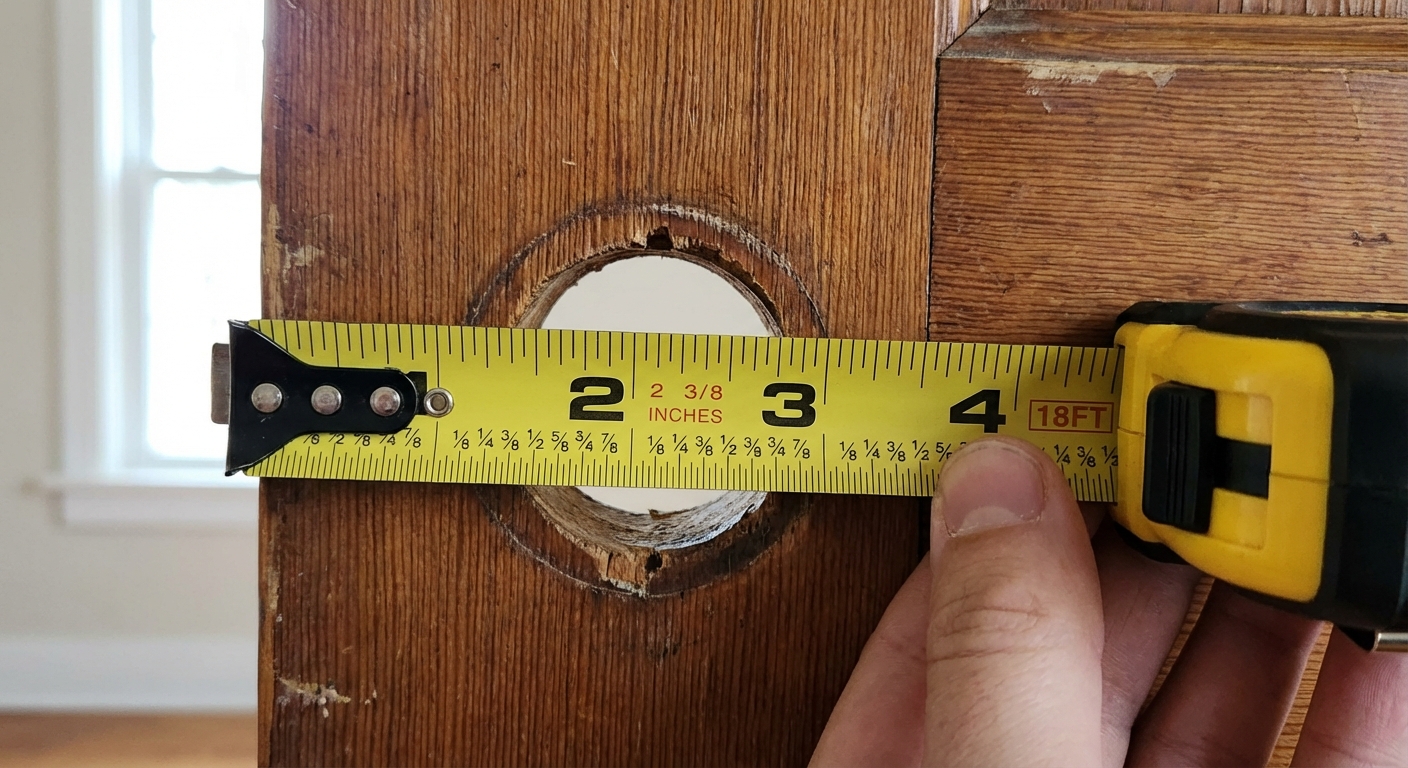
- Measure from the door edge to the center of the 2-1/8 inch bore hole.
- If you measure about 2-3/8, buy a 2-3/8 set or an adjustable latch.
- If you measure about 2-3/4, buy a 2-3/4 set or an adjustable latch.
Tip: Most modern latches are adjustable. They often have a little sliding section or twist-to-adjust body that switches between 2-3/8 and 2-3/4.
3) Confirm your hole sizes
Typical North American residential doors are drilled for:
- Main bore hole: 2-1/8 inches
- Edge bore (latch hole): 1 inch
If your door is older or non-standard (or you are dealing with something more commercial or Euro-style), bring the old latch to the store and compare sizes. If the new latch is loose in the edge bore, it can rattle and feel cheap.
4) Pick the latch faceplate style
Latches come with either:
- Faceplate: a rectangular plate that sits flush in a mortise on the door edge
- Drive-in collar: a round collar that taps into the edge bore, no mortise needed
Many sets include both. If your door edge already has a rectangular mortise, using the faceplate tends to look cleaner and feel sturdier.
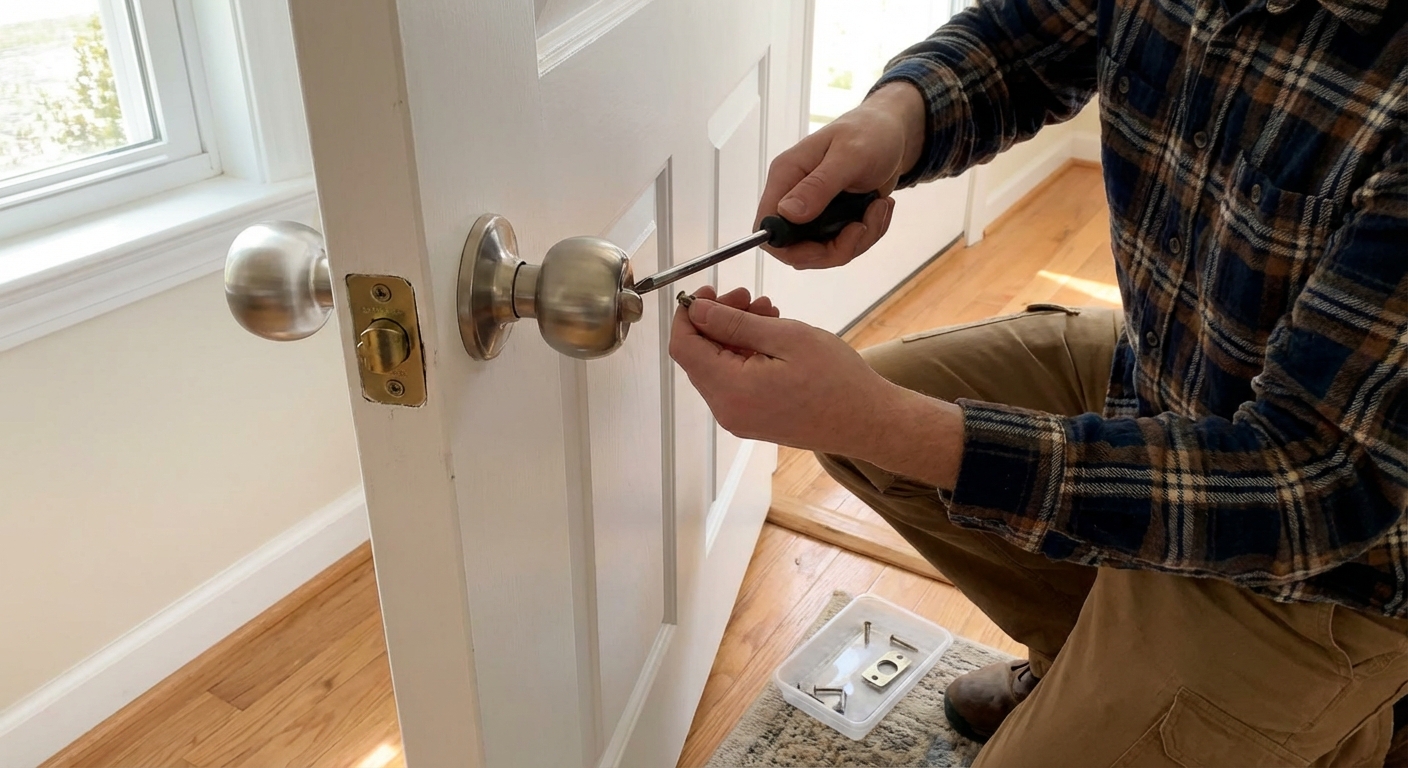
Remove the old doorknob
Most knobs come off the same way. The screws are usually on the interior side of the door.
- Open the door so you can reach both sides and the edge.
- Find the mounting screws on the interior knob or rose plate and remove them.
- Pull both halves apart. Sometimes you need to wiggle a bit if the paint line is holding it.
- Remove the latch from the door edge (two small screws on the faceplate, or pull the drive-in style out).
- Remove the strike plate from the door jamb if you are replacing it.
Paint-stuck hardware? Score the paint line around the rose and latch plate with a utility knife before pulling. It keeps you from peeling paint off the door edge.
Install a passage or privacy knob
Step 1: Set the latch backset
Adjust the latch to match your backset (2-3/8 or 2-3/4). Test fit it in the edge bore so the latch bolt moves freely without scraping the hole or binding at the faceplate.
Step 2: Install the latch
The angled side of the latch bolt should face the door jamb, so it slides smoothly into the strike when the door closes.
- If using a faceplate, screw it down snug and flush.
- If using a drive-in collar, tap it in gently with a wood block so you do not dent the collar.
Step 3: Insert the knobs and align
Feed the exterior half of the knob through the latch (the spindle goes through the latch mechanism). Then place the interior half on the other side.
Before you tighten the screws fully, make sure:
- The knobs sit flat against the door, no gaps.
- The latch retracts smoothly when you turn either knob.
- The privacy lock (if you have one) is on the correct side.
Step 4: Tighten evenly
Snug the screws a little at a time, alternating between them. Over-tightening can bind the latch and make the knob feel stiff.
Bedroom and bath note
Most privacy locks have an emergency release (a pinhole or slot on the outside). Test it before you close the door, and keep the little pin tool somewhere findable.
Install a keyed entry knob
Keyed knobs install like interior knobs, with two extra things to watch: orientation and security.
- Key cylinder outside, thumb turn or button inside.
- Make sure the exterior cylinder tailpiece (if present) seats correctly into the latch mechanism before tightening.
- Use the longer mounting screws included with the set. They pull the lockset tight and reduce wobble.
Common beginner mistake: tightening the screws while the exterior half is slightly crooked. If the key is hard to turn after install, loosen the screws, straighten both halves, then re-tighten evenly.
Security note: A keyed knob is not a substitute for a deadbolt. For exterior doors, use a deadbolt as your primary lock whenever you can.
Replace a deadbolt
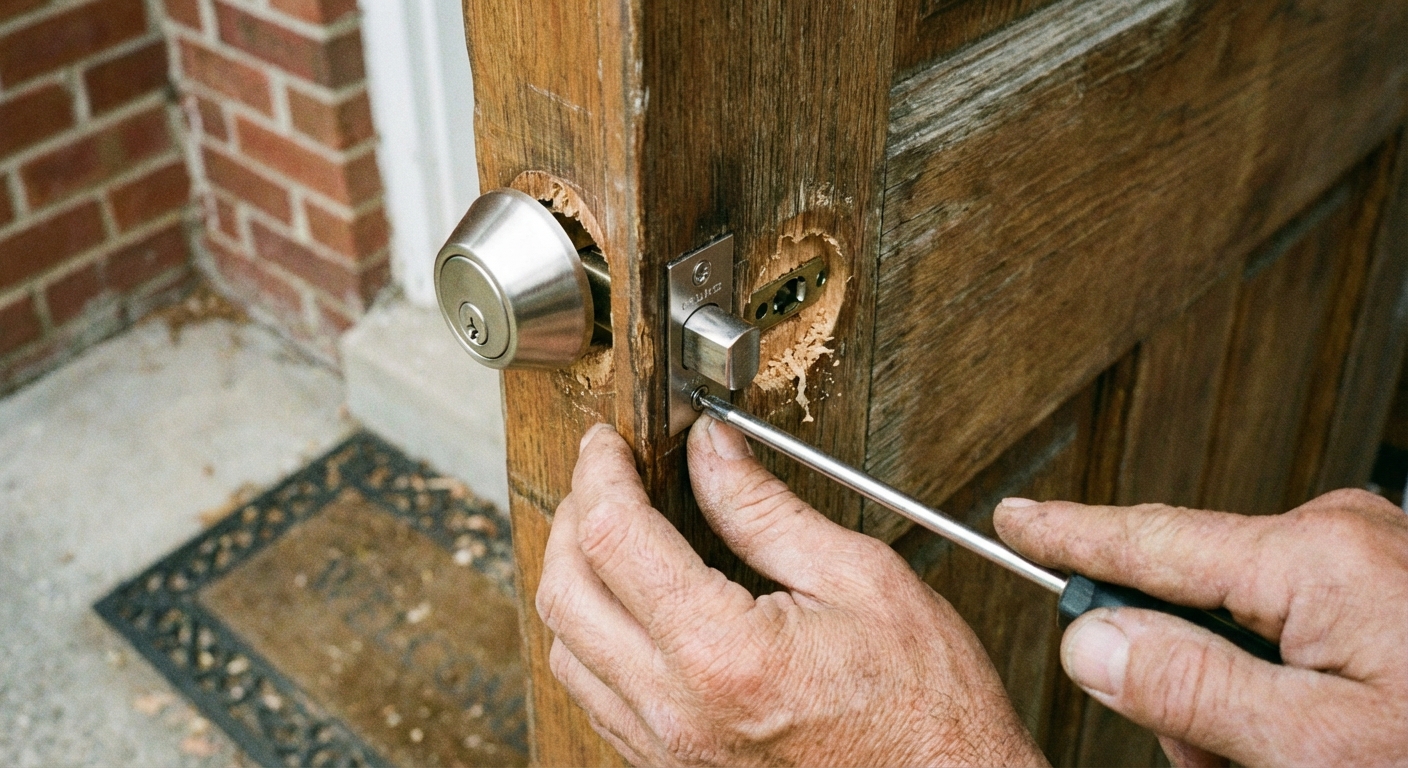
A deadbolt is basically a second latch with a bigger bolt. Most modern deadbolts fit standard holes and include an adjustable backset latch, just like knobs.
Step 1: Remove the old deadbolt
- Open the door.
- Remove the two long screws on the interior thumb turn plate.
- Pull the interior and exterior halves apart.
- Remove the deadbolt latch from the door edge.
Step 2: Install the new deadbolt latch
Adjust backset as needed, then install the latch in the edge bore. The words “UP” stamped on some latches should face up. If your latch has a beveled edge (many do not), bevel faces the jamb.
Step 3: Install exterior cylinder and thumb turn
Slide the exterior cylinder in first, making sure the tailpiece goes through the center of the latch. Add the interior thumb turn assembly, then start the long screws by hand. Tighten evenly.
Step 4: Test with the door open
Turn the thumb turn and key with the door open first. The bolt should extend and retract smoothly without rubbing.
Align the strike plate
If the knob installs fine but the door will not latch, it is usually the strike plate alignment. The strike is the metal plate on the door jamb where the latch or deadbolt goes.
Quick test
- Close the door slowly.
- Watch where the latch hits the strike opening.
- If it hits high, low, or to the side, the strike needs to move.
Easy fixes for minor misalignment
- Loosen the strike screws, nudge the plate slightly, then re-tighten.
- Enlarge the opening a hair with a metal file if the latch barely rubs. Go slow.
When you need to re-position the strike
If the latch is clearly missing the opening, move the strike plate.
- Remove the strike plate.
- Hold it where it needs to be, trace the outline with a pencil.
- Pre-drill new pilot holes (small bit, about the screw’s root diameter).
- Screw it back on and test again.
Fix stripped jamb holes
If the screws will not bite because the holes are stripped, this fix is shockingly effective for the cost of basically nothing.
- Dip a few toothpicks in wood glue.
- Jam them into the stripped hole and snap flush.
- Let the glue tack up for 10 to 20 minutes (or follow the glue label). If you have time, waiting 30 to 60 minutes gives a stronger bite.
- Re-install the screw.
Exterior doors: For a more secure deadbolt, consider replacing one strike screw with a 3 inch screw that reaches the framing behind the jamb. If your hinges are loose, a 3 inch screw in the top hinge (into framing) can also help pull a sagging door back into alignment. Do not over-torque and warp the jamb.
Common problems and quick fixes
The knob feels stiff
- Back off the mounting screws slightly. Over-tightening can bind the mechanism.
- Make sure the latch is centered in the door edge hole and not pinched by the faceplate.
The door will not latch unless you lift or push it
- This is usually a door alignment issue, but you can often cheat it by re-aligning the strike plate as described above.
- If the door is sagging, check hinge screws next. Tightening hinges or using longer screws can bring the door back into position.
The deadbolt sticks halfway
- Confirm the bolt is going straight into the jamb hole. Enlarge the jamb hole slightly if needed.
- Do not force it with the key. Fix alignment first, then test again.
The latch faceplate does not sit flush
- Paint buildup can stop it. Scrape the edge lightly.
- If the new faceplate is larger than the mortise, you may need to carefully deepen or widen the mortise with a sharp chisel.
Final checklist
- Knob turns smoothly from both sides.
- Latch retracts fully and springs back cleanly.
- Door latches without slamming.
- Deadbolt throws and retracts smoothly with door open and closed.
- Strike plate screws are tight and the plate sits flat.
If something feels off, do not power through it. Door hardware is picky, and small adjustments make a big difference. Loosen, align, re-tighten, then test again. That is the rhythm.
What to buy in the aisle
If you want the simplest shopping trip, take this quick checklist with you:
- Your backset measurement (2-3/8 or 2-3/4)
- Door thickness (often 1-3/8 or 1-3/4, but measure to be sure)
- Whether you need passage, privacy, keyed entry, or a deadbolt
- Finish that matches the rest of your house (nickel, bronze, black, brass)
When in doubt, buy a set with an adjustable latch and both drive-in and faceplate options. It covers the most “surprise, my door is weird” moments.
FAQ
How long does it take to replace a doorknob?
For a standard interior knob, 15 to 30 minutes is realistic. A deadbolt or a strike plate re-alignment can push it closer to an hour.
Can I replace a knob with a lever?
Usually, yes, as long as the new set matches standard door prep (typically a 2-1/8 inch bore and the correct backset). One more thing: some levers are handed or need reversing. Check the box for “reversible” and dry-fit it before you tighten everything down.
Do I need to replace the strike plate?
Not always, but it is often worth it. New strikes match the finish, and many deadbolts include a beefier strike that improves security when installed with longer screws.
About Marcus Vance
Content Creator @ Grit & Home
Marcus Vance is a lifelong DIY enthusiast and self-taught home renovator who has spent the last decade transforming a dilapidated 1970s ranch into his family's dream home. He specializes in budget-friendly carpentry, room-by-room renovations, and demystifying power tools for beginners. Through his writing, Marcus shares practical tutorials and hard-learned lessons to help homeowners tackle their own projects with confidence.