The 15-minute shower upgrade
If you want a fast bathroom win with a big payoff, replacing a showerhead is hard to beat. No drywall, no soldering, and usually no shutting off the whole house water. Just a clean swap at one threaded connection.
I still remember my first showerhead replacement. I cranked down with a wrench like I was tightening lug nuts and immediately created a drip that was 100 percent my fault. The good news is this job is forgiving, and once you know the right way to seal threads and tighten, you can get a perfect, leak-free connection in about 15 minutes.
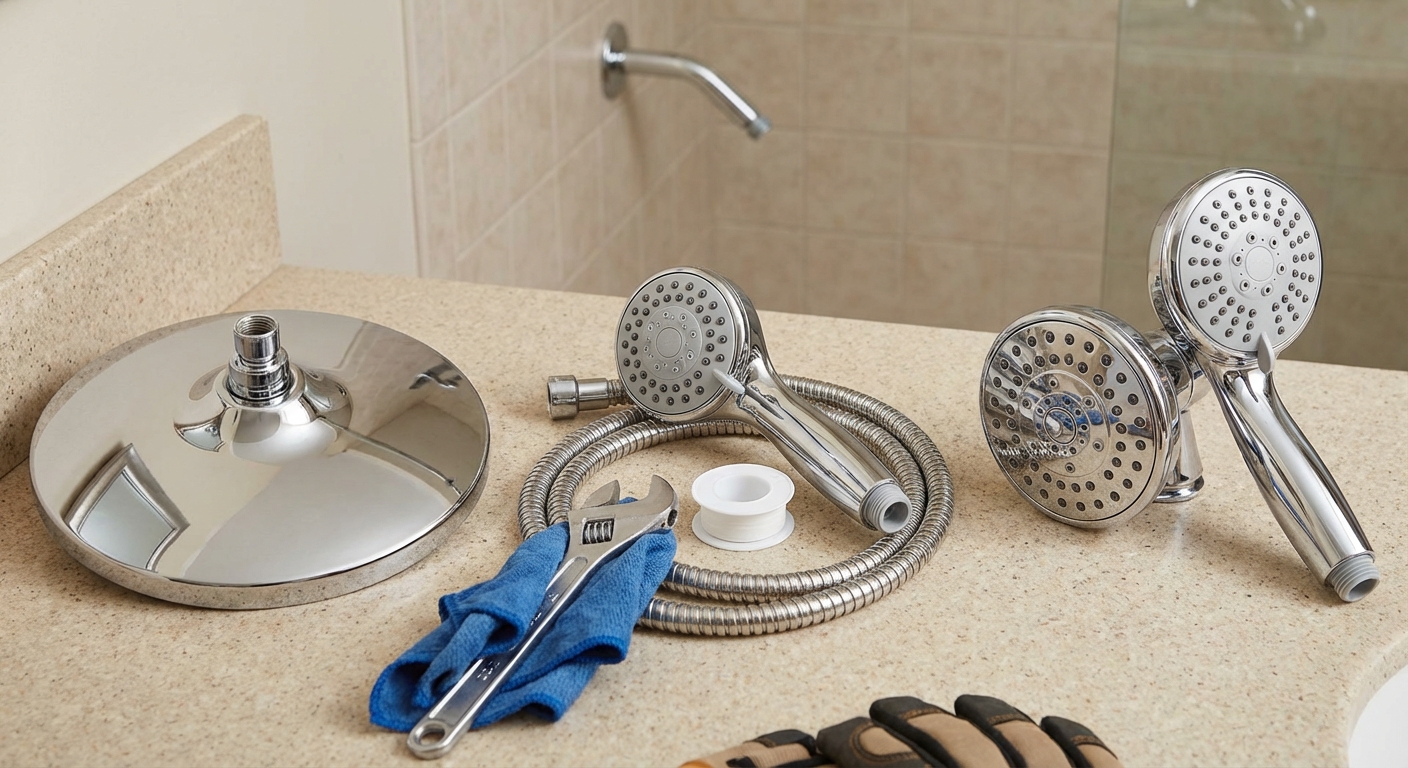
Tools and supplies
- New showerhead (rain, handheld, or dual)
- PTFE thread tape (also called Teflon tape) (optional, see note below)
- Adjustable wrench or channel-lock pliers (optional, but helpful)
- Soft cloth or an old rag (to protect the finish if you use a tool)
- Old toothbrush (optional, for cleaning threads)
- White vinegar (optional, for mineral buildup)
- Penetrating oil (optional, for a stuck showerhead)
- Smooth-jaw pliers (optional, best for protecting finishes if you have them)
Usually no water shutoff needed: You are not opening a supply line, just removing a fixture at the shower arm. Still, take 10 seconds to confirm where your shower valve shutoffs are (if you have them) or where your home main shutoff is, just in case the shower gets turned on mid-project or the shower arm loosens.
Before you start: pick the right type
Most showerheads in the U.S. and Canada screw onto a standard 1/2-inch NPT shower arm. That means you can mix and match styles without replacing plumbing in the wall. (In some other regions, BSP threads are common, so if your new head will not start by hand, double-check thread type before forcing it.)
- Rain showerhead: Wider spray, often a more “spa” feel. Some are larger and heavier, so make sure your shower arm feels solid and does not wobble.
- Handheld showerhead: Best for kids, pets, cleaning the shower, and rinsing hard-to-reach spots. Usually comes with a hose and a wall bracket.
- Dual showerhead: Combines a fixed head and a handheld on a diverter. Great function, but it is bulkier and sometimes needs a little more support to sit straight.
Step-by-step: replace a showerhead
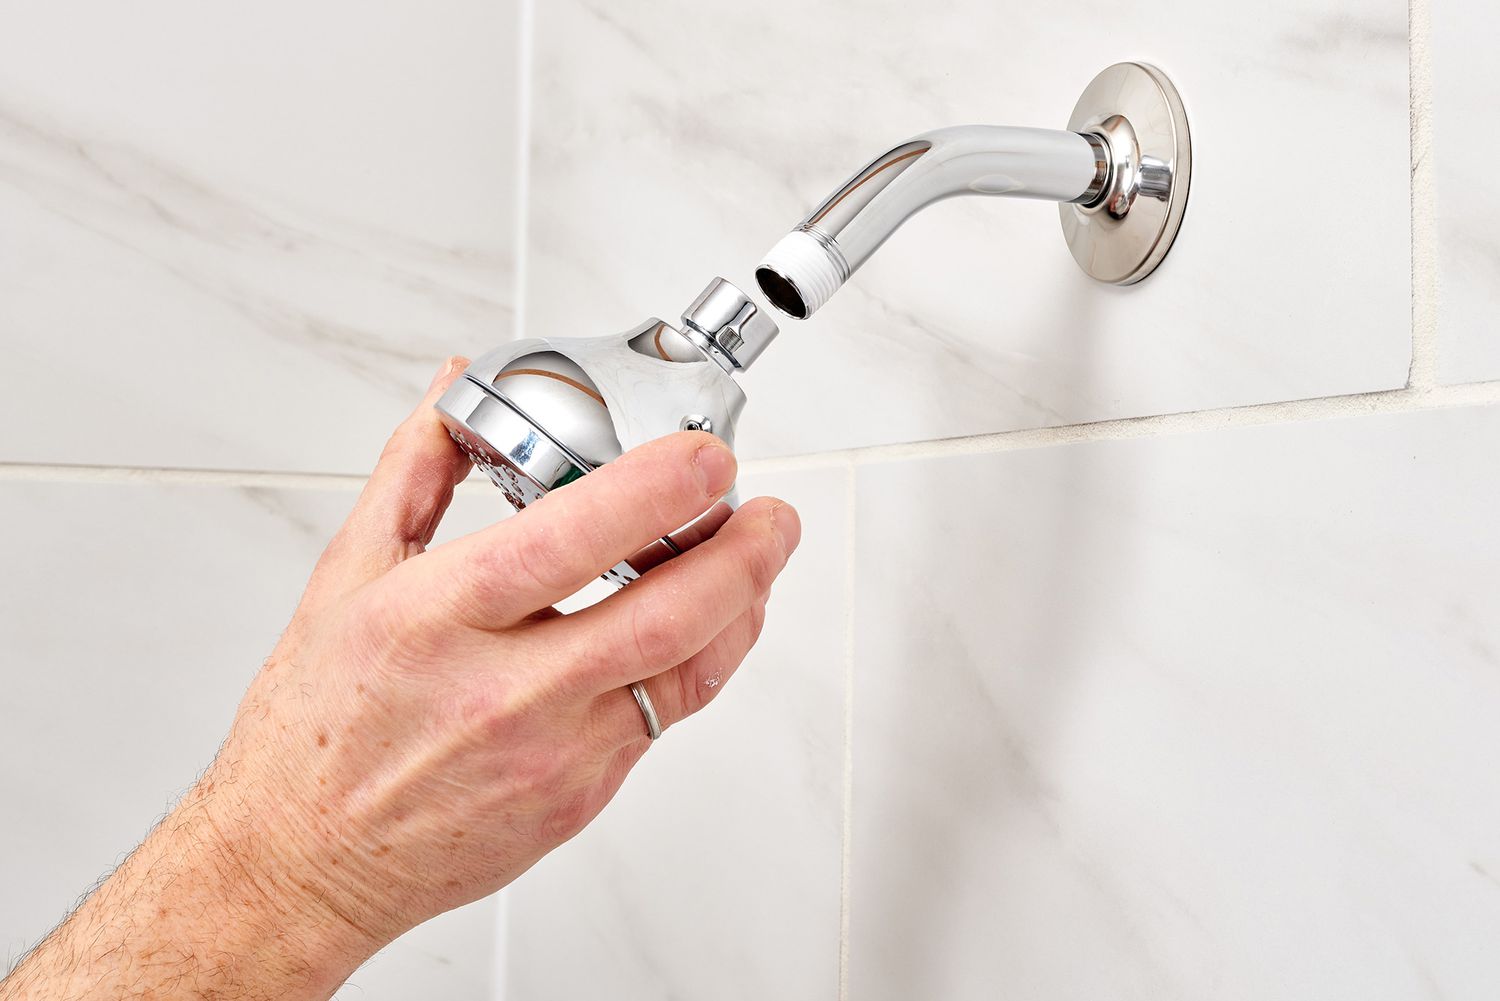
1) Protect the finish and loosen the old head
Start by trying to remove the old showerhead by hand. Turn it counterclockwise (lefty-loosey) while holding the shower arm steady with your other hand.
If it is stuck, wrap a soft cloth around the nut area and use an adjustable wrench over the cloth. Go slow. The cloth helps, but be aware that aggressive, toothed pliers can still bite through fabric. If you have smooth-jaw pliers, this is a great time to use them.
- Tip: If you twist the whole shower arm in the wall, stop. You do not want to loosen the connection inside the wall. If your shower arm has flats or a hex section near the wall, hold that area gently with a second padded tool (cloth over pliers or a wrench on the flats) while you loosen the showerhead.
Very stuck? Try a small amount of penetrating oil at the joint, wait 10 to 15 minutes, then try again. If the showerhead is badly corroded and will not budge without moving the arm, it can be safer to replace the shower arm rather than risk twisting in-wall plumbing.
2) Clean the shower arm threads
Once the old showerhead is off, wipe the threads on the shower arm. If there is crusty mineral buildup, scrub lightly with an old toothbrush. For stubborn buildup, dampen the rag with a little vinegar and wipe, then dry.
Also remove any old thread tape if it is still stuck on there. Fresh sealing works best on clean threads.
3) Decide if you need tape
Here is the important modern twist: some new showerheads seal with a rubber gasket or O-ring inside the connector and may specifically say not to use PTFE tape. Follow the manufacturer instructions first.
- If your new showerhead has a rubber washer and the instructions say “no tape”: install it dry (no tape) and tighten as directed.
- If there is no washer, or the instructions call for tape: use PTFE tape on the shower arm threads.
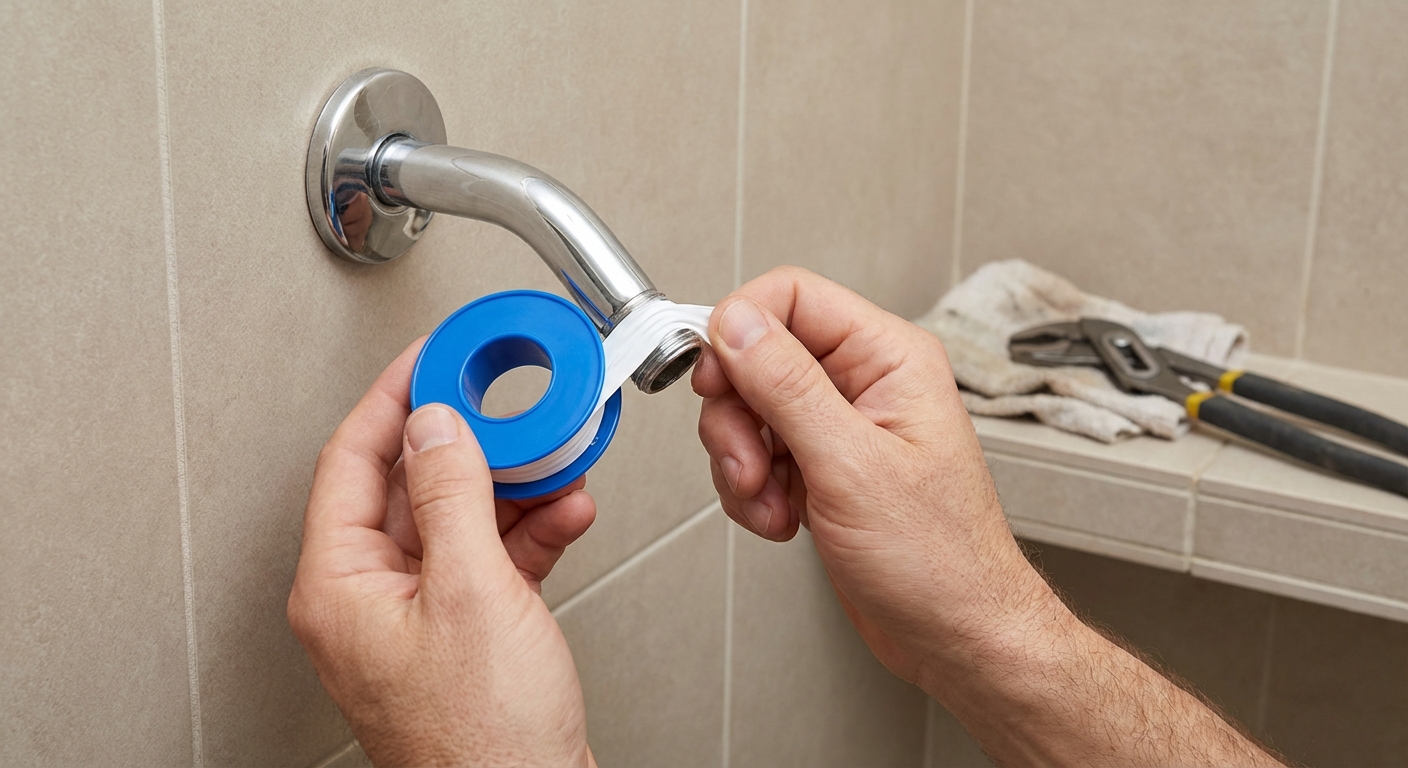
4) Apply thread tape the right way (if using it)
This is where most beginner leaks happen, and it is an easy fix.
- Hold the shower arm so you are looking at the threads.
- Wrap PTFE tape clockwise (the same direction you will tighten the new showerhead).
- Use 3 to 5 wraps, pulling the tape snug so it lays into the threads. Do not overdo it. Too many wraps can make it harder to start the threads cleanly.
- Keep tape back from the opening so it does not shred and end up in the showerhead.
Why clockwise? If you wrap the wrong direction, the tape can unravel as you screw the new showerhead on, which can cause drips.
Quick note on thread sealant paste: Most of the time you do not need it for a showerhead swap. If you are dealing with slightly damaged threads, a small amount of thread sealant paste can help, but generally do not combine paste and tape unless you know exactly why you are doing it.
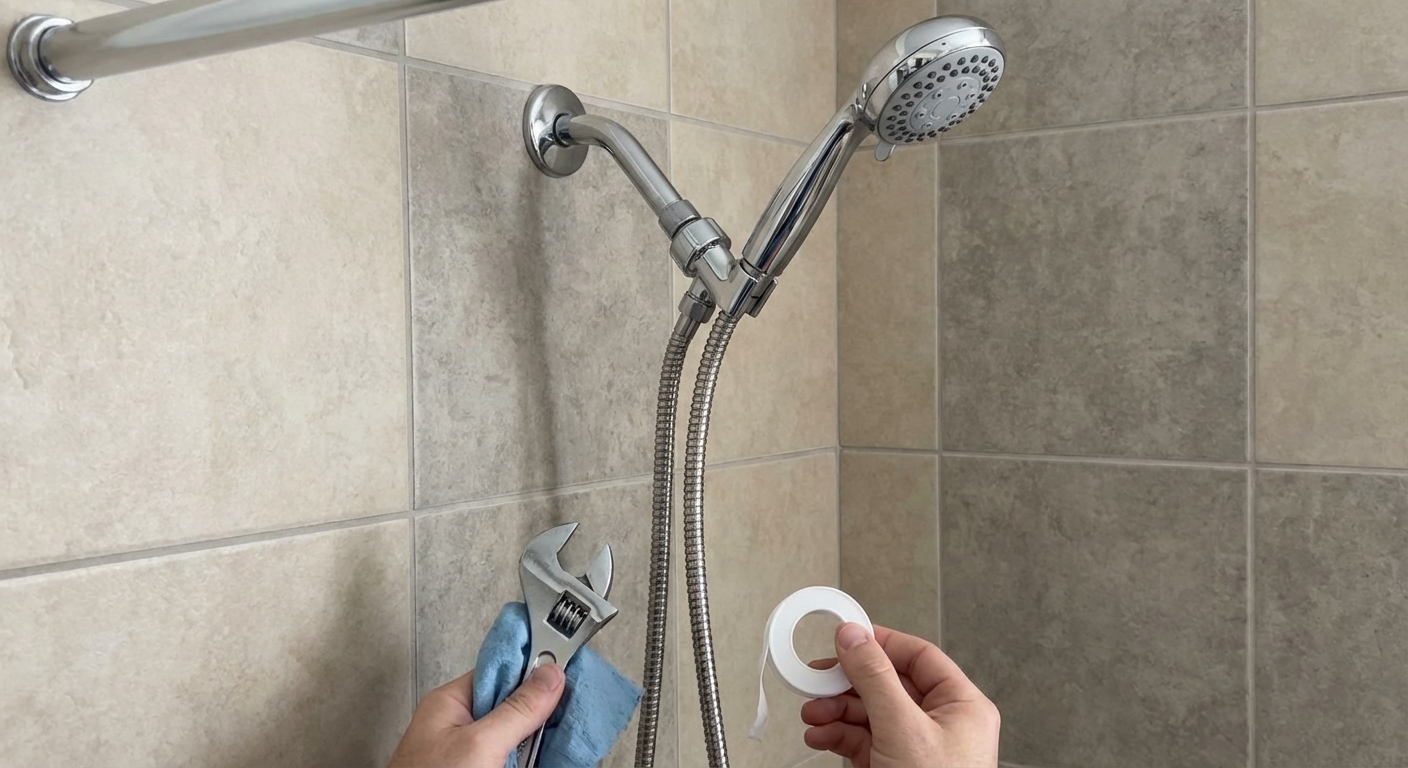
5) Thread on the new showerhead by hand
Screw the new showerhead on by hand first. It should spin easily for several turns. If it feels crunchy or wants to cross-thread, back it off and start again.
Once it is snug, stop and check the angle. Many showerheads can be adjusted slightly after tightening, but you want to get close before you put any tool on it.
6) Tighten gently
In most cases, the winning combo is:
- Hand-tighten until snug
- Then add about 1/8 to 1/4 turn more with a wrench only if needed
If you do use a wrench, use the cloth again to protect the finish. The goal is a watertight seal, not maximum tightness. Over-tightening can damage washers in some designs or make future removal miserable.
7) Test and check for leaks
Turn the shower on and let it run for 30 to 60 seconds. Then feel around the connection between the shower arm and the showerhead.
- If it is dry, you are done.
- If you feel moisture or see a drip forming, use the leak checklist below.
Flow note: Many areas require low-flow showerheads (often 2.0 GPM or similar), and many heads include a flow restrictor to meet code. Removing a restrictor can be illegal, wasteful, and sometimes makes performance worse if your plumbing is not designed for it.
Leak troubleshooting at the connection
If it drips where it screws on
- Most common cause: Not enough tape, tape wrapped the wrong direction, or tape used when the fitting is meant to seal with a washer. Remove the showerhead, clean off tape, and do the sealing method your instructions call for (washer only, or 3 to 5 clockwise wraps of tape).
- Second common cause: It is simply not snug enough. Try an additional tiny tightening nudge with a wrench, about 1/8 turn.
- Check for cross-threading: If the showerhead went on crooked, it may never seal. Remove and start the threads again by hand.
If water sprays from somewhere else
- Handheld or dual units: Check that the hose washer is seated flat in the hose nut. Hand-tighten the hose connection. These usually seal with a rubber washer, not thread tape.
- New showerhead body leak: Rare, but it happens. Confirm any included O-rings or screens are installed correctly per the manufacturer instructions.
If the shower arm moves or feels loose
Stop twisting and do not keep tightening the showerhead to “fix” it. A loose shower arm can mean the arm is unscrewing inside the wall. If it is already loose, you may need to remove the arm and re-install it with thread tape at the wall fitting, which is a separate mini-job.
Notes for handheld and dual
Handheld
- Mount the holder at a comfortable height before you commit to drilling. Painter’s tape can help you test placement.
- Some brackets are suction or adhesive instead of drilled. They are great for rentals, but follow the surface-prep directions so they do not drop mid-shower.
- If you do drill into tile, use the right bit, go slow, and do not use hammer mode. Rushing is how tile cracks.
- Most hose connections seal with a rubber washer, not thread tape. If it leaks at the hose nut, check the washer first.
Dual
- The diverter assembly adds weight. Make sure everything is snug and supported, and keep an eye on shower arm movement.
- If the selector lever is hard to turn, do not force it. Re-check that the unit is aligned and not binding.
Common beginner mistakes
- Using a wrench immediately: Always start threads by hand to avoid cross-threading.
- Ignoring the instructions: Some showerheads want a washer-only seal and specifically say no PTFE tape. Follow the manufacturer.
- Wrapping tape the wrong direction: Wrap clockwise so it tightens as you screw the head on.
- Over-tightening: Snug plus a small nudge beats “as tight as humanly possible.”
- Over-taping: Too many wraps can make threading harder and can actually create problems. 3 to 5 snug wraps is plenty.
- Forgetting to protect the finish: A rag under the wrench helps, but smooth-jaw tools are even better for shiny new hardware.
15-minute checklist
- Locate the valve shutoff or home main shutoff (just in case)
- Remove old showerhead (hand first, wrench if needed)
- Clean threads and remove old tape
- Follow your showerhead instructions: washer-only seal or PTFE tape
- If taping: apply 3 to 5 wraps clockwise
- Install new showerhead by hand
- Snug gently, protect finish if using a wrench
- Test and troubleshoot any drips
If you get stuck on a leak, do not panic. Most of the time it is tape direction, tape amount, using tape when you should not, or a connection that needs a small re-seat and re-tighten.
About Marcus Vance
Content Creator @ Grit & Home
Marcus Vance is a lifelong DIY enthusiast and self-taught home renovator who has spent the last decade transforming a dilapidated 1970s ranch into his family's dream home. He specializes in budget-friendly carpentry, room-by-room renovations, and demystifying power tools for beginners. Through his writing, Marcus shares practical tutorials and hard-learned lessons to help homeowners tackle their own projects with confidence.