
If you have a light switch that feels loose, makes a crackling sound, or just looks like it survived the 1970s a little too faithfully, replacing it is one of the most doable first electrical projects. A standard single-pole switch is the kind that controls one load (a light, fan, or switched outlet) from one location.
I still remember my first switch swap. I did everything right except one thing: I assumed the breaker label was accurate. It was not. So we are going to do this the safe way, every time.
Before you start
What this guide covers
This tutorial is for a standard single-pole light switch, which typically has:
- Two screw terminals for the hot wires (often brass-colored screws)
- One green ground screw (or a self-grounding clip on some switches)
If your switch has extra terminals, a slider, a dimmer module, a neutral terminal (common on smart switches), or a bundle of wires that looks like a bowl of spaghetti, pause and read the “When to call an electrician” section below.
Quick check: is it really single-pole
Before you buy parts or loosen screws, do this quick visual check:
- Single-pole: usually two brass screws plus a green ground screw.
- Not single-pole: three screw terminals plus ground, or labels like COM, COMMON, TRAVELER, or LINE/LOAD on an electronic or illuminated switch.
If it looks like the second situation, stop. A three-way or specialty switch is wired differently.
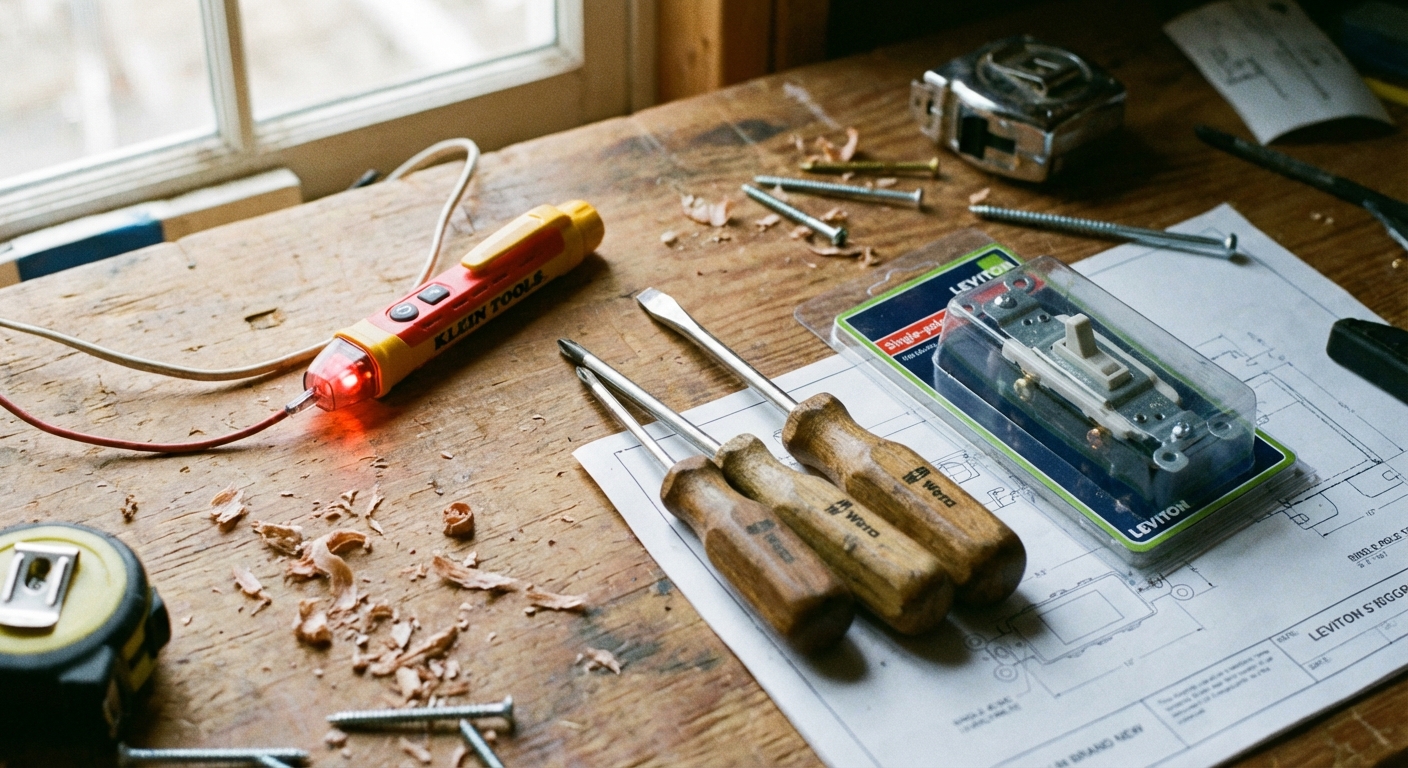
Tools and materials
- New single-pole switch
- Match the rating to the circuit: use a switch rated for your breaker and wiring (15A circuits are most common; many 20A circuits use 12 AWG wire and should use a 20A rated switch when required by code or the manufacturer)
- Matching wall plate (optional, but it is usually worth the extra couple bucks)
- Non-contact voltage tester (highly recommended)
- Optional but best: a two-pole tester or multimeter for a more reliable power-off check
- Phillips screwdriver and a flathead screwdriver
- Needle-nose pliers (helpful for bending wire loops)
- Wire strippers (only if you need to re-strip a damaged end)
- Flashlight or headlamp
- Electrical tape (optional, for wrapping terminals)
- Wire connectors and a short length of matching wire (optional, for pigtails if wires are short)
Safety first
1) Turn off the breaker
Go to your electrical panel and flip the breaker that feeds the switch to OFF. If your breakers are labeled, great. If they are not, you may need to test a couple.
Tip: Leave a note on the panel or tell your household what you are doing so nobody flips it back on while your hands are in the box.
2) Confirm the load is off
Back at the switch, try turning the light (or other load) on. If it does not turn on, that is a good sign, but it is not proof the power is off.
3) Verify with a tester
Use a tester at the switch box:
- Test the tester first on a known live source (like a nearby outlet) so you know it works.
- Remove the wall plate and hold the non-contact voltage tester near the switch screws and the wires.
- If it beeps or lights up, stop and go back to the panel to find the correct breaker.
Important: Non-contact testers are convenient, but they can give false positives or false negatives. If you have a two-pole tester or multimeter and you can safely access the conductors, confirm by testing hot to ground and hot to neutral.
Rule I live by: If you have not tested it, you do not know it is dead.
Remove the old switch
1) Remove the wall plate
Unscrew the wall plate and set it aside. If it is painted to the wall, lightly score the edge with a utility knife so you do not peel paint.
2) Pull the switch out
Remove the two mounting screws (top and bottom) holding the switch to the electrical box. Gently pull the switch straight out so you can see the wiring.
3) Verify power again
With the switch pulled out, test again near the wires and terminal screws. No signal means you are in a safer place to continue, but still work carefully and keep your fingers off bare copper.
Identify the wires
Most single-pole switch boxes typically include three types of conductors:
- Line (hot) in: often a black wire bringing power from the panel
- Load (switched hot) out: often a black wire going to the fixture
- Ground: bare copper or green insulated wire, or sometimes a ground that bonds to a metal box
About the two hot wires: On a basic mechanical single-pole switch with two brass screws and no special markings, the two hot wires are usually interchangeable. However, if the device is labeled LINE/LOAD, is illuminated, is electronic, or is a smart switch, follow the labeling and instructions. In those cases, swapping them can cause weird behavior or a non-working switch.
Important note on white wires: In some switch boxes, you may see white wires tied together in the back with a wire connector. Those are neutrals and usually do not connect to a basic switch. Occasionally, a white wire may be used as a hot (it should be marked with black tape or marker). If you are unsure, that is a good moment to call a pro.
Disconnect the old switch
1) Take a photo
Before loosening anything, snap a clear photo of the wiring. It is your insurance policy if you second-guess yourself later.
2) Loosen the screws
Most older switches use side screws with the wire wrapped in a loop. Loosen each screw and remove the wire.
- If the wire is backstabbed into holes on the back of the switch, look for a small release slot and use a tiny screwdriver to free it.
- If the copper end is nicked, heavily bent, or short, cut and re-strip to fresh copper.
3) Fix wire ends
Use needle-nose pliers to make a clean hook shape on the end of each wire. Aim for a loop that fits neatly around the screw.
If the insulation is brittle, cracking, or the wires are too short to comfortably reach the new switch, do not force it. A common fix is adding a pigtail (a short new piece of wire) with a proper connector so the switch has solid, stress-free leads.
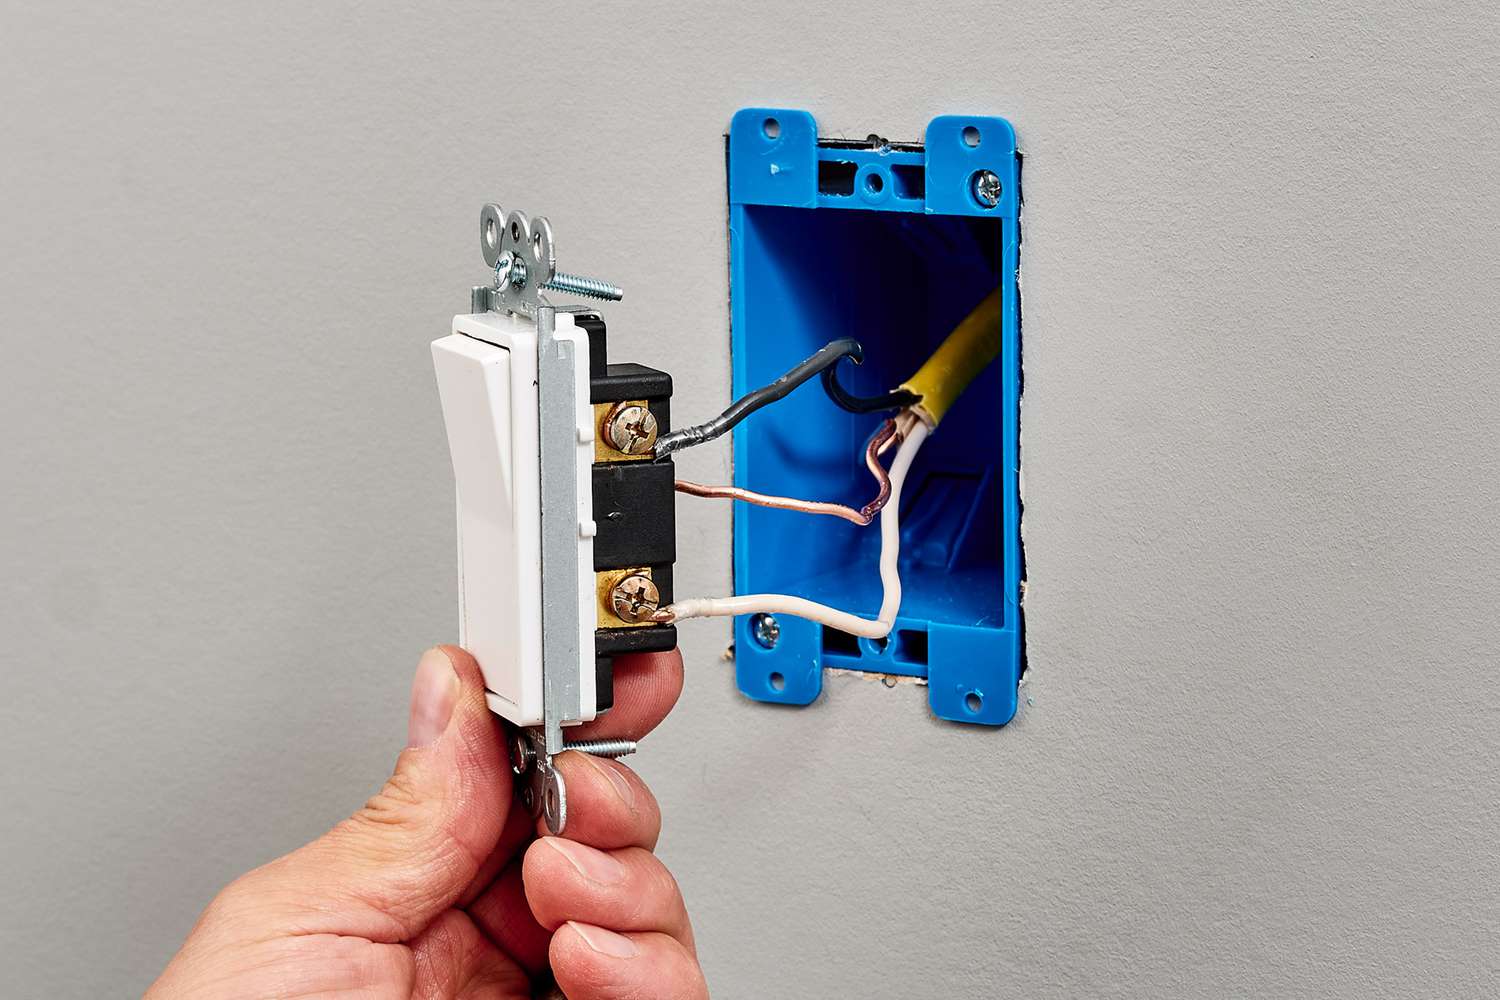
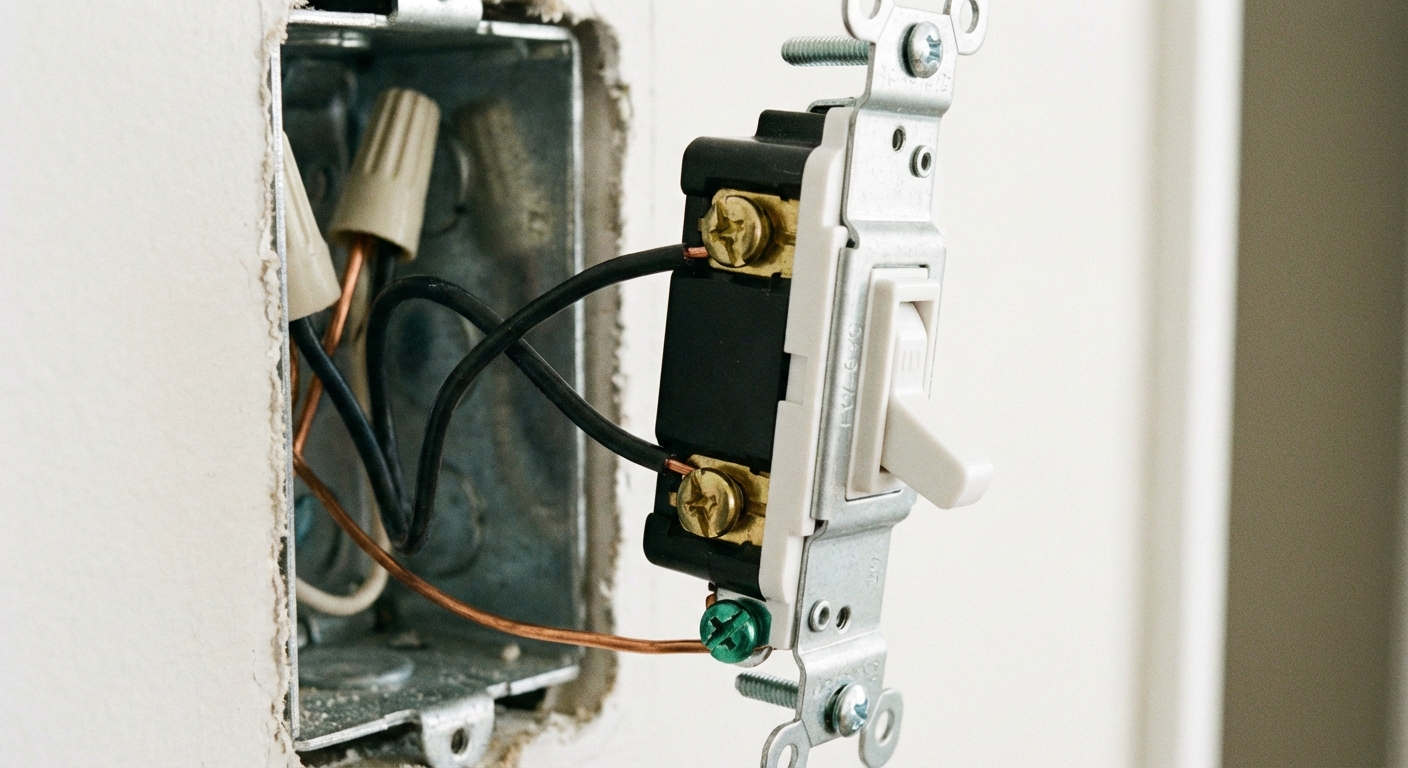
Connect the new switch
1) Connect ground first
Connect the bare copper (or green) ground wire to the green ground screw on the new switch. Make the wire loop clockwise so tightening the screw pulls the loop tighter.
If you have a metal box, the ground may be attached to the box with a ground screw or clip. Many switches still need a ground connection. If there is not already a ground pigtail to the switch, add one so the metal box and the switch are both bonded.
2) Connect the hot wires
Attach the two remaining wires (often black) to the two brass screws, unless your switch is labeled LINE and LOAD, in which case follow the labeling. Loop the wire clockwise and tighten firmly.
If your switch has push-in terminals and side screws, I recommend using the side screws. They tend to make a more reliable connection over the long haul.
Torque note: If the switch includes a torque value in the instructions, use it. If not, tighten firmly so the wire is secure and does not wiggle under the screw.
3) Optional: wrap with electrical tape
If your electrical box is crowded or metal, you can wrap a layer of electrical tape around the switch body to cover the side screws. It is not required everywhere, but it can reduce the chance of a terminal touching the box when you push things back in.
Reinstall the switch
1) Fold wires neatly
Gently push the wires back into the box. Try an accordion fold rather than stuffing. You want the switch to sit flat without pinching or sharply bending wires.
If everything feels cramped, do not muscle it. Overcrowded boxes can lead to loose connections and heat. That is a sign to consider a box extender, redoing pigtails more neatly, or calling an electrician.
2) Mount the switch
Screw the switch into the box using the top and bottom mounting screws. Keep it straight. If it looks crooked, loosen slightly, adjust, then retighten.
3) Install the wall plate
Put the wall plate back on and snug the screw. Do not over-tighten or you can crack the plate.
Restore power and test
1) Flip the breaker on
Head back to the panel and turn the breaker to ON.
2) Test the switch
Turn the switch on and off a few times. The load should respond normally, and you should not hear buzzing or crackling.
3) Watch for warning signs
- Warm switch or warm wall plate
- Flickering that did not exist before
- Burning smell
- Breaker trips
If any of those happen, turn the breaker off and stop. It is time to troubleshoot or call an electrician.
When to call an electrician
I am all for DIY, but there are a few situations where a licensed electrician is the thrifty choice because it prevents expensive mistakes.
- It is a three-way or four-way setup: Extra terminals, two switches controlling one light, or labels like COM and TRAVELER.
- Aluminum wiring: Often found in some homes from the 1960s and 1970s. It requires special devices and connectors rated for aluminum and proper anti-oxidant practices.
- No clear grounding path: No ground wire present, confusing grounding in a metal box, or you are unsure how the box is bonded.
- Burn marks, melted insulation, or a scorched smell: That suggests overheating or a loose connection somewhere.
- Wire colors do not match expectations: For example, multiple whites on the switch, or any wire you cannot confidently identify.
- Wires are too short or insulation is damaged: This often needs pigtails, re-termination, or deeper repairs.
- The electrical box is damaged or too small: Overcrowding can cause poor connections and heat buildup.
Quick troubleshooting
Nothing turns on
- Confirm the breaker is on.
- Confirm the bulb or fixture works.
- Re-check that the hot wires are securely under the screws and the screws are tight.
- Look for a loose wire connector in the back of the box that may have been bumped.
- If you installed a switch that requires LINE and LOAD, confirm they are not reversed.
The switch works but feels loose
- Tighten the mounting screws (not the wall plate screw).
- If the box is recessed behind drywall, you may need box extenders or spacers.
Final reminder
Replacing a single-pole switch is simple, but electricity does not forgive shortcuts. Take your time, verify power is truly off, and make tight, clean connections. When you flip that breaker back on and the light clicks to life, it is a small win that builds big confidence.
About Marcus Vance
Content Creator @ Grit & Home
Marcus Vance is a lifelong DIY enthusiast and self-taught home renovator who has spent the last decade transforming a dilapidated 1970s ranch into his family's dream home. He specializes in budget-friendly carpentry, room-by-room renovations, and demystifying power tools for beginners. Through his writing, Marcus shares practical tutorials and hard-learned lessons to help homeowners tackle their own projects with confidence.