Replacing a toilet sounds like one of those jobs you only do when you have to. I get it. The first time I did it, I was convinced I was one wrong move away from a bathroom flood or a cracked porcelain disaster.
Here’s the truth: a toilet swap is mostly careful prep and clean, patient assembly. If you can turn a valve, tighten a nut, and follow steps in order, you can do this. I’ll walk you through it like a neighbor leaning over the fence, including the little gotchas that cause rocking toilets and mystery leaks at the base.
Before you start
How long it takes
- Typical swap: 1 to 3 hours
- If the flange is damaged or the floor is uneven: 3 to 6 hours
When you should call a pro
- The toilet flange is broken and you cannot secure it to the subfloor
- You see soft, rotten flooring around the toilet
- Your shutoff valve won’t shut off and also won’t accept a simple replacement
- You have an older setup that’s clearly nonstandard and you’re not sure what you’re looking at
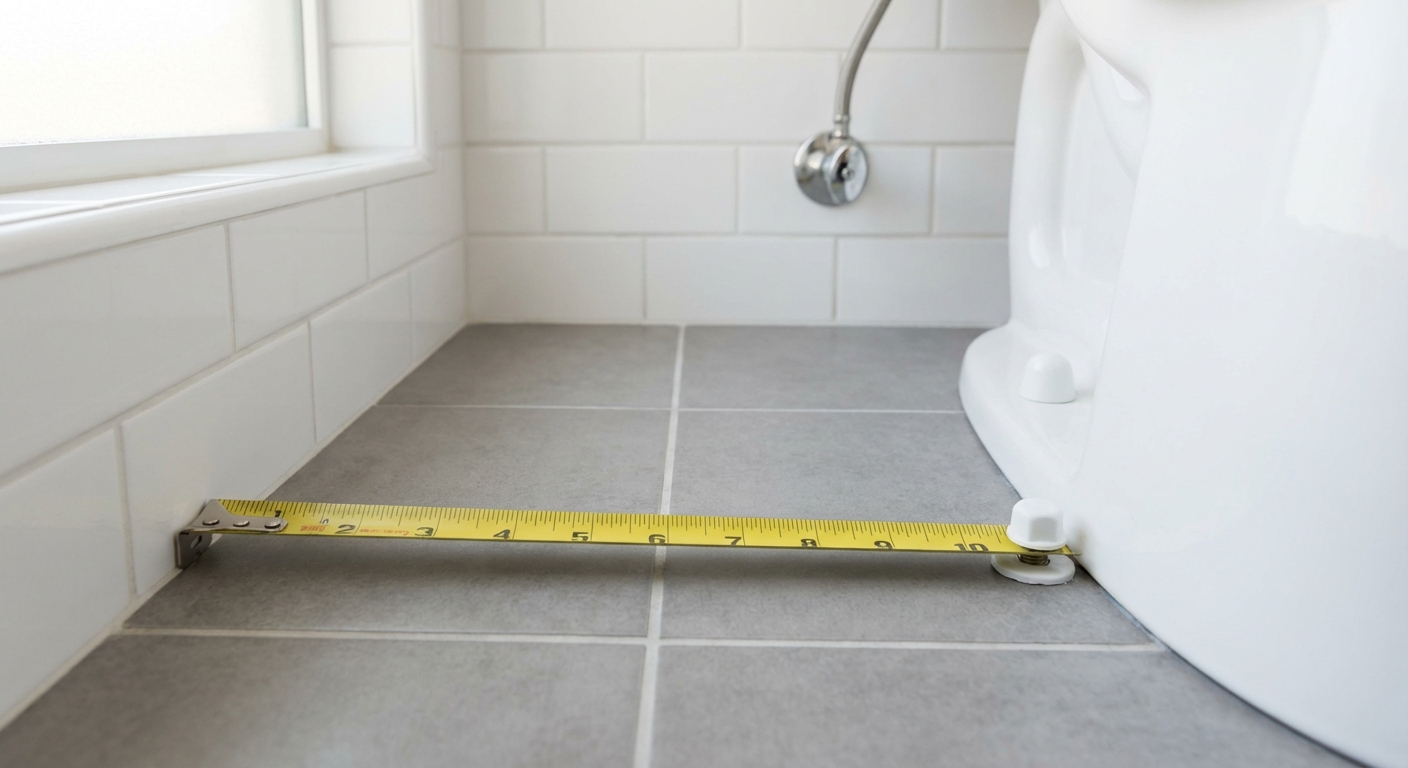
Quick compatibility check
- Rough-in: Most homes are 12 inches, but 10 inches and 14 inches show up too (especially older homes and some remodels). Measure from the finished wall (not baseboard) to the center of one closet bolt.
- Drain size: You’ll hear 3 inches or 4 inches, but don’t overthink it. Nearly all standard toilets fit either because the flange connection is standardized. The bigger deal is choosing the right wax ring or seal for your flange height.
- Seat height: “Comfort height” is taller and easier on knees. Standard height feels more like older toilets.
Lift smart
Toilets are heavy and awkward. If you can grab a helper, do it. Lift with your legs, not your back, and clear a path before you start. Also, toss an old towel or a piece of cardboard down to protect your floor during the removal.
Tools and materials
Tools
- Adjustable wrench or 2 wrenches (for the supply line)
- Channel-lock pliers (optional but handy)
- Putty knife or scraper (for wax removal)
- Utility knife (to cut old caulk)
- Small bucket and old towels
- Level (a short torpedo level is perfect)
- Rubber gloves
Materials
- New toilet (two-piece or one-piece)
- New wax ring or wax-free seal
- New closet bolts (often included, but verify)
- Toilet shims (plastic)
- Flexible supply line (buy a new one unless yours is nearly new)
- Caulk (optional, and I’ll explain where it helps and where it can hurt)
Closet bolts, explained: Those are the two bolts that stick up from the flange and clamp the toilet to the floor. They are what the little caps at the base cover.
Thrifty tip: The cheapest “universal” wax ring is fine for most installs if the flange height is right. Where people get in trouble is using the wrong ring for a flange that sits low, or stacking rings to fix a problem that needs a spacer.
Step 1: Shut off water and drain
- Turn the shutoff valve clockwise behind the toilet until it stops.
- Flush the toilet and hold the handle down to push as much water out as possible.
- Sponge or wet-vac the remaining water out of the tank and bowl into a bucket.
If your shutoff valve barely turns or won’t fully stop the water, do not wrestle it until it snaps. Turn off the house water and replace the shutoff valve first.
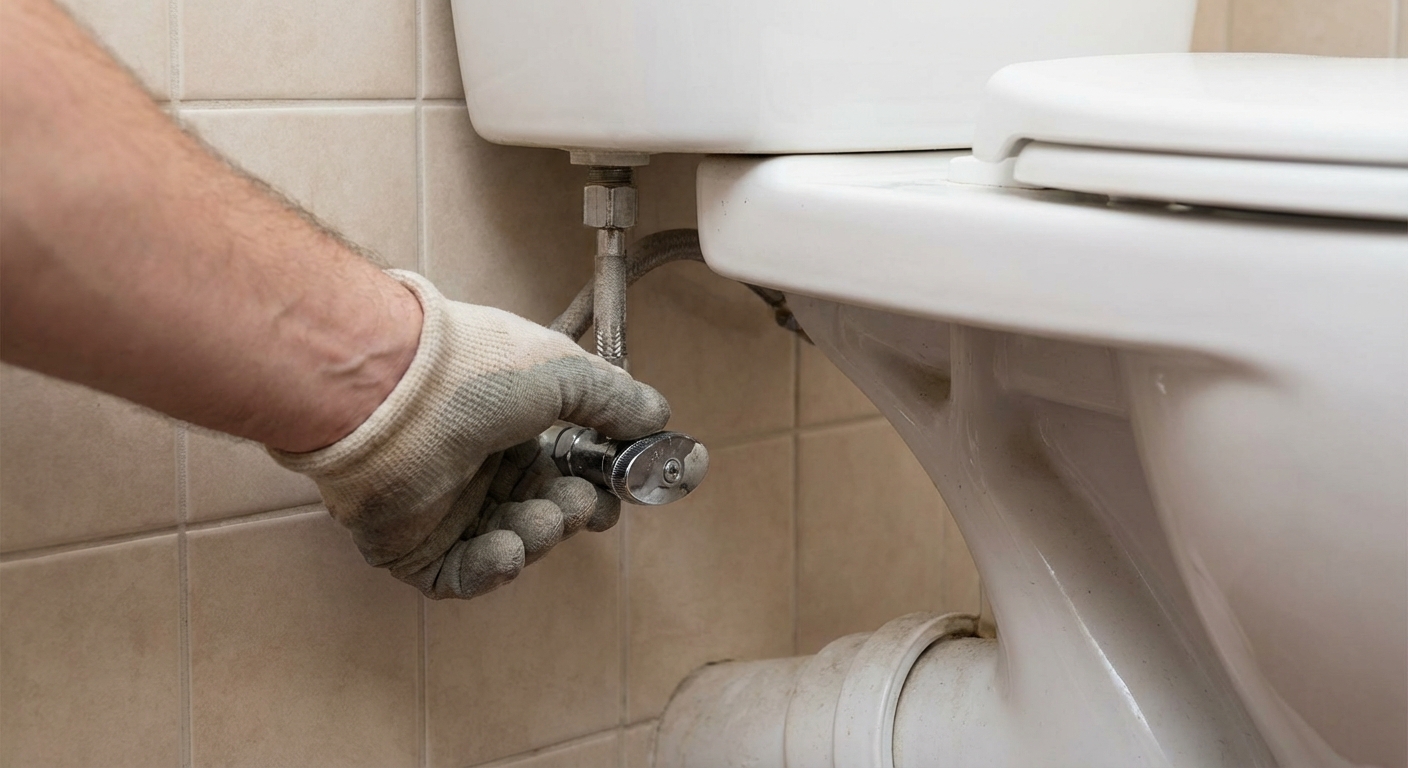
Step 2: Disconnect the supply line
- Place a towel under the valve.
- Loosen the nut under the tank first (many people find it easier), then loosen the nut at the shutoff valve.
- Use a backup wrench where you can so you do not twist the valve or the fill-valve shank while loosening.
- Let any trapped water drain into your towel or bucket.
Beginner-friendly note: You usually do not need thread tape on a toilet supply line. Most seals happen at the rubber gasket inside the nut, not on the threads. Also, tape is not used on compression threads. If your shutoff uses pipe threads (less common), follow the valve manufacturer’s directions.
Step 3: Remove the old toilet
Remove caps and nuts
- Pry off the two bolt caps at the base.
- Remove the nuts and washers. If they are rusted, a little penetrating oil helps, or cut them off carefully.
Break the seal and lift
- Score any caulk line around the base with a utility knife.
- Rock the toilet gently side to side to break the wax seal.
- Lift straight up and set it on an old towel or a piece of cardboard.
My mistake from the early days: I tried to “walk” a toilet out of a tight bathroom by twisting it. That is how you crack a flange or chip tile. Lift as cleanly as you can. If space is tight, remove the tank first on a two-piece toilet to make it lighter.
Disposal note: Old toilets often qualify as bulk pickup, construction debris, or (in some areas) porcelain recycling. Check your city’s rules before you leave it leaning against the garage for a month.
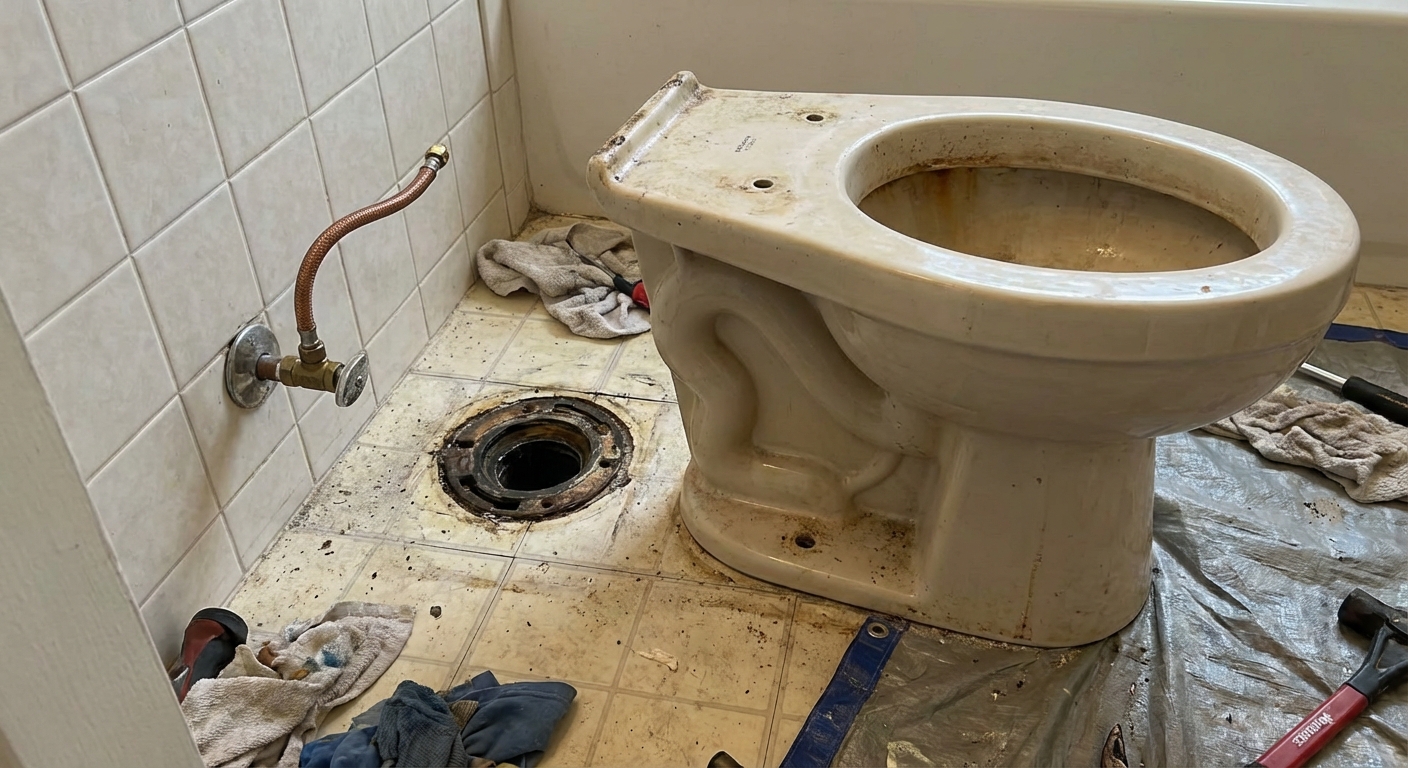
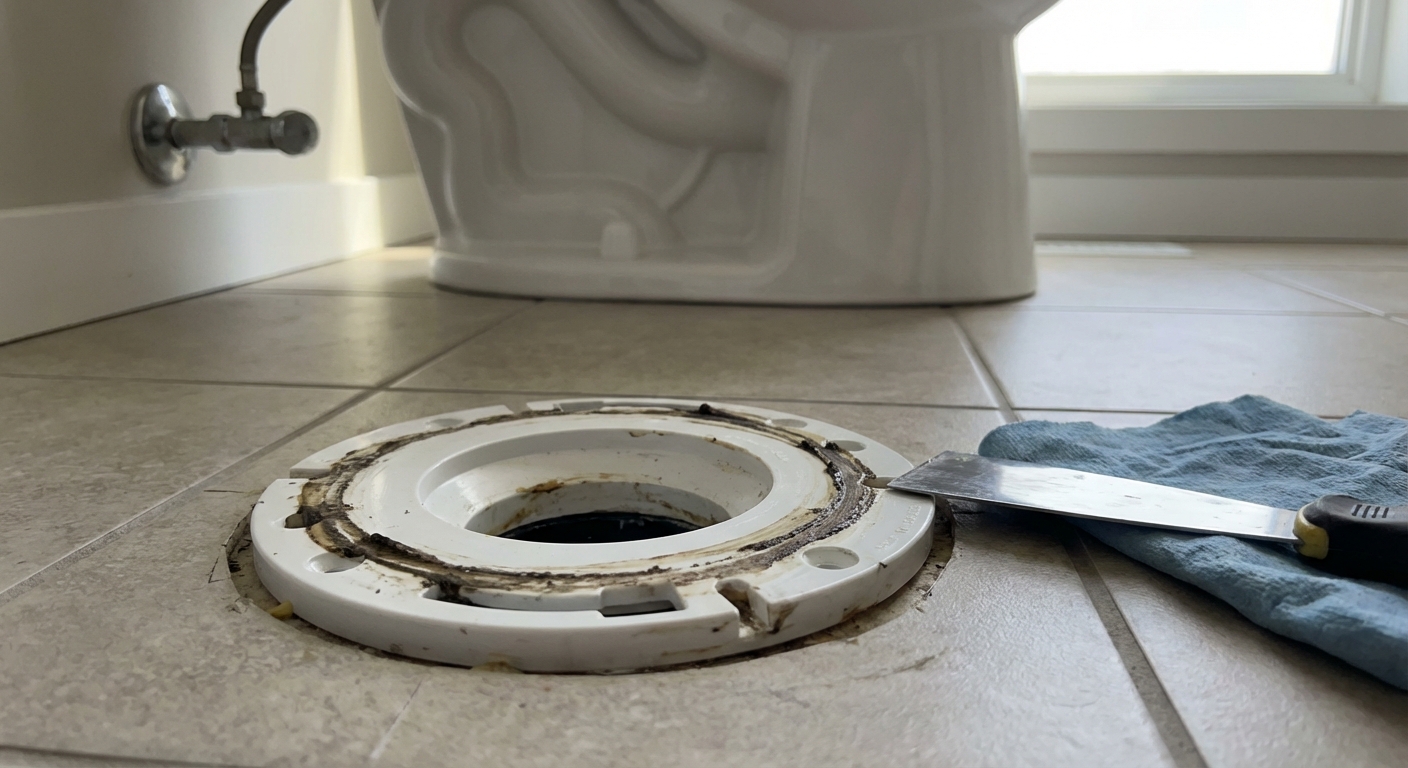
Step 4: Clean wax and check flange
Stuff a rag loosely into the drain opening to block sewer gas and keep hardware from falling in. Then scrape all old wax off the flange and floor.
What you want to see
- The flange is solidly attached to the subfloor
- The flange ring is not cracked or severely corroded
- The top of the flange sits on top of the finished floor or slightly above it (around 1/4 inch is a nice target)
Common problem: flange too low
If the flange sits below the finished floor (common after tile or LVP is installed), the gap can be too much for a standard wax ring to seal reliably. The right fix is usually a flange extender (spacer) plus a standard wax ring, not a tower of wax rings.
Common problem: uneven flange or floor
If the floor slopes or the flange is slightly off, you can still get a perfect install. The key is to set the toilet, shim it solid, and only then tighten.
Step 5: Prep the new toilet
Two-piece: follow the order
Most manufacturers want you to set the bowl first, then mount the tank. Follow the instructions that come with your toilet. The bolt, gasket, and washer order matters, including any plastic washers that protect the porcelain.
Install new closet bolts
Slide the new bolts into the flange slots and position them at roughly 3 o’clock and 9 o’clock. Some kits include little plastic retainers that keep bolts upright. Use them. They are worth it.
Wax ring: choose the right style
This is one of those debates. Here’s my practical take:
- If your toilet or seal instructions specify placement and type, follow that.
- Some wax rings include a plastic horn (funnel). In many setups it helps guide flow, but in a few flange and drain configurations it can interfere. If your kit includes both options, use the one the manufacturer recommends for your flange and drain.
- Otherwise, a standard approach is to place the wax ring on the toilet outlet horn (the bottom of the toilet). It helps keep the ring centered as you lower the bowl.
- If you are using a wax-free seal, follow the kit directions exactly.
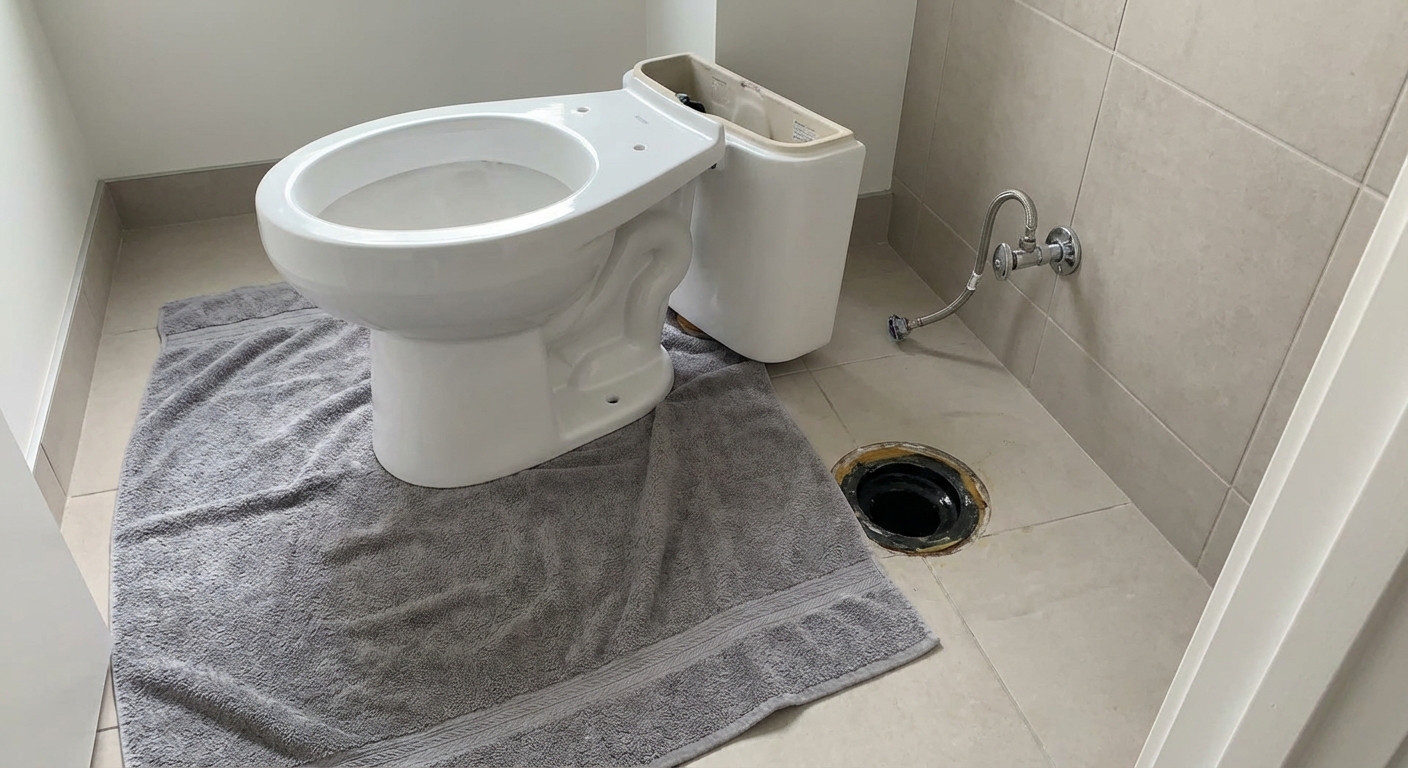
Step 6: Set the new toilet
- Remove the rag from the drain.
- Carefully lower the toilet straight down, guiding the bolts through the holes.
- Once it touches the wax, do not lift it back up “to try again.” If you lift it, plan to replace the wax ring.
- Apply body weight evenly to compress the wax. You can straddle or sit carefully. Just do not bounce.
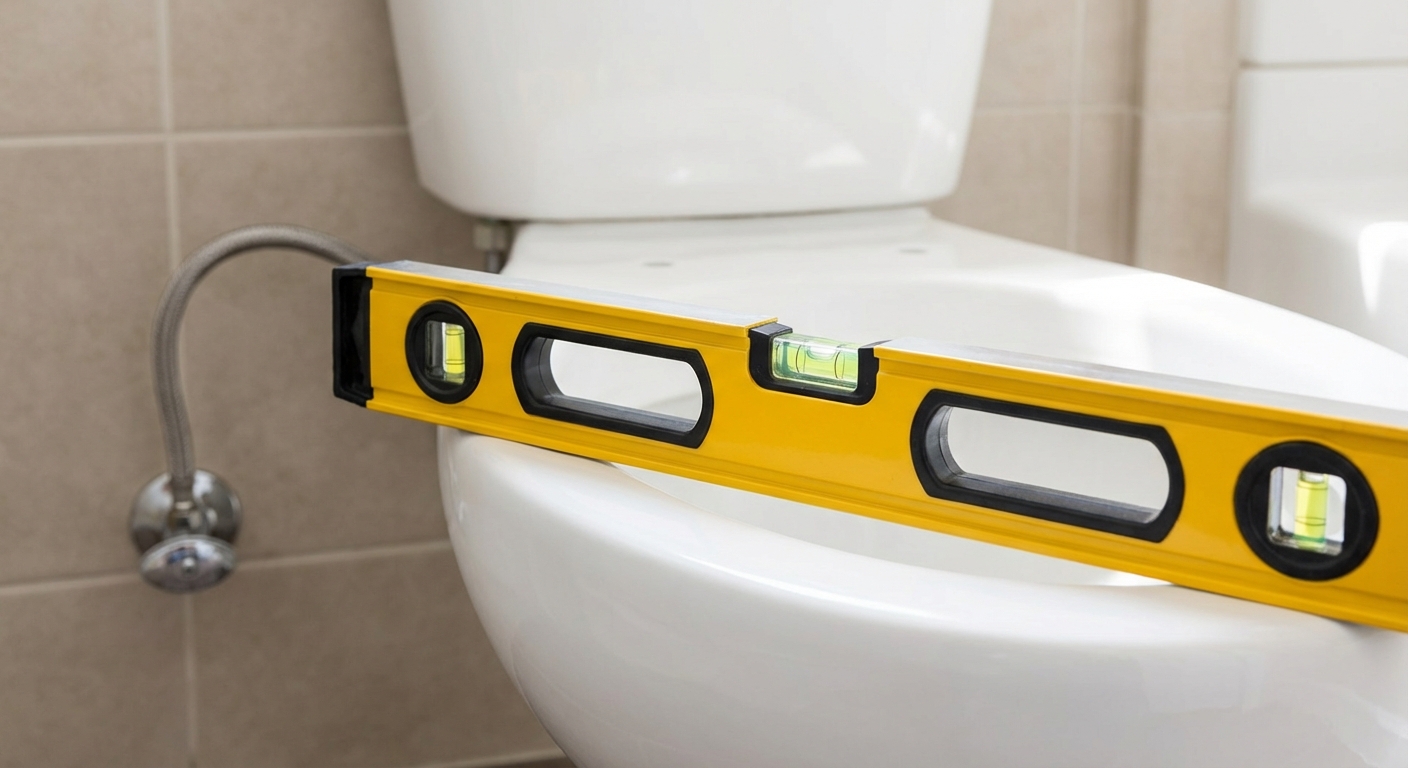
Shim and level before tightening
- Place a level across the bowl side-to-side and front-to-back.
- If there is any wobble, insert plastic shims where needed until the toilet feels rock solid.
- Trim shims later with a utility knife.
Big warning: Porcelain does not forgive overtightening. Tighten the nuts evenly, alternating side to side. Stop when the toilet is snug and stable. If you keep cranking “just to be safe,” you can crack the base.
Step 7: Attach the tank
Set the tank onto the bowl with the rubber gasket in place, then tighten the tank bolts evenly. You want the tank stable and seated, but not gorilla-tight. Alternate side-to-side until the tank is secure and level.
If the tank rocks, it is usually because one side is tightened more than the other. Back off and re-tighten evenly.
Step 8: Connect water and test
- Connect the new supply line to the shutoff valve, then to the fill valve under the tank.
- Hand-tighten first. Then snug with a wrench about a quarter turn more. Do not overtighten.
- Turn the shutoff valve on slowly.
Leak check
- Check the supply line connections at both ends.
- Check around the tank bolts and gasket area (two-piece toilets).
- Flush 3 to 5 times and look for any water around the base.
- Look at the shutoff valve itself for seepage after turning it back on.
Pro move: Place dry toilet paper around the base. Even a tiny leak shows up fast.
Adjust the water level
If the fill valve water line is set too high or too low, your flush quality suffers and your toilet can run. Set it to the mark inside the tank or per the manufacturer instructions, then test a few flushes.
Caulk or not?
This is one of those topics that starts arguments in the aisle at the hardware store.
- Caulk can make the toilet look finished and can keep mop water from getting under the base.
- Caulk can also hide leaks if you fully seal the base and water cannot escape where you can see it.
My compromise: if I caulk, I leave a small uncaulked gap at the back so a wax-ring leak can show itself instead of pooling silently.
One more wrinkle: Some jurisdictions, HOAs, or commercial rules require caulking for sanitation. If that applies to you, follow local requirements and be extra serious about leak testing first.
Common mistakes
1) Reusing the old wax ring
Wax rings are one-and-done. Once compressed, they do not reliably reseal.
2) Tightening before shimming
If you tighten a rocking toilet to stop the movement, you are putting stress on porcelain and risking cracks. Shim first, tighten second.
3) Low flange, wrong fix
A low flange usually needs an extender or a thicker seal solution approved for that condition. Guessing here is how you end up redoing the job next weekend.
4) Caulking before leak testing
Always leak test before caulk. Always.
5) Overtightening tank bolts
Cracked tanks happen. Tighten evenly until stable. Stop.
Troubleshooting
The toilet rocks
- Add shims at the low points until solid.
- Loosen nuts slightly if overtightened, then re-tighten evenly.
Water at the base
- If it is clean water, it might be condensation or a supply leak running down. Dry everything and watch where it starts.
- If it appears only after flushing, suspect a wax ring or flange issue. In many cases, the toilet needs to come back off and be reset with a new ring.
Slow leak at the supply connection
- Snug the nut slightly.
- If it still leaks, disconnect and check the rubber gasket inside the line.
My final checklist
- Toilet is solid, no wobble
- Bowl is level (or as close as your floor allows)
- No leaks at supply line, tank bolts, shutoff valve, or base after multiple flushes
- Bolt caps installed, shims trimmed
- Caulk applied only after testing (optional, with a small gap at the back if allowed)
If you made it this far, you’ve done the hard part. The best feeling is walking into that bathroom later and realizing you are no longer hoping the old toilet behaves. You fixed it. You replaced it. And it’s not going anywhere.
Quick parts list
- Toilet (correct rough-in)
- Wax ring or wax-free seal (appropriate for your flange height)
- Closet bolt kit (if not included)
- New braided supply line (correct length)
- Plastic shims
- Optional: flange extender kit, if your flange is below the finished floor
About Marcus Vance
Content Creator @ Grit & Home
Marcus Vance is a lifelong DIY enthusiast and self-taught home renovator who has spent the last decade transforming a dilapidated 1970s ranch into his family's dream home. He specializes in budget-friendly carpentry, room-by-room renovations, and demystifying power tools for beginners. Through his writing, Marcus shares practical tutorials and hard-learned lessons to help homeowners tackle their own projects with confidence.