🚨 In a DIY emergency or rush?
Skip the details and jump straight to our 30-second cheat sheet for the most crucial info.
I still remember the first time I pulled a hardwired smoke detector down and saw a bundle of wires staring back at me. It felt like one wrong move would either trip a breaker, set off every alarm in the house, or both.
The good news is: replacing a hardwired smoke detector is usually a very manageable DIY job if you slow down, kill the power properly, and match the wiring the way the house is already set up. This guide walks you through it with a big focus on safety and compatibility, because the most common “it won’t work” problems happen when the new detector does not match the old wiring plug or interconnect system.
Difficulty: Moderate DIY
Time: About 20 to 45 minutes per alarm (longer if you are swapping harnesses or labeling multiple units)
Before you start: what hardwired means
A typical residential hardwired smoke detector usually has:
- 120V house power (often black and white conductors in the ceiling box)
- A backup battery (so it works during outages)
- Optional interconnect (so when one alarm goes off, they all go off)
If your detector has a wiring harness that plugs into the back of the unit, that is almost always a 120V hardwired model in normal residential setups, but it is not absolute. Some low-voltage or security-system smokes also use plugs. Verify by checking the labeling on the alarm and in the box (or the manual) before you assume it is 120V.
Safety first: DIY vs pro
You can usually replace an existing hardwired detector yourself when you are swapping like-for-like in the same location with the same wiring method.
Call an electrician if any of these are true:
- The ceiling box has damaged, brittle, or scorched wires.
- There is no electrical box, or the box is loose or broken.
- The wiring colors do not match the usual pattern and you cannot confidently identify them.
- You are converting from battery-only to hardwired and need new wiring.
- Your home has very old wiring and you are unsure about grounding or box fill.
- Your breaker trips when you restore power (especially an AFCI breaker). Do not keep resetting it. Figure out why.
Important note: If you have had actual smoke, an electrical event, or a fire, replace every alarm in the affected area and consider a professional inspection.
Code note: Smoke and CO requirements vary by location. If you are changing alarm types, adding CO, or altering interconnect, take a moment to check local code for placement and interconnect rules.
Tools and materials
- New hardwired smoke detector(s) that are compatible with your existing interconnect
- Fresh batteries (even “sealed battery” units can ship partially discharged, and some have activation tabs)
- Non-contact voltage tester
- Optional but best: a two-pole tester or multimeter for confirmation if anything seems off
- Phillips screwdriver
- Wire stripper (only if you are re-terminating damaged ends)
- Wire nuts (only if needed)
- Painter’s tape and a marker for labeling
- Step stool or ladder
Step 1: Shut off the circuit and prove it
Find the right breaker
Most hardwired smoke alarms are on a lighting circuit, but do not assume. If your panel labels are messy, use a helper:
- Have one person stand under the alarm.
- Flip breakers one at a time until the alarm loses power.
- Do not trust LEDs alone. Some alarms behave inconsistently when they are running on battery backup.
If you cannot confidently identify the correct circuit, you can shut off the main while you verify. If that still feels uncertain, this is a good time to call a pro.
Test your tester
Before you rely on a non-contact voltage tester, test it on a known live outlet. Dead tester batteries are a real thing.
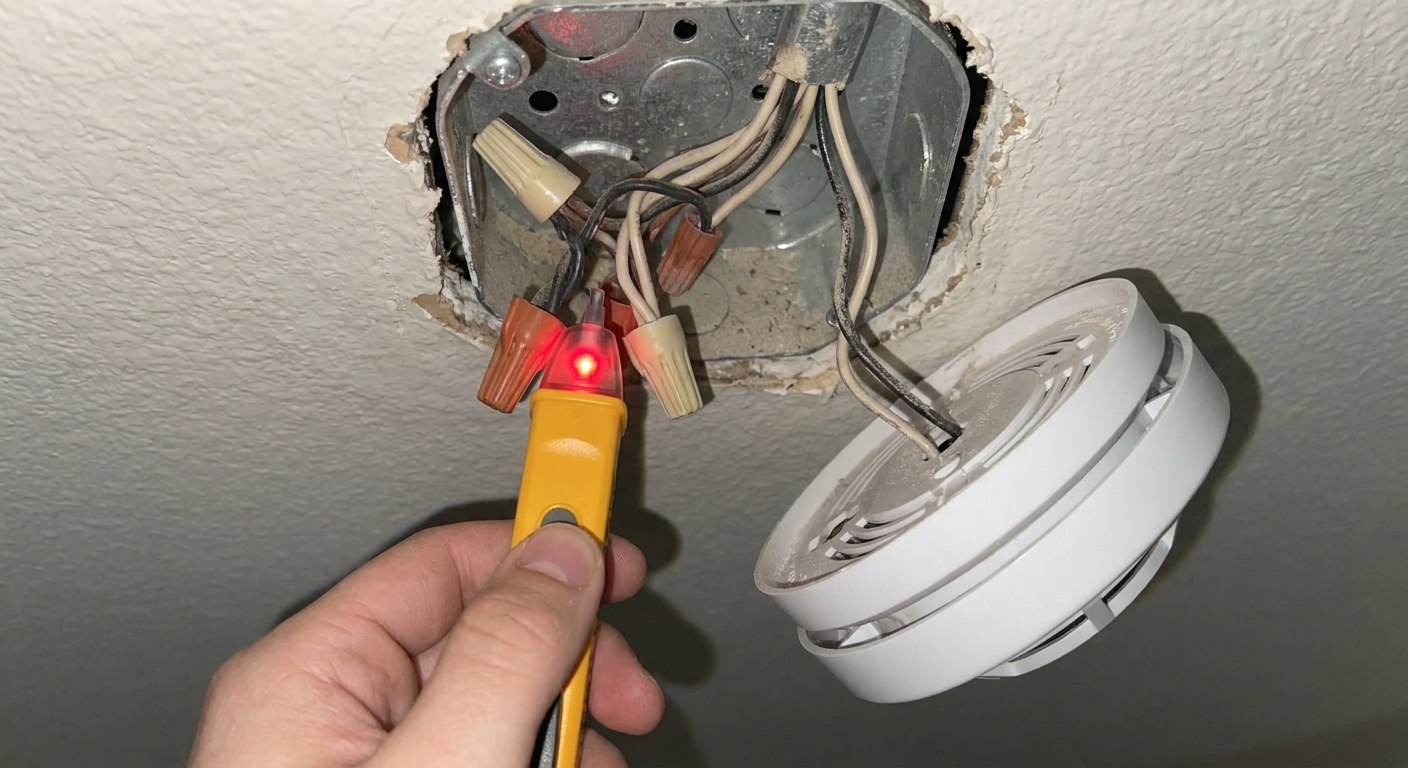
Verify at the box
Turn the alarm off the bracket, unplug the harness, and use a non-contact voltage tester at the wires in the box.
Also test the red interconnect wire if present. In rare, improperly wired homes, interconnected alarms can span different circuits, meaning the red wire could still be live even if the local black wire is dead.
NCVT reality check: non-contact testers are great for a quick safety check, but they can give false positives or false negatives depending on cable type and conditions. If you get confusing results, verify with a two-pole tester or multimeter, or bring in a pro.
Do not rely only on the “test” button to prove power is off. The test button can still work on battery even when the circuit is dead.
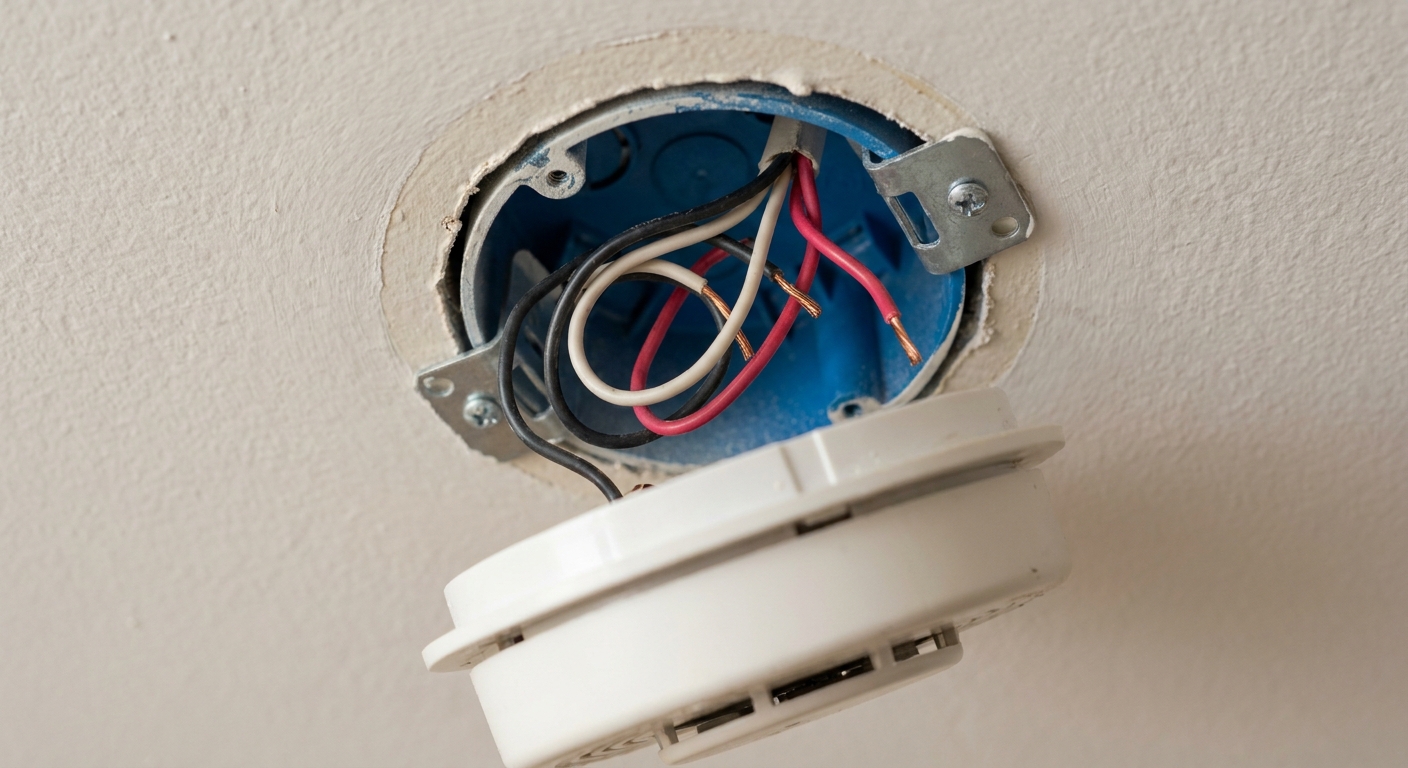
Step 2: Remove the old alarm and document
Twist the detector counterclockwise to release it from the mounting ring. Unplug the wiring harness from the back of the detector.
Now do the part that saves you later: take clear photos of:
- The wiring inside the ceiling box
- The harness plug shape and pin pattern
- The brand and model number on the old detector
- Any labels on the wires
If you are replacing multiple alarms, label each harness with painter’s tape so you do not mix them up.
Step 3: Identify hot, neutral, and interconnect
This is the part that scares beginners, but it is often consistent in most homes. Still, do not treat wire colors as a promise. Follow what is actually spliced together in the box and what your alarm manual calls for.
Typical wire roles
- Black: hot (line power). Sometimes also used for pass-through (load) to the next alarm.
- White: neutral
- Red (common): interconnect signal wire
- Bare copper or green: ground (not always used on smoke alarms, depends on model and box)
Line vs load, in plain language
In a chain of interconnected alarms, one box may have:
- Line in: power coming from the breaker
- Load out: power continuing to the next device
Many smoke alarms do not require you to separate line and load in a special way. Both hots are typically tied together in the box and feed the harness hot lead. Same with neutrals.
What you must not mess up is the interconnect wire. If you disconnect or miswire it, the alarms may still power on individually but will not all sound together when one triggers.
One house, two different boxes
Here is a real-world example I have seen in older homes: one location has only black and white (no red). That detector might be standalone hardwired. Another location has black, white, and red, indicating interconnect. Treat each box like its own puzzle and match what is present.
Step 4: Match the new alarm to the system
This is where most replacement jobs go sideways. Even if two alarms are both “hardwired,” they may not be plug-compatible or interconnect-compatible.
Start with the old model
Look for the label on the back or side of the old unit. Write down:
- Brand (Kidde, First Alert, BRK, etc.)
- Model number
- Manufacture date
Then check the new detector packaging or manual for “interconnect compatibility” and “replacement for” info.
Harness plugs are not universal
Many brands use different harness plugs across generations. Sometimes the new detector includes a new harness, which is fine as long as you wire it correctly in the box. If you are not comfortable rewiring the harness, buy a model that is a direct replacement with the same plug style.
Do not mix interconnect types
Hardwired interconnect systems are usually brand-specific and sometimes model-family-specific. Mixing can lead to:
- Interconnect not working
- Nuisance alarms
- Alarms that cannot be silenced properly
If you are replacing one alarm in a network, your safest move is to choose a model explicitly listed as compatible with the rest of your installed alarms.
Quick compatibility checklist
- Brand and series: match what is already installed, unless you are replacing the whole set.
- Harness plug: direct match, or confirm the new unit includes the correct harness and you are comfortable swapping it.
- Interconnect type: hardwired red wire vs approved wireless module. Do not guess.
- Smoke only vs smoke/CO: confirm whether your network supports CO signaling the way you expect (model-specific).
Ionization vs photoelectric
Two common smoke sensing technologies are:
- Ionization: often responds faster to fast-flaming fires, but can be more prone to nuisance alarms near kitchens.
- Photoelectric: often responds faster to smoldering fires and is typically less nuisance-prone near cooking areas.
My practical rule of thumb: if you are upgrading and have the choice, I prefer photoelectric or a dual-sensor model for many homes because it tends to be more livable day-to-day.
Compatibility reality check: your existing network may limit what you can install. If you want to change technology and keep full interconnect behavior, you may need to replace multiple units as a set so they all match the same compatible series.
Placement basics
Always follow the instructions that come with your specific alarm and your local code requirements. These guidelines are a solid starting point for typical residential installs.
Ceiling placement
- Mount as close to the center of the ceiling as practical.
- Avoid corners where the wall meets the ceiling. Smoke can dead-air there.
- Keep distance from ceiling fans, HVAC supply registers, and bathroom doors where steam can cause nuisance alarms.
Wall placement
- If mounting on a wall, place it high, usually within the top portion of the wall per the manufacturer’s instructions.
- Do not place it right at the ceiling line if the manufacturer specifies a down-from-ceiling range.
Typical coverage
- Inside each bedroom (common in many jurisdictions and best practice)
- Outside each sleeping area (hallway)
- On every level of the home (including basement)
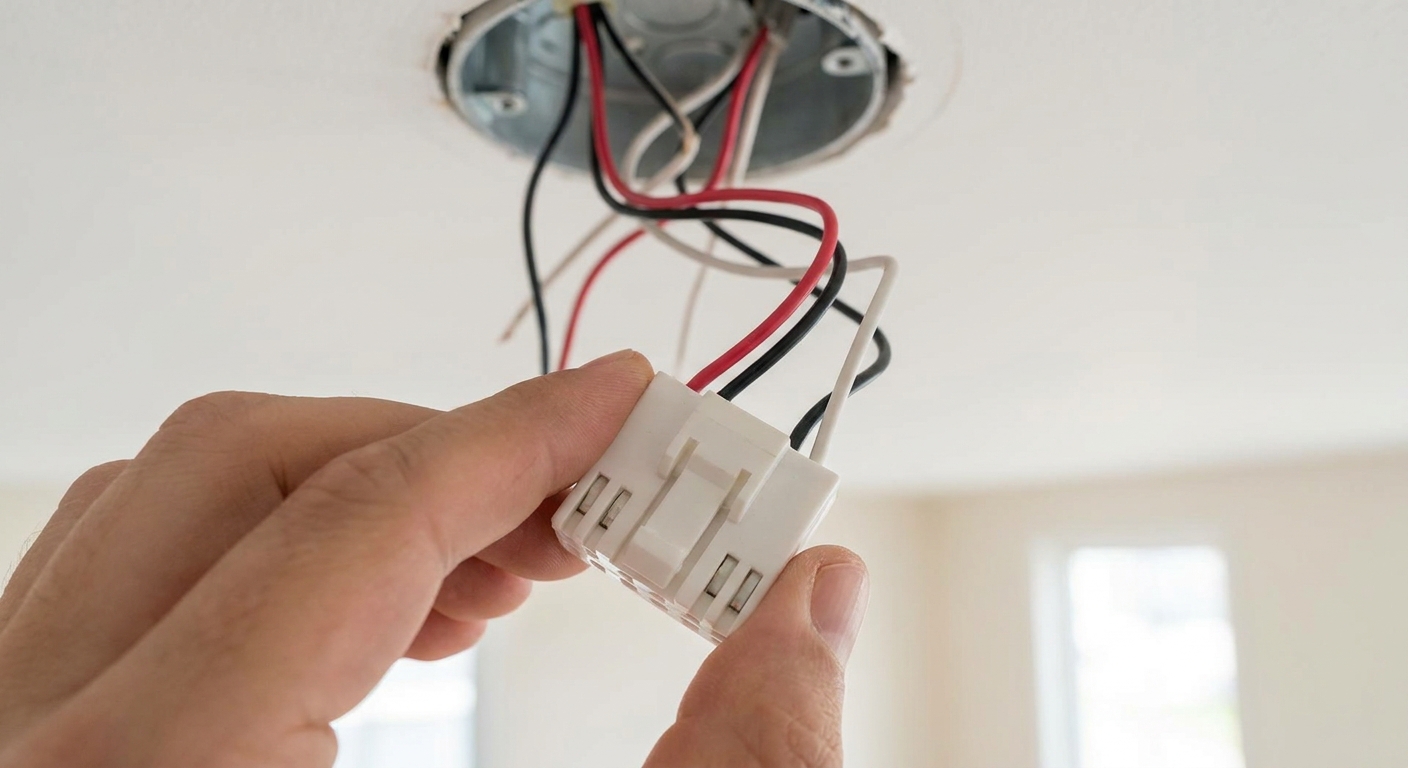
Step 5: Install the new ring and harness
Swap the bracket
New detectors often come with a new mounting ring. Use it. Screw it to the existing electrical box with the correct screws. Do not drive wood screws into drywall and call it good. The box is there for a reason.
If you must replace the harness
If the new detector includes a different harness plug, you may need to wire the new harness in the ceiling box.
General pattern (confirm with your manual):
- House black to harness black
- House white to harness white
- House red (interconnect) to harness red if present
- Ground to the box or harness ground if your model uses one
Make tight connections, tug-test each wire, and fold wires neatly back into the box so nothing gets pinched.
One mistake I made early on: I stuffed wires too aggressively and the harness plug did not seat fully. The alarm had power, but it would randomly chirp. Reseat the plug and re-pack the wires gently if anything feels strained.
Step 6: Restore power and test hard
Power on
Plug the harness into the detector, mount it on the ring, and turn the breaker back on.
Test each alarm
- Press and hold the test button until it alarms.
- If your alarms are interconnected, confirm that other alarms sound too.
- Check for a steady power light (varies by model).
If one alarm sets off the whole house and will not stop
Do not panic. This is often an interconnect or harness seating issue, or a defective unit. Try:
- Silence button on the triggering unit
- Reseat the harness plug
- Confirm the interconnect wire is not touching hot or neutral
- If needed, shut off the breaker, remove the problem unit, and reinstall
When replacement is also an upgrade
Sometimes you start with “replace one chirpy alarm” and end with “this system is outdated.” That can be a good thing.
Upgrade to smoke plus CO
If you have fuel-burning appliances, an attached garage, or a fireplace, carbon monoxide protection is a big deal. Many homeowners upgrade to combo smoke/CO alarms during replacement.
Two key cautions:
- Combo units can have different placement rules than smoke-only alarms. Follow the manual and local code.
- CO-to-CO (and sometimes CO-to-smoke) signaling depends on the model and series. Confirm what your network actually supports before you assume the whole house will alarm for CO.
Add or fix interconnect
Best practice is that when one smoke alarm activates, they all activate. If your home has hardwired alarms that are not interconnected and you have access to the wiring, this can be a smart retrofit.
That said, retrofitting interconnect wiring can turn into a bigger project depending on access. If you cannot run the interconnect conductor easily, there are wireless interconnect options in some product families, but they still must be installed per manufacturer instructions and local code.
Sealed 10-year battery notes
Hardwired alarms with sealed 10-year batteries are not “forever alarms.” When they reach end-of-life, you replace the whole unit. Do not try to open them up or swap batteries that are not designed to be replaced.
Common troubleshooting
It has power but does not interconnect
- Interconnect (often red) not connected in one of the boxes
- Incompatible models mixed in the system
- Loose wire nut on the interconnect splice
It chirps shortly after install
- Battery tab not removed or battery not seated
- Harness plug not fully seated
- Some models chirp if they detect miswire or missing neutral, check the manual
Random nuisance alarms
- Unit too close to kitchen or bathroom steam
- Dust from renovation, especially after sanding or drywall work
- A failing, dirty, or expired interconnected unit triggering the whole network
If you have been doing dusty work, gently vacuum the outside vents of the alarm after power is off. Avoid blasting it with compressed air into the sensor chamber unless the manufacturer allows it.
The breaker trips
If the breaker trips when you restore power, especially an AFCI breaker, stop and investigate. A miswire, damaged conductor, or incompatible device can be the cause. If you are not sure, call an electrician.
Replacement timeline
Most smoke alarms have a replacement interval (commonly around 10 years, but check your unit label). If one alarm in your home is expired, there is a good chance others are the same age.
My thrifty homeowner take: this is one place I do not try to squeeze extra years out of a device. Replace expired alarms as a set where possible, especially if they are interconnected and you want compatibility and reliable whole-house alarming.
Quick recap
- Shut off the breaker and verify power is truly off.
- Test your tester on a known live outlet first.
- Photograph and label wiring before changing anything.
- Match hot, neutral, and interconnect correctly. Test the red wire too.
- Buy a detector compatible with your existing harness and interconnect network.
- Follow placement guidance, local code, and test interconnect after install.
The 30-Second Cheat Sheet
Essential takeaways for: How to Replace Hardwired Smoke Detectors Safely
Do this in order
- Turn off the breaker that feeds the alarms. If you cannot confidently identify it, shut off the main and call a pro if needed.
- Test your tester on a known live outlet first, then proceed.
- Pull the alarm down, unplug the harness, and verify power is off with a non-contact voltage tester at the box wires.
- Also test the red interconnect wire (if present). In rare, improperly wired homes, alarms can span circuits and the red wire may still be live even if the local black wire is dead.
- Take photos of the ceiling box wiring, the harness plug, and the old model number.
- Identify wires: typically black = hot, white = neutral, red = interconnect (if present). Colors are common, not guaranteed. Match existing splices and the manual.
- Install the new bracket. If the new alarm uses a different plug, wire the new harness: black to black, white to white, red to red.
- Restore power, then test every alarm. If interconnected, confirm the other alarms sound too.
Compatibility checklist
- Harness plugs are not universal. Buy a true replacement or be prepared to swap the harness in the box.
- Interconnect is often brand and series specific. Mixing models can break interconnect or cause nuisance alarms.
- Hardwired vs wireless matters. Some families support wireless modules, but compatibility is still model-specific.
- If you want to switch sensing type, consider replacing multiple alarms so the network stays compatible.
Upgrade triggers
- If alarms are near or past their labeled lifespan (often around 10 years), replace them as a set.
- Consider smoke plus CO combo alarms where CO risk exists (fuel-burning appliances, attached garage).
- Sealed 10-year battery hardwired units still get replaced at end-of-life. Do not try to “swap the battery.”
Placement basics
- Prefer the ceiling, away from corners, fans, HVAC vents, and steamy bathrooms.
- Follow the manufacturer’s wall-mount spacing guidance if you mount on a wall.
- Best practice coverage: inside bedrooms, outside sleeping areas, and on every level.
Stop and call a pro if
- Wires are damaged, scorched, or confusing.
- No proper electrical box exists.
- You cannot confirm which conductor is the interconnect.
- The breaker trips (especially AFCI) when you restore power.
💡 Tip: Scroll up to read the full article for detailed, step-by-step instructions.
⬆️ Back to topAbout Marcus Vance
Content Creator @ Grit & Home
Marcus Vance is a lifelong DIY enthusiast and self-taught home renovator who has spent the last decade transforming a dilapidated 1970s ranch into his family's dream home. He specializes in budget-friendly carpentry, room-by-room renovations, and demystifying power tools for beginners. Through his writing, Marcus shares practical tutorials and hard-learned lessons to help homeowners tackle their own projects with confidence.