🚨 In a DIY emergency or rush?
Skip the details and jump straight to our 30-second cheat sheet for the most crucial info.
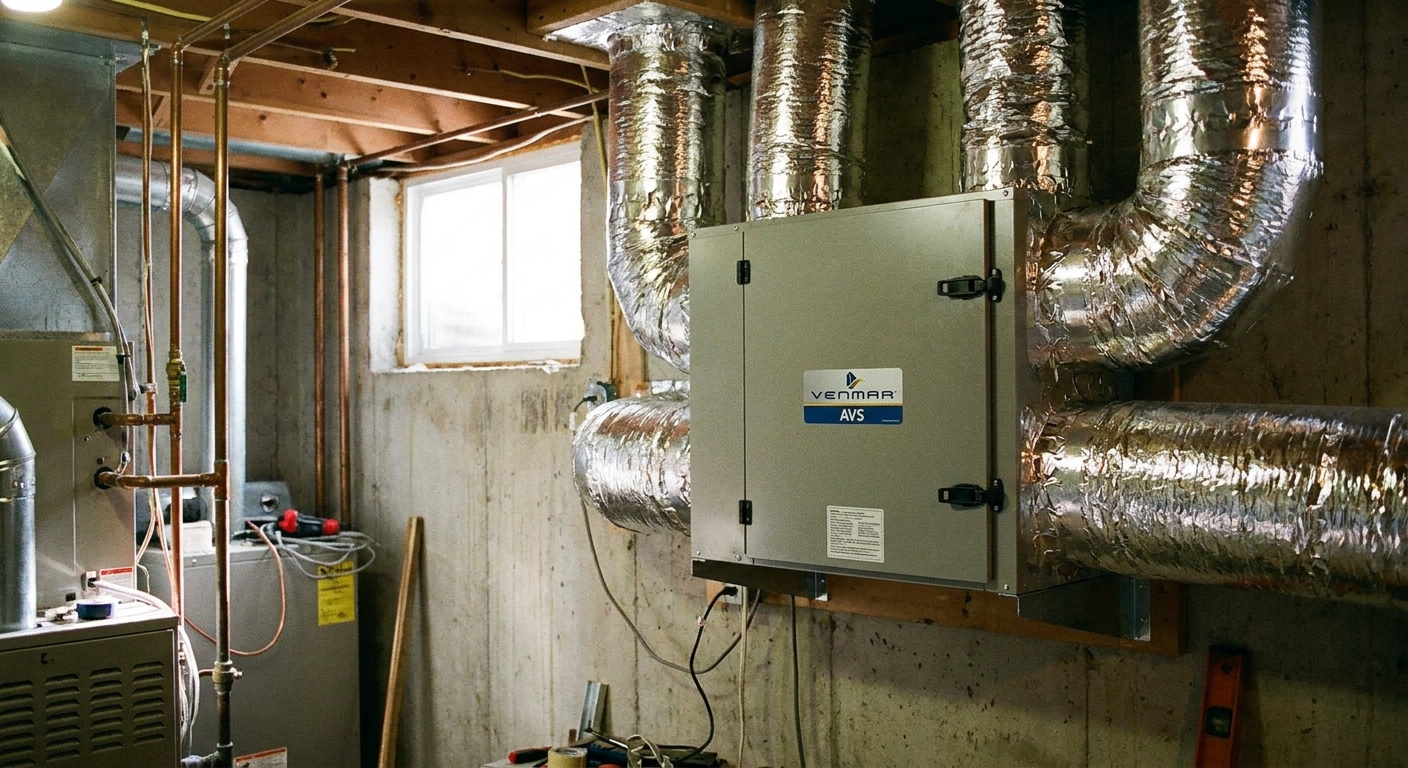
If you live in a newer, tighter home or you have done big air-sealing upgrades, your HRV or ERV is basically your house’s lungs. When it’s working right, you forget it exists. When it’s not, you notice fast: bedrooms feel stuffy, the house goes negative and doors get “sticky” (hard to latch or open), or you see frost building up in winter.
I’ve been there. The good news is that a lot of HRV/ERV issues come down to a handful of basics: restricted airflow from dirty filters, a plugged intake hood, a misadjusted damper, or frost control not doing its job. Let’s walk through what to check first, in the order that saves the most time and avoids making things worse.
Before you touch anything
- Confirm it has power and is actually on. Check the wall control mode, timers, and any HVAC interlock. Then verify the outlet, breaker, or GFCI has not tripped.
- Turn the unit off at the wall control or switch before opening doors.
- Have a flashlight, a vacuum, and a damp rag ready. Most maintenance is just careful cleaning.
- Find the manual for your model if you can. Filter sizes, core type, and what is washable are model-specific.
- Do not defeat frost protection just to “get more air.” That can lead to a frozen core and water where you do not want it.
If you smell burning, hear grinding, see melted wiring, or the unit is tripping a breaker, stop and call a pro. That’s not a filter problem.
Combustion safety note: If you suspect backdrafting (smoke smell, soot, or appliance spillage), stop using the appliance and call a qualified pro. Do not keep “testing” it.
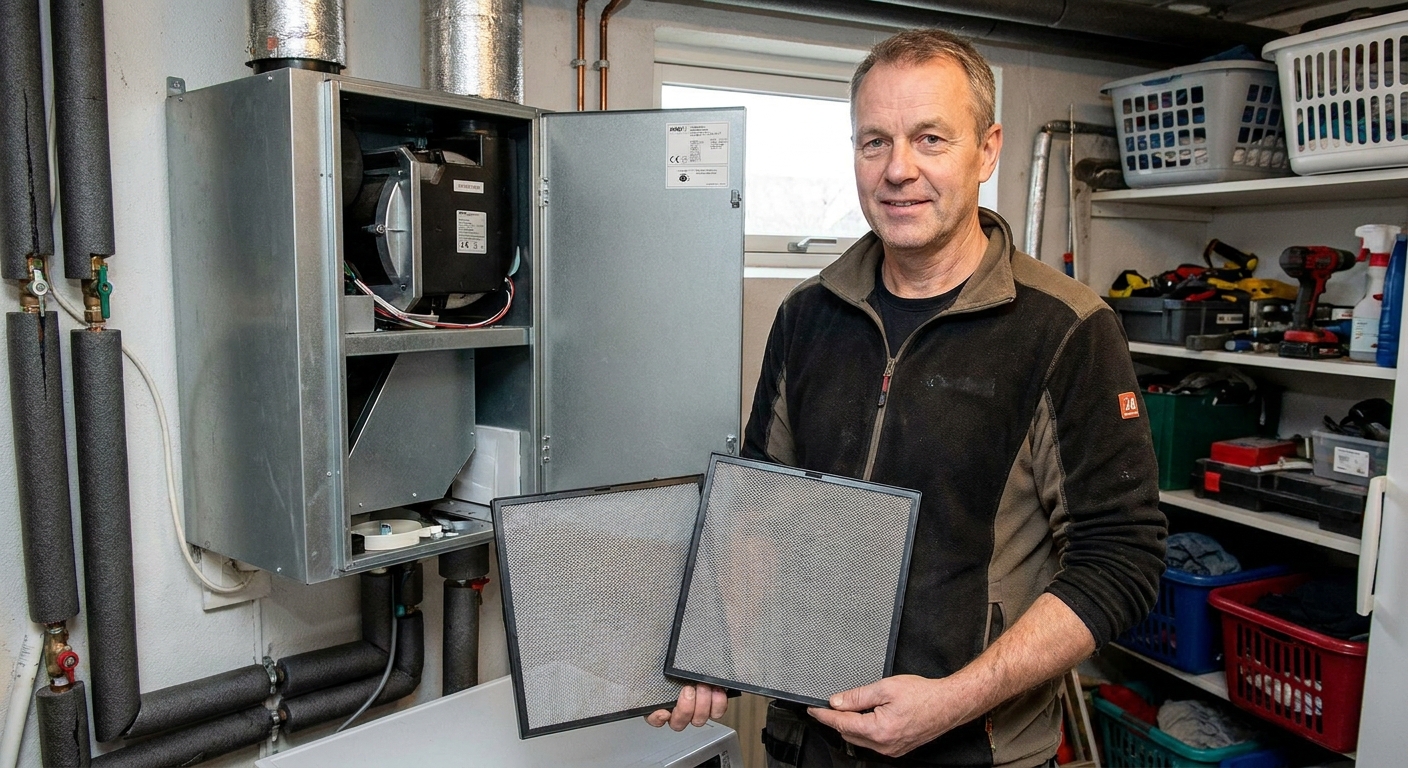
Step 1: Check filters and screens
Restricted airflow is one of the most common reasons an HRV/ERV starts feeling useless. Most units typically have two filters (one on the incoming outdoor air stream and one on the outgoing exhaust stream), but some models add pre-filters or extra stages.
Filters vs the core vs HEPA
This gets confusing because “filter” gets used for different things:
- The standard HRV/ERV filters are usually washable foam, washable mesh, or replaceable pleated filters. They protect the fans and the core from dust and lint.
- The core (heat exchange core or enthalpy core) is not a HEPA filter. It transfers heat, and in an ERV it also transfers some moisture. It does not “purify” air like a true air cleaner.
- True HEPA is uncommon inside HRV/ERV units because HEPA creates a big pressure drop. Some homes use a separate HEPA/air cleaner on the HVAC side instead.
If your home’s air feels dusty or you are dealing with allergies, an HRV/ERV helps with fresh air but it is not a HEPA solution by itself.
What to do
- Pull the supply and exhaust filters.
- If they’re washable: vacuum first, then rinse with cool water. Avoid detergents, bleach, or harsh cleaners unless your manufacturer specifically approves them.
- Let washable filters dry fully before reinstalling.
- If they’re pleated and disposable: replace them. If you cannot see light through them, they are done.
- Wipe the filter rails and inside surfaces where lint builds up.
My mistake to save you time: I once “cleaned” washable filters and put them back damp. The unit smelled musty for days. Let them dry.
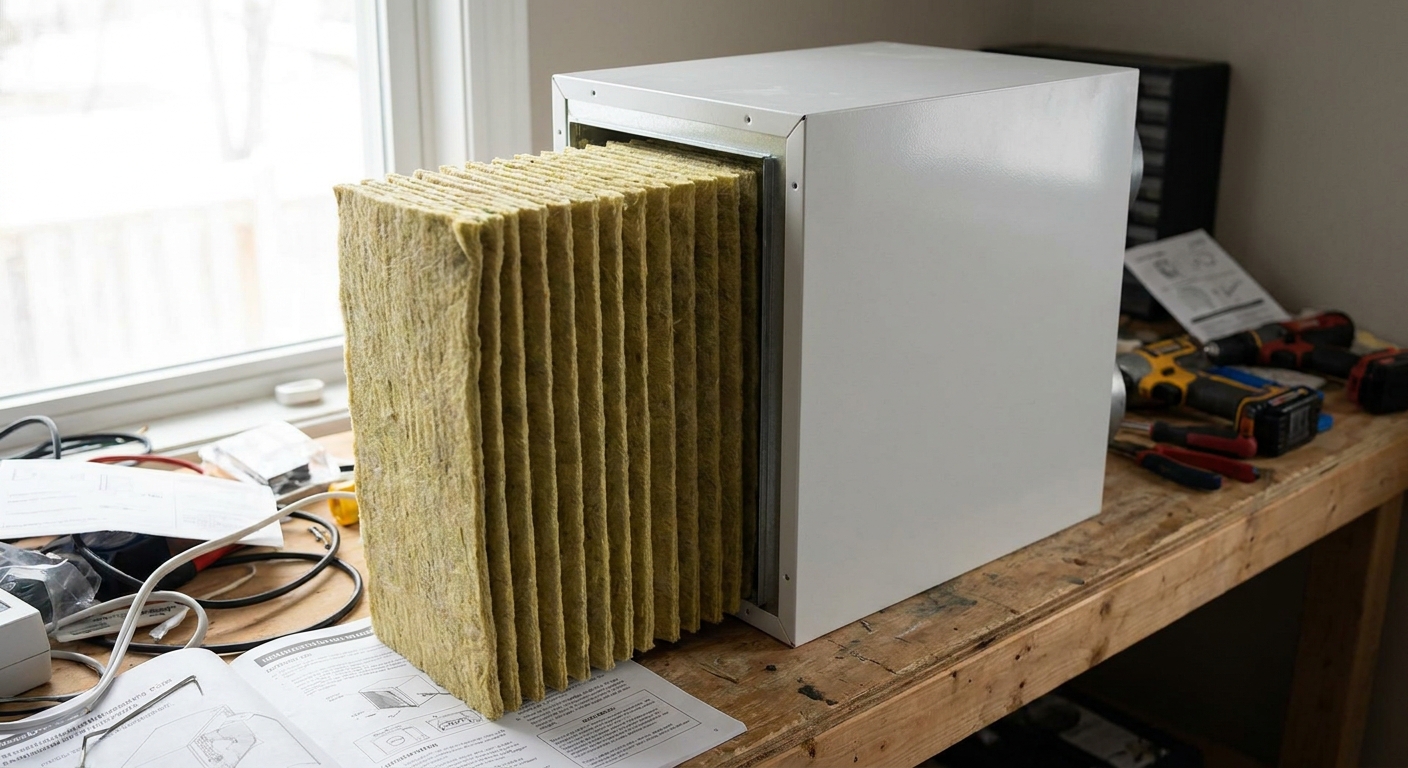
Step 2: Inspect and clean the core
If filters are clean but airflow still seems weak or the air feels stale, the core is next. A dirty core is like breathing through a clogged mask.
HRV core vs ERV core
- HRV (Heat Recovery Ventilator): transfers heat. Cores are often plastic (commonly polypropylene) and may tolerate gentle rinsing depending on the model.
- ERV (Energy Recovery Ventilator): transfers heat and some moisture. The enthalpy core can be more sensitive. Some are not meant to be rinsed.
Check your manual. When in doubt, vacuum gently and use a barely damp cloth on the casing. Do not soak an enthalpy core unless the manufacturer says it is washable.
What you’re looking for
- Dust mats and fuzz blocking passages
- Signs of frost damage or warped plastic
- Black spotting or mildew (often a drainage or humidity issue)
If the core is damaged, it can restrict airflow and, depending on the failure, allow odor transfer or leakage and bypass between air streams.
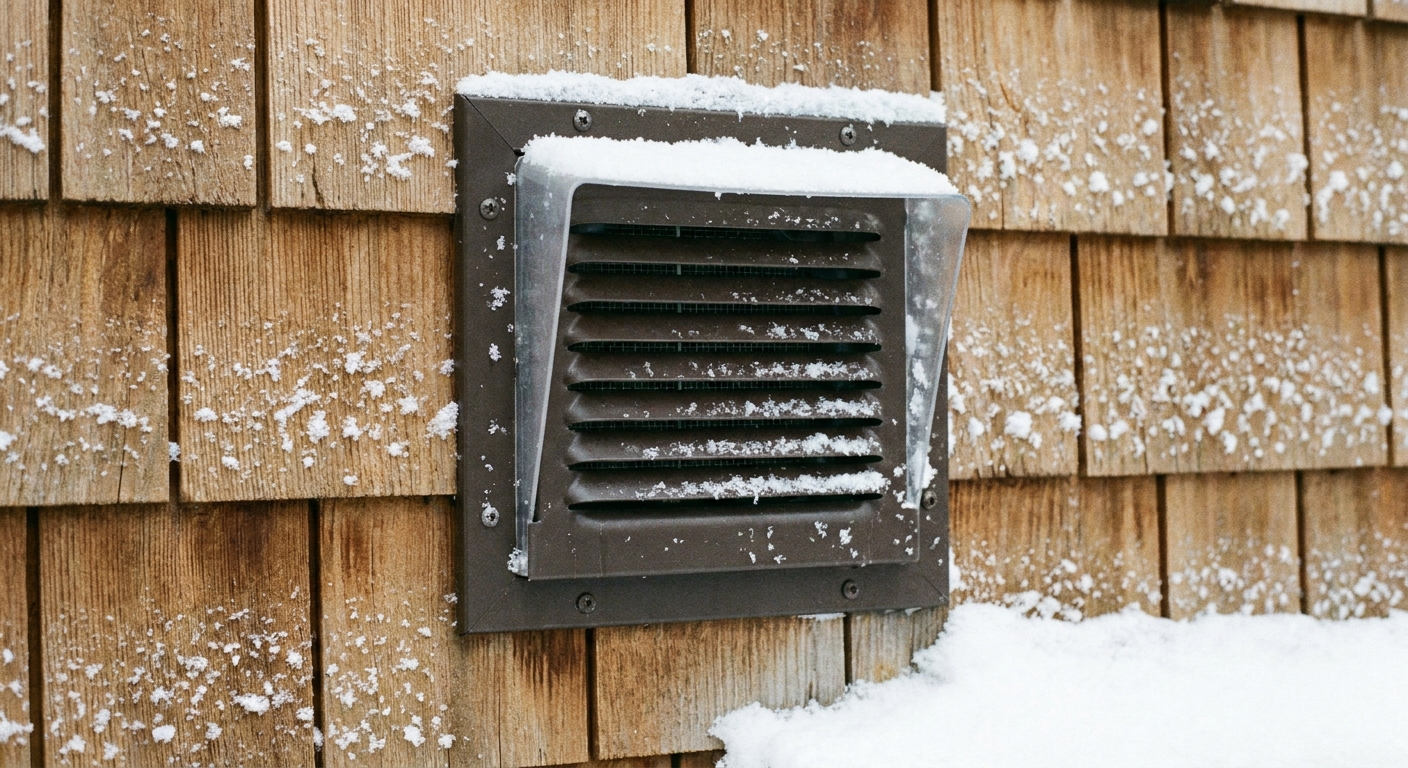
Step 3: Check outdoor hoods
This is the quick win people skip because the problem is out of sight. If the intake or exhaust hood is blocked, the unit cannot breathe.
- Outside intake hood: check for leaves, lint, spider webs, cottonwood fluff, snow buildup, or a screen packed with debris.
- Exhaust hood: check for frost “bearding” in winter or a stuck backdraft damper.
- Inside duct near the unit: look for a crushed flex duct, a disconnected duct, or a kinked run.
Tip: If one hood is blasting air and the other feels weak, you may have a blockage or imbalance. Also keep in mind it can be normal during defrost (many units reduce or stop intake briefly), and wind or stack effect can make “by hand” airflow feel misleading.
One more thing: resist the urge to “improve” the hood with extra-fine screen mesh. Some manufacturers avoid fine screens because they clog fast. Stick with the manufacturer’s setup.
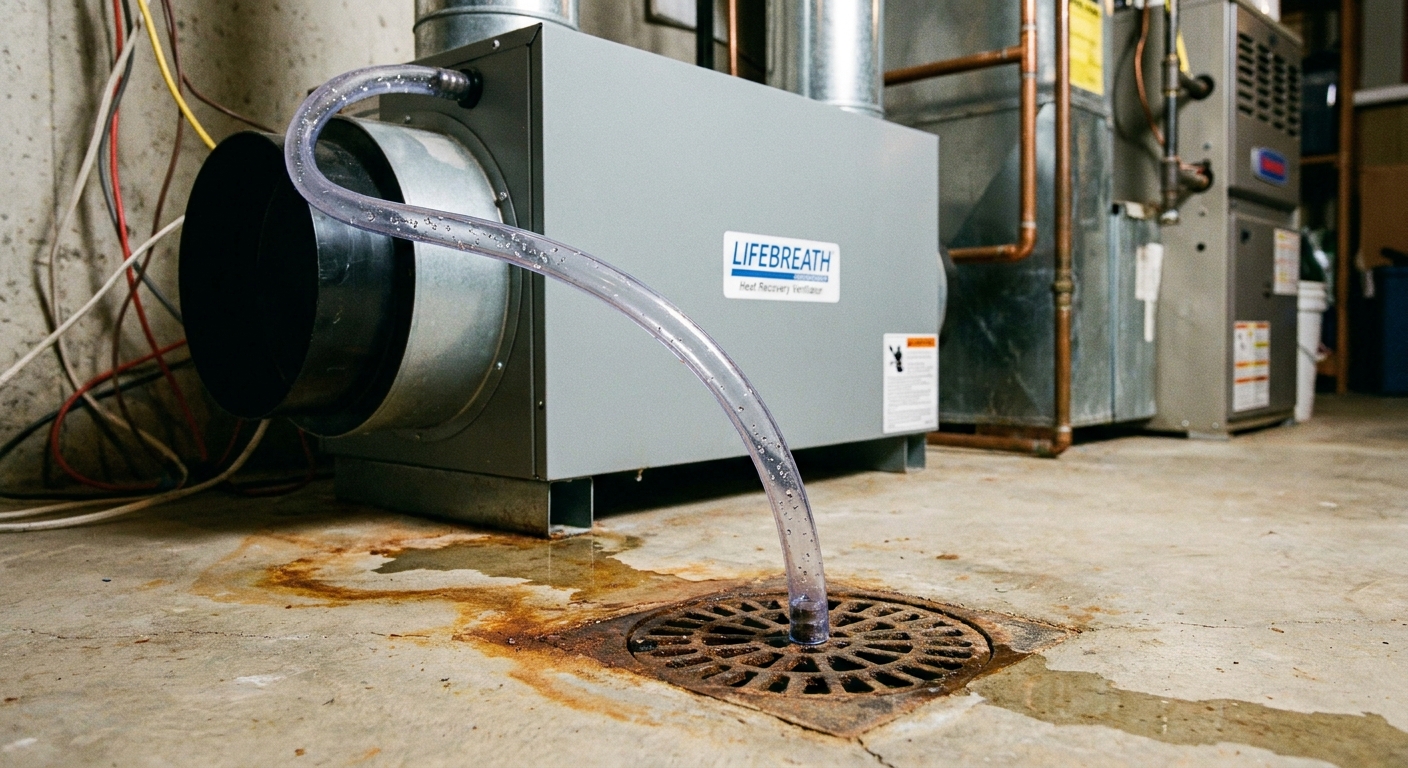
Step 4: Frost and drainage
In cold climates, light frost that clears during defrost cycles can be normal. What is not normal is ice buildup that keeps growing, airflow that stays restricted, or water overflowing where it should not.
How frost control works
- Defrost cycle: the unit periodically reduces or stops intake air to let the core warm up.
- Recirculation defrost: some units use indoor air briefly to thaw the core.
- Preheater: a small electric heater warms incoming air in very cold weather (not on every unit).
If frost is building fast, your defrost settings might be wrong for your climate, the temperature sensor might be off, or airflow might be too low due to dirty filters or a blocked hood.
What to check first
- Confirm defrost is enabled at the wall control or on the unit dip switches, depending on model.
- Look for a clogged drain line or dry trap. Meltwater has to go somewhere.
- Verify the unit is level so condensate flows to the drain pan outlet.
- Check the condensate hose for sags, kinks, or freezing where it runs through a cold space.
If you see ice and standing water inside the unit, shut it down, thaw it carefully (room temperature air is safest), and fix the airflow and drainage cause before restarting.
Step 5: Pressure imbalance basics
Your HRV/ERV has two fans: one bringing fresh air in, one exhausting stale air out. Ideally, those airflows are close to equal. When they are not, you get pressure problems.
Signs you’re imbalanced
- Negative pressure (too much exhaust): outside air sneaks in through every crack, doors are harder to open, and you can get smoke smell or backdraft risk with atmospherically vented appliances.
- Positive pressure (too much supply): warm moist air can get pushed into wall cavities in winter, which is not where you want condensation.
Common causes you can actually fix
- Dirty filter on one side (supply or exhaust) more than the other
- One duct run partially blocked or disconnected
- Damper set wrong after service or after someone “tuned” it by feel
- Fan speed changed on one side only (some units have separate adjustments)
Reality check: Proper balancing is done with airflow meters, not a hand in front of a grille. You can catch obvious issues DIY, but for a true balance, an HVAC tech with the right tools is worth it.
Step 6: Dampers and balancing
Dampers are basically little doors in the ductwork. They help set how much air goes down each path. In tight homes, a small damper change can make a noticeable comfort difference.
What you might have
- Balancing dampers on the supply and exhaust trunks near the unit
- Branch dampers feeding specific rooms
- Backdraft dampers at exterior hoods to prevent wind from pushing air the wrong way
Safe DIY checks
- Make sure all dampers that should be open are actually open.
- Look for a damper handle that slipped or got bumped during other work.
- Confirm bathroom and range hood fans are not running 24/7 and overpowering the HRV/ERV plan.
Thrifty homeowner tip: If your HRV/ERV is tied into your forced-air system, a dirty furnace filter can reduce the “mixing” effect and make rooms feel stale even if the HRV/ERV is working.
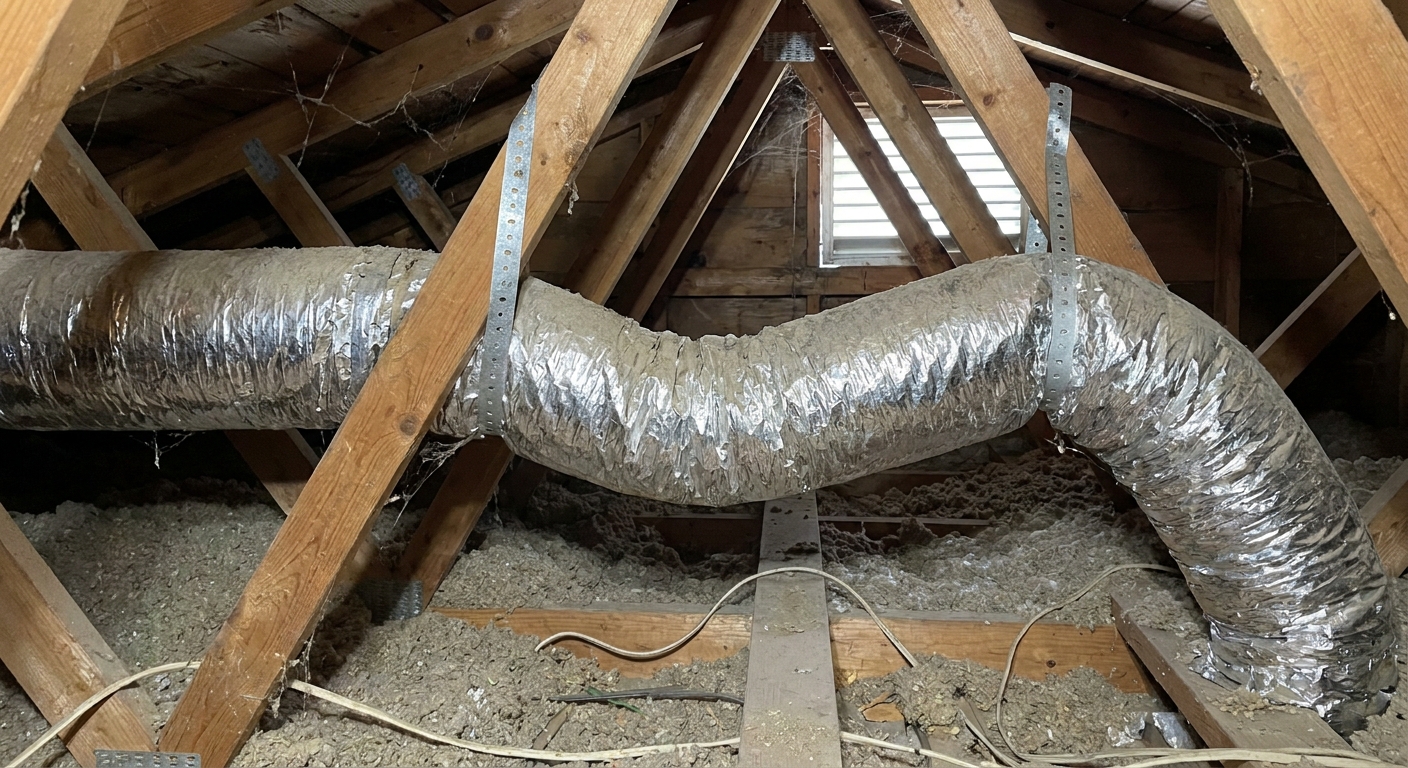
Step 7: Duct issues in tight homes
In a tight house, small duct mistakes show up as big comfort problems. Here are the repeat offenders I see in real homes.
1) Intake and exhaust swapped
This sounds ridiculous, but it happens after renovations or exterior siding work. If the unit is sucking from the “exhaust” hood and exhausting from the “intake” hood, you can end up pulling in stale air from the wrong location.
2) Short-circuiting outdoors
If intake and exhaust hoods are too close together, the unit can pull its own exhaust back in. The home feels stale even though the fans are running.
3) Uninsulated ducts in cold spaces
Fresh air ducts running through an attic, garage, or vented crawlspace should be insulated and sealed. Otherwise you get condensation, frost, and big heat loss.
4) Loose connections and tape failures
Foil tape dries out, flex duct slips, and clamps get loose. A small leak can turn into a large airflow loss because the system runs continuously.
Quick symptom guide
- Stale air everywhere: unit off or in the wrong mode, clogged filters, dirty core, blocked outdoor intake, very low fan speed, clogged hood screen.
- Stale air in one room: closed or crushed branch duct, damper closed, supply grille blocked by furniture, disconnected run.
- Doors pull shut or smoke smells: exhaust higher than supply, blocked supply side, strong bath or range fans running a lot. Treat any combustion spillage as a safety issue.
- Frost or ice in winter: defrost disabled, airflow too low, intake hood blocked with snow, drain line clogged or frozen, unit not level. Light frost that clears in defrost can be normal.
- Musty smell from the unit: damp filters reinstalled, standing water in drain pan, dirty core, high indoor humidity issue upstream.
When to call a pro
If you have cleaned filters, checked hoods, confirmed frost control, and you still have problems, it is time for measured troubleshooting.
- Ask for an HRV/ERV airflow balance (supply vs exhaust CFM).
- Ask them to confirm static pressure is within the unit’s range (high pressure can mean duct issues).
- Ask them to verify defrost strategy is appropriate for your climate and that sensors are reading correctly.
- If your unit is integrated with forced air, ask how it is interlocked with the HVAC blower and whether that setup matches the manufacturer’s guidance.
The goal is simple: consistent fresh air without pressure issues or winter icing.
The 30-Second Cheat Sheet
Essential takeaways for: HRV or ERV Stale Air, Imbalance, or Frost? What to Check First
What to check first (in order)
- Power and mode: Confirm the unit is actually running (wall control mode, timers, interlocks, and that the outlet or breaker has not tripped).
- Filters and screens: Pull the supply and exhaust filters (typically two, sometimes more stages). Vacuum and wash if washable, or replace if pleated. Let washable filters dry fully.
- Core condition: Slide out the HRV heat-exchange core or ERV enthalpy core. Vacuum gently. Only rinse if your manual says it is washable. Avoid detergents or bleach unless the manufacturer specifically allows it.
- Outdoor hoods: Clear leaves, lint, spider webs, snow, and packed screens. Make sure the backdraft damper is not stuck. Do not add extra-fine screen mesh unless the manufacturer recommends it, since it can clog quickly.
- Condensate drain: Confirm the drain line is open, not kinked, and not frozen. Make sure the unit sits level so water reaches the drain pan outlet.
- Frost control: Verify defrost mode is enabled. Fast frost buildup is often low airflow (dirty filters) or a blocked intake.
- Imbalance clues: Doors pulling shut, smoky odors, or whistling can mean too much exhaust. Condensation risk in winter can mean too much supply.
- Dampers: Check that balancing dampers near the unit were not bumped closed and that branch ducts are not crushed or disconnected.
Core vs. HEPA (keep expectations realistic)
- The core transfers heat (and moisture on an ERV). It is not a HEPA air cleaner.
- HRV/ERV filters protect the unit and help airflow. They are usually not “true HEPA.”
When to call a pro
- You have cleaned everything and still have stale air, icing, or pressure issues.
- Ask for a measured balance (supply CFM vs exhaust CFM) and confirmation that defrost settings match your climate.
Simple maintenance cadence
- Filters: check every 1 to 3 months (more often with pets, renovations, wildfire smoke, or heavy pollen).
- Hoods: check seasonally and after big storms.
- Core and drain: check 1 to 2 times per year, or per the manual.
💡 Tip: Scroll up to read the full article for detailed, step-by-step instructions.
⬆️ Back to topAbout Marcus Vance
Content Creator @ Grit & Home
Marcus Vance is a lifelong DIY enthusiast and self-taught home renovator who has spent the last decade transforming a dilapidated 1970s ranch into his family's dream home. He specializes in budget-friendly carpentry, room-by-room renovations, and demystifying power tools for beginners. Through his writing, Marcus shares practical tutorials and hard-learned lessons to help homeowners tackle their own projects with confidence.