Start here: 60-second diagnostic flow
When an ice maker quits, it usually comes down to water not getting in or the ice maker not cycling. There are a few other common curveballs (reset button, door switch, low pressure), but this quick flow will catch the big stuff fast before you start taking things apart.
Quick flow (follow in order)
- Step 1: Is the ice maker turned ON (switch) and is the shutoff arm down or the optical sensor unblocked?
- If no, turn it on or clear the sensor and wait 2 to 4 hours.
- If yes, keep going.
- Step 2: Try the Test/Reset button (if your model has one).
- Many modern ice makers (LG, Samsung, Whirlpool and others) have a small test or reset button on the ice maker head. Press and hold per your manual (often 3 to 10 seconds) to force a harvest and fill cycle.
- If it runs a test cycle, you just learned the motor and module can at least wake up. Then focus on water supply issues (Step 4) and freezing/jams (Step 3).
- If nothing happens, still continue the flow, but put “ice maker module or power issue” on your shortlist.
- Step 3: Is the ice bin empty, but you hear the ice maker trying to run (clicks, hums), or do you see ice stuck in the mold?
- Some models are quiet, so if you cannot tell either way, just move to Step 4.
- If you see stuck cubes, go to Fix #5 (jammed arm or ice stuck in the mold).
- Step 4: Check water supply basics.
- If you have a water dispenser, is it slow or dead? If yes, suspect the filter (Fix #3) or inlet valve (Fix #2), or low supply pressure (see note in Fix #2).
- If your fridge does not have a dispenser, skip the dispenser test and go straight to: is the shutoff valve fully open, is the line kinked, and is the inlet valve getting water (Fix #2).
- If the dispenser works fine but the ice maker does not, suspect a frozen fill tube (Fix #1) or the ice maker itself.
- Step 5: Is the freezer cold enough? Aim for 0°F to 5°F.
- If it is warmer than 10°F, fix temperature first (see Fix #4).
Safety note: Any time you remove panels or unplug water lines, unplug the refrigerator first and keep a towel nearby. Water finds the one spot you did not cover.
Tools and supplies (keep it simple)
- Flashlight
- Phillips screwdriver or 1/4-inch nut driver (most common)
- Towels and a small bowl
- Hair dryer on low or a cup of warm water (for thawing)
- Optional: thermometer for the freezer, multimeter for advanced checks
Fix #1: Thaw a frozen fill tube
If water cannot reach the ice maker, it cannot make ice. A frozen fill tube is one of the most common and most DIY-friendly fixes.
How to tell
- The ice bin is empty.
- The water dispenser may still work.
- You see a small tube (usually rubber or plastic) entering above or behind the ice maker, and it feels rock solid with ice.
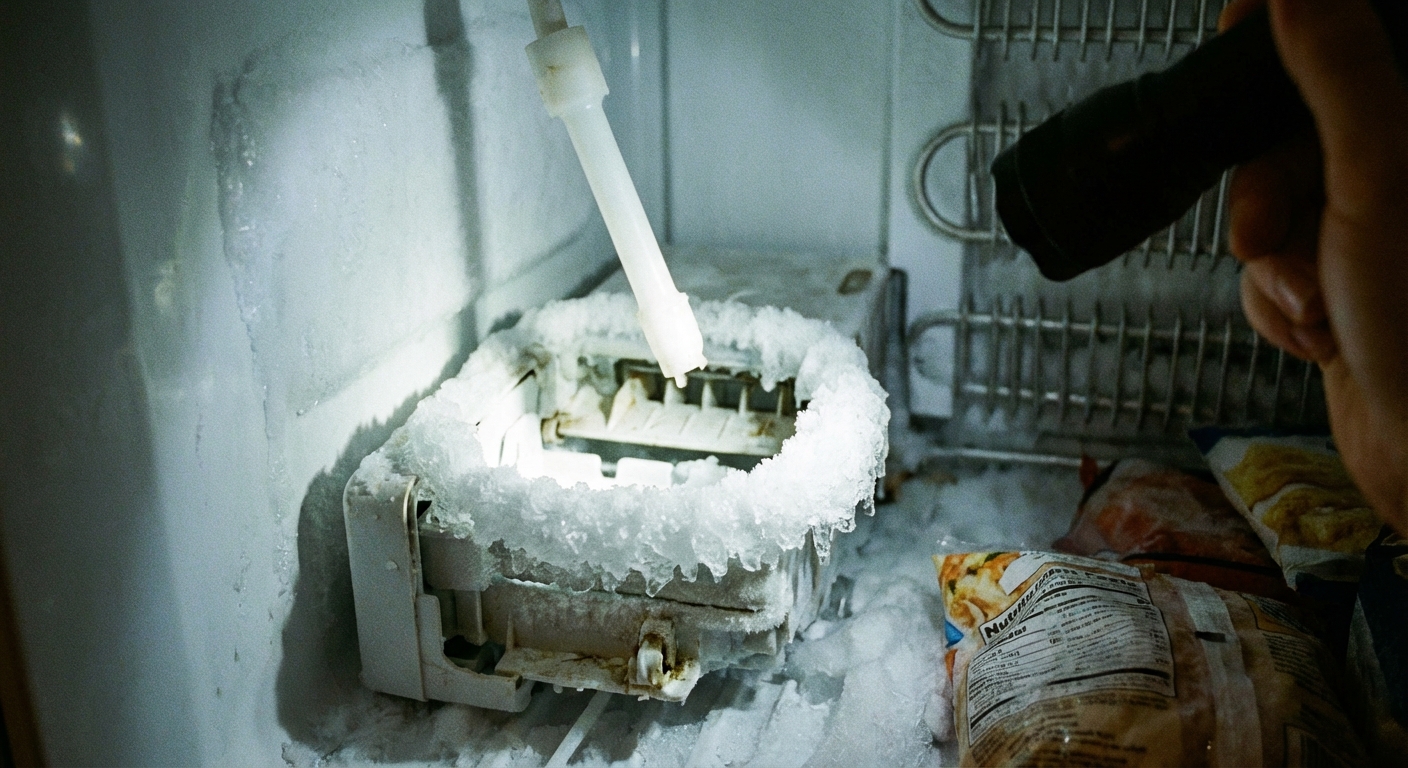
What to do
- Unplug the fridge.
- Pull out the ice bin and look for the fill tube above or behind the ice maker.
- Thaw gently: use a hair dryer on low, moving constantly, or hold a warm (not boiling) damp cloth against the tube area.
- Once thawed, wipe up water and restore power.
Why it froze (so it does not happen again)
- Weak water flow from a clogged filter can cause a slow dribble that freezes (see Fix #3).
- Inlet valve seeping can let tiny amounts of water freeze in the tube between cycles (see Fix #2).
- Very cold settings can contribute too, especially when combined with low flow or a seeping valve (see Fix #4).
Fix #2: Check the water inlet valve (no water, low water, or leaking)
The inlet valve is the electric valve on the back of the fridge that opens to send water to the ice maker and dispenser. When it fails, you can get no ice, tiny hollow cubes, or a frozen fill tube that keeps coming back.
Signs it is the culprit
- Water dispenser is slow or not working (often points to valve or filter).
- Ice cubes are very small, hollow, or fused into a sheet.
- Fill tube freezes repeatedly after you thaw it.
- You see dripping, mineral buildup, or dampness near the back lower area of the fridge.
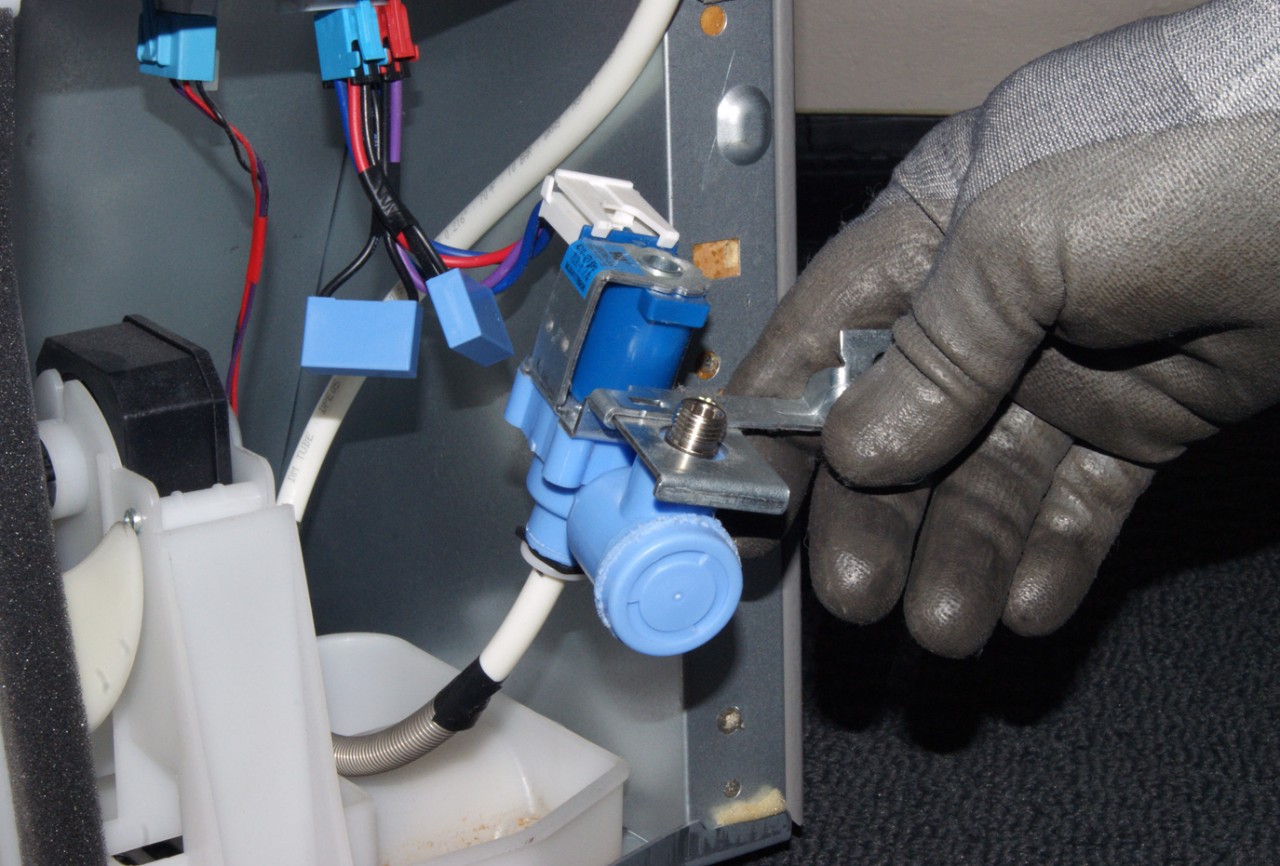
What you can do without getting too deep
- Confirm the shutoff valve is fully open at the wall or under the sink.
- Inspect the supply line for kinks or crushing behind the fridge.
- Pressure and saddle valve note: Low house water pressure, or a self-piercing saddle valve that is partially clogged, can starve the ice maker. If your shutoff is a tiny saddle valve, consider replacing it with a proper shutoff, or have a plumber do it.
- If you are comfortable: unplug the fridge, remove the lower rear access panel, and check for obvious leaks or a loose electrical connector on the valve.
Repair reality check
A bad inlet valve is usually a replace situation, not a clean-and-go fix. If you have basic DIY confidence, it is very doable. If not, this is a fair spot to call an appliance tech, especially if you have a tight installation space or a brittle water line.
Fix #3: Replace a clogged water filter
I am thrifty, so I used to push filters way past their “replace by” date. That was fine until it was not. A clogged filter can starve the ice maker of water, which leads to slow fills, small cubes, or no ice.
Quick tests
- If your water dispenser is slower than it used to be, suspect the filter.
- If the fridge has a filter warning light, treat it as a strong hint, not a suggestion.
What to do
- Locate the filter (inside the fridge, inside the base grille, or in-line behind the fridge depending on model).
- Replace it with the correct part number for your refrigerator.
- Flush the line: many manufacturers recommend flushing about 2 to 4 gallons (or a few minutes of flow). Check your manual for the exact amount, then discard that water to clear carbon fines and air.
- Give it time: first batch is often 2 to 4 hours, a full bin is usually 24 hours.
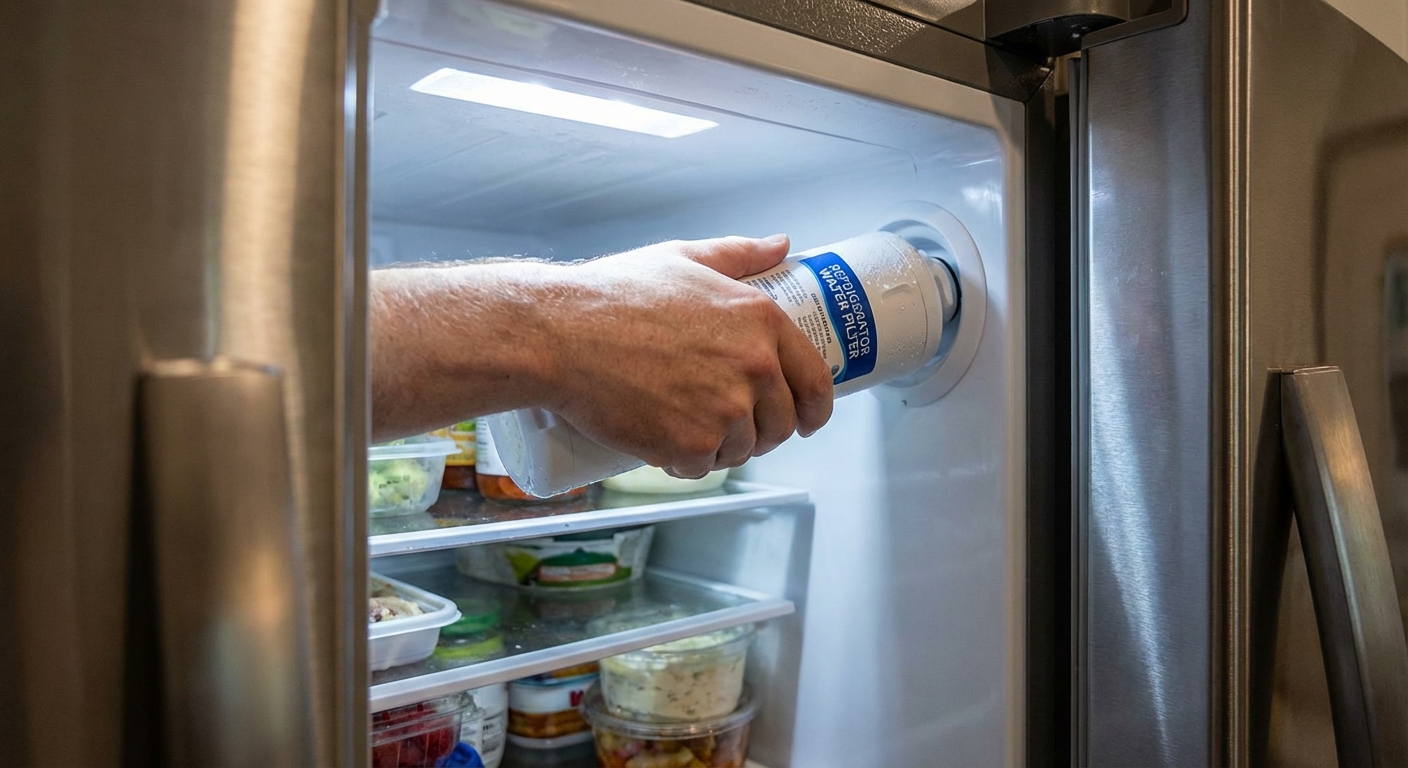
Tip: If you just replaced the filter and ice stopped right after, re-seat it. A filter that is not fully clicked or twisted into place can block flow.
Fix #4: Set the right freezer temp (and airflow)
Ice makers are picky about temperature. Too warm and the mold will not freeze. Very cold settings can contribute to freezing headaches, especially combined with low water flow or a valve that seeps. The sweet spot for most homes is 0°F to 5°F.
What to check
- Actual temperature: Put a thermometer in the freezer and leave it at least 30 minutes without opening the door (longer is even better for a stable reading).
- Air vents: Make sure food packages are not blocking vents near the back wall.
- Door seal: Look for gaps, torn gasket sections, or frost buildup that hints at warm air leaks.
What to do
- Adjust the freezer setting gradually. Big swings make it harder to diagnose.
- Give it 24 hours to stabilize before judging results.
If your freezer cannot hold temp, that is a bigger refrigerator cooling issue. In that case, fix the cooling problem first or the ice maker will keep losing the battle.
Fix #5: Unjam the shutoff arm or stuck harvest
Most ice makers stop making ice when the bin is “full” by lifting a shutoff arm, or when an optical sensor sees ice in the way. If that arm is stuck up, or cubes are wedged in the mechanism, the ice maker can look dead even though it is fine.
What to look for
- A wire or plastic shutoff arm stuck in the up position.
- Ice clumps holding the arm up.
- Cubes frozen together in the bin, especially if the freezer temp swings or the door was left cracked.
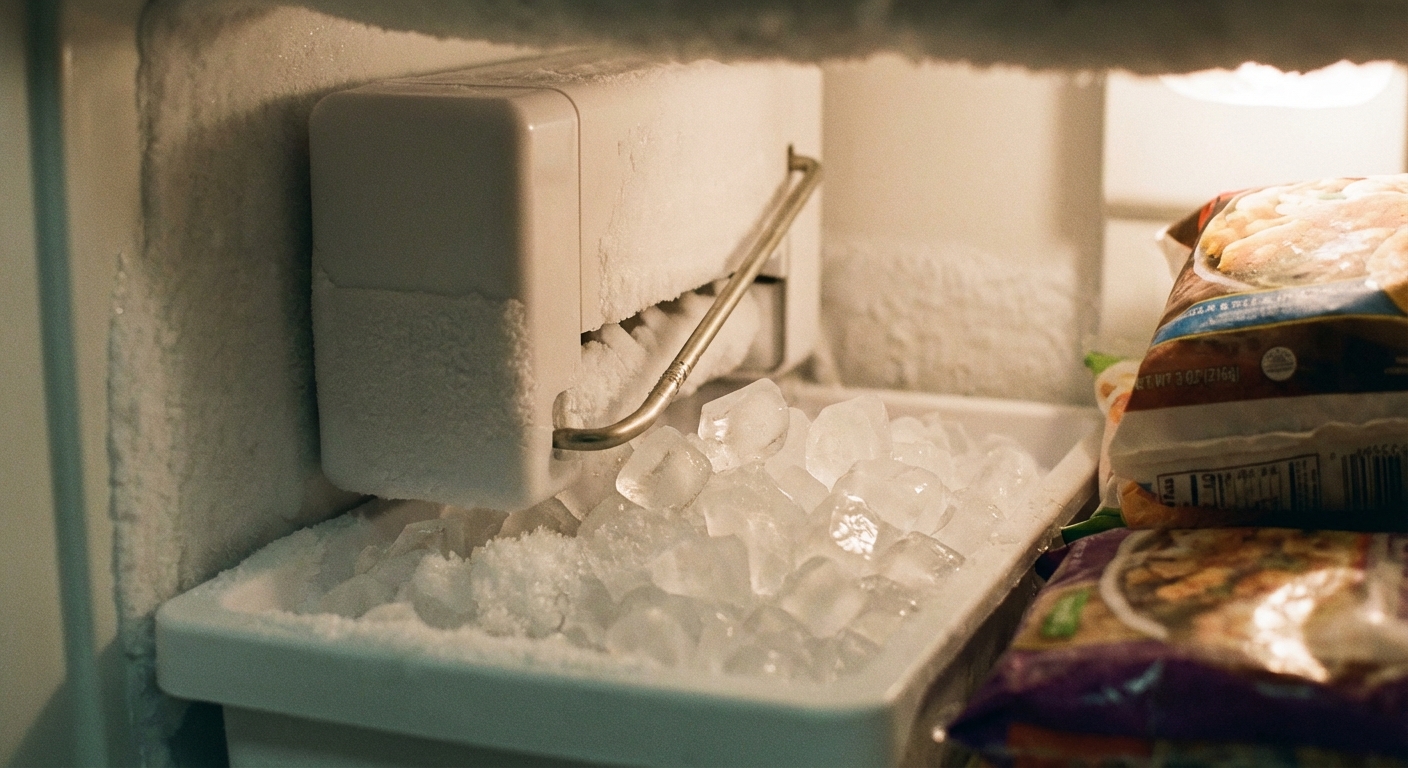
What to do
- Pull out the ice bin and break up clumps in the sink.
- Make sure the shutoff arm moves freely and rests down when the bin is empty.
- If cubes are stuck in the ice maker mold itself, thaw gently with a hair dryer on low, then dry the area.
My hard-learned lesson: Do not chip ice with a screwdriver. It is a fast way to puncture a plastic mold or crack a liner, and then you have a bigger problem than “no ice.”
Fix #6: Reset or replace the ice maker
If your water supply checks out, the freezer is cold, and the ice maker still will not cycle, the ice maker assembly itself may be the issue. The good news is that on many refrigerators, the whole ice maker unit is a simple plug-and-play replacement (a few screws and a wiring connector).
What to try first
- Run the Test/Reset again after you fix water flow or thaw a fill tube. A lot of ice makers behave better after a clean start.
- Power cycle the fridge: unplug for 1 minute, plug back in, then wait for the ice maker to re-home (varies by model).
If you replace it
- Use your model number to buy the correct ice maker assembly.
- Unplug the fridge, remove the ice bin, remove mounting screws, unplug the harness, then install the new one in reverse.
- Plan on 2 to 4 hours for first ice and 24 hours to refill the bin.
Fast symptom checker
If you do not want the full flow, match your symptom to the most likely fix:
- No ice, water dispenser works: Fix #1 (frozen fill tube), Fix #5 (jammed mechanism), or Fix #6 (reset/ice maker).
- No ice, water dispenser also slow or dead: Fix #3 (filter) then Fix #2 (inlet valve or supply pressure).
- Small or hollow cubes: Fix #3 (filter) or Fix #2 (inlet valve or low pressure).
- Ice clumps, bin is a brick: Fix #4 (temperature swings) and Fix #5 (clear bin and check arm).
- Fill tube keeps freezing again: Fix #2 (inlet valve seep) and Fix #3 (filter), plus double-check Fix #4.
- Test/Reset does nothing: Check that the unit is ON, confirm freezer temp, then consider Fix #6 or service.
When to stop DIY and call for service
I love a good DIY win, but here are the lines I use at my own house:
- You see active leaking behind the fridge and cannot shut it down quickly.
- The freezer cannot maintain temperature (likely a cooling system problem).
- You test basics and the ice maker still will not cycle, especially on units with integrated control boards.
- You smell burning or see damaged wiring, connectors, or scorch marks.
- Your symptoms point to a door switch issue (lights do not behave normally, dispenser acts odd, or the ice maker seems to “think” the door is open) and you are not comfortable testing it.
If you do call a tech, tell them what you already checked: freezer temp, filter age, dispenser flow (if you have one), whether the fill tube froze, whether Test/Reset did anything, and whether the shutoff arm is down. That short list can save you time and diagnostic fees.
FAQ
How long should it take an ice maker to start making ice again?
After a fix, most ice makers need 2 to 4 hours to produce the first batch, and about 24 hours to fill the bin. If you just replaced a filter or restored temperature, give it time.
Can a clogged filter stop only the ice maker but not the dispenser?
Sometimes, yes. Depending on the refrigerator’s plumbing and pressure, the dispenser may still trickle while the ice maker does not get enough flow to complete a fill properly.
What freezer temperature is best for ice production?
Most manufacturers target 0°F. Anywhere in the 0°F to 5°F range is usually solid for consistent ice.
Where is the ice maker Test/Reset button?
It is usually on the ice maker head (side or front), sometimes behind a small cover. Not every model has one, so use your manual or model number to look up the procedure.
About Marcus Vance
Content Creator @ Grit & Home
Marcus Vance is a lifelong DIY enthusiast and self-taught home renovator who has spent the last decade transforming a dilapidated 1970s ranch into his family's dream home. He specializes in budget-friendly carpentry, room-by-room renovations, and demystifying power tools for beginners. Through his writing, Marcus shares practical tutorials and hard-learned lessons to help homeowners tackle their own projects with confidence.