If your fridge is happily making ice but the dispenser won’t spit out a single cube, you are not alone. This problem often feels like an ice maker failure, but most of the time it is not. The ice maker is doing its job. The issue is usually somewhere in the dispenser path inside the freezer door or the ice bucket.
Below is the exact order I’d troubleshoot in my own kitchen, starting with the free checks and ending with the parts that commonly fail.
Quick safety and setup
- Unplug the fridge or switch off the breaker before removing panels or touching wiring.
- Have a towel ready. Ice bins like to dump a surprise handful of cubes.
- Tools you may want nearby: flashlight, towel, hair dryer (low setting), and a multimeter (optional).
- Know your dispenser type: mechanical lever (push paddle) or electronic switch (push pad or touch panel). The troubleshooting is similar, but the failure points differ a bit.
Step 1: Check for a simple lockout
I know this sounds too basic, but it is the fastest win. Many fridges have a dispenser lock that turns on accidentally during cleaning or from curious little hands. Also, some models have an Ice Off setting that disables the dispenser.
What to check
- Control lock light on the display (often labeled “Lock,” “Control Lock,” or a padlock icon).
- Hold the lock button for 3 to 5 seconds to toggle it off.
- Ice Off or Ice Maker Off indicator on the panel. Turn it back on if needed.
- If you have a touch panel, wipe it dry. Wet fingers and condensation can make controls act strange.
If the panel looks glitchy after a power flicker, jump down to the reset section near the end.
Step 2: Check freezer temperature
Dispensers get cranky when temperatures are way off. If the freezer is too warm, ice melts and refreezes into clumps. If it is set extremely cold, you can get more freezing issues inside the door (especially on water lines and chutes).
Quick target
- Aim for about 0°F / -18°C in the freezer.
- If you are regularly above 10°F / -12°C, expect clumping and jams to come back until the cooling issue is fixed.
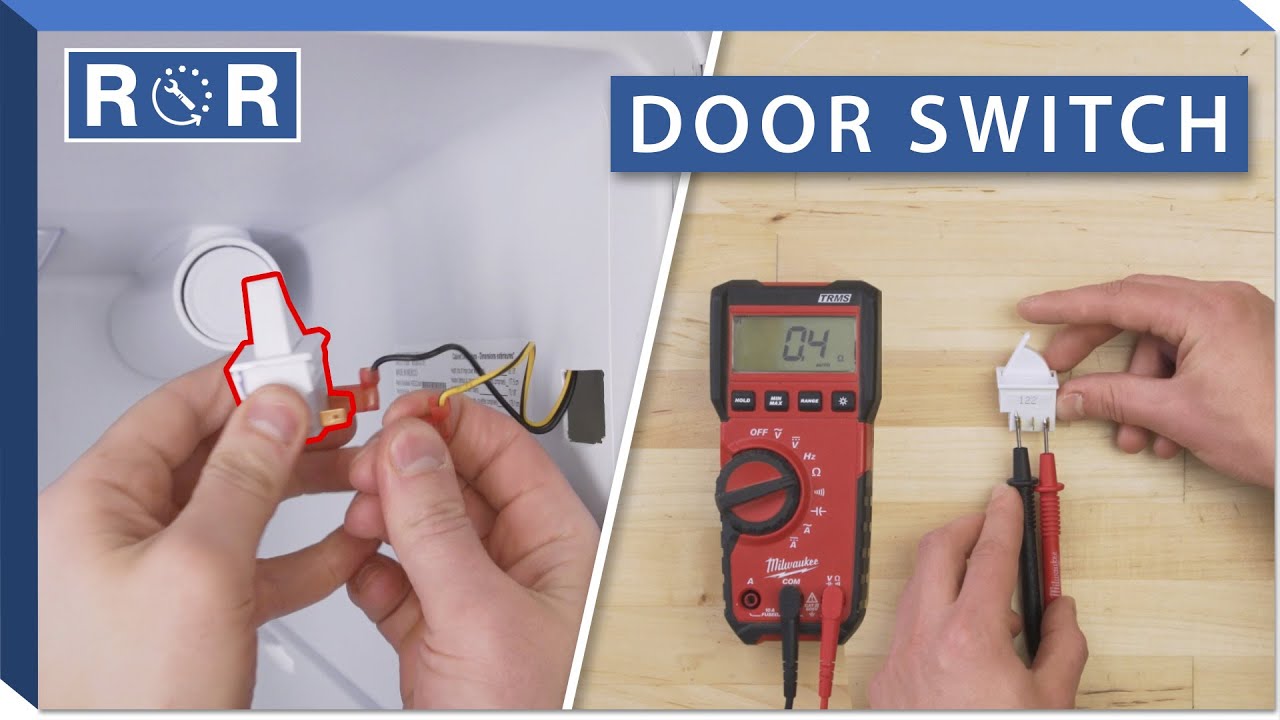
Step 3: Confirm the door switch
The dispenser will not run if the fridge thinks the door is open. That is a safety feature so it doesn’t fire ice across the kitchen.
Quick test
- Open the freezer door and locate the door switch on the frame.
- Press and hold it closed with your finger and try the dispenser.
What the result tells you
- If it dispenses while you hold the switch, the door is likely not closing firmly, or the switch is worn.
- If nothing changes, keep going. The problem is likely in the ice bin, auger system, chute, or a dispenser electrical issue.
Step 4: Listen for sounds
When you press the dispenser, you should typically hear something happen. That sound is your best clue.
- Humming or grinding from the ice bin area: the auger motor is trying to turn, which usually points to a jam or frozen clump.
- Click or whir at the door but no ice: the chute flap actuator (often a solenoid, sometimes a small motor, depending on model) may be moving, but ice is blocked or the auger is not pushing.
- Dead silence: could be lockout, door switch, a failed dispenser switch/UI, broken wiring in the door hinge, or no power to the dispenser circuit.
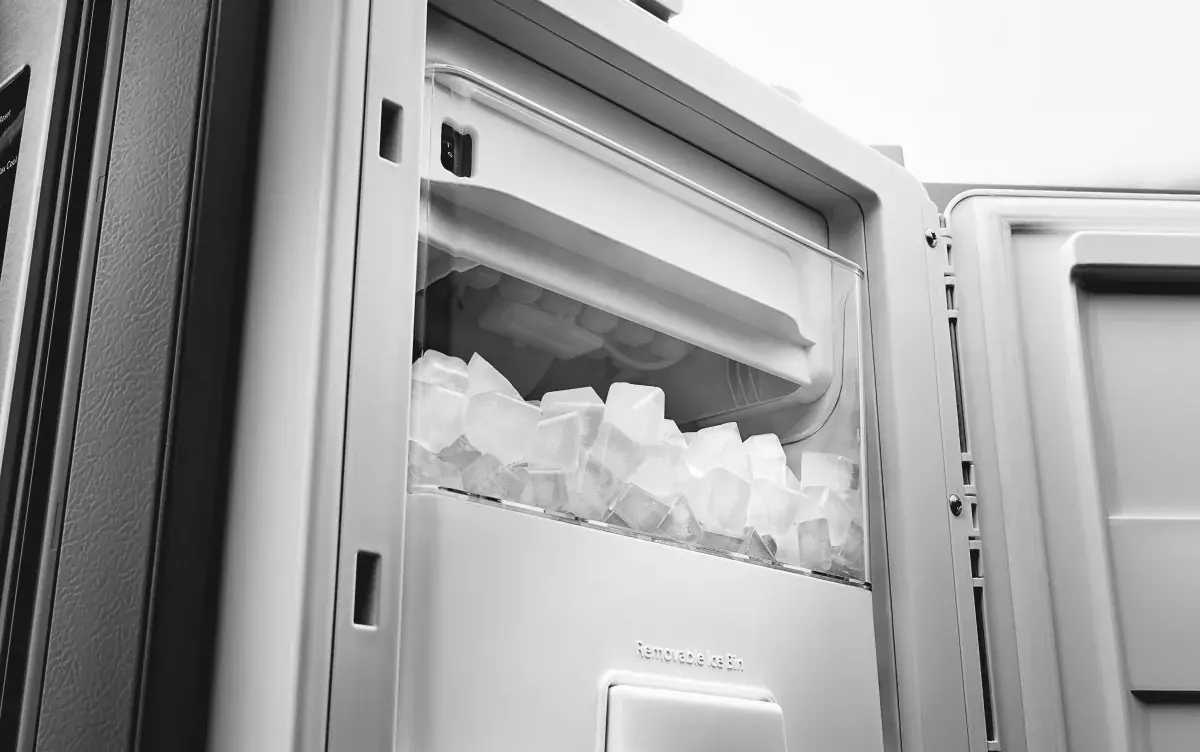
Step 5: Pull the ice bucket
This is the most common real-world cause I see: ice cubes partially melt, then refreeze into one big chunk that the auger cannot push through. It happens after a door gets left ajar, after a freezer defrost cycle, or when the ice bin sits for weeks.
What to do
- Remove the ice bin/bucket.
- Dump the ice into a sink and check for one solid mass or slushy pieces.
- Wash the bucket with warm water, then dry it completely.
- Check the auger helix inside the bucket (the spiral). Make sure it spins freely by hand if your model allows it.
- Reinstall the bucket firmly. Some models will not dispense if the bin is not fully seated, or if a bin-removed sensor is not satisfied.
Thrifty tip
If you find a frozen block, the fix might be as simple as emptying the bin, drying it, and letting the freezer recover to the right temperature. You do not want to start buying parts until you rule this out.
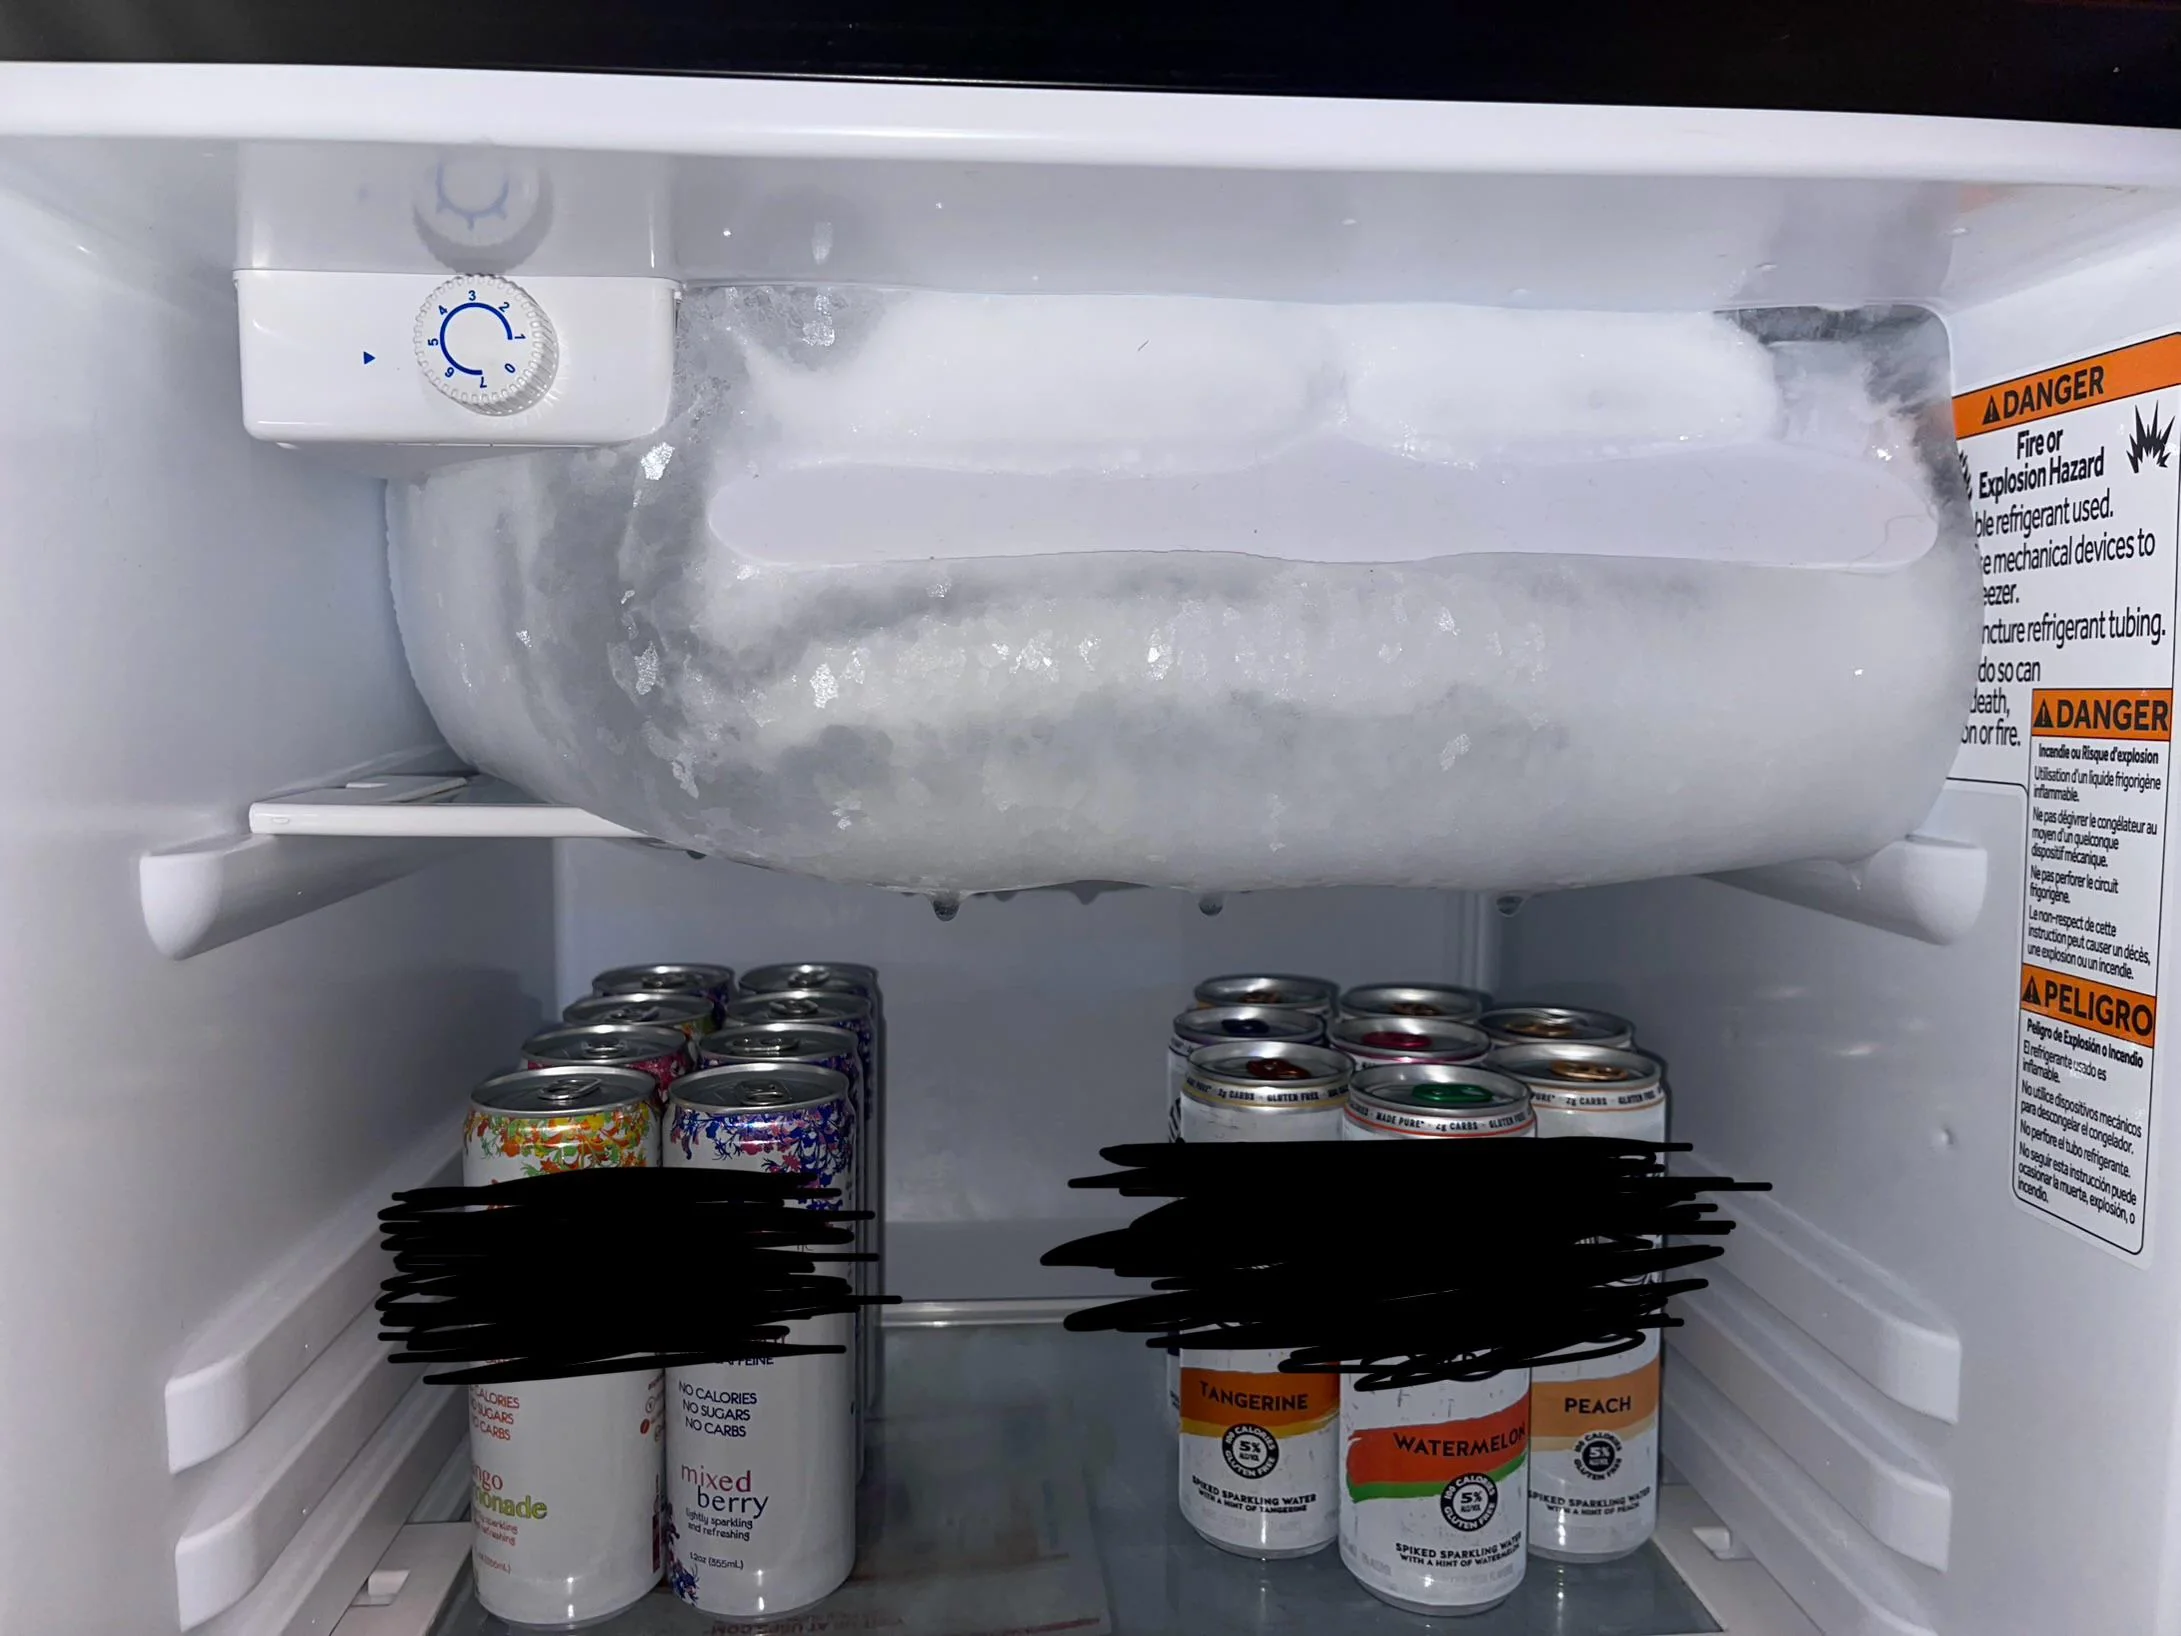
Step 6: Check the chute for a plug
The chute is the little tunnel in the freezer door where ice drops out. If the chute door does not seal well, warm kitchen air sneaks in and causes frost buildup. Eventually it creates an ice plug that blocks cubes.
How to check
- Look up into the chute from the outside dispenser opening using a flashlight.
- If you see frost, packed snow, or a solid chunk, you have found your blockage.
How to clear it (safe method)
- Unplug the fridge.
- Use a hair dryer on low for short bursts, holding it a safe distance away to avoid overheating plastics.
- Keep the dryer away from standing water. If possible, plug into a GFCI-protected outlet.
- Wipe melted water as you go so it does not refreeze deeper in the door.
- Do not chip with a screwdriver. It is too easy to puncture plastic or damage a foam-insulated door panel.
If it keeps freezing
- Inspect the little chute flap for cracks, warping, or sticky residue that prevents a tight seal.
- If the flap does not close fully, the usual fix is replacing the dispenser door/flap or the flap actuator (solenoid or motor, depending on model).
Step 7: Cubed vs crushed selector
If your fridge makes ice but only dispenses one mode, or it grinds strangely, the issue may be the crusher mechanism or the cubed/crushed actuator that moves a gate inside the ice bucket.
Symptoms
- Crushed works but cubed will not (or vice versa).
- Ice dispenses intermittently, especially when switching modes.
- Lots of tiny chips but no full cubes, even in cubed mode.
What to try
- Set it to cubed and dispense for 10 seconds.
- Switch to crushed and try again.
- Remove the bucket and inspect for broken plastic tabs, loose gates, or pieces rattling inside.
If you find broken pieces in the ice bucket assembly, replacement is often the most reliable fix. Glue rarely holds up long-term in freezing temps and constant torque.
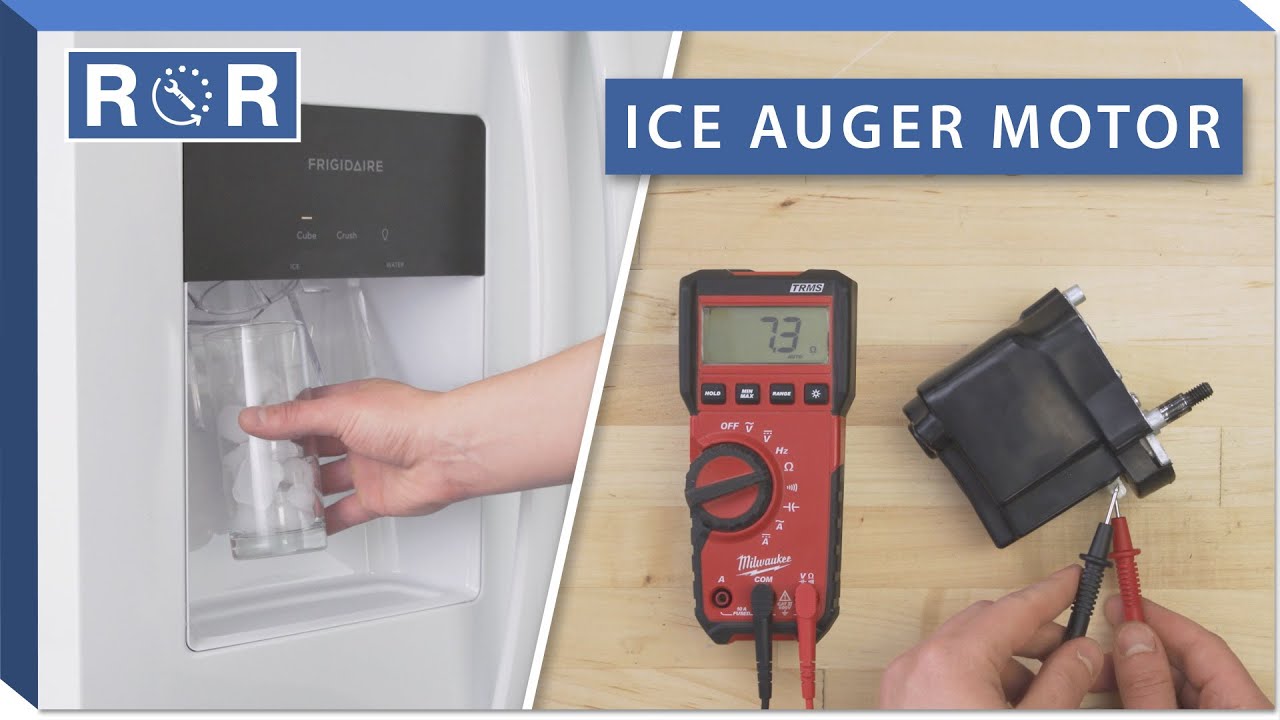
Step 8: Auger motor or coupler
The auger motor turns the spiral that pushes ice forward. If the motor runs but nothing moves, the coupler (the plastic or metal interface between motor and bucket) may be stripped. If you hear nothing and you have ruled out lockouts and door switch issues, the motor itself may be dead.
Simple checks
- With the ice bucket removed, look at the drive fork/coupler in the freezer wall. If it is rounded off or cracked, it cannot grab the bucket auger.
- Reinstall the bucket firmly. Some models need the bucket seated perfectly to engage the drive.
- Reconfirm it is not mechanically bound: if the auger is frozen in place or packed with ice, the motor may hum without turning. Clear the jam first before blaming the motor.
When replacement makes sense
- Replace the coupler if it is visibly stripped, cracked, or wobbly.
- Replace the auger motor if the auger is confirmed free and power is reaching it but it does not run, or it only hums and stops repeatedly.
If you are comfortable with a multimeter, checking for voltage at the auger motor while pressing dispense is the cleanest confirmation. If you are not, a good compromise is to inspect for obvious mechanical damage first and only then consider calling a pro.
Step 9: Switch, UI, or hinge wiring
If you get dead silence when pressing the paddle, and the door switch and lockout are fine, the failure may be in the dispenser switch behind the paddle, the user interface/control board, or (more common than people think) broken wires where the harness passes through the freezer door hinge.
Common signs
- Paddle feels loose or does not “click” like it used to.
- Other dispenser functions are flaky (lights, water, mode buttons).
- Water dispenser works but ice does nothing, or vice versa.
- Dispenser works only when the door is in a certain position (a hinge harness clue).
What to try first
- Power reset (steps below).
- If your model has it, run the built-in dispenser test mode in the service manual.
- Visually inspect the wire bundle at the bottom hinge area for pinched, broken, or rubbing wires (do this with power off). If you see damaged wiring, stop and call a pro unless you are experienced with appliance wiring repair.
Replacing boards can get pricey fast, so I treat this as a late-stage check after you rule out the jam and chute problems that cost nothing to fix.
What about the water line?
Good question, because people see “line to the door” mentioned a lot. If your fridge makes ice, your water supply is reaching the ice maker. But there is a separate water path for the dispenser, and it can freeze in the door.
When to suspect a frozen water line
- Your water dispenser stopped too, not just ice.
- You hear the water valve hum but no water comes out.
- The freezer is set extremely cold and the kitchen is humid.
If only ice dispensing is failing and water still works normally, the water line is probably not your culprit.
Resetting: when it helps
A reset is worth trying when the dispenser stopped after a power outage, a filter change, or a control panel glitch. It will not fix a jammed auger or a frozen chute, but it can bring a confused control board back to life. On some models, dispensing also will not start until the door is fully closed and you hold the paddle for a second or two.
Basic reset
- Unplug the refrigerator (or switch off the breaker) for 5 minutes.
- Plug it back in.
- Wait 1 to 2 minutes, then try the dispenser again.
Hard reset
Some brands have a key combination on the control panel to reset the dispenser or enter diagnostics. Search your model number plus “service manual” and use the exact steps listed. Avoid random button combos from generic videos.
Replace parts or call a pro?
DIY-friendly replacements
- Ice bucket assembly (cracked or broken crusher gate)
- Dispenser chute door/flap
- Auger coupler
- Door switch (if it is clearly failing)
Consider a pro if
- You suspect a control board but are not comfortable testing voltage.
- You suspect broken wiring in the door hinge area.
- The freezer door needs disassembly to access the chute heater or wiring harness.
- You smell burning, see melted connectors, or the motor repeatedly trips a breaker.
My troubleshooting order
- Lockout off, Ice Off is not enabled, correct ice mode selected
- Freezer temp check (aim near 0°F / -18°C)
- Door switch test
- Listen for auger and flap actuator sounds
- Remove ice bucket, clear clumps, dry everything, reseat bucket fully
- Check and thaw frozen dispenser chute
- Inspect crusher gate and bucket parts
- Inspect coupler and auger drive engagement, confirm auger is not bound
- Reset power
- Only then consider switch, motor, hinge wiring, or control board replacement
If you want the fastest win: very often it is a clumped ice bucket or a frozen chute. Start there and you will save yourself a lot of time and parts roulette.
About Marcus Vance
Content Creator @ Grit & Home
Marcus Vance is a lifelong DIY enthusiast and self-taught home renovator who has spent the last decade transforming a dilapidated 1970s ranch into his family's dream home. He specializes in budget-friendly carpentry, room-by-room renovations, and demystifying power tools for beginners. Through his writing, Marcus shares practical tutorials and hard-learned lessons to help homeowners tackle their own projects with confidence.