What back-wall ice usually means
If you are seeing frost or a sheet of ice forming on the interior back wall of the refrigerator compartment (the fresh food side, not the freezer), it is most commonly one of these situations:
- Too much moisture is getting in (door gasket, door alignment, or the door not fully closing).
- Moisture is not being managed correctly (drain, airflow, fan, damper, or defrost-related problems depending on your design).
The good news: most of these checks are beginner-friendly, and you can do a lot before you ever buy a part. I’m thrifty by nature, and I’ve learned the hard way that the cheapest fix is the one you confirm with a simple diagnosis first.
Quick safety and prep
Before you start
- Unplug the fridge if you will remove panels, thaw with a hair dryer, or test parts.
- Protect the floor with towels. Ice problems often turn into water problems.
- Do not chip ice with a knife or screwdriver. One slip can puncture an evaporator line and end the fridge.
Tools that help
- Flashlight
- Phillips screwdriver or nut driver (commonly 1/4 inch)
- Hair dryer (low or medium, keep it moving and a few inches back) or a bowl of hot water (for gentle thawing)
- Small turkey baster or squeeze bottle (for clearing a drain)
- Multimeter (optional but helpful for heater and thermostat checks)
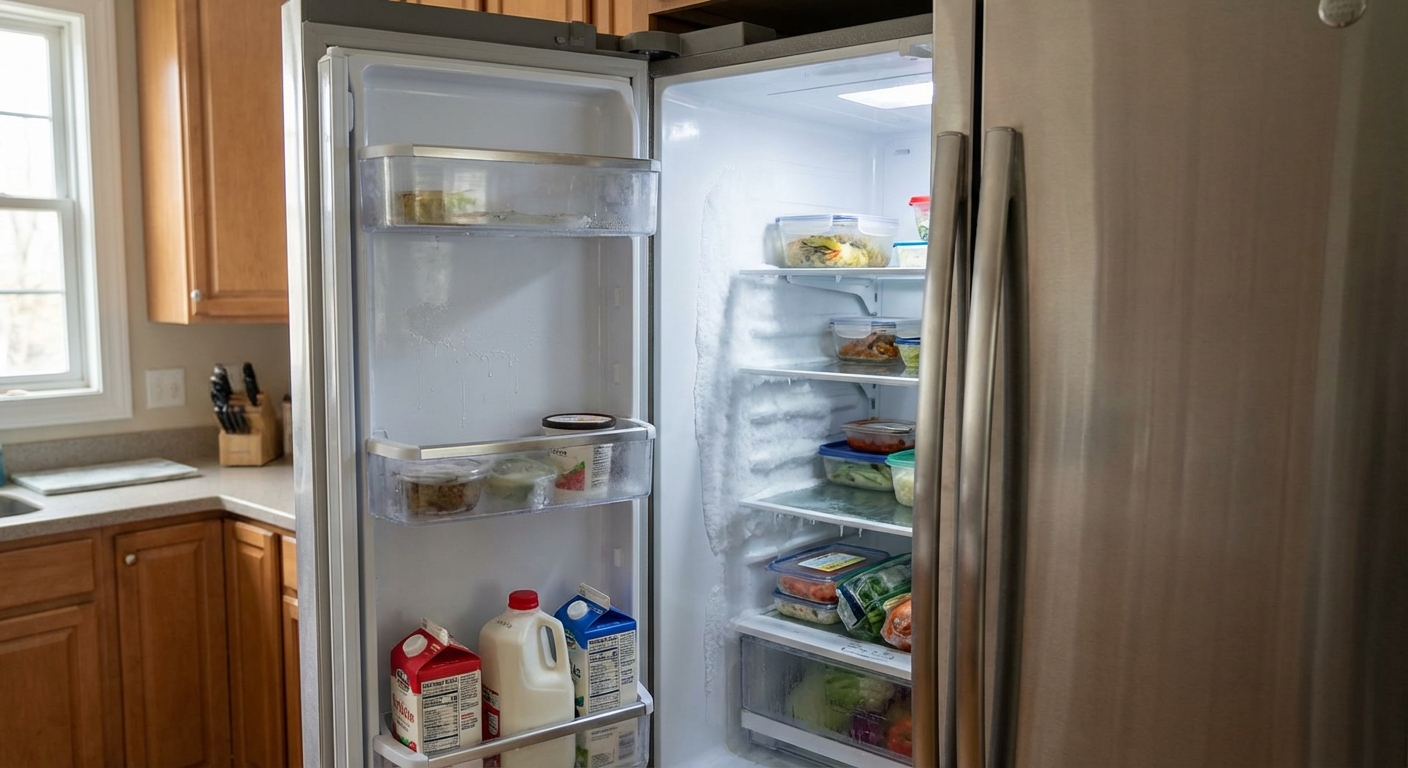
Start here: ice pattern
Different ice patterns point to different causes. Take 30 seconds and observe before you start taking things apart.
Common patterns
- Ice concentrated at the bottom of the back wall or a puddle that keeps returning: often a clogged defrost drain or a drain that is re-freezing.
- A thin sheet of frost across a big area, food near the back freezing: often an airflow issue, a gasket leak, or a damper stuck open sending too much cold air into the fresh-food section.
- Back wall bulging or a warped-looking panel: this can indicate heavy ice behind it from a defrost problem, but it can also happen from an air leak or repeated door-left-ajar events.

Cause #1: Door gasket leak
Warm, humid air sneaking in is a frost machine. Every time that moisture hits cold surfaces near the back wall (especially near air vents), it can condense, freeze, and slowly build up.
How to diagnose
- Dollar-bill test: close the door on a dollar bill. You should feel steady resistance pulling it out. Test all four sides, especially corners.
- Look for telltales: torn gasket, flattened sections, sticky grime, gaps at corners, or the door not sitting flush.
- Check door alignment: if the fridge is not level or the door is sagging, the gasket can look fine and still leak.
- Quick reality check: make sure bins, shelves, or a tall container are not preventing the door from closing all the way.
Fix: clean and reseat
- Clean the gasket with warm soapy water and a microfiber cloth. Grime prevents a tight seal.
- Warm and reshape flattened areas with a hair dryer (low or medium, keep it moving). Then gently massage the gasket back into shape.
- Inspect for gaps and press the gasket into its channel if it is a push-in style.
Fix: level the fridge
- Place a level on a shelf.
- Adjust front leveling legs so the fridge is very slightly higher in the front. That helps doors swing closed instead of drifting open.
Fix: replace the gasket
- Find your model number (usually on a label inside the fridge compartment).
- Order the exact gasket for your model.
- Soak the new gasket in warm water for a few minutes to relax wrinkles.
- Install per your style (screwed under the inner liner or press-in).
- Re-test with the dollar bill around the perimeter.
My mistake to help you avoid: I once tried a “close enough” universal gasket to save a few bucks. It never sealed right in the corners, and I spent more time fighting frost than the gasket was worth. Exact match matters.
Cause #2: Clogged defrost drain
Most frost-free refrigerators melt ice off an evaporator during a defrost cycle. That meltwater is supposed to run into a drain and down to a pan underneath the fridge where it evaporates. If the drain clogs, water backs up, re-freezes, and often shows up as ice on the lower back wall or under drawers.
Design note: on many models, the primary defrost drain is actually accessed from the freezer side behind the evaporator cover. The symptom can still show up in the fridge compartment, but the cleanout steps and access point vary by brand and layout.
Signs this is your issue
- Ice buildup is worst near the bottom of the back wall.
- Water pooling under crisper drawers.
- A recurring ice “slab” that comes back soon after you melt it.
How to clear the drain
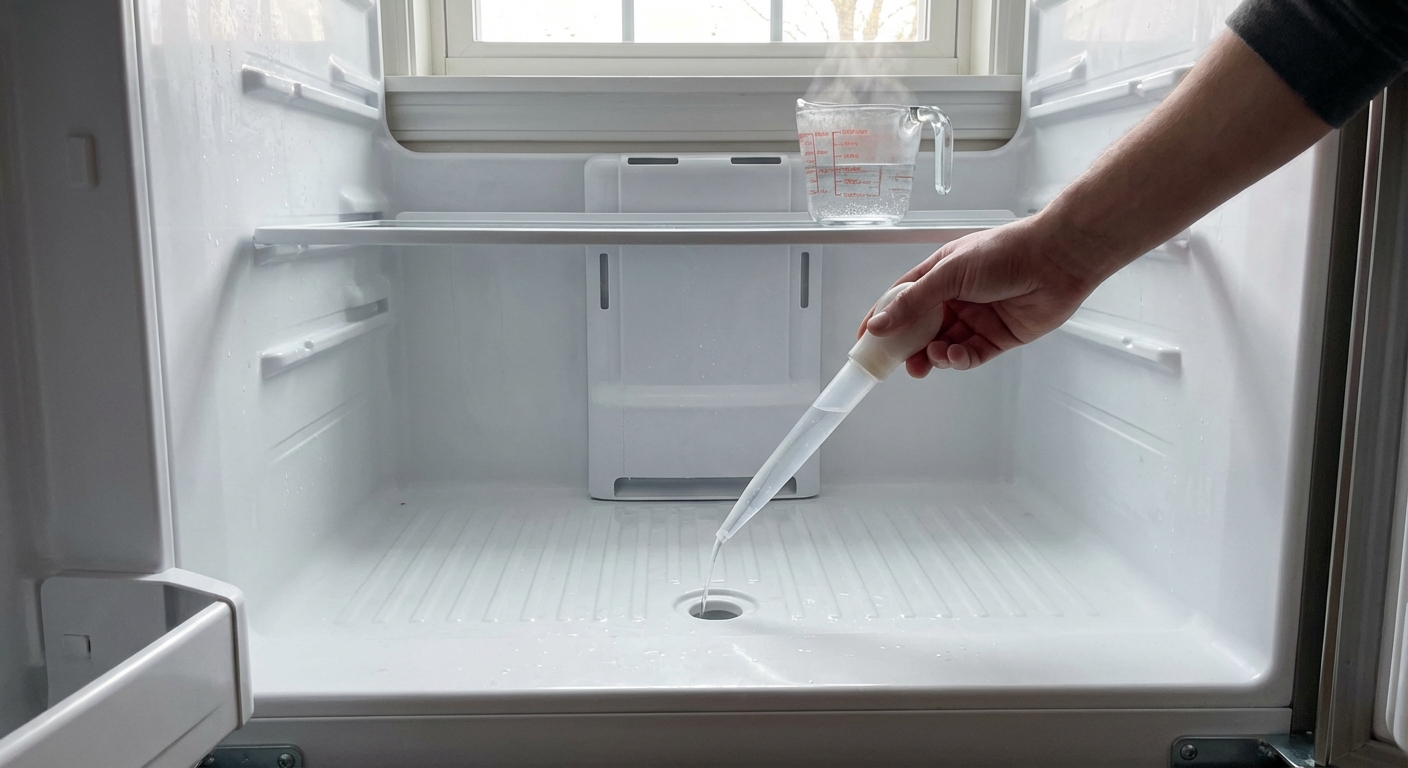
- Unplug the refrigerator.
- Get access: remove drawers and any covers needed to reach the drain trough or hole (fridge side or freezer side depending on the model).
- Melt visible ice gently (hair dryer low or medium, keep it moving) or use towels with hot water. Keep water away from controls and lights.
- Locate the drain opening at the bottom of the evaporator area or rear panel.
- Flush with warm water using a turkey baster or squeeze bottle. Do several cycles until it drains freely.
- Break up stubborn gunk by alternating warm water and gentle suction with the baster.
- Verify flow: you should hear water trickling down. If possible, pull the fridge out and confirm water reaches the drain pan underneath.
If it freezes again
- Some models use a small drain heat probe (a metal clip or wire) that helps keep the drain opening warm. If yours is missing or out of place, the drain can refreeze.
- If the freezer is icing up heavily too, the underlying issue may be a defrost system failure (next section).
Cause #3: Defrost problems
This is the one that scares beginners, but it’s actually straightforward when you take it one step at a time.
Important modern note: many newer refrigerators, especially French-door models, use a dual-evaporator setup. That means the fresh-food compartment can have its own evaporator coil sitting right behind that back panel (and often its own drain path). In those designs, a defrost failure or drain freeze-up in the fridge evaporator can create back-wall ice even if the freezer looks fine.
On single-evaporator designs (very common too), the evaporator is typically in the freezer. When that evaporator ices over, airflow gets weird, temperatures swing, and moisture can end up freezing on the fridge’s back wall.
What the parts do
- Defrost heater: warms the evaporator periodically to melt frost.
- Defrost thermostat (bimetal) or defrost sensor: helps control when the heater runs and when it shuts off.
- Defrost timer (older units) or control board (newer units): schedules or commands defrost cycles.
Symptoms that fit
- Back panel looks swollen or you hear a fan struggling.
- Fridge warms up but the freezer seems “kind of okay,” or vice versa.
- You recently had to crank the temperature colder to keep food safe.
- Ice returns quickly after you fully thaw the unit.
Check airflow first
- Check vents inside the fridge (often at the top back or side back). Make sure food is not blocking them. Leave 1 to 2 inches of breathing room behind items.
- Listen for the evaporator fan (often behind a panel). When the compressor is running, you should typically hear a steady fan sound. If it is silent or grinding, airflow issues can mimic defrost problems.
- Do a full manual thaw reset: unplug the fridge, leave doors open, and let it thaw completely for 24 hours with towels down. If it runs fine briefly and then the ice returns, that often points to a defrost or drain issue, but re-check gasket sealing and door habits too.
Test heater and controls (typical)
Exact access varies by model, but many require removing an interior panel to reach the evaporator coil and heater. Depending on your fridge, that panel may be in the freezer or in the fresh-food compartment (dual-evaporator designs).
- Unplug the fridge.
- Remove shelves and the rear interior panel (keep screws organized).
- Inspect the evaporator area. A solid block of ice is a classic sign of defrost failure.
- Thaw enough to access components (hair dryer low or medium, keep it moving). Do not overheat plastics.
- Test the defrost heater for continuity with a multimeter (with wires disconnected from the heater). No continuity usually means the heater is bad.
- Know what you have before you test it:
- A bimetal defrost thermostat acts like a switch. It is commonly closed when cold (continuity) and open when warm.
- A thermistor is different. It does not simply open and close. Its resistance changes with temperature, and you typically compare readings to the service chart for your model.
If you are not comfortable with a multimeter, you can still do a lot by inspection, full thaw, and checking whether the issue returns quickly. But if you want to avoid guesswork, the meter pays for itself.
Timer or control board
- You test the heater and thermostat or sensor and they seem okay, but the unit still never defrosts.
- Your fridge has a history of intermittent problems that come and go.
Older refrigerators may have a mechanical defrost timer. If it sticks, the fridge can miss defrost cycles. Newer refrigerators typically use an electronic control board, and failures can be harder to confirm without service mode diagnostics for your brand.
A thrifty fix path
- Confirm the evaporator is icing over (inspection behind the appropriate panel).
- Test heater and bimetal thermostat or sensor first (common failures and easier swaps).
- Only then consider timer or control board if the heater circuit checks out.
Cause #4: Settings and habits
Not every back-wall frost problem needs a part. Sometimes it is a settings and habits fix, especially in humid seasons.
Common contributors
- Fridge set too cold: the back wall is often the coldest surface.
- Overpacked shelves: blocked vents cause cold air to dump in one spot, which can freeze moisture on the rear panel.
- Hot leftovers uncovered: steam is moisture, and moisture becomes frost.
- Frequent door openings: lots of humid air exchange, especially with kids in and out.
No-cost fixes
- Set the fridge to 37°F to 40°F (3°C to 4°C) and freezer to 0°F (-18°C). Use a cheap fridge thermometer to verify.
- Leave space in front of interior vents and along the back wall for airflow.
- Cover liquids and let hot food cool a bit before refrigerating.
Less common causes
If you have checked the gasket and cleared obvious drain issues, these are worth keeping on your radar:
- Evaporator fan failure: weak or no airflow can cause cold spots, icing, and temperature swings.
- Air damper stuck open: too much cold air gets dumped into the fresh-food section, freezing items near the back wall and building frost.
- Thermistor or control calibration issues: the fridge may run longer than it should, creating excessive cold surfaces where moisture freezes.
- Door-left-ajar issues: a weak door-ajar alarm, a door that bounces back open, or an item preventing full closure can keep feeding humidity into the compartment.
Troubleshooting checklist
If you want the simplest path with the fewest wasted steps, here is my neighbor-over-the-fence order of operations:
- Check door closure: dollar-bill test, clean gasket, confirm the door shuts on its own and nothing is blocking it.
- Look for blocked vents and move food away from the back wall.
- Check for water under drawers: if yes, suspect a clogged drain and clear it (from the fridge side or freezer side depending on your model).
- Do a full 24-hour thaw reset if ice is heavy.
- If ice returns quickly, inspect the correct evaporator area (freezer evaporator on single-evap designs, fresh-food evaporator on many dual-evap designs) and test heater and thermostat or sensor.
- Only then consider timer or control board issues.
When to call a pro
I love DIY, but I also love not turning a manageable problem into a bigger one.
Call for service if
- You see signs of a sealed system issue (weak cooling in both sections, oily residue, hissing that is not normal cycling).
- Wiring looks burned, brittle, or you smell electrical odor.
- The unit is under warranty, especially for control board or sealed system coverage.
Consider replacement if
- The refrigerator is very old and needs a control board plus other parts.
- There is corrosion or repeated major icing even after correct repairs.
Food safety note
If your fresh-food compartment has been above 40°F (4°C) for more than a couple hours, be cautious with perishables. When in doubt, follow food-safety guidance for your area and discard risky items. No repair is worth a stomach bug.
FAQ
Is ice on the back wall normal?
A light dusting during very humid periods can happen, but recurring frost or a sheet of ice is not normal. It usually points to a gasket leak, drain issue, airflow problem, or defrost trouble.
Why only in the fridge and not the freezer?
The fridge back wall is often where cold air enters or travels behind panels. Moisture from door openings and uncovered food can condense there first. On dual-evaporator models, the fresh-food section may have its own evaporator right behind that panel, so icing can be localized there.
Can I just scrape the ice off?
You can melt it and get temporary relief, but if you do not fix the cause, it will come back. Also avoid scraping with sharp tools because punctures are expensive.
A final practical tip
Any time you are troubleshooting refrigeration, write down what you see and what you changed. Gasket cleaned on Saturday. Drain flushed on Sunday. Ice returned on Wednesday. That little timeline keeps you from chasing your tail and buying parts you do not need.
About Marcus Vance
Content Creator @ Grit & Home
Marcus Vance is a lifelong DIY enthusiast and self-taught home renovator who has spent the last decade transforming a dilapidated 1970s ranch into his family's dream home. He specializes in budget-friendly carpentry, room-by-room renovations, and demystifying power tools for beginners. Through his writing, Marcus shares practical tutorials and hard-learned lessons to help homeowners tackle their own projects with confidence.