🚨 In a DIY emergency or rush?
Skip the details and jump straight to our 30-second cheat sheet for the most crucial info.
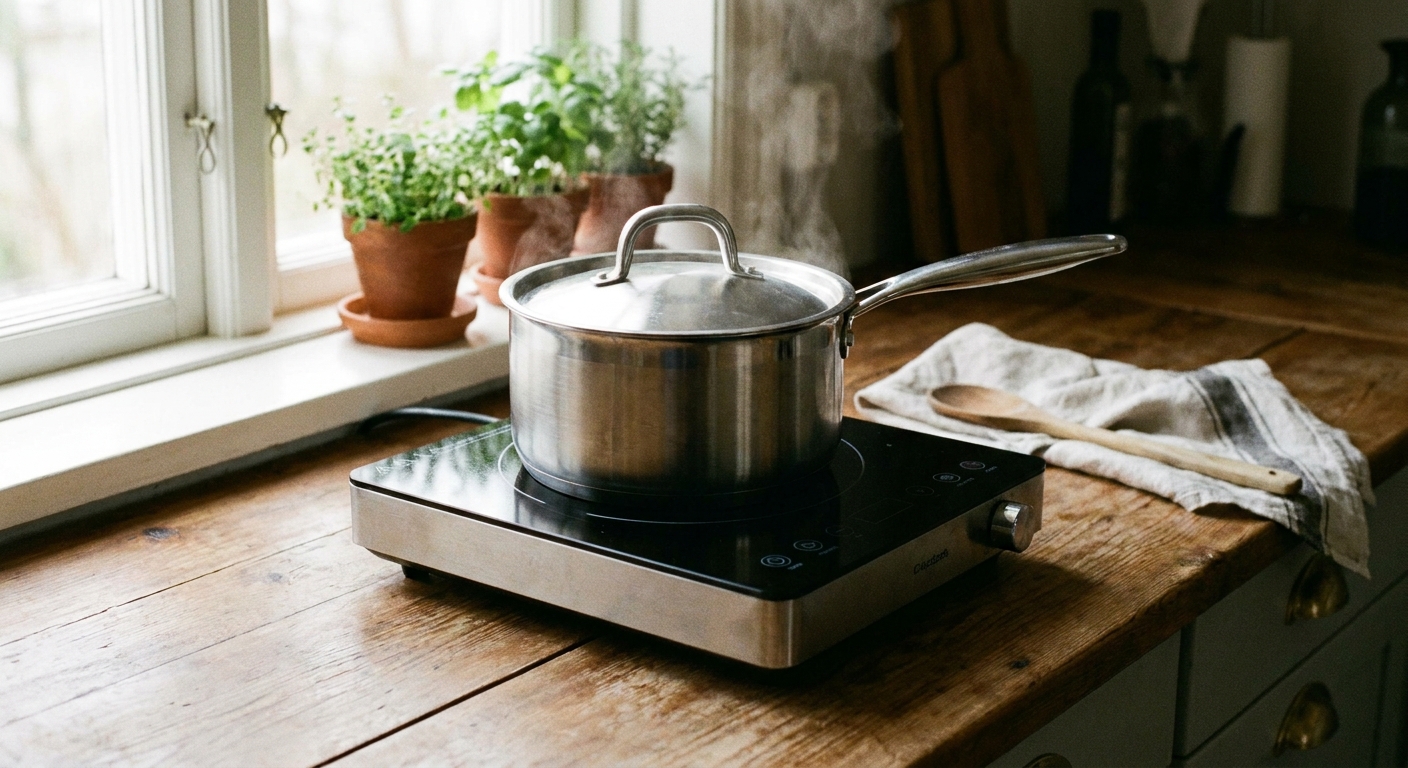
Induction cooktops are a little magical when they work, and a little maddening when they don’t. If yours powers on but won’t heat, or it’s flashing an error code you’ve never seen before, the good news is a lot of fixes are simple: the wrong pan, a tripped breaker, a lock setting, a blocked vent, or a dirty sensing area.
I’ll walk you through the most common checks in the same order I use at home: quick stuff first, then the deeper troubleshooting. I’ll cover both portable induction burners and built-in cooktops.
Before you troubleshoot: two quick safety rules
- Do not keep trying to heat an empty pan. Induction can ramp power fast and overheat cookware.
- If the glass is cracked, stop. Even if it still works, cracked glass is a real shock and cut hazard and is typically a replacement job.
Step 1: Confirm the pan is induction-compatible
This is the number one “it’s broken” call that ends up being cookware. Induction needs a magnetic pan base. If the cooktop does not detect a compatible pan, it may beep, flash a pan icon, show a code, or shut the heat off after a few seconds.
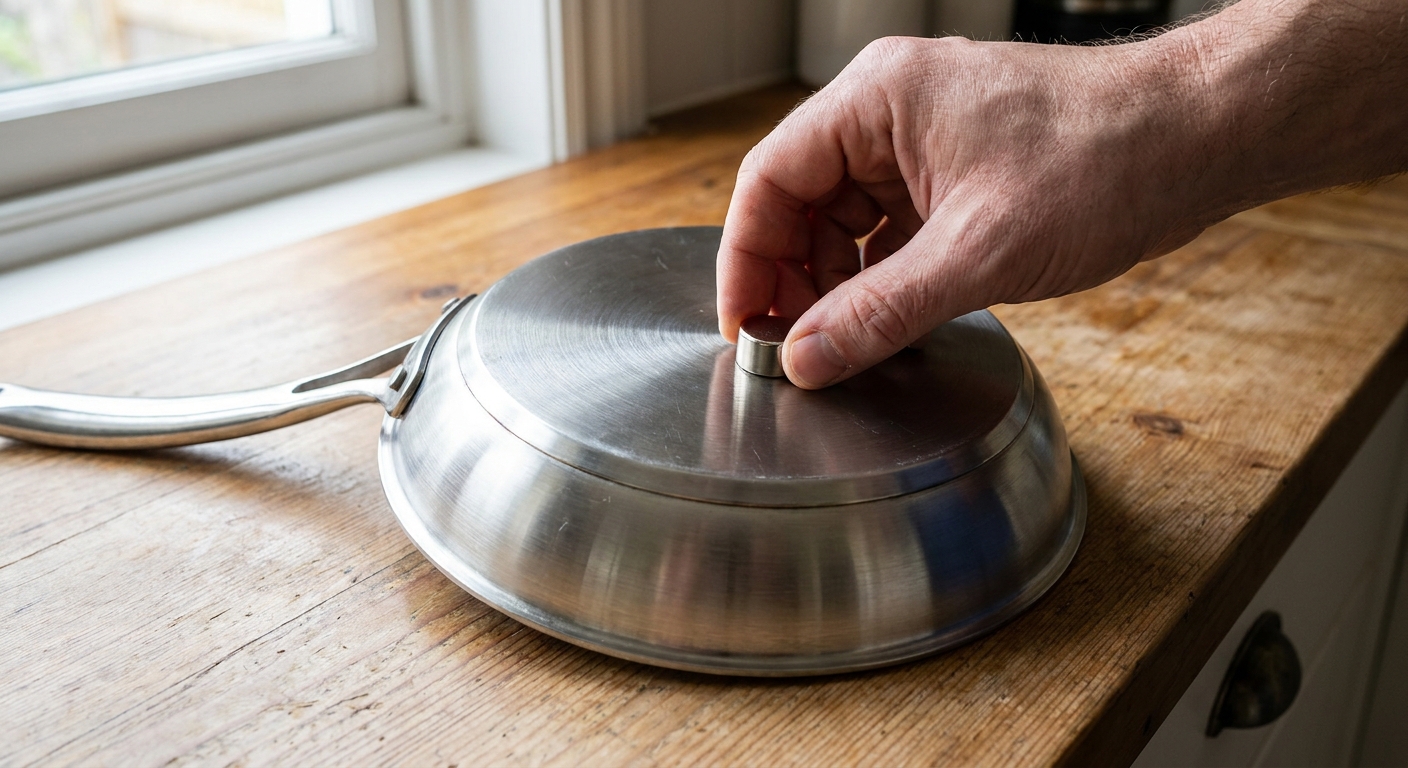
Do the magnet test
- Grab a fridge magnet.
- Stick it to the bottom of the pan.
- If it sticks firmly, the pan is usually induction-ready.
- If it barely sticks or falls off, the cooktop may refuse to heat.
Pan size, centering, and flatness matter
- Too small: Many burners require a minimum base diameter. Small saucepans can trigger “no pan” behavior even if they are magnetic.
- Not centered: If the pan is off-center, the sensor can think there’s no cookware present.
- Warped bottom: A bowed or spun pan can heat inconsistently or error out. Set it on a flat counter and see if it rocks.
- Dirty bottom: Grease or burnt-on residue can affect detection on some models, and it can contribute to uneven performance or scorching on the glass if debris is trapped between the pan and surface.
Check the load in the pan
One sneaky “it won’t heat” scenario is trying to heat an almost-empty pan or a tiny amount of liquid. Some induction units are pickier about minimum load than others. If the cooktop keeps cycling or shuts off, add more water or food (safely) and try again.
Common compatible cookware: cast iron, enameled cast iron, many stainless steel pans marked “induction,” carbon steel, and some multi-ply cookware. Common incompatible cookware: aluminum (unless it has an induction plate), copper (unless it has an induction plate), most glass, and many non-magnetic stainless pans.
Step 2: Make sure you are using the controls correctly
Induction behaves differently than a coil or radiant glass-top. A few normal behaviors feel like “not heating” if you are new to it.
- You must select a burner first on many built-in units, then set the power level.
- Power levels are not always linear. Some models pulse at low settings, so it may cycle on and off. That can be normal.
- Boost mode is time-limited. “P” or “Boost” often shuts off automatically after a few minutes.
Normal noises vs problem noises
- Light buzzing or humming: Often normal, and it can vary by pan.
- Clicking: Often normal power cycling at low settings.
- Loud buzzing or vibration: Often cookware-related (thin pans, warped bases, or loose handles). Try a heavier pan.
- New, loud buzzing plus burning smell or repeated shutoffs: Stop and move to the “call a pro” section.
Step 3: Check lock or demo mode
If your cooktop turns on but won’t accept settings, or it beeps and ignores touch inputs, a lock or showroom mode may be active.
Signs a lock is on
- A lock icon is lit.
- The cooktop beeps when you touch controls but won’t change heat.
- It powers on then immediately disables the controls.
What to try
- Press and hold the Lock button for 3 to 5 seconds.
- On some models: press and hold Timer or a specific key combo for several seconds.
- If you suspect demo mode (lights work, no heat ever): look up your model manual for “demo” and disable it. Demo mode is most common on showroom floors and new installs, but it can also be toggled accidentally.
If you do not have a manual handy, look up your exact model number (usually on a tag under the portable unit, or under the counter for built-ins) and search “model number + control lock.”
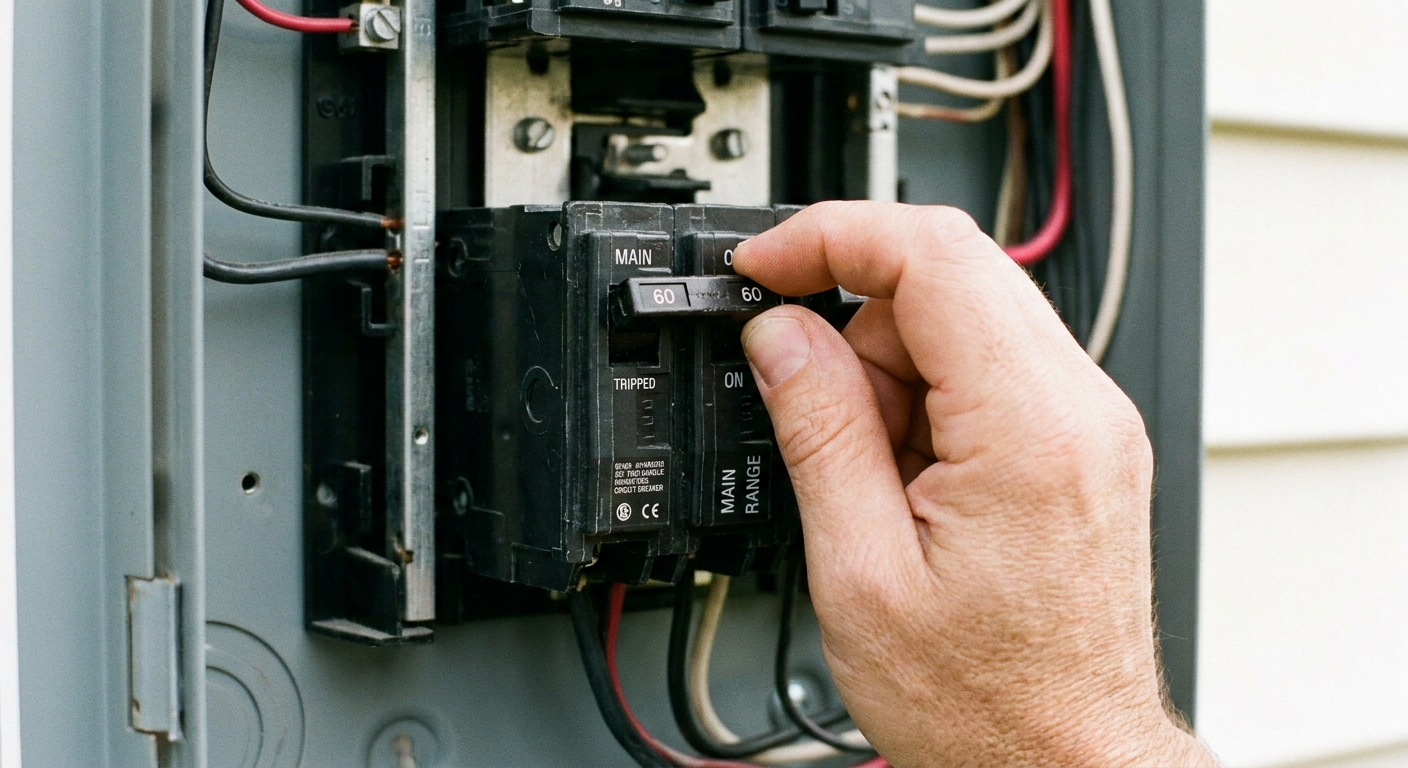
Step 4: Verify power at the wall and the breaker
Induction is picky about power. Low voltage, a loose plug, a tripped breaker, or a GFCI issue can cause random shutoffs, error codes, or a unit that will not heat reliably.
Portable induction cooktop power checks
- Plug it directly into a wall outlet, not a power strip.
- Try a different outlet on a different circuit if possible.
- If the outlet is GFCI protected, press Reset on the GFCI.
- Avoid long, light-duty extension cords. If you must use one temporarily, use a heavy gauge cord rated for the cooktop’s wattage.
Built-in induction cooktop power checks
- Most built-in cooktops are hardwired, so you usually will not have a plug to check. Focus on the breaker and any appliance disconnect switch.
- Check the breaker panel for a tripped double-pole breaker (it might look half-tripped).
- Flip the breaker fully OFF, then back fully ON.
- If the cooktop shares a circuit with other heavy loads, try turning those off and test again.
DIY note: If your breaker trips repeatedly after resetting, stop resetting it and call a pro. That can be a wiring fault, a failing breaker, or an internal cooktop short.
Step 5: If it heats briefly then shuts off
This symptom is common, and it usually points to one of three buckets: pan detection, overheating, or power.
- Pan detection: Try a different pan that you know works, center it, and make sure the base is large enough for the zone.
- Overheating: Let it cool 10 to 30 minutes and make sure vents and airflow are not blocked.
- Power: Try a different outlet or circuit (portable), or reset the breaker once (built-in). If you smell burning, do not keep cycling power.
Step 6: Let it cool and clean the surfaces that affect sensing
Induction cooktops protect themselves. If internal temps rise too high, the unit may reduce power or shut a burner down and show a warning. This can happen after a long boil, blocked airflow, or cooking with large pans that trap heat over the controls.
What to do
- Turn the cooktop off.
- Remove the pan.
- Let it cool for 10 to 30 minutes.
- Wipe the glass with a soft cloth and a cooktop-safe cleaner once cool.
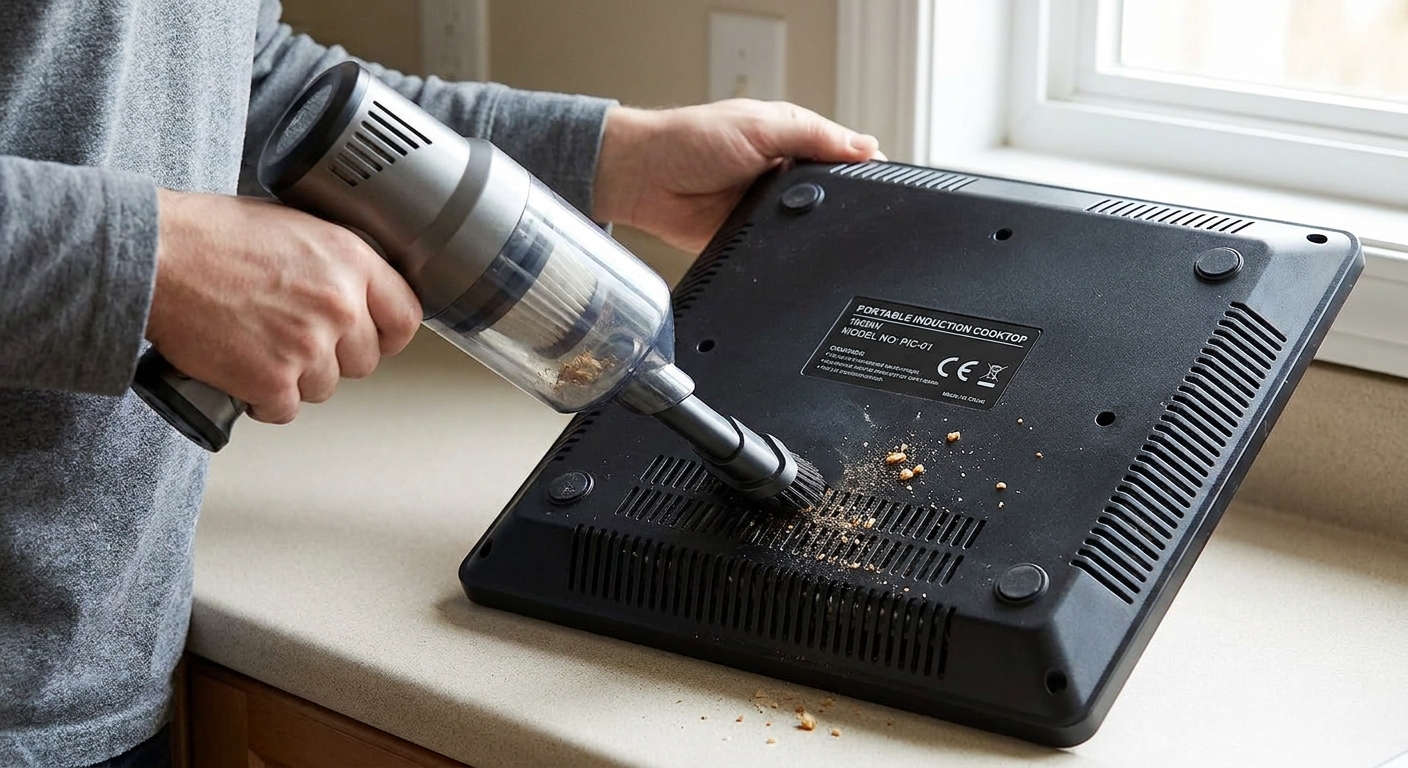
Portable unit airflow (very common)
- Make sure the bottom vents are not blocked by a towel, paper, or a soft mat.
- Keep a few inches of clearance around the fan vents.
- Vacuum dust out of intake vents if you see buildup.
Built-in airflow
- Confirm the installer left the required cabinet clearance and ventilation openings.
- Clean or replace filters if your setup uses a downdraft or integrated vent system.
- If a large pan overhangs the control area, try moving to a different zone. Excess heat near the touch panel can cause false touches or shutdowns on some models.
Step 7: Try a proper reset
Resetting is useful when the controls freeze, a code pops after a power flicker, or a burner refuses to recognize pans it normally likes.
Portable induction reset
- Unplug the unit.
- Wait 2 to 5 minutes.
- Plug it back in and test with a known compatible pan.
Built-in induction reset
- Turn off the cooktop and confirm the display is off.
- Switch the cooktop breaker OFF.
- Wait 5 minutes.
- Switch the breaker back ON and test.
If you smell burning or see discoloration under the glass, do not keep cycling power. Jump to the “call a pro” section.
If the unit returns to the exact same code immediately after a reset, that is a clue you are dealing with a real fault rather than a temporary glitch.
Step 8: Error codes (treat them as brand-specific)
Error codes vary widely by manufacturer, and the same code can mean different things on different models. Treat the items below as common patterns you might see, not a universal dictionary. Your manual is the final authority.
Pan detection and cookware
- No pan / pan icon: Often cookware not detected. Try a different induction-ready pan, center it, and make sure the bottom is clean and flat.
- E0 (common on some portables): Often “no pan” or pan detection fault, but confirm with your manual.
Power and voltage
- E1 (on some models): Often related to input power issues, but on other brands it can mean something completely different. If you suspect power, try a different outlet or circuit (portable) or check the breaker and wiring (built-in).
Overheating and ventilation
- E2, E5, or “H” style warnings (on some models): Often over-temp protection. Let it cool, improve airflow, and avoid blocking vents. On some cooktops, “H” can also mean the surface is still hot after cooking.
- Fan runs constantly: Often normal after cooking, but if it runs for a long time with errors, suspect blocked vents or a failing fan.
Sensors and electronics
- E3, E4, E6, E7 (varies): Often tied to sensor faults, internal power electronics, or the induction coil circuit. If these recur after cooling, cleaning, and a reset, service is more likely.
- One burner fails but others work: Could be a failed coil, a connection issue, or a burner-specific control channel.
My rule: If you can fix it with a pan change, cleaning, cooling, or a reset, it’s a homeowner problem. If the same code returns after those steps, it’s usually a parts, wiring, or board problem.
Step 9: If only one zone won’t heat (built-in units)
This is where induction troubleshooting starts to look more like appliance repair than DIY. Still, a couple of checks are worth doing before you call.
Quick tests
- Test the problem zone with a different induction pan you know works on another zone.
- Swap pans between zones to confirm it’s the zone, not the pan.
- Power-cycle the cooktop at the breaker for 5 minutes.
Likely causes if the problem stays on one zone
- Failed induction coil for that zone.
- Bad temperature sensor for that zone.
- Loose connection or failing power electronics channel.
On a built-in cooktop, getting inside usually means pulling the unit, dealing with sharp metal edges, and exposing high-voltage components. That is the point where I recommend a service call unless you have appliance repair experience and can follow safe electrical procedures.
Portable induction burner: no-heat checklist
- Compatible pan passes magnet test
- Pan centered and large enough for the ring
- Enough food or liquid in the pan to engage reliably
- Outlet is solid, no power strip, no weak extension cord
- GFCI is not tripped
- Vents are not blocked, fan can breathe
- Unit cooled down after an overheat shutdown
- Reset: unplug 2 to 5 minutes
Hard stops: when to call a pro
Some problems are not worth experimenting with, especially around high voltage and a glass cooking surface.
- Cracked glass top, chipped corners, or visible impact damage
- Burning smell, smoke, or a new loud buzzing, or discoloration under the glass
- Breaker trips repeatedly when you use the cooktop
- Recurring codes that return immediately after cooling, cleaning, and a proper reset
- Water intrusion into controls after a boil-over, especially if the unit is acting erratic
If your cooktop is under warranty, it’s also worth stopping early. Opening panels or attempting internal repairs can void coverage.
My thrifty best next step if you’re stuck
If you’ve done the pan test, power check, lock check, cleaning, cooling, and reset, here’s the next move that saves the most time: write down the exact model number and the exact code on screen (a quick photo helps), then look up the manufacturer’s error code list. Induction codes are not universal, and one brand’s E6 might be another brand’s overheating warning.
If you’re calling for service, have this ready: model and serial number, which burner is affected, the exact code (or a photo), and the steps you already tried. A good appliance tech can usually narrow it down quickly with that info.
The 30-Second Cheat Sheet
Essential takeaways for: Induction Cooktop Not Heating or Showing Errors? Fixes to Try
Start here (fast checks)
- Cookware: Do the magnet test on the pan bottom. If a magnet does not stick firmly, many induction tops will not heat.
- Pan placement: Center the pan and use a base large enough for the cooking zone.
- Pan contents: Some units will not engage well with very low mass (for example, an empty pan or a tiny amount of liquid). Add food or liquid and try again.
- Lock: Look for a lock icon. Press and hold Lock (often 3 to 5 seconds) to unlock.
Power and reset
- Portable unit: Plug directly into a wall outlet, avoid power strips, reset GFCI if present. Unplug 2 to 5 minutes to reset.
- Built-in unit: Most are hardwired. Check the double-pole breaker (and any nearby disconnect switch, if you have one). Turn it fully OFF then ON. For a reset, leave breaker OFF 5 minutes.
Overheating and sensors
- If it shut down mid-cook, let it cool 10 to 30 minutes and make sure vents are not blocked (especially on portable burners).
- Clean the glass and pan bottoms after cool down. Some models get finicky with grime around the sensing area.
What error codes often mean
- No pan / pan icon (common): cookware not detected.
- Over-temp warnings (varies by brand): cooling and airflow issue.
- Recurring codes after reset: more likely sensor, coil, fan, wiring, or power board fault.
Hard stops: call a pro
- Cracked or chipped glass top
- Breaker trips repeatedly
- Burning smell, smoke, or discoloration under glass
- Same code returns immediately after cleaning, cooling, and reset
💡 Tip: Scroll up to read the full article for detailed, step-by-step instructions.
⬆️ Back to topAbout Marcus Vance
Content Creator @ Grit & Home
Marcus Vance is a lifelong DIY enthusiast and self-taught home renovator who has spent the last decade transforming a dilapidated 1970s ranch into his family's dream home. He specializes in budget-friendly carpentry, room-by-room renovations, and demystifying power tools for beginners. Through his writing, Marcus shares practical tutorials and hard-learned lessons to help homeowners tackle their own projects with confidence.