🚨 In a DIY emergency or rush?
Skip the details and jump straight to our 30-second cheat sheet for the most crucial info.
Mealybugs are the houseplant pest that makes you feel like your plant grew little bits of cotton overnight. The good news: you can beat them without scorching leaves or drowning your pot in harsh chemicals. The trick is to match the treatment to the plant and hit the places mealybugs actually hide, especially leaf joints (leaf axils), undersides, and the soil line.
I learned this the hard way with my own plants: you can do everything right on the leaves and still lose the battle if you ignore the rim of the pot and the first inch of soil. We'll cover a calm, organized routine that works for most common houseplants.
How to spot mealybugs
Mealybugs are slow movers, but they're great at hiding. If you catch them early, removal can be as simple as a few swabs and a rinse.
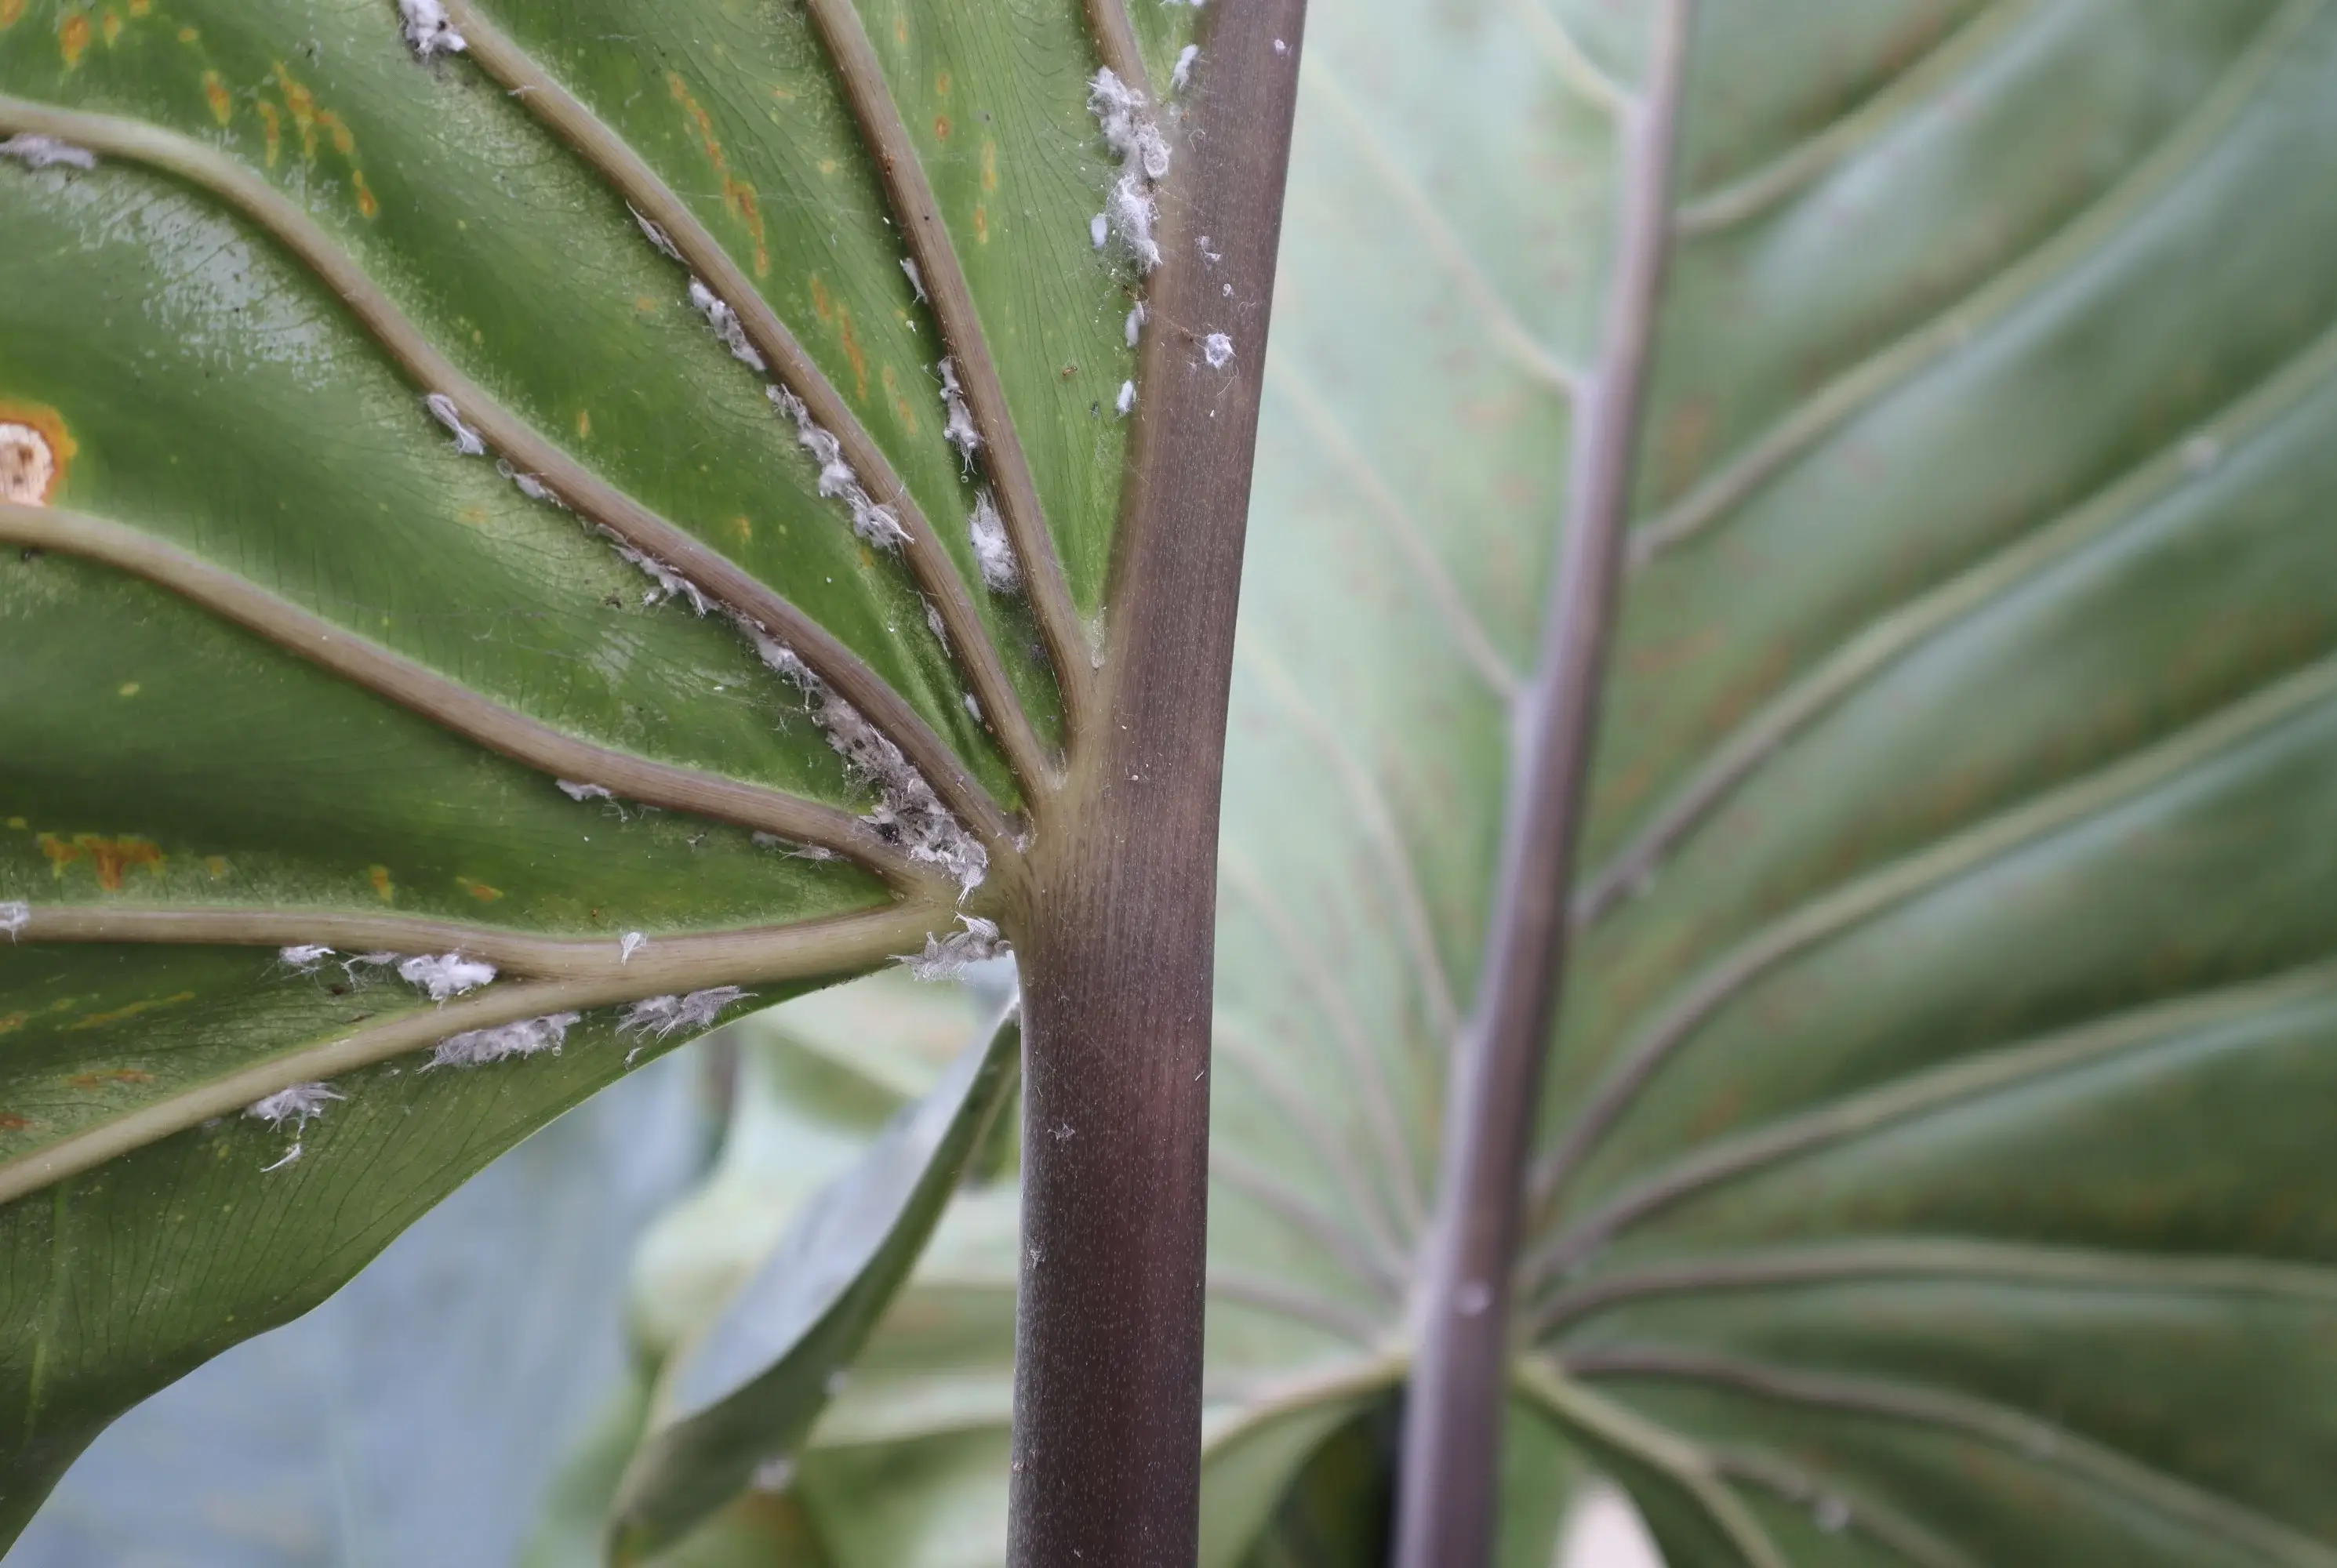
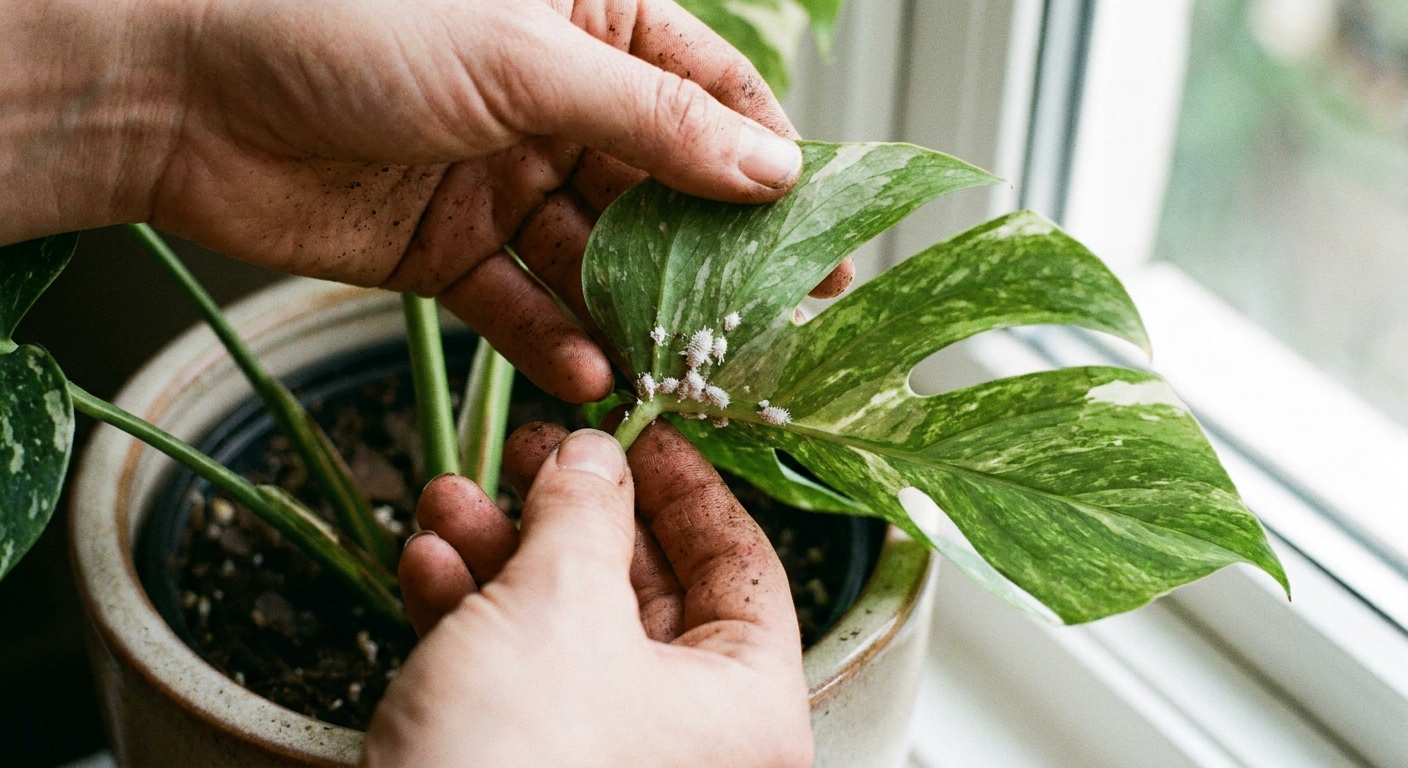
What they look like
- Cottony white clusters in leaf joints and along stems
- Small oval bugs with a fuzzy or waxy coating
- Sticky honeydew on leaves or nearby surfaces (like a shelf)
- Sooty mold, a black film that can grow on the honeydew
- Leaf yellowing and stunted growth even when watering and light are fine
Where they hide
- Stem nodes and leaf joints (leaf axils)
- Under leaf curls and along the midrib on the underside
- New growth and tight crowns (especially on hoya, pothos, and peperomia)
- At the soil line, under the pot rim, and around drainage holes
First move: quarantine
If you do only one thing right away, do this: move the plant away from your other plants. Mealybugs spread by crawling, brushing against neighboring leaves, and hitchhiking on hands and tools.
Quarantine checklist
- Place the plant in a separate room if possible, or at least several feet away from others.
- Put a tray underneath to catch drips during cleaning.
- Wash your hands after handling the plant.
- Don't reuse the same pruning snips without wiping them down.
How long to quarantine: I recommend 3 to 4 weeks for new plants. Mealybug eggs can hatch later than a 14 day window, especially depending on temperature and indoor conditions.
Quick reality check: if you see mealybugs on multiple plants in the same area, assume they've already traveled. Plan to inspect everything within a few feet.
Plant-safe removal
For most houseplants, the safest approach is a two-part combo: physical removal first, then a gentle spray to catch what you missed. Think of it like cleaning sawdust before paint. You get better results when you prep.
Tools and supplies
- Cotton swabs or cosmetic pads
- 70% isopropyl alcohol
- Spray bottle
- Insecticidal soap (best) or a careful DIY soap mix (details below)
- Paper towels
- Nitrile gloves (optional, but nice)
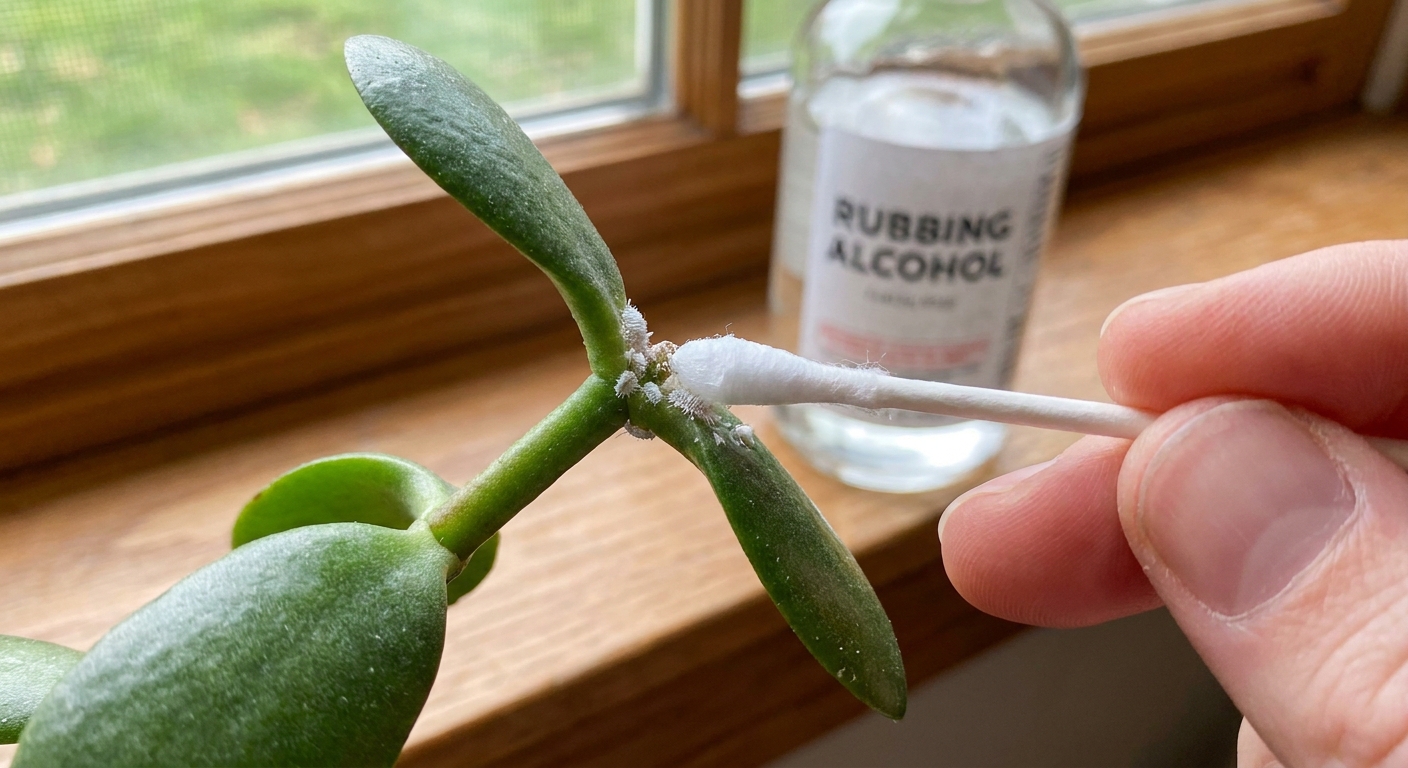
Step 1: Alcohol swab the clusters
Dip a swab in 70% isopropyl alcohol and dab the cottony clusters directly. The waxy coating breaks down and the bugs die quickly.
- Use a dabbing and rolling motion in crevices instead of scrubbing hard.
- Work one section at a time so you don't miss nodes.
- For heavy clusters, pinch them off with a paper towel, then swab what remains.
Important: 70% is commonly used because it works well while lowering burn risk. Higher concentrations (like 91% to 99%) can increase leaf damage on some plants. Always test a hidden spot first, wait 24 hours, then proceed.
Step 2: Follow with a gentle soap spray
After you manually remove the worst of it, a soap spray helps get the small crawlers you didn't see.
Option A (best): use a labeled insecticidal soap and follow the directions.
Option B (DIY, test first): mix 1 teaspoon of unscented castile soap in 1 quart of water. Dish soaps vary a lot and may contain degreasers, dyes, or fragrance additives that can damage foliage, so if you're improvising, keep it truly mild and treat DIY as test first, at-your-own-risk. Mist the stems, undersides, and joints until evenly wet, not dripping.
- Avoid heavy oils on delicate leaves unless you know your plant tolerates it.
- Keep the plant out of direct sun until leaves are dry to reduce spotting.
- Rinse with plain water after 15 to 30 minutes on sensitive plants.
Containment tip: if you're spraying in a sink or shower, don't let runoff splash onto other plants or tools. Rinse the area when you're done.
Sensitive plants
Not all houseplants take treatments the same way. Some leaves spot if you look at them wrong, and mealybugs love those plants too.
Often more sensitive
- Ferns
- Calathea and maranta (prayer plants)
- African violets and other fuzzy-leaf plants
- Some succulents with powdery farina (the natural white coating)
Safer approach
- Use targeted alcohol swabs on bugs only, not broad spraying.
- Use diluted insecticidal soap and rinse after a short dwell time.
- Increase airflow and dry time, keep out of bright sun during treatment days.
Avoid these mistakes
- Full-strength alcohol spraying across the whole plant
- Soapy water left to dry on delicate leaves without testing
- Heavy neem oil on plants that dislike oils (can clog pores and cause burn)
- Mixing products back-to-back without rinsing (soap plus oil is a common leaf-burn combo)
Don't ignore the soil line
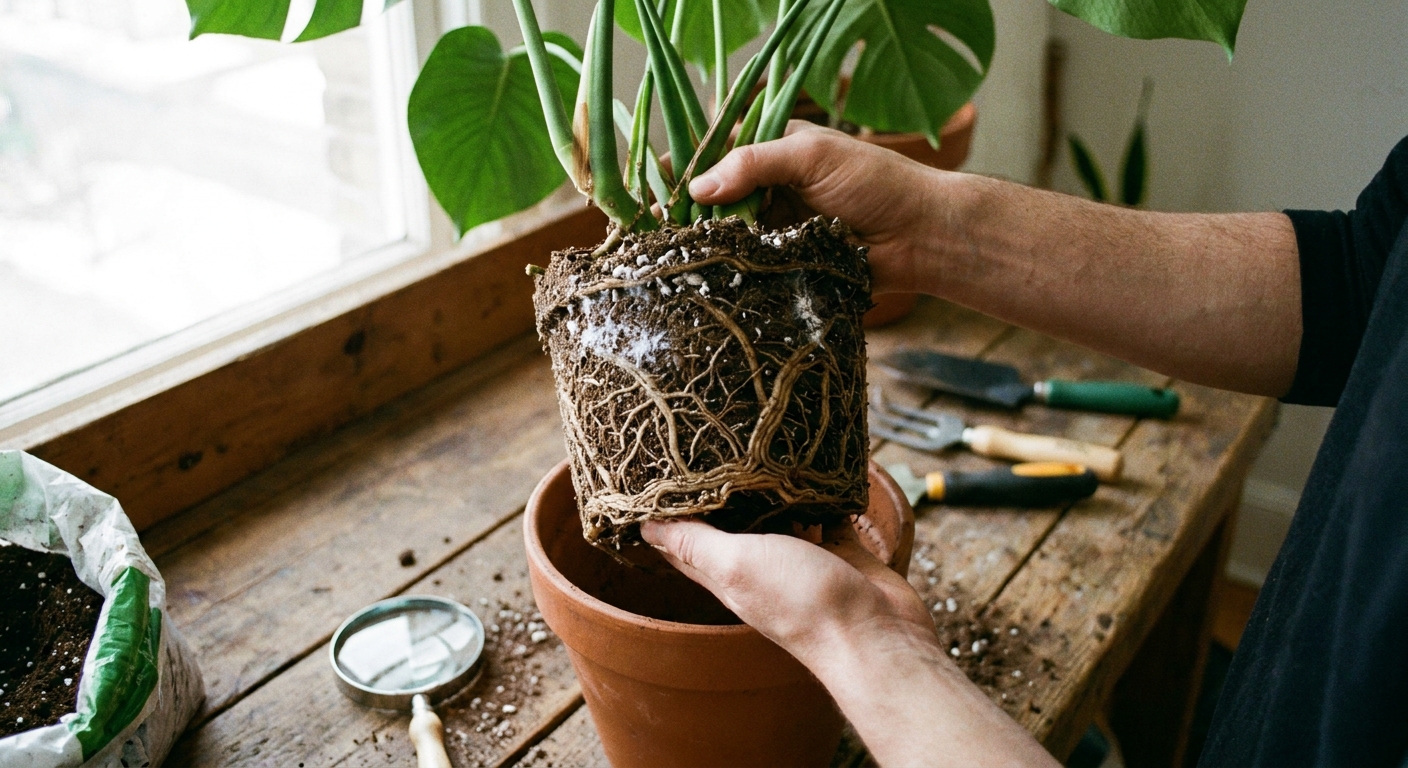
If mealybugs keep coming back after you clean the stems, check the pot rim and soil line. Some species hide right where the stem meets the soil. There are also root mealybugs that live below the surface and can look like tiny bits of perlite that move or white cottony clusters on roots and in the potting mix.
Signs it's in the pot
- White cottony fluff at the base of stems
- Sticky residue on the pot rim
- Plant declines even after leaf cleaning
- White clusters visible near drainage holes
Soil-line treatment
- Scrape off the top 1 inch of soil and discard it in a sealed bag.
- Wipe the pot rim and outside of the pot with alcohol on a paper towel.
- Replace with fresh potting mix.
- Continue weekly leaf and stem checks.
When to repot
If you see bugs at drainage holes or you suspect root mealybugs, repotting is usually the cleanest reset.
- Remove the plant and gently shake off as much soil as possible.
- Rinse roots with lukewarm water.
- Inspect roots and the crown for white fuzz and remove what you see with swabs.
- Wash the pot with hot soapy water, then rinse. If it's a cheap nursery pot and the infestation is heavy, I toss it.
- Repot in fresh mix and don't reuse old soil indoors.
Simple treatment schedule
Mealybugs have life stages, and the tiny crawlers are easy to miss. That's why one perfect cleaning rarely solves it. You want a routine that's boring, repeatable, and effective.
My go-to timeline
- Day 1: Quarantine, swab visible bugs, then soap spray.
- Day 3 to 4: Recheck leaf joints and undersides, swab any new clusters.
- Day 7: Repeat soap spray.
- Weekly: Keep inspecting and spot-treating until you see no signs for 2 to 3 consecutive checks. In many homes that's about a month, but temperature and plant type can stretch or shrink the timeline.
If you're seeing new clusters every week with no slowdown, treat the soil line and consider a repot.
Prevention
Mealybugs don't usually appear out of nowhere. Most often they arrive on a new plant, a cutting, a pot you brought back inside, or from a nearby infested plant.
Quarantine new plants
- Keep new plants separate for 3 to 4 weeks.
- Inspect nodes, undersides, and the soil line on arrival and weekly during quarantine.
- Wipe down the outside of nursery pots. They're often dirtier than you think.
Make plants less inviting
- Avoid heavy over-fertilizing, which can create tender growth mealybugs love.
- Provide enough light for the plant type so it stays vigorous.
- Remove dead leaves and debris from the soil surface.
- Wipe nearby shelves and windowsills to remove honeydew, since it can attract more pests and grow sooty mold.
If you see ants
If ants are hanging around the plant, deal with them too. Ants can protect sap-sucking pests in exchange for honeydew, and that can make your treatments feel like they aren't sticking.
When to discard the plant
I'm thrifty by nature, so I don't say this lightly. Sometimes the best move is to cut your losses to protect your other plants.
Consider discarding if
- The infestation is heavy and spread across multiple stems and leaf joints.
- You suspect root mealybugs and the plant is already declining fast.
- You've repeated treatment cycles with no improvement.
- The plant is inexpensive or easily replaced, and you have valuable plants nearby.
How to toss safely: seal the whole plant and soil in a bag before carrying it through the house. Clean the shelf area, and inspect nearby plants the same day.
FAQ
Are mealybugs the same as scale?
They're related, but not the same. Mealybugs look fuzzy and cottony, while scale often looks like brown or tan bumps. Treatments overlap, but mealybugs are usually easier to wipe off.
Will rubbing alcohol kill my plant?
It can damage sensitive leaves if sprayed broadly or used too strong. Stick to 70%, test first, and use swabs for targeted contact.
Do I need pesticides?
Not always. Many indoor infestations are manageable with swabbing, insecticidal soap, and persistence. For large collections or repeated outbreaks, a labeled systemic product may be an option, but follow label directions and consider pets and kids in the home.
One more note: systemic availability and labels vary by country, and these products can persist in plant tissue. Avoid using them on edible plants unless the label specifically allows it.
The 30-Second Cheat Sheet
Essential takeaways for: Mealybugs on Houseplants: Get Rid of Them Without Hurting the Plant
Fast ID
- Look for white cottony clusters in leaf joints (leaf axils), on stems, and under leaves.
- Check for sticky honeydew and black sooty film on leaves, pots, or shelves.
- Inspect the soil line, pot rim, and drainage holes.
Immediate actions
- Quarantine the plant right away.
- Use a cotton swab + 70% isopropyl alcohol to dab bugs in joints and crevices. Test first.
- Follow with insecticidal soap. If you must DIY, use true mild soap (like unscented castile) and test first.
Soil-line fixes
- Scrape off and discard the top 1 inch of soil if you see fuzz at the base.
- Wipe the pot rim with alcohol.
- If bugs show at drainage holes or keep returning, repot into fresh soil and wash or replace the pot.
Simple schedule
- Day 1: Swab + soap spray.
- Day 3 to 4: Inspect, swab any new spots.
- Day 7: Soap spray again.
- Weekly: Keep going until you see no signs for 2 to 3 consecutive checks (often 4 weeks).
Prevention
- Quarantine new plants for 3 to 4 weeks.
- Inspect undersides, nodes, and soil line on arrival and weekly during quarantine.
When to toss the plant
- Heavy infestation everywhere, repeat treatments not working, or suspected root mealybugs with fast decline.
- Bag the plant and soil before carrying it through the house.
💡 Tip: Scroll up to read the full article for detailed, step-by-step instructions.
⬆️ Back to topAbout Marcus Vance
Content Creator @ Grit & Home
Marcus Vance is a lifelong DIY enthusiast and self-taught home renovator who has spent the last decade transforming a dilapidated 1970s ranch into his family's dream home. He specializes in budget-friendly carpentry, room-by-room renovations, and demystifying power tools for beginners. Through his writing, Marcus shares practical tutorials and hard-learned lessons to help homeowners tackle their own projects with confidence.