🚨 In a DIY emergency or rush?
Skip the details and jump straight to our 30-second cheat sheet for the most crucial info.
When a ductless mini-split stops cooling or starts dripping water inside, the cause is most commonly a setting issue, restricted airflow, or a condensate drain problem. There are other possibilities too, like a failed condensate pump, a cracked drain pan, line-set insulation sweating, sensor or control faults, or a blower issue. The trick is checking the likely stuff in a smart order so you do not waste time, and so you do not turn a small problem into a bigger one.
I will keep this to owner-safe checks. No gauges, no refrigerant, and no electrical work beyond flipping a breaker or using a disconnect if your setup has one. If anything here feels beyond your comfort level, that is your cue to stop and call a licensed HVAC technician.
Safety first
- Turn the unit off with the remote before opening panels or removing filters.
- Protect the wall and floor if you have active dripping. Put a towel down, then a shallow pan.
- Do not poke the coil fins with anything stiff. They bend easily and a bent coil does not breathe well.
- Avoid soaking electronics: if you use any cleaner, apply lightly and keep liquid away from control boards and wiring.
- Do not attempt refrigerant work. If you suspect low refrigerant, that is a pro-only stop.
- If you smell burning, see smoke, or the breaker trips repeatedly, shut it down and call a pro.
Quick checks
1) Confirm mode, setpoint, and fan
This sounds too basic, but it is a top fix with ductless systems, especially after a power outage or when someone bumps the remote.
- Mode: Set to Cool (snowflake). If it is in Dry, it will cool lightly but may not keep up on a hot day. If it is in Heat or Auto, it may not behave how you expect.
- Temperature: Set at least 3 to 5°F lower than room temperature for testing. Example: if the room is 78°F, set it to 73°F.
- Fan: Set fan to High temporarily while troubleshooting. This is a common diagnostic step because low airflow can contribute to icing. Some inverter systems modulate differently, so treat this as a test, not a permanent setting.
- Cancel timers and schedules: Some remotes have timers or weekly schedules that quietly override your setpoint.
- Remote basics: replace weak batteries, check for a remote lock, and confirm whether you have Follow Me/iFeel enabled. If that sensor is active and the remote is sitting in a hot spot, the system can behave oddly.
2) Check for error codes
If the indoor head is blinking a pattern or the remote shows an error code, write it down. It can save a lot of guesswork and will help a technician if you end up calling.
Owner-level move: power-cycle the system once.
- Turn the unit off.
- Flip the mini-split breaker off, or use the outdoor disconnect if you have one.
- Leave it off for 1 to 5 minutes (some manufacturers specify a time, so follow your manual if it does).
- Turn power back on, wait 3 to 5 minutes, then try cooling again.
If the error code returns immediately, stop troubleshooting and call a pro with that code in hand.
Airflow problems
Restricted airflow is one of the most common causes of poor cooling, icing, and indoor dripping because it changes how cold the indoor coil gets and how condensate behaves.
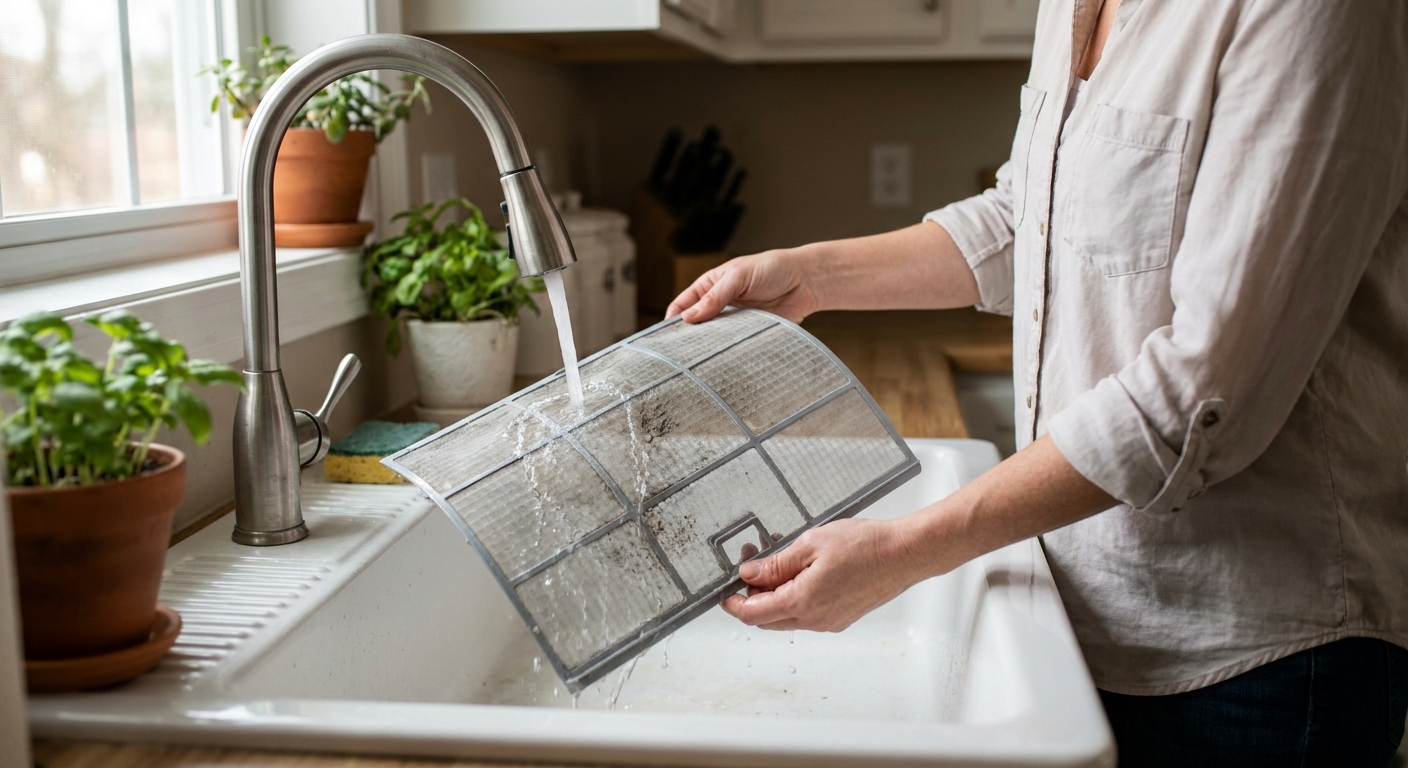
3) Clean the indoor filters
A mini-split needs a steady stream of warm room air moving across the indoor coil. When filters clog, airflow drops, the coil can get too cold, and you can end up with poor cooling, ice, or water that does not drain correctly.
- Open the front panel and slide out the filters.
- Vacuum loose dust, then rinse with lukewarm water.
- Let them dry completely before reinstalling.
My thrifty rule: do not buy fancy chemicals for filters. Mild soap and water is enough.
4) Check the indoor coil and blower wheel
With the filters out, shine a flashlight inside. You are looking for three things:
- Dirt buildup: a gray, fuzzy blanket on the coil surface.
- Ice: white frost or solid ice on the coil or copper lines.
- Blower wheel buildup: caked-on dust or dark, fuzzy growth on the crossflow fan. You can often see it by shining a light past the louvers and looking at the curved wheel behind them.
If the coil is dirty: you can do a gentle clean.
- Turn the unit off.
- Protect the wall below with a towel if needed.
- Use a soft brush or a vacuum with a brush attachment on low suction.
- If needed, use a no-rinse evaporator coil cleaner made for mini-splits and follow the label. Apply lightly and avoid spraying into electrical compartments.
If the coil is iced up: do not scrape it. You will bend fins or puncture something expensive.
- Turn the system off.
- Set it to Fan Only if your model allows, or just leave it off and let it thaw.
- Plan on 1 to 4 hours, and it can take longer if it is heavily iced. Keep towels and a pan in place during thaw.
If the blower wheel looks caked: note it as a likely airflow issue. Light dust is normal. Heavy buildup can cause weak airflow and water carryover. Cleaning the wheel often requires partial disassembly, so this is commonly a pro job unless your manual shows an owner-safe method.
Once thawed, you can restart cooling and continue the checklist. If it ices up again within a day, jump ahead to the section on ice-up versus refrigerant symptoms.
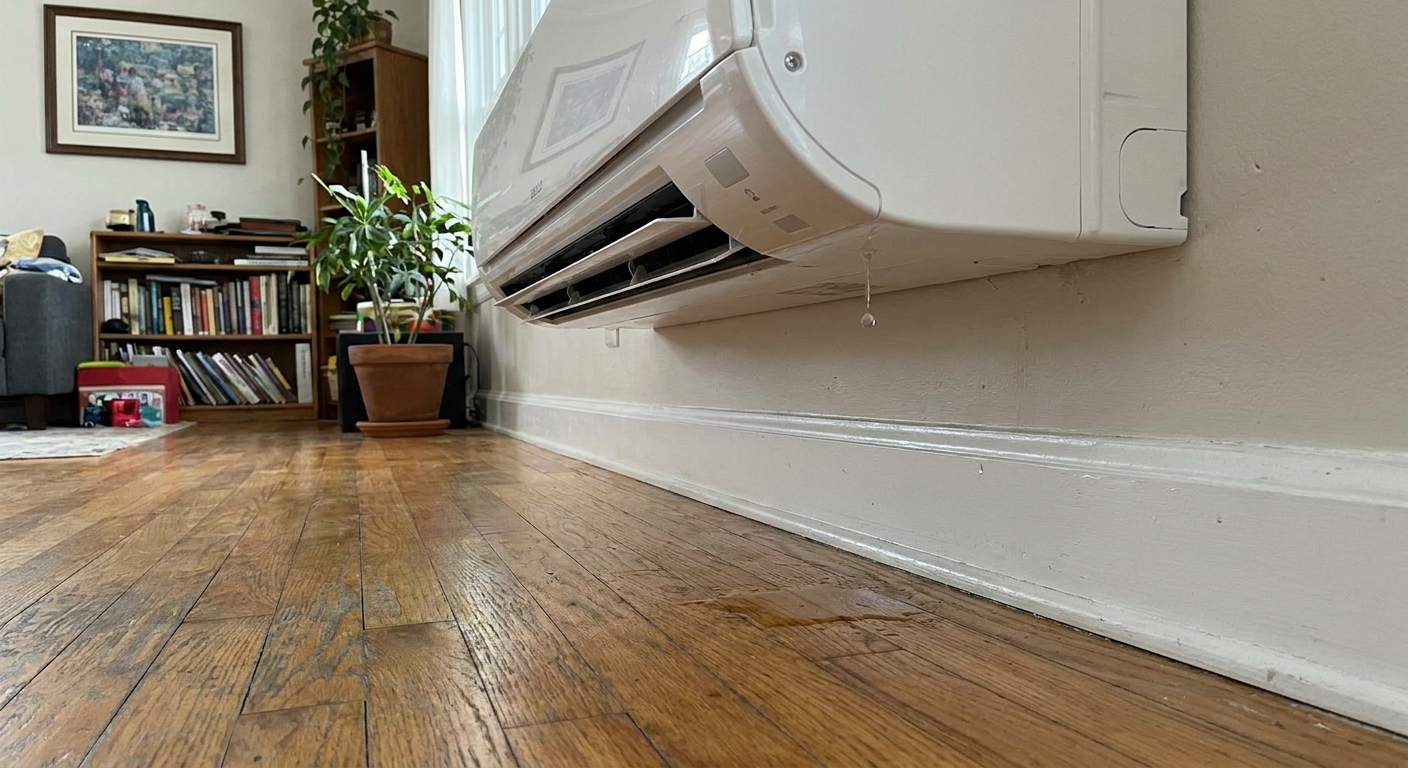
Indoor dripping water
In cooling mode, the indoor unit pulls humidity out of the air. That water should drip into the drain pan and run out through a drain line. If that path is blocked, kinked, disconnected, pumped incorrectly, or the pan is compromised, the water ends up on your wall or floor.
5) Check level and nearby sweating
A wall-mounted head should be installed per the installation manual. Many are level or slightly pitched toward the drain side. If the bracket has loosened or the wall has shifted, water can spill over the wrong edge of the pan.
- Visually check if the unit looks tilted.
- Do not re-mount it yourself unless you know what you are doing. A mini-split head is not light, and you do not want to stress the refrigerant lines.
Also, make sure the louvers are not aiming air straight at a cold surface that sweats, like a nearby metal duct, pipe chase, or uninsulated window frame. Sometimes the “leak” is actually condensation elsewhere. Another common culprit is damaged or missing line-set insulation or gaps at the wall penetration that let humid air hit a cold line and drip.
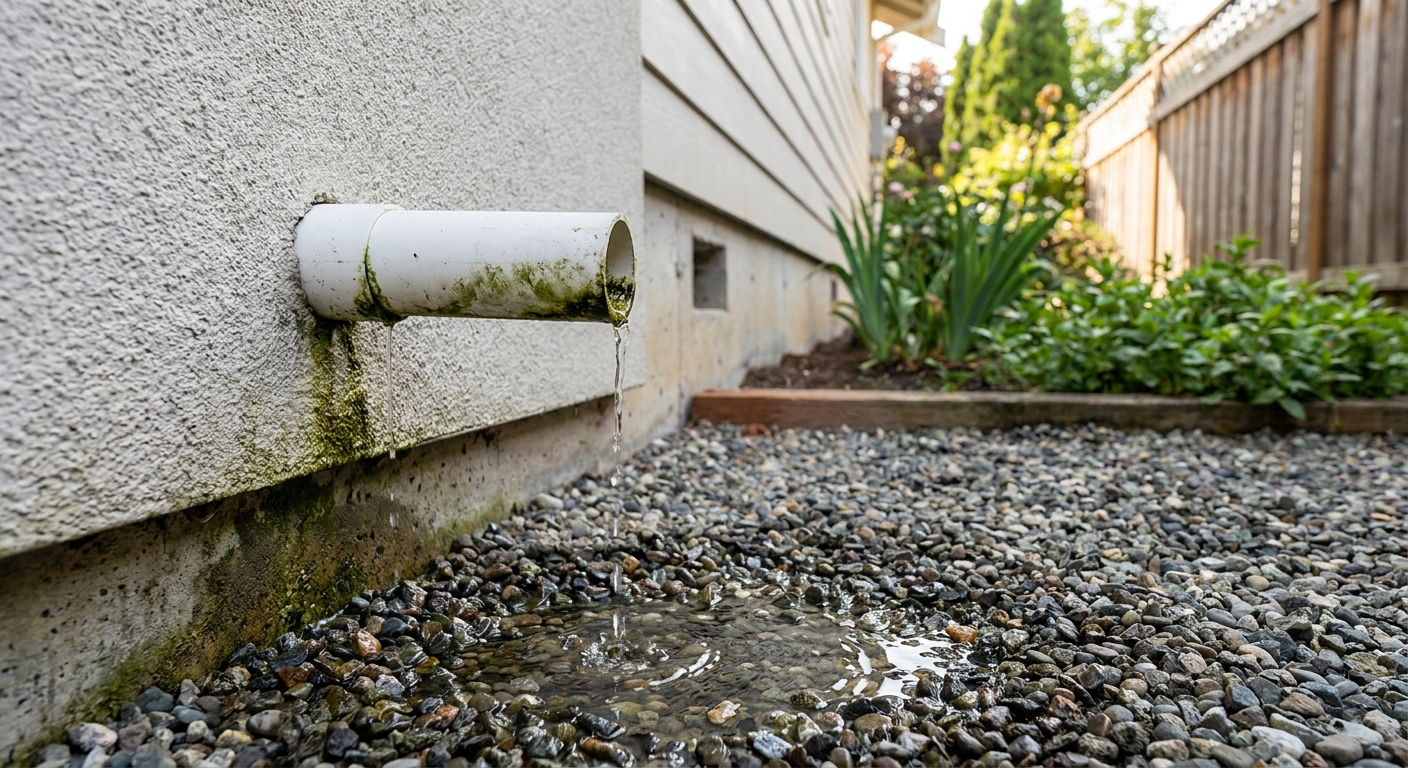
6) Confirm the drain line is actually draining
Most mini-splits drain outdoors through a small flexible tube. Locate where it ends outside.
- With the system running in cooling on a humid day, you will often see intermittent dripping outside. On dry days, there may be little or none, even when the system is working.
- If you see no water outside but you have water inside, suspect a clog, kink, disconnection, a failed pump, or a pan issue.
- If you see water outside but still get indoor dripping, suspect a partially blocked pan, blower wheel carryover, or a leveling issue.
7) Clear a simple drain clog (owner-safe)
Stop point: If you cannot easily access the drain line end outdoors, or if the drain runs into a plumbing stack or condensate pump you cannot reach, skip to calling a pro. Forcing it can pop a connection inside the wall and create hidden water damage.
If you can access the outdoor end of the drain line:
- Check for kinks or pinched spots first and straighten them.
- Use a wet-dry vac on the outdoor end: hold the vac hose tight to the drain line for 30 to 60 seconds to pull out slime and debris.
- Seal the connection: wrap a rag around the hose-to-drain connection, or use painter’s tape, so you get real suction instead of air leaks.
- Afterward: empty and rinse the vac canister so you do not grow a science project in it.
Avoid blasting compressed air. It can blow the hose off the drain pan and then the next gallon of condensate ends up inside your wall.
8) If you have a condensate pump
Some installations, especially in basements or interior walls, use a small pump to lift condensate to a drain.
- Listen for the pump running when the unit has been cooling for a while.
- Check the pump reservoir for standing water and slime buildup.
- Make sure the discharge line is not kinked and the outlet is not blocked.
If the pump hums but does not move water, cycles constantly, trips a safety switch, or shuts the system down, that is typically a repair or replacement job.
Outdoor unit checks
9) Clear airflow around the condenser
Outdoor airflow matters more than people think. A mini-split can look like it is “running” while it quietly struggles because it cannot dump heat outside.
- Remove leaves, cottonwood fluff, grass clippings, and weeds around the unit.
- Follow the manual for minimum clearances. As a rule of thumb, aim for roughly 24 inches of open space where possible, especially in front of the discharge.
- Make sure nothing is leaning against the coil, including lattice or storage items.
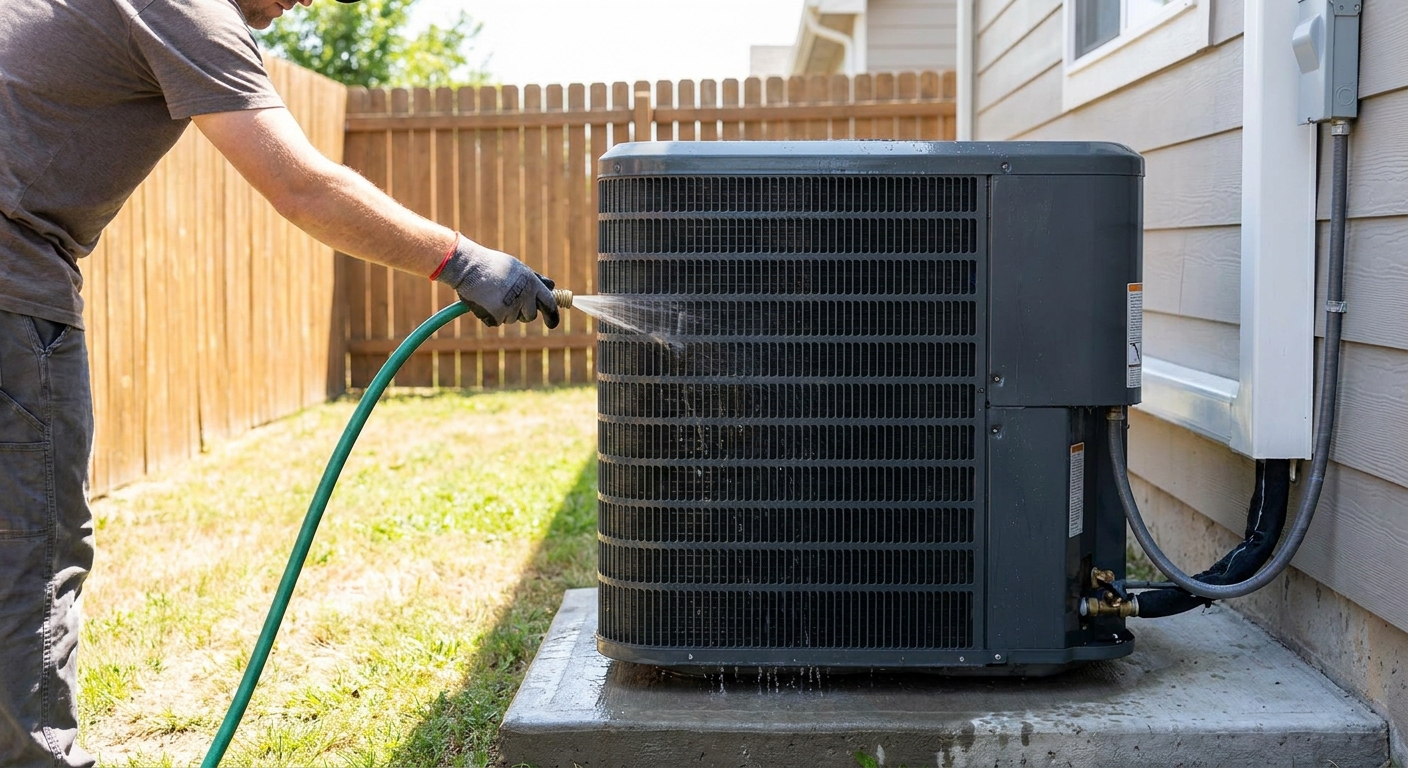
10) Gently rinse the outdoor coil
Turn the system off. Use a garden hose with gentle flow.
- Rinse from the inside out if you can safely reach (often not possible without opening panels). Otherwise rinse from the outside in.
- Do not use a pressure washer. It bends fins and permanently reduces airflow.
Ice-up vs low refrigerant
This is the part where homeowners can accidentally chase their tails. Ice on the indoor coil can be caused by something you can fix, like dirty filters, or something you should not touch, like low refrigerant or a mechanical problem.
Ice-up causes you can address
- Dirty filters or coil restricting airflow.
- Blower wheel buildup reducing airflow.
- Supply air blocked by furniture too close to the indoor head.
- Fan speed too low for conditions (test with higher fan).
- Trying to cool when it is chilly outside (some systems do not like low outdoor temps in cooling unless designed for it).
Signs of a sealed-system issue (call a licensed tech)
- The unit cools weakly and ices up repeatedly even after filter and coil cleaning and obvious airflow checks.
- You see ice on the refrigerant lines beyond the coil area.
- The indoor unit runs but the air is only slightly cool, and the outdoor unit does not seem to be moving heat like it used to.
- There is oily residue around flare connections or the outdoor unit piping. That can indicate a refrigerant leak.
- You hear unusual hissing at the indoor or outdoor unit.
Low refrigerant is not “used up” like gasoline. If it is low, it usually leaked out. A proper repair is leak detection, repair, evacuation, and recharge to spec.
Still not cooling?
11) Check return air and cycling
- Make sure curtains, tall bookshelves, or stacked storage are not blocking the top intake of the indoor head.
- Confirm doors to the space are in a normal position. A tight, closed-off room can take longer to stabilize, and people sometimes mistake that for “not cooling.”
- Listen for the system turning on and off every few minutes. That can be a sensor issue, a control problem, or improper sizing.
12) Cooling is fine, but the room stays hot
Sometimes the mini-split is doing its job, but the room is asking too much of it.
- Sun load through big windows can overwhelm a small head.
- Open-plan layouts can spread the cooling thin.
- Gaps around doors, attic heat, or uninsulated walls can make a system feel weak.
If your air feels cold at the unit but comfort is poor across the room, you might be looking at airflow direction, sizing, or insulation, not a mechanical failure.
When to call a pro
Stop DIY troubleshooting and call a licensed HVAC tech if:
- The coil ices up again within 24 to 48 hours after cleaning filters and confirming airflow.
- You suspect a refrigerant leak, see oily residue, or get persistent poor cooling.
- The unit shows an error code that returns after a single power-cycle.
- Indoor leaking continues after verifying the drain line end is clear and draining, or you suspect a cracked pan, pump failure, or hidden disconnection.
- You need to open electrical panels, remove the indoor head from the bracket, or access hidden drain connections.
What to tell the tech: model number, the error code (if any), whether the indoor coil iced, whether water is draining outside (and what the humidity has been like), whether you have a condensate pump, and what you have already cleaned or checked. That saves labor time, which usually saves you money.
The 30-Second Cheat Sheet
Essential takeaways for: Mini-Split Not Cooling or Dripping Water Indoors? Fixes to Try First
Do this in order (most fixes are steps 1 to 4)
- Confirm settings: Mode on Cool, set temp 3 to 5°F below room temp, fan on High (as a test), cancel timers/schedules, check remote batteries and any Follow Me/iFeel mode.
- Power-cycle once: breaker or disconnect off 1 to 5 minutes (follow your manual if it specifies), then wait 3 to 5 minutes before testing.
- Clean indoor filters: vacuum, rinse, fully dry, reinstall.
- Check indoor coil and blower wheel: if dirty, gently clean the coil; if iced, turn off and let it thaw (no scraping). Shine a flashlight past the louvers to look for a dirty blower wheel (caked dust/mold), which can cause weak airflow and recurring issues.
- If dripping indoors: find the drain line end outside. On a humid day, you should usually see dripping outside when cooling. If not, suspect a clog, kink, disconnection, pump issue, or a cracked/overflowing pan.
- Clear drain safely: straighten kinks, then use a wet-dry vac on the outdoor drain line end for 30 to 60 seconds. Seal the connection with a rag or tape. Avoid compressed air.
- Outdoor unit: clear debris and rinse coil gently with a garden hose (no pressure washer). Aim for at least the manual minimum clearance; as a rule of thumb, about 24 inches open space helps when possible.
Call a licensed HVAC tech if you see any of these
- Coil ices up again soon after filter and coil cleaning.
- Weak cooling plus oily residue at line connections (possible refrigerant leak).
- Error code returns immediately after one power-cycle.
- Indoor leaking persists and you cannot verify the drain path, pan condition, or pump operation.
- Burning smell, smoke, repeated breaker trips, or electrical buzzing.
What to tell the technician
Model number, any error code, whether the coil iced, whether water drains outside (and whether it is humid or dry outside), whether you have a condensate pump, and what you already cleaned or checked.
💡 Tip: Scroll up to read the full article for detailed, step-by-step instructions.
⬆️ Back to topAbout Marcus Vance
Content Creator @ Grit & Home
Marcus Vance is a lifelong DIY enthusiast and self-taught home renovator who has spent the last decade transforming a dilapidated 1970s ranch into his family's dream home. He specializes in budget-friendly carpentry, room-by-room renovations, and demystifying power tools for beginners. Through his writing, Marcus shares practical tutorials and hard-learned lessons to help homeowners tackle their own projects with confidence.