🚨 In a DIY emergency or rush?
Skip the details and jump straight to our 30-second cheat sheet for the most crucial info.
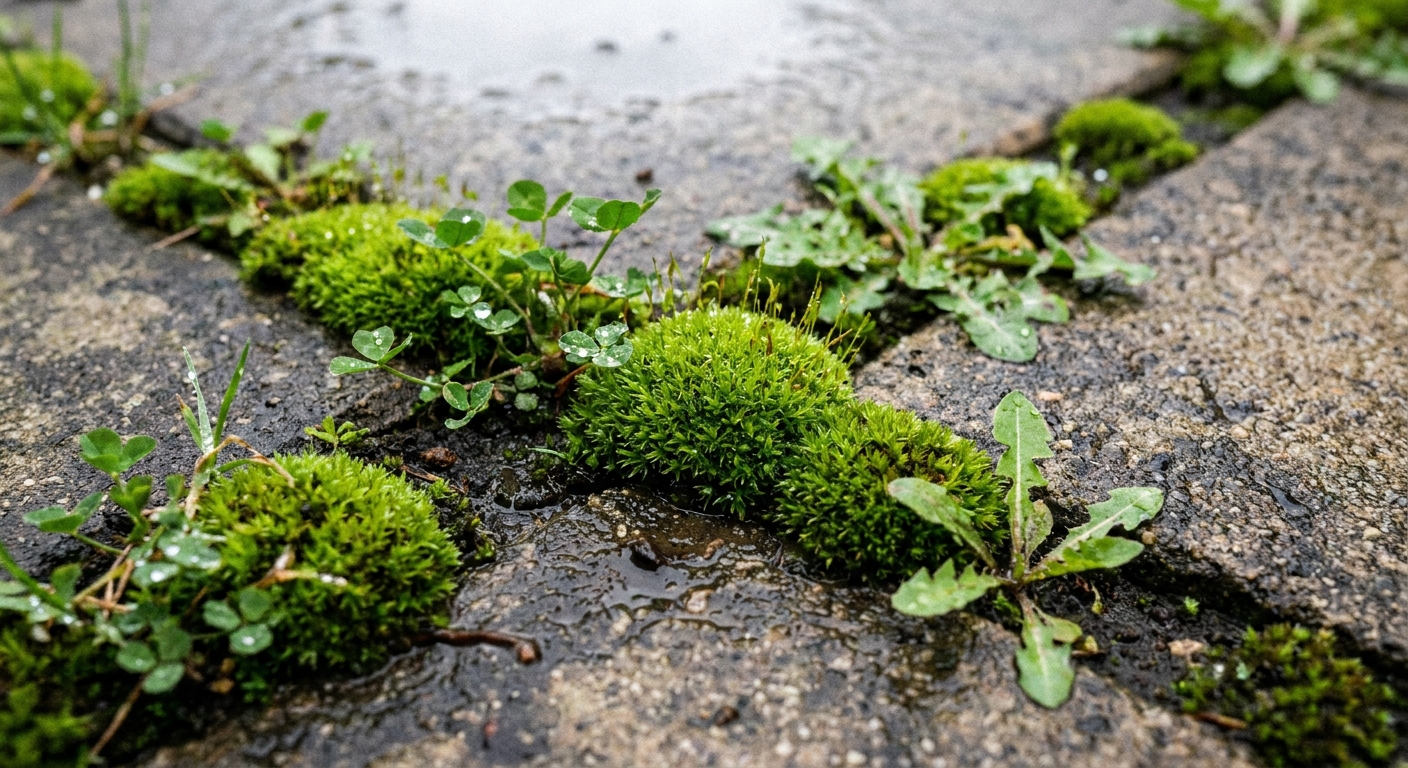
When moss and weeds show up in the joints between your patio pavers, it is not just an eyesore. It is often a sign the joints have lost sand, organic fines have built up, the surface stays damp too long, or some mix of all three. The good news is you do not need to tear out your patio to get it back under control.
In this guide I will walk you through a clean-and-reset approach that actually lasts: pull and kill what is there, clean the joints without wrecking your base, then re-sand properly (often with polymeric sand) so the cracks are not an open invitation for the next round.
Quick reality check: Most “weeds in pavers” are rooted in debris that collects in the joint, not magically growing up from the base below. Re-sanding removes that soil-like space, but nothing is 100 percent weed-proof forever because windblown seeds still happen.
Rough time and cost: A small patio is usually a half day to a weekend depending on growth and drying time. Materials are commonly a bag or two of polymeric sand plus cleaner. Pressure washing and haze remover (if needed) are the usual add-ons.
Why moss and weeds keep coming back
Most patios start out with tight, sand-filled joints. Over time, rain, ants, leaf litter, and aggressive washing remove joint sand. Once the joint is low, two things happen:
- Seeds land and germinate in the organic gunk and windblown dust that collects in low joints.
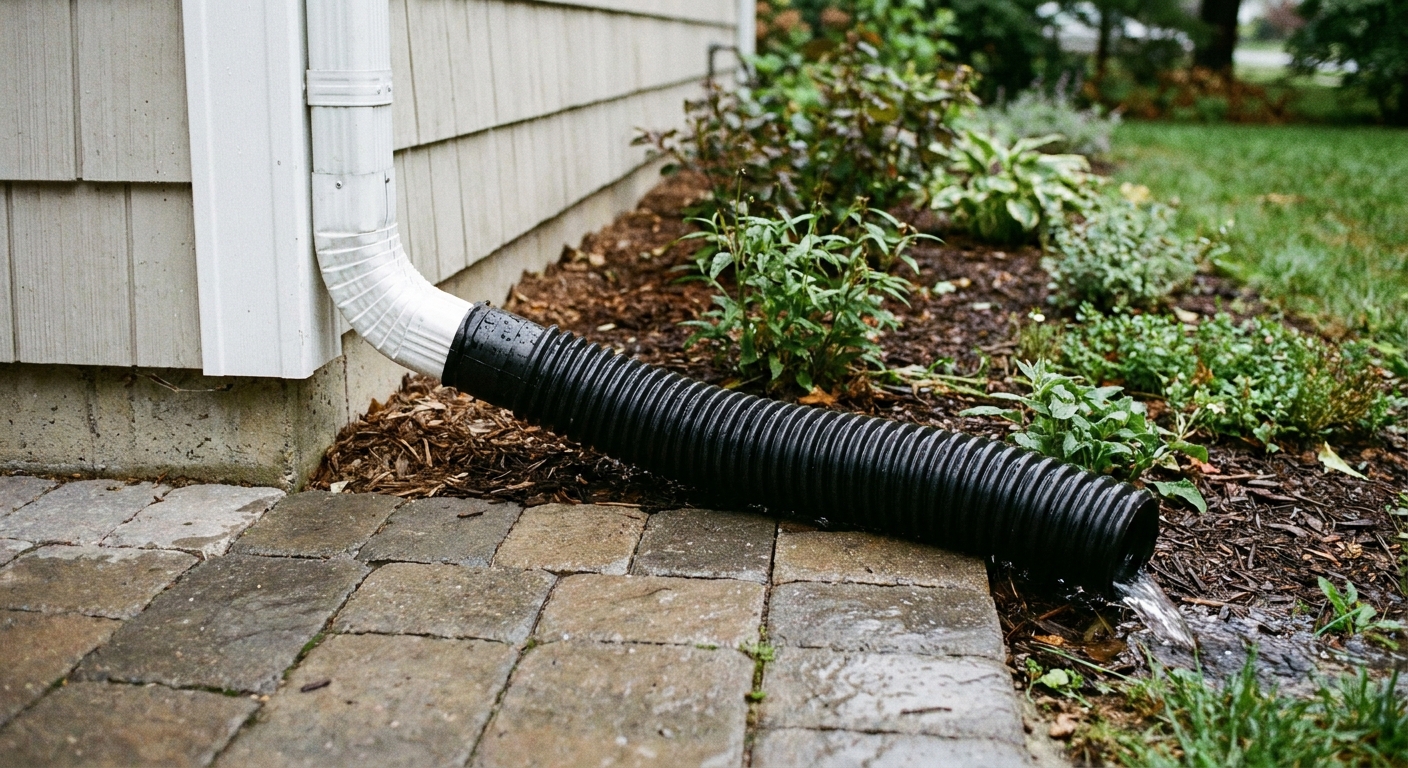
- Moss thrives where moisture lingers, especially in shade, on the north side of the house, near downspouts , or where the patio holds water.
If you only spray a killer and walk away, you are treating the symptom. The long-term fix is restoring the joint material and reducing the moisture and debris that feed growth.
Fast triage
You can spot-check your patio in two minutes.
Do a full clean and re-sand if you see:
- Joints that are more than 1/4 inch low in lots of areas
- Loose, gritty sand washing out every time it rains
- Moss that returns within a month or two
- Ant activity moving sand out of the joints
You might get away with a simpler cleanup if:
- Most joints are still full and firm
- Growth is limited to a shady corner
- You can remove it and still have sand nearly flush with the paver surface
Before you start
- Check the forecast: If you are using polymeric sand, plan for the dry window your product requires (often 24 to 48+ hours) plus its cure time.
- Know your paver type: Concrete pavers, natural stone, and clay brick can behave differently with cleaners and polymeric sand. When in doubt, test a hidden spot.
- Find the water sources: Downspouts and sprinkler overspray are usually the real moss fuel.
- Protect plants and drains: Pre-wet plants, cover sensitive beds, and keep runoff out of storm drains. Follow local rules for herbicides and cleaners.
Tools and supplies
Basic, budget setup
- Stiff push broom
- Nylon scrub brush (hand brush) for tight spots
- Weeding knife or crack weeder
- Leaf blower or shop vac
- Garden hose with a spray nozzle
For a long-lasting reset
- Polymeric sand matched to your joint width
- Rubber mallet (optional, for settling pavers)
- Plate compactor with a rubber mat (great for big patios, optional for small ones)
- Pressure washer (optional, with the cautions below)
Chemical options (choose one)
- Vinegar solution for weeds and mild algae, best in dry weather
- Bleach solution for heavy moss and mildew, use carefully
- Dedicated moss or algae cleaner or a paver-safe biocide, more predictable and often less harsh on surrounding plants when used as directed
My thrifty rule: If the patio sits next to landscaping you care about, I lean toward a dedicated cleaner labeled for hardscapes. It costs more up front, but it reduces the chance of accidentally smoking your shrubs.
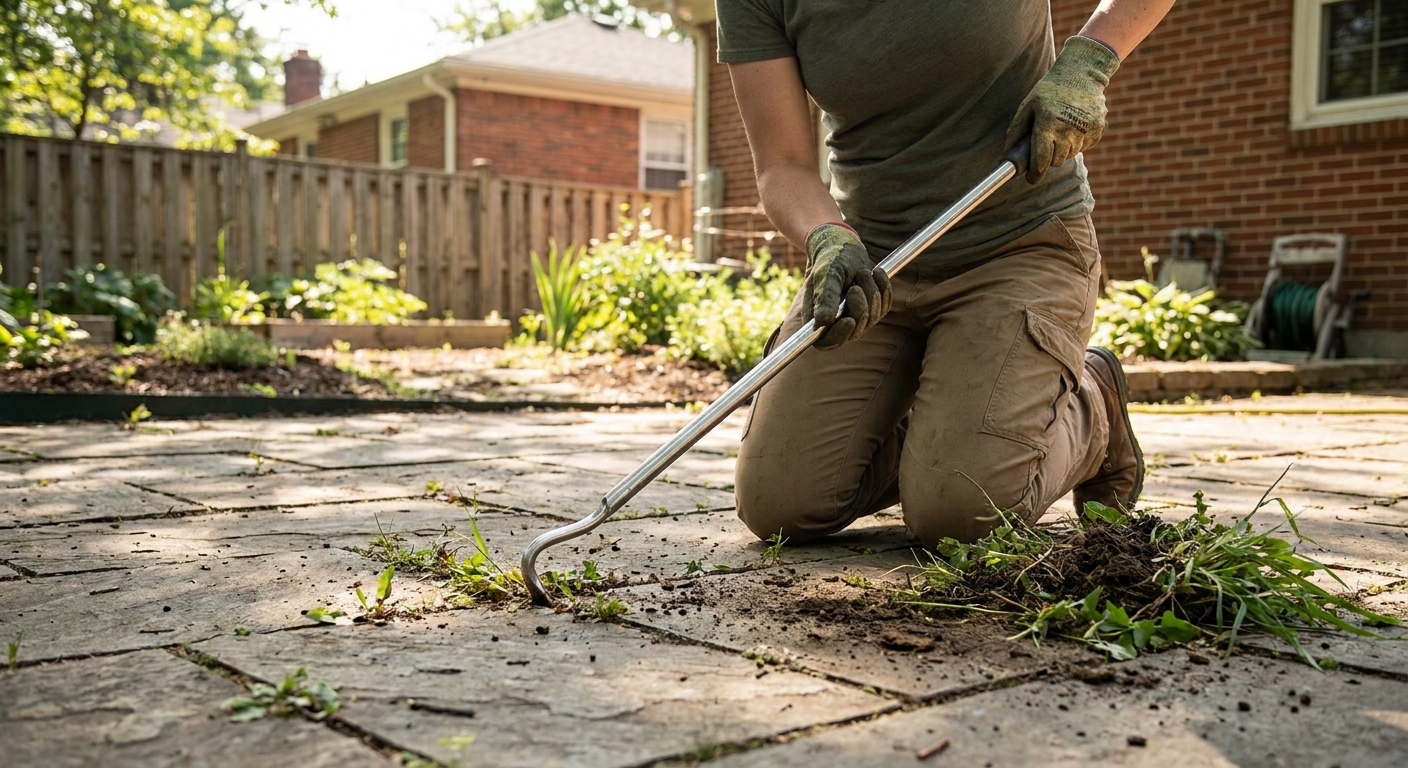
Step 1: Remove the bulk growth
- Pull and scrape first. Use a crack weeder or weeding knife to lift weeds and peel moss mats out of the joints.
- Bag it. Do not leave moss clumps on the patio. Moss fragments can reattach and spread in damp weather.
- Dry sweep. Sweep up loose debris so you are not making mud in the next step.
Step 2: Choose your cleaner
There is no single perfect option. Here is how I think about it in real life.
Vinegar (acetic acid)
- Best for: small weeds, light green film, and homeowners who want a simple pantry approach
- Pros: easy to find, low cost, no chlorine smell
- Cons: can burn nearby plants, less effective on thick moss, may need repeat applications
- Smart move: Test in an inconspicuous spot, especially on colored or sealed surfaces.
- How to use: Apply on a dry day, avoid overspray, let it sit, then scrub and rinse.
Bleach (sodium hypochlorite)
- Best for: heavy moss and dark organic staining
- Pros: fast visual results on organics
- Cons: can lighten or discolor some concrete and pavers, harms plants and soil biology, runoff is a real concern
- Smart move: Test in an inconspicuous spot first. Many contractors avoid bleach on some hardscapes for this reason.
- How to use: Spot treat, keep it off plants, rinse thoroughly. Never mix bleach with vinegar, ammonia, or other cleaners.
Dedicated moss and algae removers (paver-safe)
- Best for: predictable results and patios near landscaping
- Pros: formulated for outdoor surfaces, instructions are clearer, often less risk of unwanted reactions
- Cons: higher cost, still requires careful application
Important safety note: Whatever you choose, read the label, wear gloves and eye protection, and protect nearby plants with plastic sheeting or a gentle pre-wet and rinse routine.
Step 3: Clean the joints
This is where most people accidentally make the problem worse. The goal is to remove grime and roots while keeping the base and edge restraints intact.
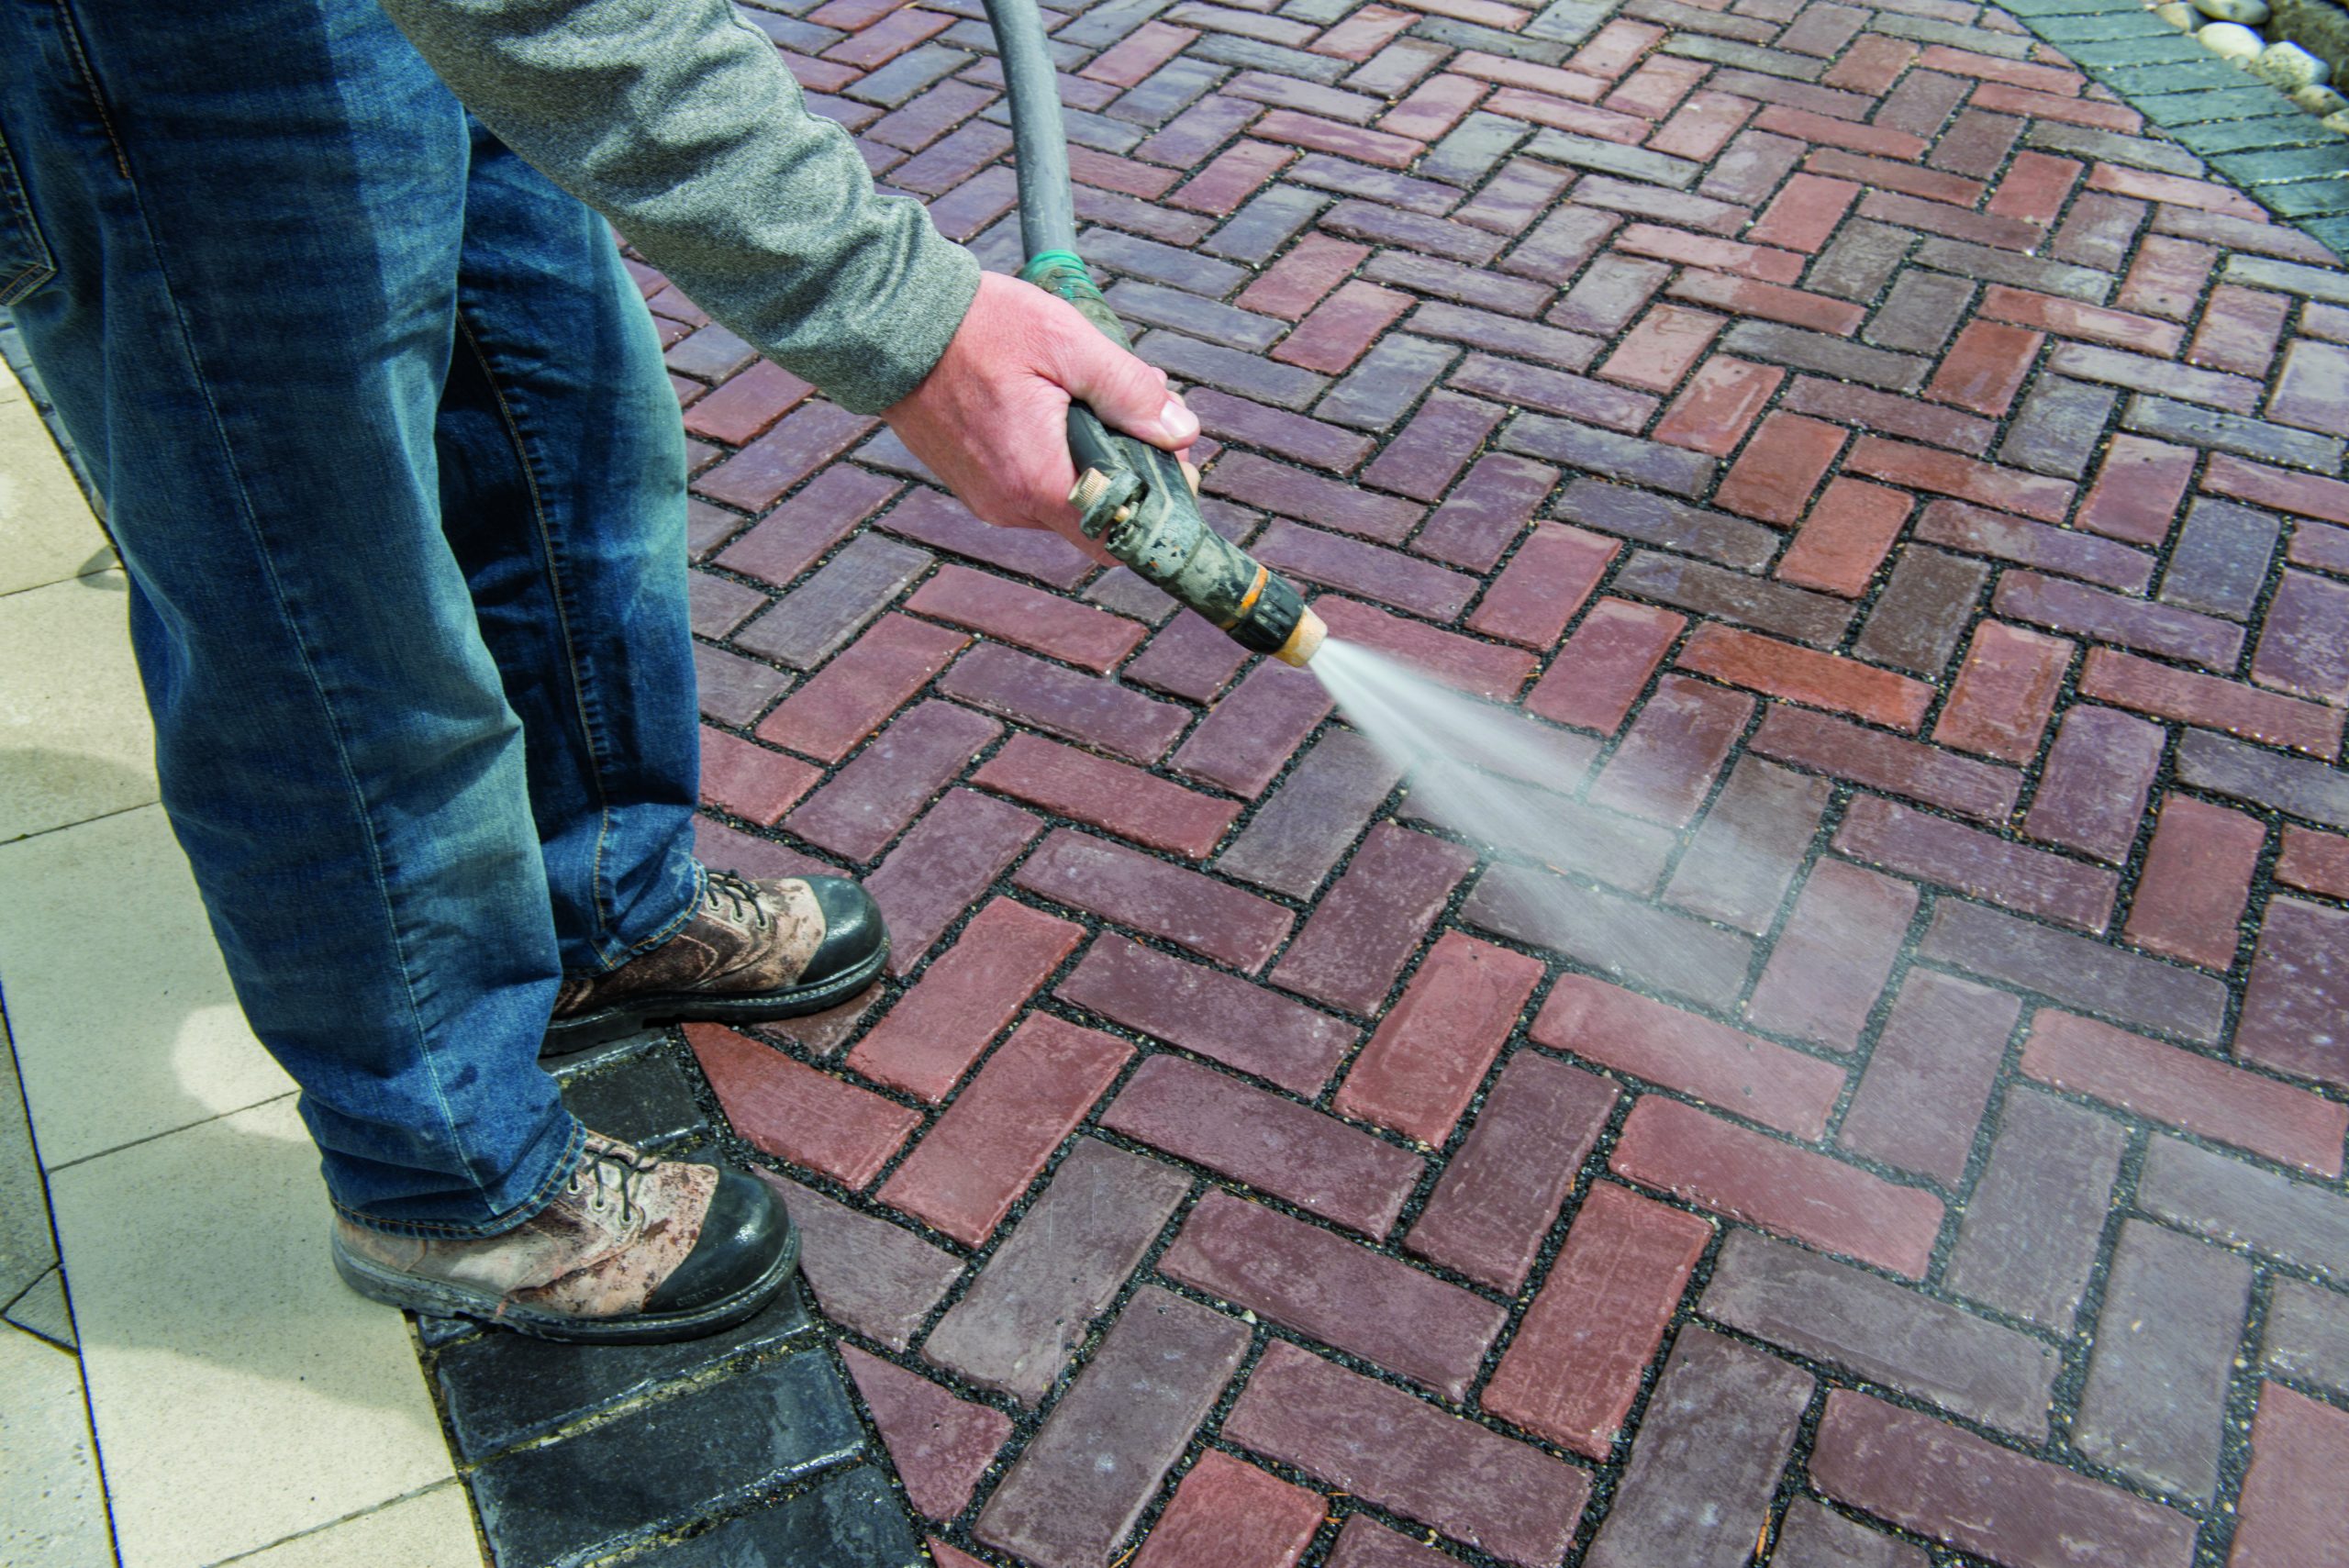
Option A: Hose, scrub, and rinse
- Wet a small section.
- Scrub joints with a stiff nylon brush.
- Rinse and push dirty water off the patio.
This takes more elbow grease, but you keep far more joint sand in place.
Option B: Pressure washing
Pressure washers are fantastic at blasting out weeds and moss. They are also fantastic at blasting out all your joint sand and undercutting pavers if you get careless.
- Use a wider tip (often 25 or 40 degree) instead of a pinpoint jet.
- Keep the wand moving and do not linger in one joint.
- Spray at an angle across the joint, not straight down.
- Start far back and move closer only if needed.
- Avoid edge areas where pavers can loosen if you wash out the bedding layer.
My honest mistake: The first time I pressure washed my own pavers, I got a little too proud of the power. I carved out joints so deep I had to buy twice the polymeric sand I planned on. Clean is good. Sand-free is not.
Step 4: Let it dry
If you are doing a polymeric sand reset, drying time is not optional. Polymeric sand needs dry joints so it can pack in and then activate properly when you mist it.
- Follow the bag: Dry-time requirements vary by manufacturer, temperature, humidity, shade, and whether the bedding layer is saturated.
- Rule of thumb: 24 hours of dry weather after washing is often the minimum, and 48 hours is often better, but cool humid shade can take longer than that.
Run a leaf blower over the surface to push standing water out of the joints. If you can feel cool dampness down in the joint, wait.
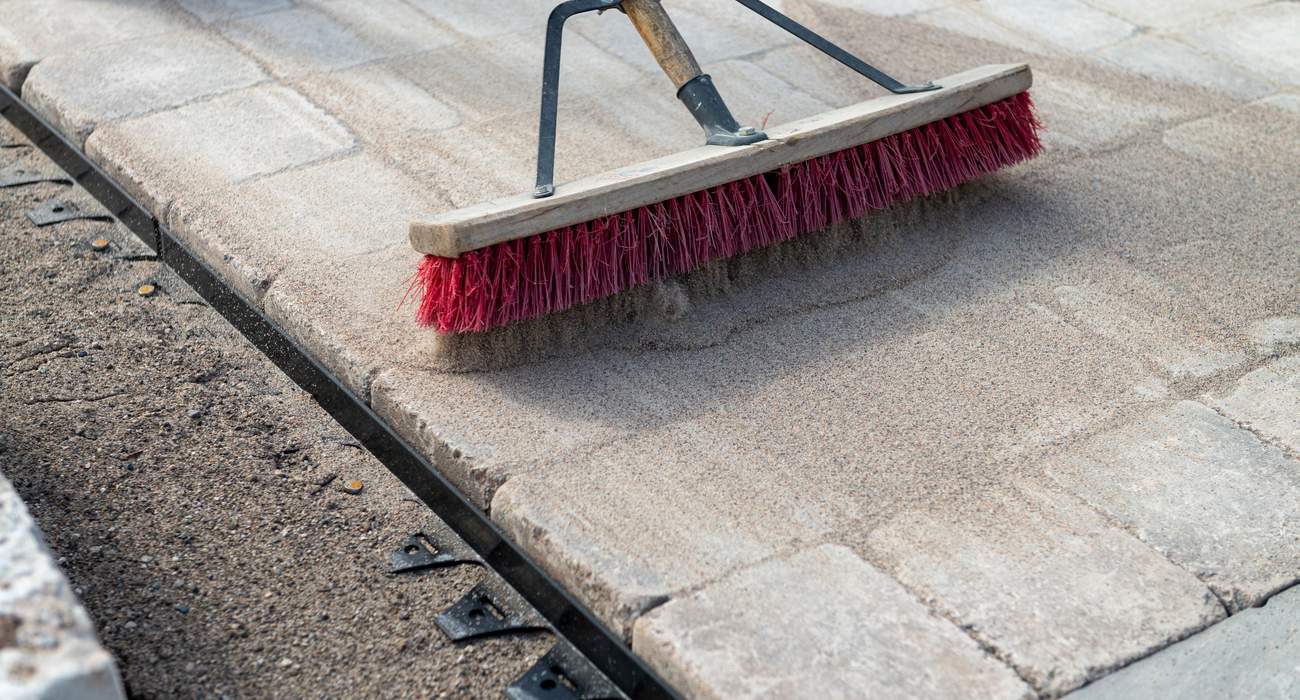
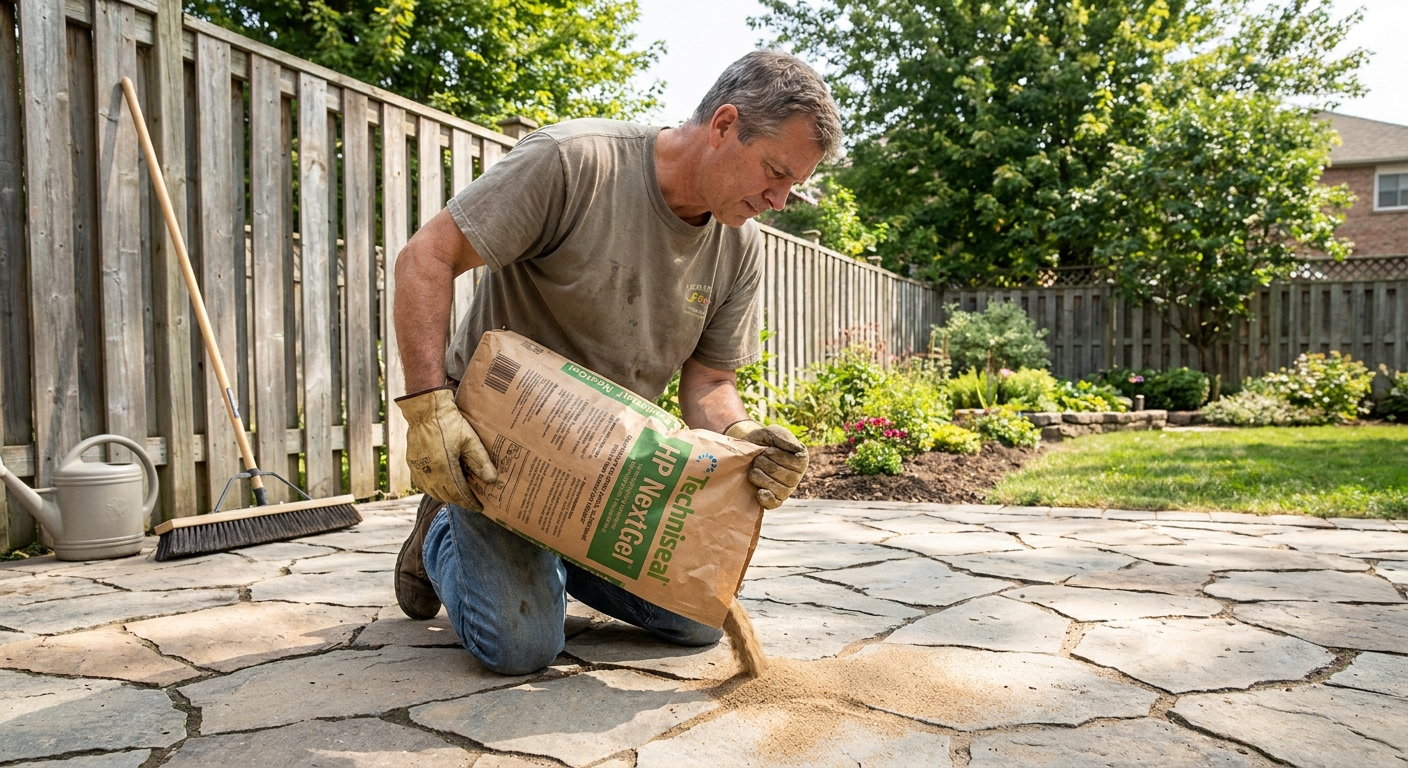
Step 5: Re-sand the joints
Re-sanding is the part that slows regrowth because it removes the open soil-like space weeds love.
Regular joint sand
- Pros: cheap, easy, forgiving
- Cons: washes out more easily, weeds can reestablish sooner
Polymeric sand
- Pros: hardens after activation, resists washout, slows weeds and makes ant excavation less likely
- Cons: costs more, installation is pickier, haze can happen if you do not clean the surface well before wetting
Polymeric sand is usually worth it for patios when the joints and base are a good match. Read the bag for joint width limits and required depth. Different products have different rules.
When not to use polymeric sand
Polymeric sand is great, but it is not universal. Pause and double-check your setup if any of these apply:
- Joints are too wide for the product spec (some mixes are not meant for very wide gaps).
- Permeable or open-graded systems: Some permeable paver installs are designed to drain through the joints and use specific joint aggregate, not polymeric sand.
- Constant moisture problems: If the patio stays wet for long stretches because of drainage issues, polymeric joints can fail early. Fix the water first.
- Material sensitivity: Some clay brick, natural stone, or sealed surfaces are more prone to staining or haze. Always test a small area and follow the manufacturer guidance for your paver type.
How to install polymeric sand
- Confirm joint depth. You generally want enough depth for the sand to lock in. If joints are shallow because of compacted debris, clean them deeper first.
- Work in small sections. Dump sand, then sweep it diagonally across the pavers so it packs the joints instead of bridging over them.
- Compact and top off. For larger patios, a plate compactor (with a rubber mat) helps settle sand. For small patios, use a rubber mallet to tap around stubborn spots and sweep again.
- Clean the surface thoroughly. Sweep, then leaf-blow the paver faces. Keep going until there is no dusty residue on the paver surface. This is the haze-prevention step. Take your time here.
- Mist to activate. Use a gentle shower spray, not a jet. Mist in passes according to the product directions. Too much water can wash polymer out and weaken the joint.
- Keep it dry during cure. Stay off the patio and avoid rain or sprinklers during the stated cure window.
If you get a haze: Haze risk goes up when you leave dust on the pavers or overwater during activation. Many manufacturers recommend a specific haze remover, and timing matters. Check the product instructions before you start scrubbing with random acids or harsh cleaners.
Fix what grows moss
If moss is your main villain, moisture is the real issue. You may not be able to change the shade, but you can usually change how long the surface stays wet.
Quick drainage wins
- Extend downspouts so roof water does not dump near the patio edge.
- Regrade soil around the patio so it slopes away from the pavers.
- Unclog joints and edges so water is not trapped by leaf litter.
- Check for low pavers that hold puddles. A few sunken pavers can keep a whole area damp.
Shade and airflow improvements
- Trim back shrubs to increase sun and breeze on the surface.
- Reduce overwatering from sprinklers that hit the patio daily.
Maintenance cadence
Once the joints are reset, a little routine keeps you from doing the big job again next season.
- Weekly to biweekly: quick blow-off or sweep to remove leaf litter and dirt that turns into joint soil
- Monthly in wet or shaded seasons: spot-pull weeds before they root deeply
- Spring and fall: gentle wash and inspection for low joints, then top off with compatible sand if needed
If you used polymeric sand and you start seeing gaps, that is your cue that water is moving through the joints harder than it should. Look upstream for the cause, usually downspouts, slope, or sprinkler spray patterns.
Common mistakes
- Blasting joints with a pressure washer: Start gentle, use a wide tip, spray at an angle, and accept that you will need to re-sand after aggressive cleaning.
- Applying polymeric sand to damp joints: It clumps, cures unevenly, and fails early. Let it dry and follow the product requirements.
- Overwatering during activation: Mist in light passes. More water is not better.
- Skipping surface cleanup before activation: Leftover dust on paver faces is the number one reason for haze.
- Assuming chemicals replace re-sanding: Kill and clean helps, but the joint needs material to stay hostile to weeds.
- Expecting “weed-proof” joints: Polymeric sand reduces germination space and washout, but windblown seeds can still sprout in surface dust over time.
When to call a pro
DIY is great here, but a pro is worth considering if:
- Pavers are rocking or settling in multiple areas, which points to base problems
- Water pools on the patio and you need pitch correction
- You have a large area and want plate compaction and re-leveling done quickly
Most homeowners can still handle the maintenance afterward once the hardscape is stable again.
The 30-Second Cheat Sheet
Essential takeaways for: Moss and Weeds Between Patio Pavers
Best long-term fix
Clean the joints, let them dry, then re-sand with polymeric sand (if your patio is a good fit for it). Sprays alone are temporary because open, low joints collect dirt and seeds again.
Pressure washing rules (so you do not wreck your patio)
- Use a 25 or 40 degree tip, not a pinpoint jet.
- Spray at an angle across joints and keep moving.
- Expect to re-sand after washing if you blast out joint material.
Vinegar vs bleach vs pro cleaner
- Vinegar: cheap, decent on small weeds and light film, weaker on thick moss, can burn plants. Test a small spot first.
- Bleach: strong on moss and mildew, higher risk to plants and runoff, can lighten or discolor some pavers. Test a small spot first and never mix with other cleaners.
- Dedicated moss or algae remover: more predictable and often safer around landscaping when used as directed.
Polymeric sand success checklist
- Joints clean and fully dry. Follow the bag. In cool, humid shade it can take longer than 48 hours.
- Sweep sand in, compact, then top off.
- Clean paver faces until no dusty residue remains before wetting to avoid haze.
- Mist to activate, do not flood.
- Keep dry during cure per the bag.
Slow moss regrowth
- Extend downspouts and reduce sprinkler overspray.
- Trim plants for more sun and airflow.
- Fix low spots that hold puddles.
Easy maintenance cadence
- Sweep or blow off debris every 1 to 2 weeks.
- Spot-pull weeds monthly in wet seasons.
- Inspect joints spring and fall and top off if needed.
💡 Tip: Scroll up to read the full article for detailed, step-by-step instructions.
⬆️ Back to topAbout Marcus Vance
Content Creator @ Grit & Home
Marcus Vance is a lifelong DIY enthusiast and self-taught home renovator who has spent the last decade transforming a dilapidated 1970s ranch into his family's dream home. He specializes in budget-friendly carpentry, room-by-room renovations, and demystifying power tools for beginners. Through his writing, Marcus shares practical tutorials and hard-learned lessons to help homeowners tackle their own projects with confidence.