
The $100 closet reset (what you are really fixing)
Most small closets are not short on space. They are short on usable space. One tall hanging section wastes the lower half. One deep shelf becomes a linty junk cave. And the back wall is basically a storage opportunity we never touch.
This guide is my go-to approach when we need a real improvement without a full built-in makeover. It works for renters and homeowners because most of the upgrades are removable and low-risk.
- Goal: everything has a “home” you can reach without a ladder or a 10-minute shuffle.
- Budget: under $100 (pick the upgrades your closet needs most).
- Time: 1 to 3 hours for quick upgrades, or a weekend afternoon for the simple DIY shelf system.
If you only do 2 things
- Empty space under one rod: add a second hanging level.
- Clutter on shelves and floor: add bins plus a door organizer.
Tools and supplies (keep it simple)
Basic tools
- Tape measure
- Pencil
- Stud finder (helpful, not mandatory)
- Level (a small torpedo level is perfect)
- Drill and bits
- Screwdriver
Common budget organizers
- Shelf risers or under-shelf baskets
- Second tension rod or closet rod kit
- Over-the-door organizer (clear pockets or wire rack style)
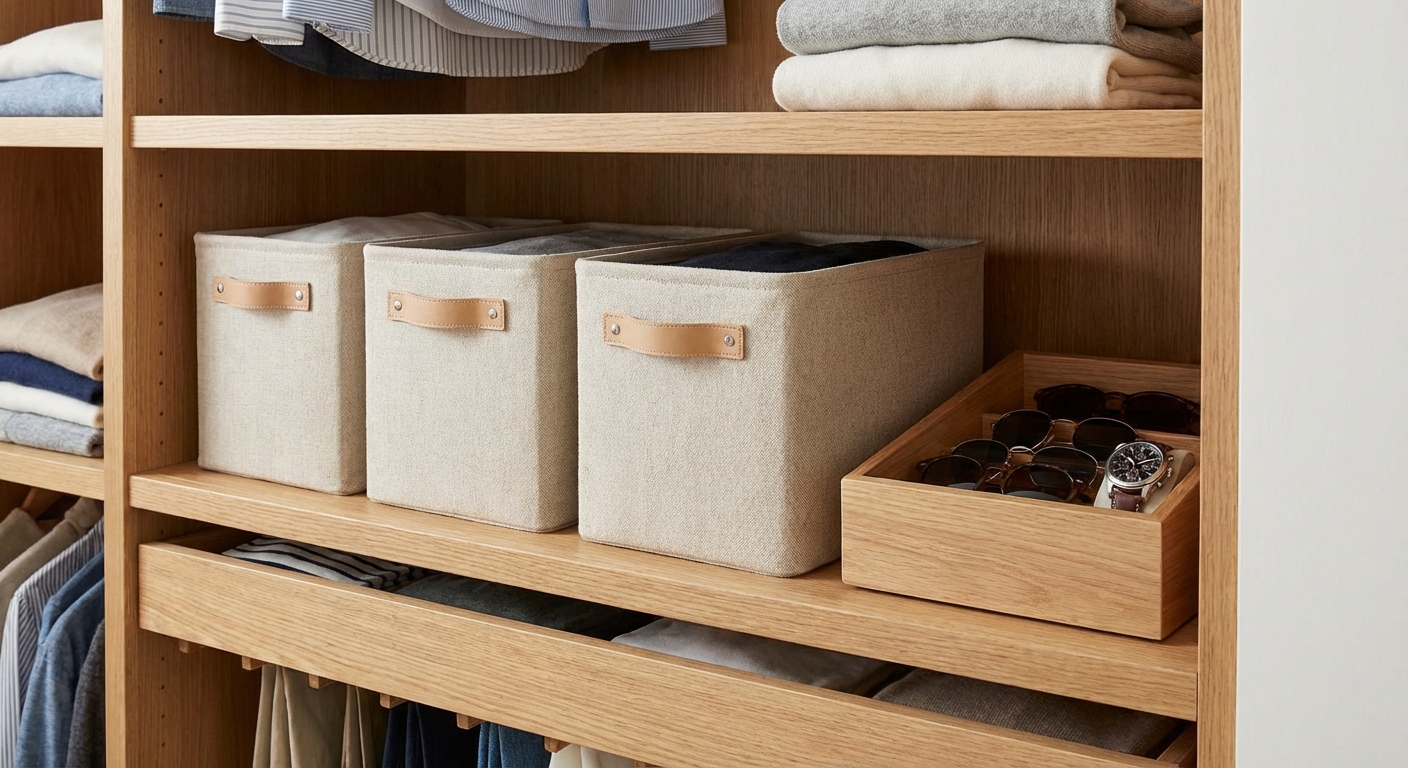
- Two to four bins (ideally matching)
- Drawer dividers or small bins for accessories
- Optional: slim velvet hangers for space savings
Marcus note: Matching bins is not just an aesthetic thing. When every bin is the same footprint, you can rearrange without playing storage Tetris.
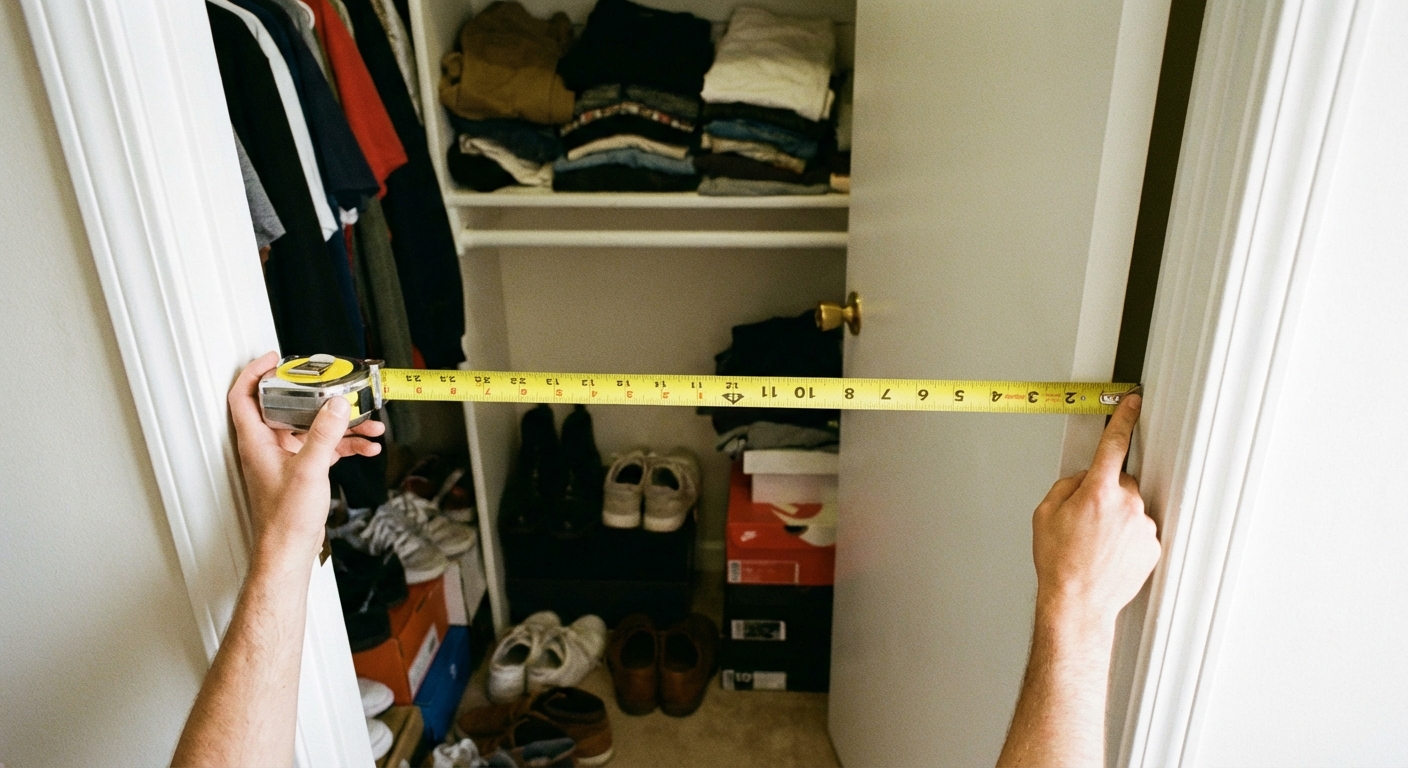
Step 1: Measure first so you don't buy the wrong stuff
Before you order anything, grab a few measurements. This takes five minutes and saves you the classic “this doesn't fit” return run.
- Closet width: left wall to right wall, at the height where rods or shelves will sit.
- Closet depth: back wall to the inside edge of the door trim (or the point where the door closes). Closets are often around 20 to 24 inches deep, but it varies.
- Hanging height: floor to existing rod, plus the hanging length of your longest daily-wear items.
- Door clearance: if you plan door storage, measure from the back of the door to the nearest rod or shelf so the organizer does not crash into it.
Step 2: Purge with a keep zone (the part most people skip)
If you organize clutter, you just get a cleaner-looking clutter pile. My rule is simple: only organize what you're actually willing to store.
Fast purge method
- Put a laundry basket on the floor for “donate.”
- Pull everything out and sort into: daily, sometimes, rarely, gone.
- Create a “keep zone” on your bed or a cleared floor space. If it doesn't land there, it doesn't go back in.
Thrifty tip: If you're unsure about an item, hang it with the hanger backward. If it's still backward in 60 days, you have your answer.
Step 3: Make one shelf twice as useful (shelf risers and under-shelf baskets)
The top shelf is often the only shelf in a small closet, so it needs to work overtime. Shelf risers and under-shelf baskets create a second layer without installing anything permanent.
Where shelf risers shine
- Stacked tees, sweaters, jeans
- Handbags and clutches (kept upright so they don't slump)
- Two-tier shoe storage for off-season shoes
Quick setup
- Put the riser on the shelf and test height with the items you actually own.
- Keep the front edge clear for the things you use weekly.
- Use the back zone for seasonal items in bins.
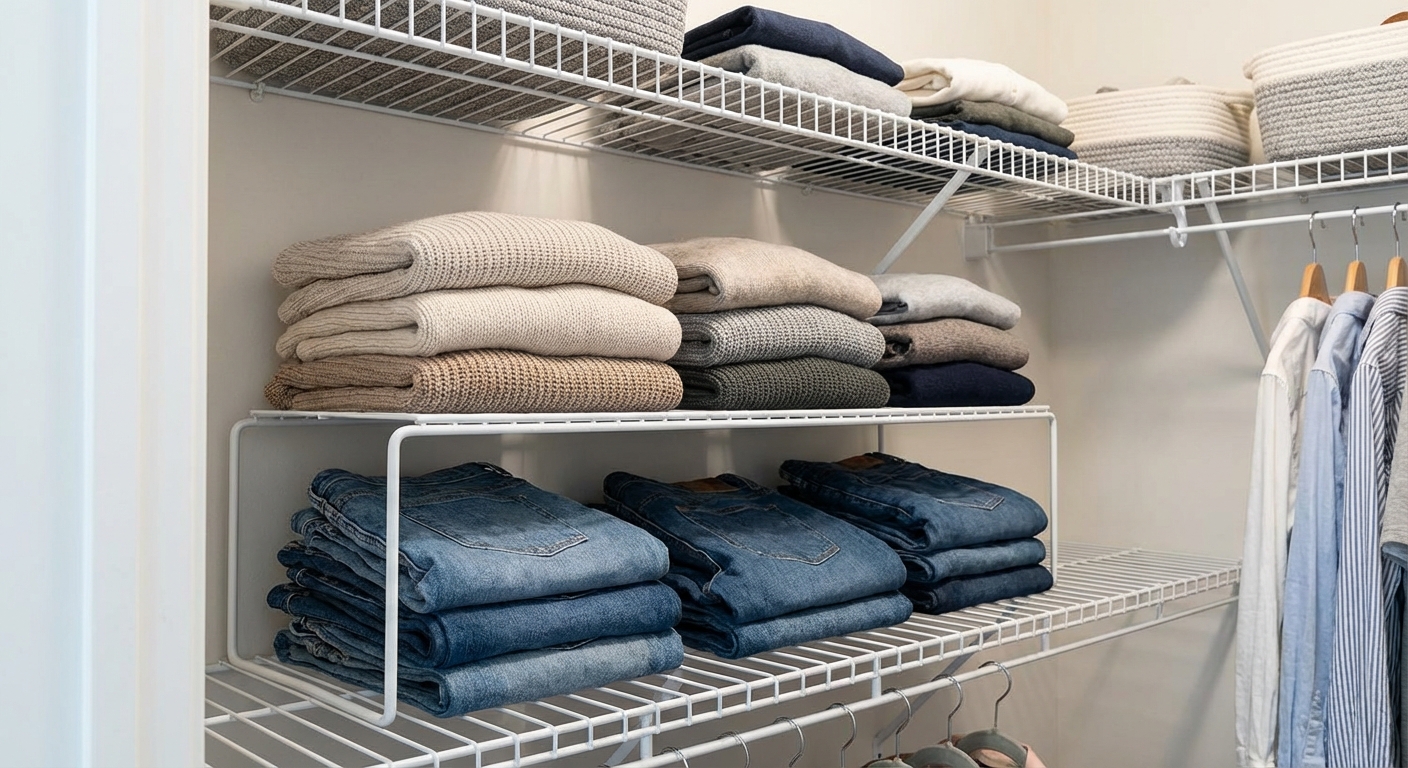
Budget range: $12 to $25
Step 4: Add a second hanging level (double-hang rod)
If your closet has one rod with empty space below it, this is the biggest bang-for-your-buck upgrade. Many shirts and folded-over pants only need about 36 to 40 inches of hanging height, but it depends on your hangers and your actual clothes. Measure your longest “short-hang” item and give it a little breathing room.
Two easy options
- Tension rod (renter-friendly): quick install, best for lighter clothing.
- Fixed rod kit (sturdier): uses brackets and screws, supports more weight.
Placement that actually works
- Keep the top rod for shirts, blouses, light jackets.
- Use the bottom rod for pants, skirts, kids’ clothing, or shorter items.
- Leave one side as a long-hang zone if you have dresses or coats.
- Spacing shortcut: a common starting point is about 36 to 40 inches from the floor to the lower rod, and about 80 to 82 inches from the floor to the upper rod. Then adjust based on your measurements so nothing drags or collides.
My mistake, so you don't repeat it: I once set the lower rod too high, and every time I pulled a shirt off the top rod it snagged on the hangers below. Leave enough clearance so hangers can swing a little without kissing each other.
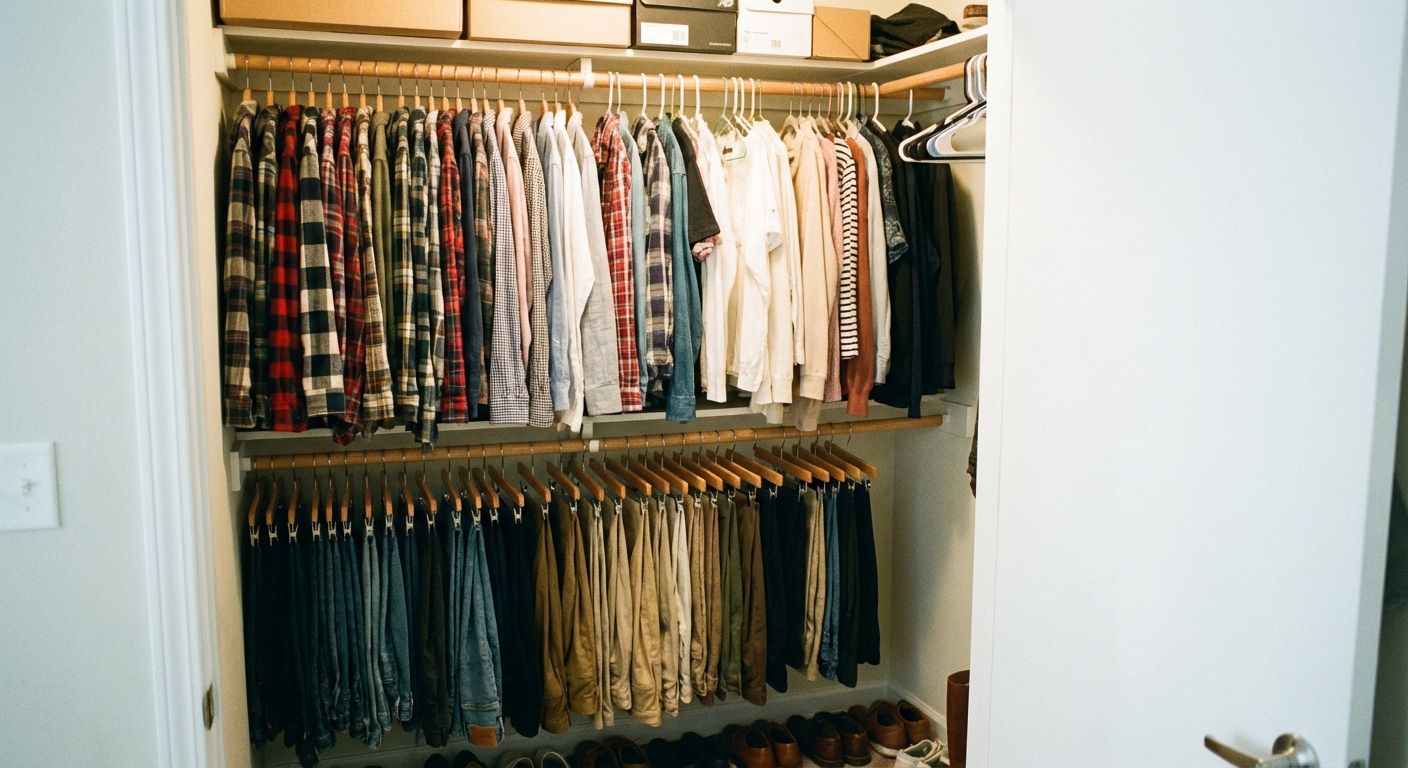
Budget range: $10 to $35
Step 5: Use the door like a storage wall
The back of the closet door is prime real estate. Door-mounted storage is also one of the best options for renters because it's removable and doesn't require drilling into studs.
What to store on the door
- Socks, tights, belts, scarves
- Small handbags or clutches
- Hair tools and brushes (when fully cooled)
- Cleaning supplies for a linen closet setup
Door organizer types
- Clear pocket organizer: best for small items you want to see.
- Wire rack organizer: best for bulkier items and bottles.
Do this before you commit: close the door slowly and check clearance. If the organizer bumps a rod or shelf, switch to a slimmer style or mount it lower.
Noise fix: If an over-the-door unit rattles, stick small felt pads on contact points. Cheap and instantly calmer.
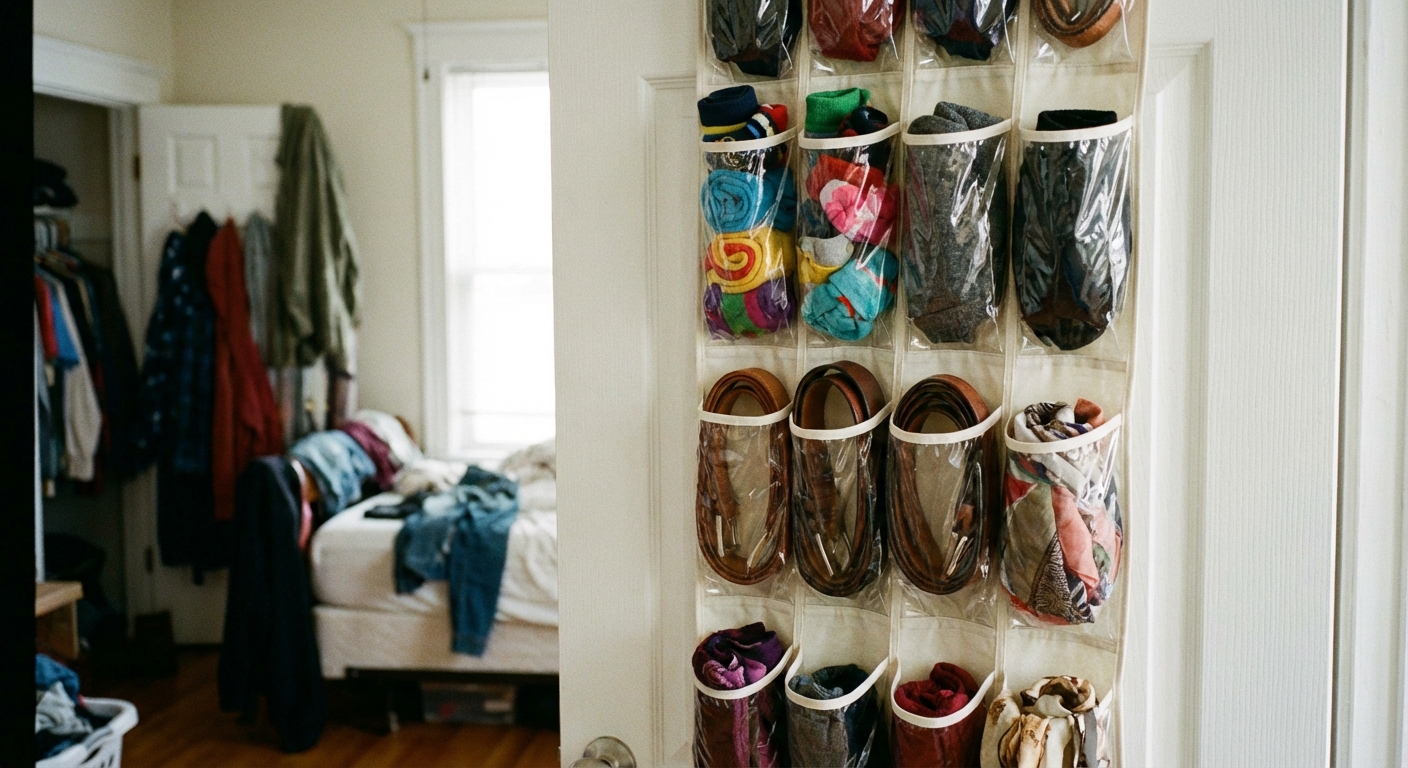
Budget range: $12 to $30
Step 6: Bins and dividers that keep you organized next month too
Bins are not magic. The magic is using categories you'll actually maintain. I like to organize by “how often” first, then by type.
Simple bin plan
- Weekly: easy reach, eye level, no lid if you're in and out often.
- Monthly: top shelf front, lidded bin is fine.
- Seasonal: top shelf back, labeled lidded bin.
Dividers that make drawers and shelves behave
- Use drawer dividers for underwear, socks, and tees.
- Use small open bins on shelves for chargers, sunglasses, watches, and “pocket dump” items.
Weight rule: heavy items low, light items high. It saves your back and your shelves.
Budget range: $20 to $45 for a small set
The under-$100 shopping list (pick what fits your closet)
Here is a realistic mix-and-match cart that stays under $100 for most closets.
- Shelf riser or under-shelf basket: $15
- Tension rod or rod kit for double-hang: $20
- Over-the-door organizer: $18
- Two matching lidded bins: $22
- Small dividers or mini bins: $10
Estimated total: $85
Rental note: tension rods and over-the-door organizers avoid holes. If you do install a fixed rod or cleats, plan to patch a few small screw holes later. Always check your lease rules before drilling.
DIY: Build a simple shelf system with basic tools
If your closet is missing shelves, or the existing shelf is flimsy, a simple cleat-and-shelf build gives you a custom fit without “custom closet” pricing. This is the kind of project that looks intimidating until you do it once.
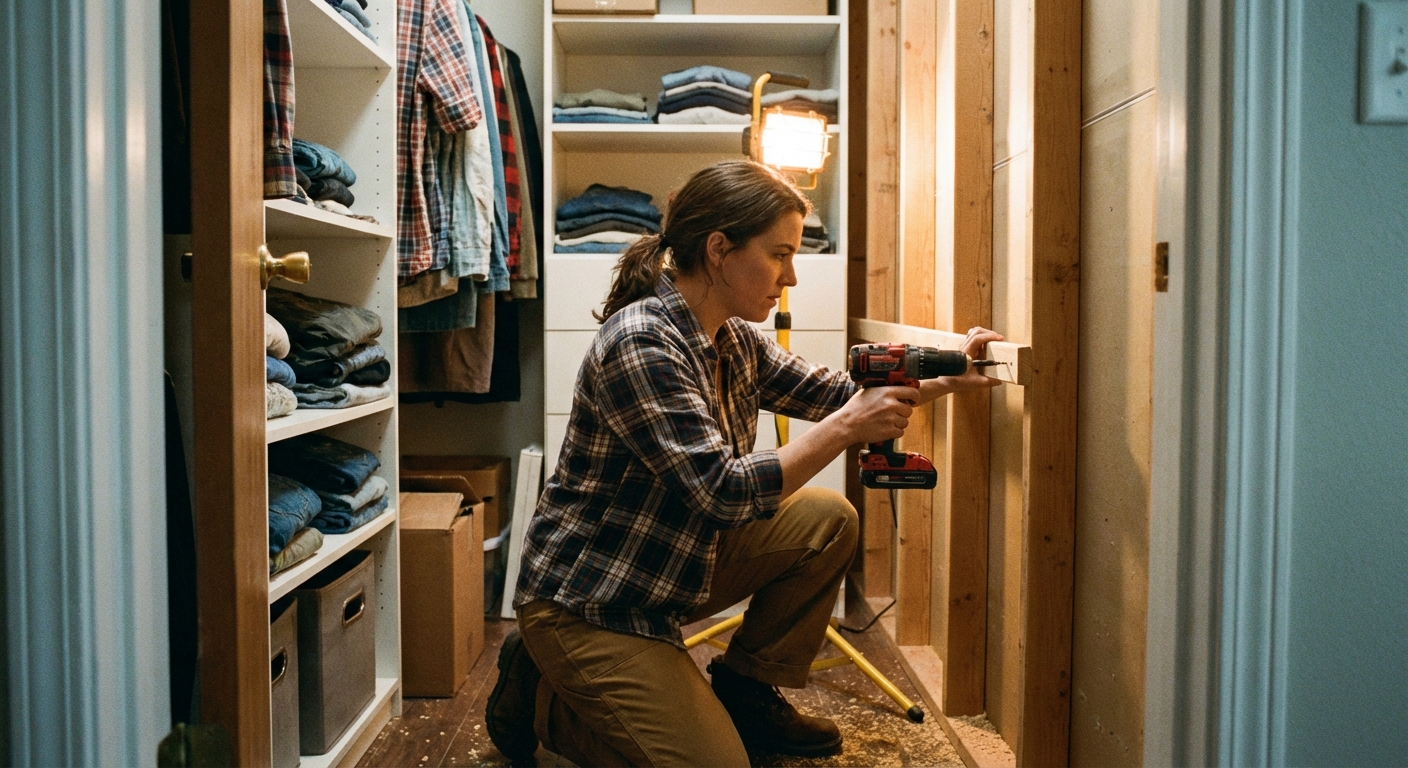
What you'll build
Two to three sturdy shelves on one side of the closet. The outer edges are supported by wall cleats. The inner edge is supported by a vertical divider (basically a skinny support wall) so the shelves are not hanging in midair.
Materials (typical small closet)
- 1x2 or 1x3 boards for cleats (usually 2 pieces per shelf: back and outer side): $8 to $16
- 3/4-inch plywood or pre-cut laminated shelf boards: $20 to $45
- One vertical divider panel (1/2-inch or 3/4-inch plywood, cut to shelf depth and your shelf stack height): $15 to $35
- Wood screws for cleats into studs (often 2 to 2.5 inches): $6
- Shorter screws for fastening shelves to cleats and divider (often 1 to 1.25 inches): $4 to $8
- Paint or primer (optional, if you already have it): $0 to $15
- Optional: L-brackets for extra support under the front edge: $6 to $15
Layout sizes that work
- Shelf depth: 10 to 12 inches is great for folded clothes and bins without feeling cramped.
- Vertical spacing: 12 to 14 inches between shelves for most bins and stacks.
- Bottom clearance: leave 12 to 18 inches at the bottom if you want shoes or a hamper.
- Shelf width: 18 to 30 inches works well for a “one side” shelf bay in a reach-in closet.
Build steps
- Decide your shelf bay width. Mark the inner edge of the shelves on the back wall with a pencil. This is where the vertical divider will sit.
- Mark shelf heights. Use a level and pencil to draw a line on the back wall and the outer side wall for each shelf.
- Install the divider so it can't wobble. Studs do not always land where you want the divider, so use a simple “box it in” approach:
- Floor cleat: screw a small cleat to the floor where the divider will sit (or use two L-brackets if you cannot screw into the floor).
- Back cleat: screw a cleat to the back wall along your divider line. Hit a stud if you can. If you cannot, use heavy-duty anchors rated for your wall type and keep loads light.
- Optional top stretcher: add a short horizontal board at the top from the divider to the back wall or the side wall. This keeps the divider plumb and stiff, even when studs are not cooperating.
- Set the divider into place, check it with a level, then screw it into the floor cleat and back cleat (and the top stretcher if you used one).
- Cut cleats. You need a back cleat per shelf and an outer side cleat per shelf. The divider replaces the missing inner side wall.
- Install cleats. Pre-drill to avoid splitting, then screw cleats along your level lines. When you can, prioritize studs.
- Cut shelves to size. Measure from the outer side wall to the divider, and cut each shelf board.
- Set shelves on cleats and divider. Screw down through the shelf into the cleats and also into the top edge of the divider so nothing shifts. Use the shorter screws here so you do not poke through the top of the shelf.
- Finish if you want. A quick coat of paint makes it look built-in. Let it dry before loading it up.
Safety and weight notes
- Do not overload shelves attached only with drywall anchors.
- If you plan to store heavy items, prioritize studs, consider adding blocking, and use 3/4-inch material.
- Follow manufacturer ratings for tension rods and door organizers. They are great, but not magic.
- Wear eye protection when drilling overhead.
Budget reality: If you already have screws and paint, this can land around $55 to $85. If you need to buy everything new, it may brush up near $100, but you'll get sturdier storage than most “closet kits.”
Small closet layout ideas (quick wins)
If you have mostly short-hang clothes
- Double-hang rods across most of the closet
- Top shelf for bins and seasonal items
- Door organizer for accessories
If you have long-hang items
- One long-hang section (about 24 to 30 inches wide)
- One side with two to three shelves for bins and folded items
- Shoes under the long-hang zone
If you share the closet
- Split left and right sides by person
- Use matching bins with each person assigned a color or texture
- Keep a shared “misc” bin, but cap it at one
Maintenance that takes 2 minutes
The best closet system is the one you can keep up with on a tired Wednesday night.
- One-in, one-out: when a new shirt comes in, an old one leaves.
- Reset Sundays: put 5 things back where they belong.
- Label only the bins you can't see into: less visual clutter, same clarity.
If you do the measuring, add the second hanging level, and give the door a job, you'll feel the difference immediately. Everything else is just fine-tuning.
About Marcus Vance
Content Creator @ Grit & Home
Marcus Vance is a lifelong DIY enthusiast and self-taught home renovator who has spent the last decade transforming a dilapidated 1970s ranch into his family's dream home. He specializes in budget-friendly carpentry, room-by-room renovations, and demystifying power tools for beginners. Through his writing, Marcus shares practical tutorials and hard-learned lessons to help homeowners tackle their own projects with confidence.