🚨 In a DIY emergency or rush?
Skip the details and jump straight to our 30-second cheat sheet for the most crucial info.
Pocket doors are great until the day they start dragging, rubbing, or refusing to roll back into the wall. The tricky part is that a pocket door is not usually “sticking” because of hinges like a standard swing door. Most often, it is the track, the rollers, the hangers, the bottom guide, or something inside the pocket that is stealing your clearance. (Yes, the door slab can also swell, warp, or start scraping after new flooring. We will cover that too.)
I have wrestled with pocket doors that felt possessed. In my case, it was a loose hanger nut that slowly backed off until the door leaned like a shopping cart with one bad wheel. The good news is most pocket door issues are fixable with basic tools and a little patience.
Quick diagnosis: what the door is telling you
Before you pry off trim or buy new rollers, do two quick tests. They usually point you to the exact failure.
Test 1: Does it drag at one end?
Quick terms so we are talking about the same thing:
- Leading edge: the edge you grab at the opening (the part you see in the room).
- Trailing edge: the edge that disappears into the pocket.
- Leading edge drags the floor or rubs the jamb: one hanger is lower than the other, a roller is binding, the bottom guide is off-center, or the door is tilted off level.
- Trailing edge drags as it disappears into the pocket: debris in the pocket, bent track, a rear roller off the track, or a pocket-side fastener poking into the cavity.
Test 2: Does it feel rough or does it feel like it hits something?
- Rough, gritty rolling: dirty track, worn rollers, or lack of the right lubricant.
- Hard stop like it hit a wall: screw protruding into the pocket, broken door guide, warped slab, anti-jump clip snagging, or track bracket pulling loose.
Safety note: If the door is glass, heavy solid-core, or it is hanging by one roller, recruit a helper. Pocket doors can surprise-drop when a hanger lets go. Wear eye protection when prying trim. If your home is older, assume paint could contain lead and use lead-safe practices.
Tools and supplies (keep it simple)
You can do most realignments with a small kit. Grab these before you start so you are not holding a door with one hand while searching for a wrench.
- Utility knife
- Flat pry bar and a stiff putty knife or thin scrap of wood (to protect paint)
- Hammer (optional, mostly for gently setting a pry bar, not for “pounding” trim)
- Screwdrivers or bits that match your hardware (often Phillips or square drive)
- Adjustable wrench or a small socket set (commonly 7/16 in. or 1/2 in. for hanger nuts)
- Optional but very handy: a thin pocket door wrench, or an angled box wrench, for tight clearances at the top
- Step stool
- Flashlight or headlamp
- Vacuum with crevice tool
- Dry silicone spray or PTFE dry lube (non-greasy). Some manufacturers prefer lubing the rollers, not the track, so follow your hardware maker if you can identify it.
- Painters tape and a marker (label trim pieces)
- Optional: replacement rollers or hangers (and track if yours is damaged)
Lubricant warning: Avoid heavy grease and avoid blasting WD-40 into the track as your long-term fix. Grease and oily sprays collect dust and turn into grinding paste inside the pocket.
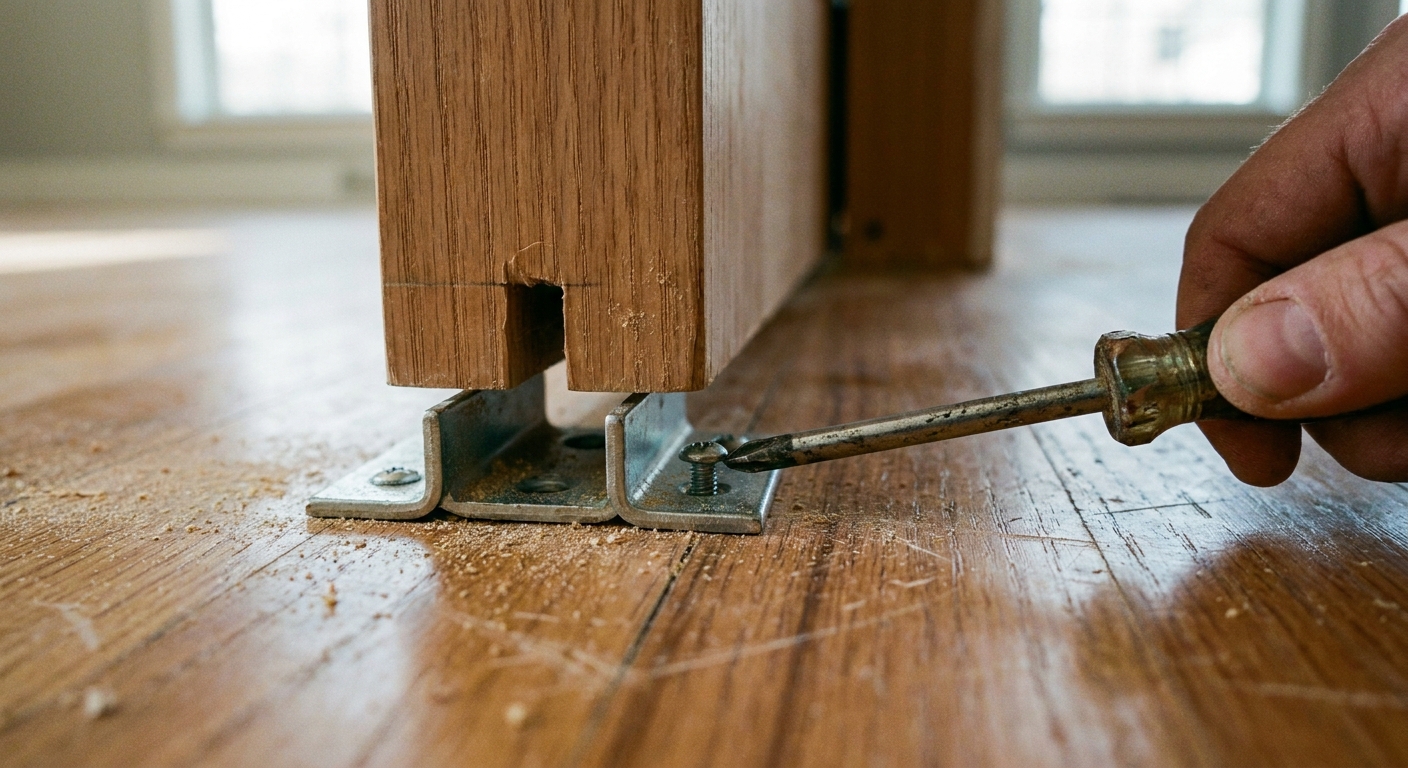
Step 1: Check the bottom guide
Before you touch the top track, look at the floor guide. Pocket doors need a guide at the bottom to stop them from swinging inside the pocket. When that guide breaks, loosens, or gets buried under new flooring, the door can rub and feel “off track” even when the rollers are fine.
What to look for
- A plastic or metal U-shaped guide centered in the opening at the floor.
- Scrape marks on one face of the door near the bottom.
- A guide that is cracked, missing screws, or pinching the door.
Quick fixes
- Tighten the guide screws.
- If new flooring raised the floor, replace with an adjustable guide or shim the guide so it centers the door again.
- If the guide is missing, install a new one before you adjust the rollers. Otherwise the door can drift right back out of alignment.
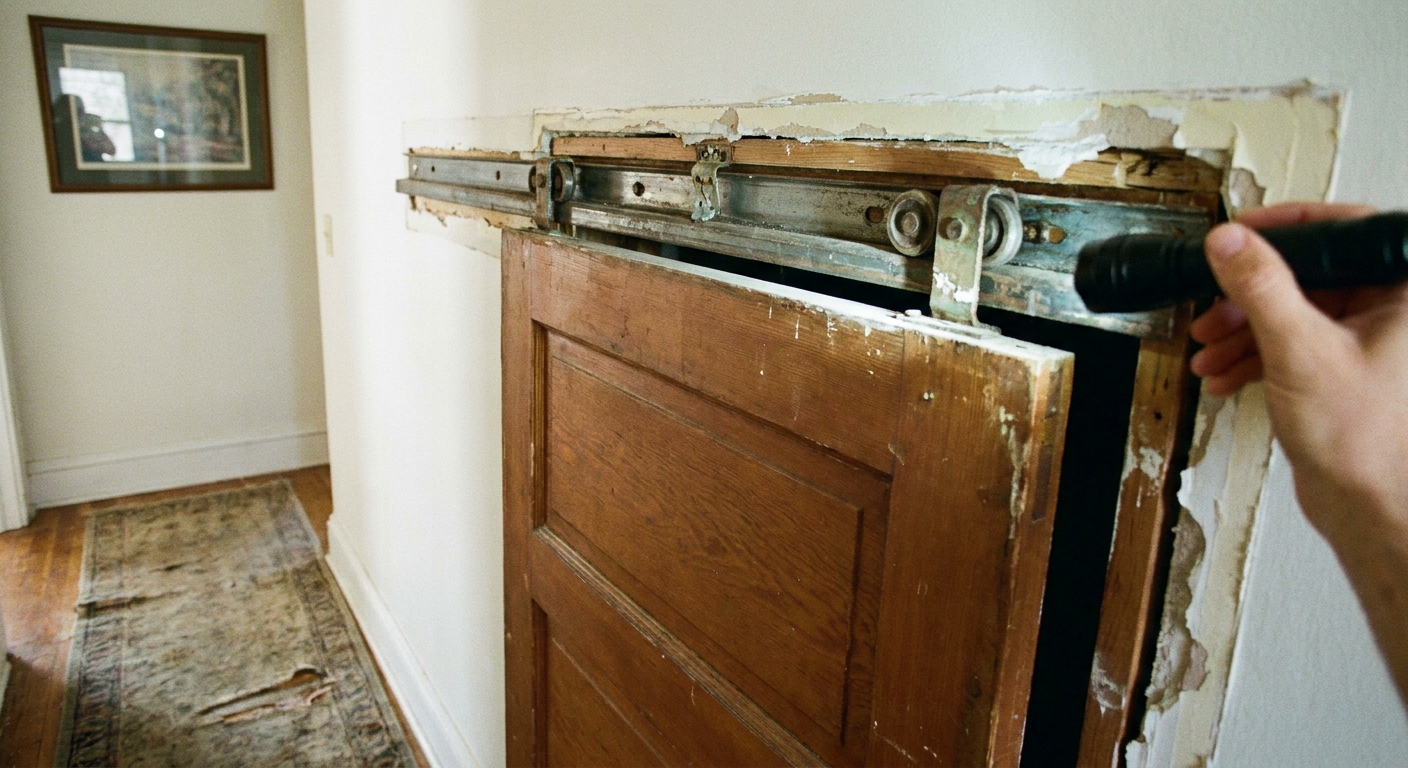
Step 2: Find the access point
Most pocket door systems are designed so you can service the rollers from the opening, but the method depends on your trim style and your hardware style.
Common access types
- Removable head jamb stop: a thin stop piece at the top or side that can be pried off.
- Split jamb kit: the pocket side trim is designed to come off cleanly for service.
- Old-school trim nailed tight: you may need to carefully remove casing on one side to get enough room to lift and unhook the door.
Common hanger styles (why this matters)
- Clip or tab hangers: often have a little locking tab, clip, or anti-jump retainer you flip to release or secure the roller pin.
- Bolt-on hangers: use nuts and a threaded stem for height adjustment. Access is usually the main challenge.
If you can see the roller hardware through a slot at the top of the opening, you may be able to adjust without removing anything. If everything is buried behind trim, keep reading.
Step 3: Remove trim safely
This is the part that scares beginners. It is not hard, but it is easy to chip drywall paper or tear caulk if you rush.
How I do it
- Score caulk lines: run a sharp utility knife along both edges of the trim where it meets the wall.
- Protect the wall: slide a putty knife behind the trim first, then pry against that.
- Pry a little in several spots: do not try to yank one corner free in a single go.
- Label pieces: put painters tape on each trim piece and mark its location so it goes back the same way.
- Pull nails, do not fight them: if possible, grab nail tips with nippers and pull them out the back side of the casing. This keeps the face cleaner and reduces wall damage.
Important: Do not drive long finish nails back into the pocket side when reinstalling. A nail that barely pokes into the pocket cavity can catch the moving door and cause the “mystery hard stop.”

Step 4: Inspect the track and rollers
With the top area exposed, shine a light up into the track and slowly slide the door while watching the rollers.
What a healthy system looks like
- Rollers spin freely and stay centered in the track.
- Track is straight, firmly fastened, and not twisted.
- No screws protruding down into the track channel.
- Any anti-jump clip or retainer is intact and not dragging on the track lip.
Red flags
- Flat-spotted or cracked wheels: the door will thump, bind, or jump.
- Roller stem bent: door leans and rubs.
- Track dented or pinched: door hits the same rough spot every pass.
- Loose track brackets: track sags, creating a low spot that drags the door into the jamb.
If the roller is off track, you will usually see one hanger riding crooked, with the wheel sitting outside the track channel or jammed at the edge.
Step 5: Realign the door
Most pocket doors hang from two roller assemblies. Each assembly usually has an adjustment nut that raises or lowers that corner of the door. Your goal is a door that is plumb, level at the top, and centered in the opening so it does not kiss the jamb or the pocket studs.
How to adjust the height
- Close the door until you can comfortably reach the hanger nuts at the top edge.
- Support the door lightly from below or have a helper steady it.
- Turn the adjustment nut a little at a time. On many systems, tightening raises that side and loosening lowers it, but hardware varies, so watch the door move and follow your manufacturer if you know it.
- After each small adjustment, slide the door in and out and feel for rubbing.
My rule: If you need more than a few turns on one side to stop rubbing, something else is wrong. Do not “adjust your way” around a broken roller or sagging track.
How to center the door
Some systems let you fine-tune the door position by shifting the hangers or stop hardware. If yours has end stops in the track, verify they are intact and positioned so the door finishes centered, not shoved hard into one side of the jamb.
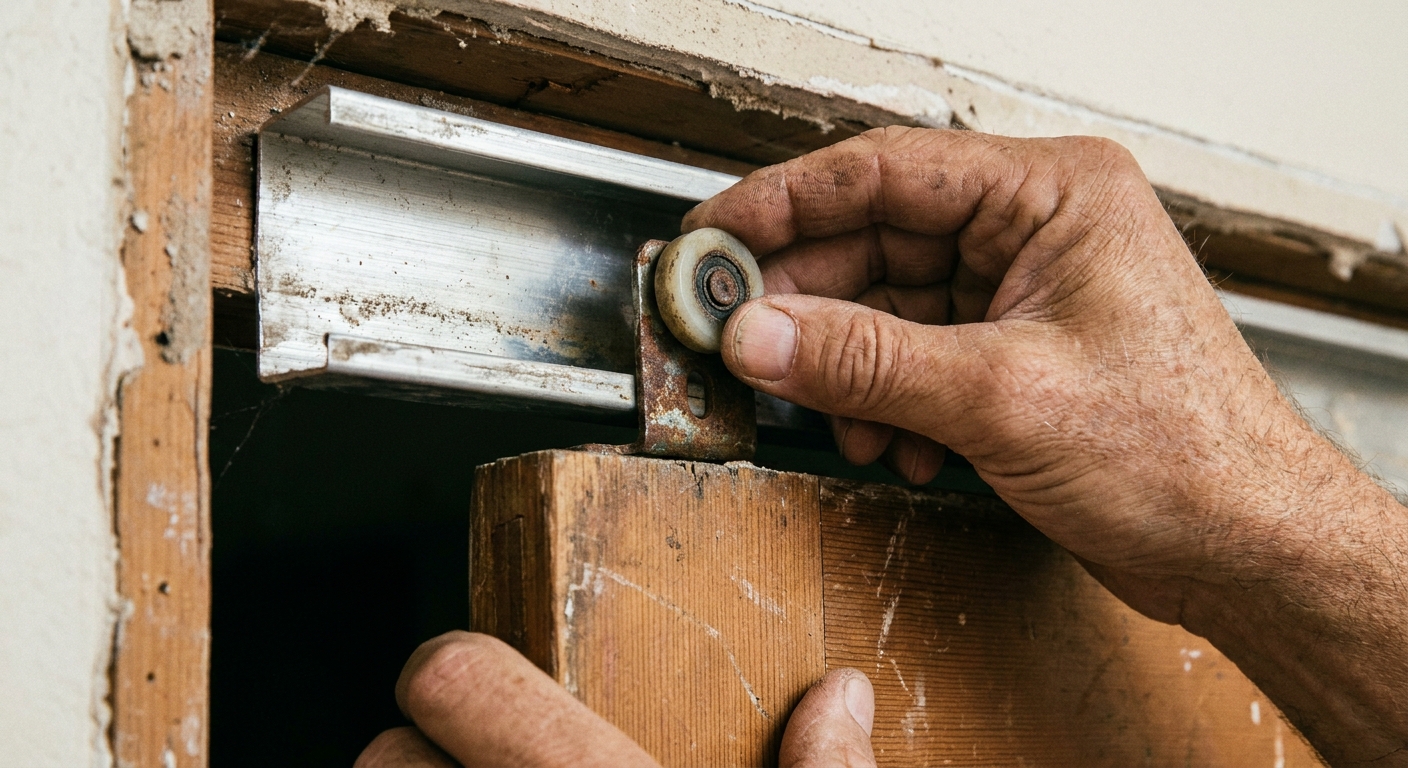
Step 6: Put a derailed roller back on
If a roller jumped the track, you need to relieve pressure, guide the wheel back into the channel, then confirm both rollers are seated.
Typical re-rail process
- Slide the door toward the opening until you can access the problem roller.
- If the door is jammed, lift up slightly on the door to take weight off the roller.
- If your hanger has a locking tab, clip, or anti-jump retainer, flip it to the release position before you try to unhook or re-seat anything.
- Guide the wheel into the track channel. Sometimes you can do this by lifting and nudging, other times you may need to partially unhook one hanger.
- Once the wheel is in, roll the door a few feet and watch that it stays centered.
- Flip the locking tab or retainer back to the secure position.
If it keeps derailing: you likely have a bent track lip, a damaged roller, or a door guide that is missing at the bottom. Fix the root cause or it will pop out again.
If you have to remove the door
Sometimes you cannot access the hardware well enough to fix the problem with the door hanging. If you need to remove the slab, plan this part before you start.
The clean, safe way
- Clear the area and recruit a helper for heavy or solid-core doors.
- Open the door halfway so you can reach both hangers.
- Release retainers: flip any anti-jump clips or locking tabs to the release position.
- Support the slab: take the weight of the door from underneath.
- Unhook one hanger at a time per your hardware style (clip, pin, or nut-based connection).
- Lift and angle the door out toward the room side, then set it on padded sawhorses.
Take a quick photo of each hanger before you undo it. It is the fastest insurance policy when it is time to put everything back.
Step 7: Clean and lubricate
Cleaning buys you more than people expect. Pocket tracks collect drywall dust, pet hair, and paint flakes, and that grit is what turns a smooth door into a grumpy one.
Clean first
- Vacuum the track channel with a crevice tool.
- Wipe accessible areas with a dry rag. Avoid soaking the pocket cavity with water.
Then lubricate lightly
- Use dry silicone or PTFE dry lube sparingly. Some manufacturers prefer lubing the rollers rather than the track, so if you can identify your hardware, follow that guidance.
- A quick spray on the wheel tread is fine if you can reach it.
- Wipe overspray off the door edge and jamb so it does not attract dirt.
Avoid: oil on wooden door edges, thick grease in the channel, or anything that stays wet. It will trap dust inside the pocket, which is hard to clean later.
When to replace rollers or hardware
If your door still sticks after alignment and cleaning, worn rollers are the next most common culprit. Many builder-grade pocket door kits use small plastic wheels that wear out faster than you would think.
Signs you should swap rollers
- Wheel is cracked, wobbly, or has a flat spot.
- Roller does not spin freely even after cleaning.
- The adjustment hardware is stripped or will not hold position.
What I recommend for replacements
- Match the system if possible: take a photo of the hanger and track profile, then buy the same brand or a compatible set.
- Upgrade to ball-bearing rollers: they roll smoother and tend to last longer, especially on heavier doors.
- Replace as a pair: swapping both rollers keeps the door level and avoids uneven wear.
Pro tip: If your track is dented or the mounting brackets are bent, replacing only rollers can be a temporary win. A damaged track will chew up new rollers.
If the floor height changed
If the door started scraping right after new flooring, this is often a clearance issue, not a roller issue.
- First, check adjustment range: raise the door with the hanger nuts if you still have room to go.
- Then check the bottom guide: a guide that used to be centered may now be pinching after a floor height change.
- If you are maxed out: the real fix may be trimming a little off the bottom of the door. Confirm the hangers are adjusted correctly before you cut anything.
If the pocket is the problem
Sometimes the rollers are fine and the door is rubbing inside the wall pocket. This happens a lot after a remodel when someone screws new drywall, baseboard, or trim and hits the pocket cavity.
How to spot it
- The door rolls smoothly until it reaches a certain point, then it suddenly gets tight.
- You hear a scrape inside the wall.
- The door face shows fresh rub marks along one vertical line.
What you can do
- Check for new trim nails or screws that might be too long near the pocket opening and replace them with shorter fasteners.
- Inspect the pocket opening edges for drywall bulges or cracked corner bead that could be snagging the door.
- If you suspect a screw inside the pocket, use a small inspection camera if you have one, or remove trim to get a better angle with a flashlight.
If the pocket framing is badly bowed or the drywall is pinching the door deep inside the wall, this can turn into a bigger repair than a typical weekend tune-up.
DIY vs. call a pro
This is usually a DIY win
- Door is rubbing the jamb or floor but rollers and track look intact.
- Door feels gritty or noisy and improves with cleaning and dry lube.
- One corner is low and responds to hanger adjustment.
- Bottom guide is loose or broken and needs replacement.
- Rollers are worn but the track is straight and accessible.
Consider a pro, or plan for a bigger project
- Track is pulling away from framing or the header is sagging.
- The pocket opening is out of square because the wall moved or was reframed poorly.
- The door slab is damaged or warped enough that alignment cannot compensate.
- You have a tight pocket cavity with no service access and trim removal will risk major drywall repair.
- Old hardware is obsolete and you may need a new track system that requires opening the wall.
There is no shame in tapping out when the fix starts looking like reframing. Pocket door frames are specialized, and if the pocket studs or header are wrong, the “simple adjustment” can become a chain reaction.
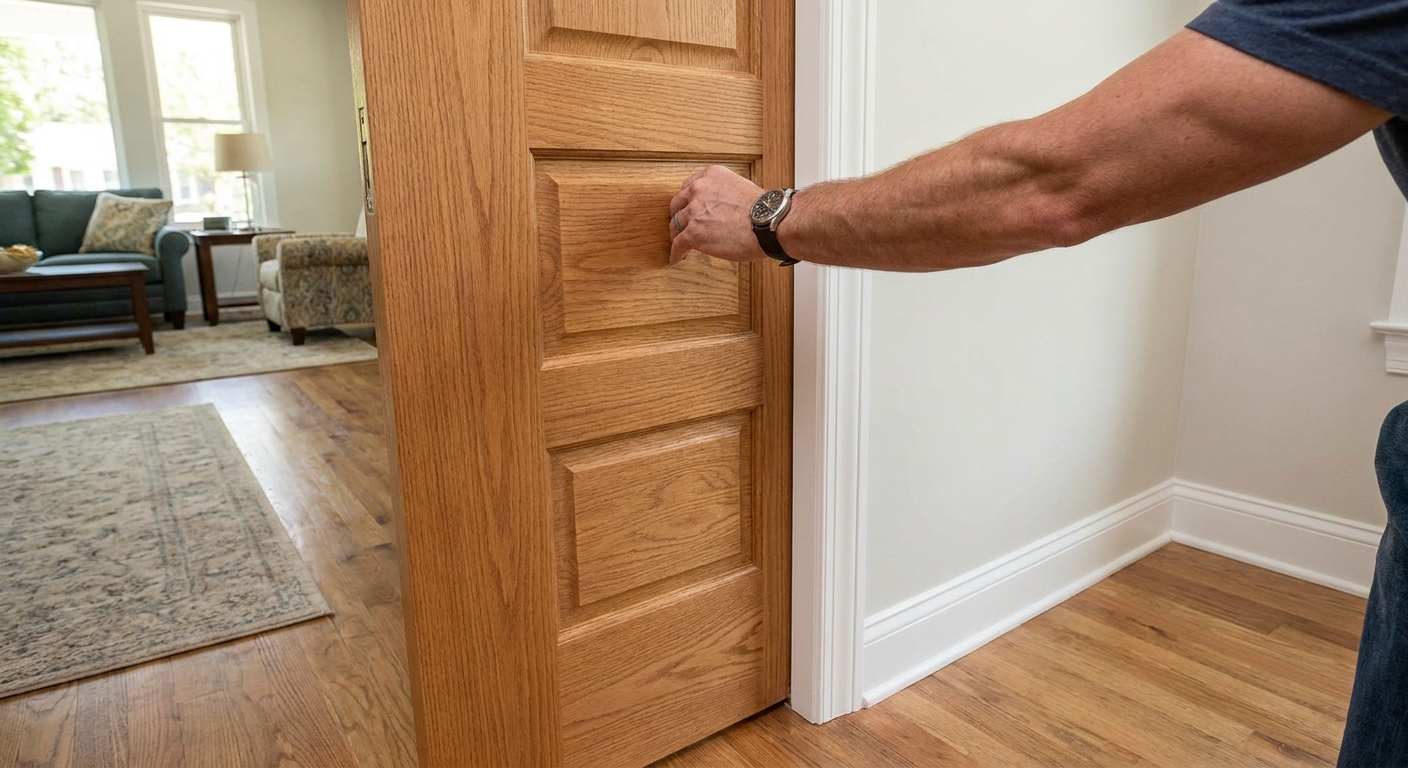
Reassemble and prevent a repeat
Once the door rolls smoothly, put everything back in a way that does not set you up for the same problem.
Before reinstalling trim
- Slide the door fully in and out several times.
- Confirm the gap along the jamb is consistent.
- Make sure the bottom guide is centered and not rubbing.
- Confirm any anti-jump clips or retainers are re-secured.
When reinstalling
- Use nails that are short enough to avoid the pocket cavity on the pocket side.
- Re-caulk lightly and touch up paint as needed.
If you want one maintenance habit that actually matters: vacuum the track area once in a while, especially after sanding drywall or cutting trim nearby. Pocket doors hate dust.
Common pocket door questions
Can I fix a pocket door without removing trim?
Sometimes. If your hanger adjustment nuts are exposed from the opening, you can often level the door and add dry lube without removing casing. If you cannot see or reach the hardware, trim removal is usually the cleanest path.
Why does my pocket door keep jumping off track?
Repeat derailments usually point to a bent track lip, worn rollers, a missing bottom guide, or a door that is being forced sideways by something inside the pocket cavity. On some systems, a loose or mis-set anti-jump clip can also cause trouble.
Should I oil the track?
I do not. Use a dry silicone or PTFE dry lube instead, unless your hardware manufacturer says otherwise. Oil stays wet, grabs dust, and turns into grime inside a pocket where you cannot easily wipe it out.
The 30-Second Cheat Sheet
Essential takeaways for: Pocket Door Stuck or Off Track? Fix and Realign It
Fast diagnosis
- Rubs floor/jamb: door is out of level, bottom guide is off, or the floor height changed.
- Rough, gritty slide: dirty track, worn rollers, or the wrong lube.
- Hard stop inside wall: protruding screw/nail, broken guide, pocket drywall bulge, or a loose track bracket.
30-second fix order (do this in order)
- Check the bottom guide: tighten, center it, or replace if cracked.
- Clean the track: vacuum the channel and wipe accessible grit.
- Lubricate: light spray of dry silicone or PTFE dry lube where wheels ride (follow your hardware maker if they specify something else).
- Adjust hangers: turn the hanger nuts to level the door and stop rubbing (direction varies by hardware).
- Re-rail if needed: lift door slightly and guide the wheel back into the track. Flip any retainer/locking clip back into place.
When to replace parts
- Replace rollers if wheels are cracked, flat-spotted, wobbly, or will not spin freely.
- Replace as a pair, and consider ball-bearing rollers for smoother sliding.
When to call a pro
- Track is pulling loose, header is sagging, or the opening is out of square.
- Door is warped or the pocket cavity is pinching the slab deep in the wall.
- Hardware is obsolete and a new track system likely means opening the wall.
Avoid these mistakes
- Do not use heavy grease or oily sprays that collect dust.
- Do not reinstall trim with long nails on the pocket side.
- Do not crank one hanger way down to “force it” straight. Fix the worn roller or track instead.
💡 Tip: Scroll up to read the full article for detailed, step-by-step instructions.
⬆️ Back to topAbout Marcus Vance
Content Creator @ Grit & Home
Marcus Vance is a lifelong DIY enthusiast and self-taught home renovator who has spent the last decade transforming a dilapidated 1970s ranch into his family's dream home. He specializes in budget-friendly carpentry, room-by-room renovations, and demystifying power tools for beginners. Through his writing, Marcus shares practical tutorials and hard-learned lessons to help homeowners tackle their own projects with confidence.