If your pool pump will not start, it is tempting to assume the motor is toast. Sometimes it is, but a surprising number of no-start calls come down to a tripped GFCI, a timer that is off, or a pump that lost prime after a quick basket cleanout.
I am going to walk you through a calm, organized checklist. Start at Step 1 and stop when you find the issue. If you hit a safety red flag, I will tell you exactly when to stop and call a pool tech.
Safety first (electricity + water is not forgiving)
Pool equipment combines high voltage, moisture, and metal parts. Treat it with respect.
- Turn off power at the breaker before opening any electrical covers or touching wiring.
- Do not reset a breaker or GFCI repeatedly if it trips right away. That is a sign of a fault that needs diagnosis.
- Never work on the pump with wet hands or while standing in water.
- If you smell burning plastic, see smoke, or hear arcing or crackling, shut off power and call a pro.
- Let the motor cool before touching it if it has been trying to start or humming.
Quick note: This guide covers homeowner-safe troubleshooting. Electrical testing inside a live panel or rewiring a motor is a job for a licensed pro in many areas.
Tools and info to grab before you start
- Phillips screwdriver
- Work gloves and a flashlight
- Garden hose (for priming help)
- Silicone pool lube (for lid O-rings)
- Owner manual or a photo of your pump label (brand, model, voltage)

Step 1: Confirm it is actually supposed to be on
This sounds obvious, but timers and automation settings cause a lot of “dead pump” panic.
Check the timer or automation schedule
- Mechanical timer: Make sure the trippers are installed and aligned correctly, and the dial is set to the correct current time.
- Digital timer/controller: Look for a paused schedule, a “service mode,” or a power outage that reset the clock.
- Variable-speed pumps: They often run at low RPM and can sound quiet. Put your hand near the motor housing and listen closely before assuming it is off.
If you have an automation panel, try switching to Manual or Service mode and command the pump on.
Step 2: Power checklist (breaker, disconnect, and GFCI)
If the pump is completely dead, start here. A pump cannot start without solid power.
2A. Check the breaker
- Find the pool pump breaker in your main panel or subpanel.
- If it is tripped, switch it fully to OFF, then back to ON.
- If it trips again quickly, stop here and call a pro. Repeated trips can damage equipment and point to a serious fault.
2B. Check the pool equipment disconnect
Many setups have a small outdoor disconnect box near the equipment pad. Make sure it is fully on and seated.
2C. Check GFCI protection
- Your pump circuit may be protected by a GFCI breaker, a GFCI receptacle, or a GFCI device in an automation panel.
- Press Reset once. If it will not reset or it immediately trips, stop and call a pool tech or electrician.
What this tells you: If restoring power makes the pump come alive, your “pump problem” was actually a supply or control issue. Keep an eye on it. If it trips again, do not ignore it.
Step 3: Listen for the symptom (dead silent vs humming)
Once you are sure it is commanded on and has power, what you hear matters.
If the pump is dead silent
- Likely causes: no power reaching the motor, timer/relay not closing, failed drive on a variable-speed pump, loose connection, or a tripped thermal overload that has not reset yet.
- Homeowner moves: re-check timer settings and GFCI, allow 20 to 30 minutes for the motor to cool, then try again.
- If still silent after power and schedule checks, a tech may need to test voltage at the motor and verify relays or drives.
If the pump hums but does not start
A humming motor is often getting power but cannot spin up. Common reasons:
- Debris jam in the impeller or pump basket area
- Failed start capacitor (common on single-speed and two-speed motors)
- Seized motor bearings or a stuck shaft
- Low voltage or a failing relay
Important: Do not let a humming motor sit there. Shut it off within 10 to 20 seconds. Humming without spinning can overheat and damage the motor.
Step 4: Quick mechanical checks you can do safely
4A. Check the pump basket for a jam
Power off at the breaker before you put your hands anywhere near the pump.
- Close suction and return valves if you have them (helps prevent water rush).
- Open the pump lid and remove the basket.
- Reach in and feel for leaves, small stones, or clumps of debris near the impeller opening.
- Clean it out, reinstall the basket, and make sure the lid O-ring is clean and seated.
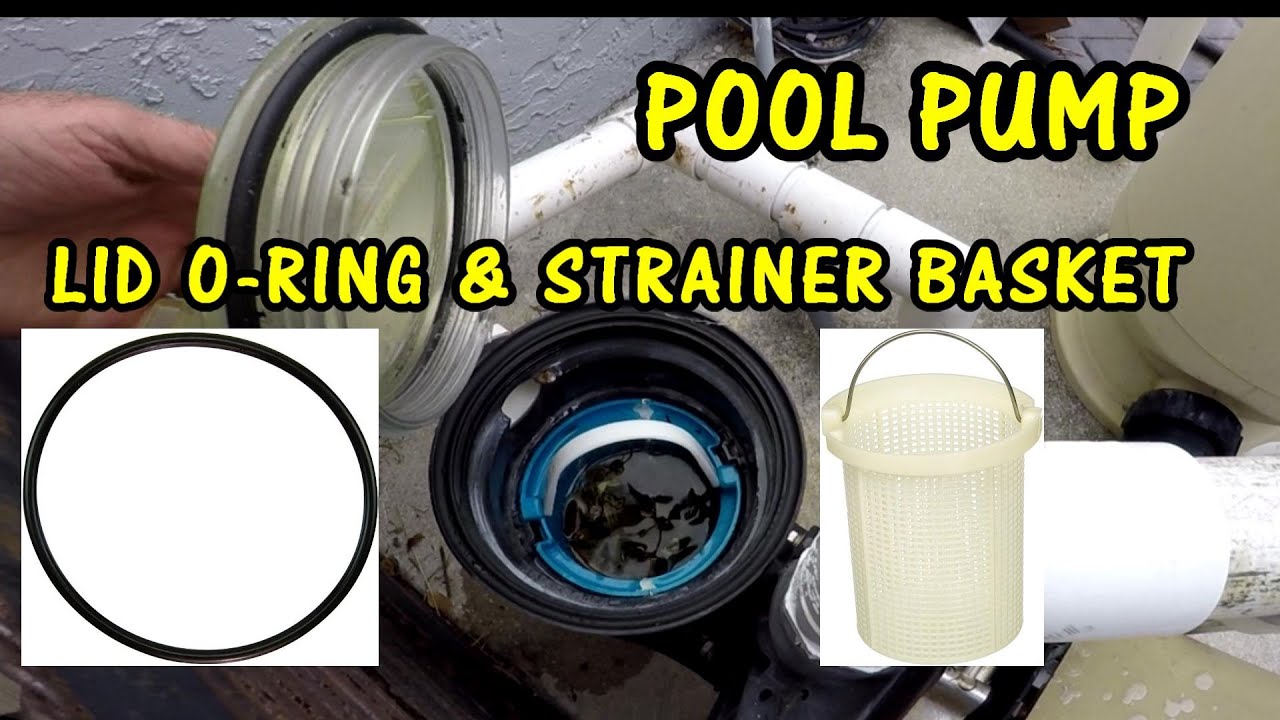
4B. Inspect the lid O-ring and lid sealing surface
- Wipe the O-ring and groove clean.
- Apply a thin film of silicone pool lube if the O-ring looks dry.
- Cracked or flattened O-ring? Replace it. A bad seal can keep the pump from priming.
4C. Look for obvious leaks at the pump
Water dripping from the motor side of the pump can point to a failed shaft seal. That is not usually the direct cause of a no-start, but it can lead to motor damage over time.
Step 5: Priming basics (the most common “it ran yesterday” issue)
If your pump starts but will not catch prime, it may shut itself off, run dry, or sound like it is struggling. This often happens after you cleaned the basket, opened plumbing, or the water level dropped.
Before you prime, check the pool water level
The water should be roughly halfway up the skimmer opening. If it is low, the skimmer can suck air and the pump will not prime reliably.
How to prime a typical skimmer setup
- Turn power off.
- Open the pump lid and fill the pump basket housing with water using a hose or bucket.
- Reinstall the lid firmly. Do not cross-thread it. Tight and even is the goal.
- Open suction valves (if you have multiple lines, start with skimmer only or the line you know is most reliable).
- Turn the pump on and watch the lid. You want to see water quickly replace air.
What “good prime” looks like
- The basket fills with water and stays mostly full.
- The return jets in the pool push steady water with minimal bubbles.
- The filter pressure gauge rises to its normal operating range for your system.
If it will not prime after 2 or 3 tries
- Re-check the lid O-ring.
- Make sure drain plugs on the pump housing are installed and snug.
- Check that suction valves are open and not set halfway between positions.
- Look for air leaks on the suction side: loose unions, cracked fittings, or a missing O-ring at a union.
Thrifty tip from my own mistakes: I once chased a “bad pump” for an hour before realizing the drain plug O-ring was missing after winterization. One cheap O-ring later, perfect prime.
Step 6: Timer, relay, and controller issues (common and sneaky)
If the breaker is on but the pump never gets the signal to run, the culprit is often upstream.
Mechanical timer checks
- Listen for a clear click when it switches on.
- Look for burned or pitted contacts (do not touch them, just inspect).
- If the timer motor does not advance time, the pump may never get scheduled power.
Automation relay checks
- When you command the pump on, you should often hear a relay click in the panel.
- No click can indicate a control issue, blown fuse on the board, or a failed relay.
Stop point: If troubleshooting requires opening an energized control panel, call a pro. That is a high-risk area.
Step 7: What the motor is telling you (and when to stop)
Motor starts then shuts off after a short time
- Possible overheating from blocked airflow, clogged impeller, failing bearings, low voltage, or a failing capacitor.
- Make sure vents are clear and the motor is not packed in with leaves or storage items.
- If it repeatedly overheats, call a tech. Running it like that can finish it off.
Motor is very loud, squealing, or grinding
- Often points to failing bearings or internal damage.
- Shut it down and call a pro. This is not a “run it and see” situation.
Burning smell or visible smoke
- Turn off the breaker immediately.
- Do not try to restart.
- Call a pool tech or electrician.
When to call a pool tech (clear stop points)
I love DIY, but I love safe DIY more. Call a professional if:
- The breaker or GFCI trips repeatedly.
- The motor hums but will not spin, and cleaning the basket area does not help.
- You suspect a failed capacitor, relay, or drive and are not trained to test and replace it.
- You see water leaking from the motor area or corrosion inside electrical compartments.
- You cannot get prime after checking lid O-rings, valves, drain plugs, and water level.
- You have an older pump with brittle plumbing and you are not comfortable disassembling unions.
Quick troubleshooting checklist (printable in your head)
- Timer or automation: scheduled to run, not in service mode
- Breaker on, disconnect on
- GFCI reset and holds
- Listen: silent vs hum
- Power off, clear basket and check impeller area
- Inspect and lube lid O-ring, tighten lid evenly
- Fill basket housing with water and prime
- Watch for air leaks, bubbling returns, or pump losing prime
- Stop if tripping, burning smell, loud grinding, or repeated overheating
If you want, tell me your pump brand and what it is doing (silent, hums, starts then stops, or runs but no flow), plus whether you have a timer or automation. I can help you narrow it down faster.
About Marcus Vance
Content Creator @ Grit & Home
Marcus Vance is a lifelong DIY enthusiast and self-taught home renovator who has spent the last decade transforming a dilapidated 1970s ranch into his family's dream home. He specializes in budget-friendly carpentry, room-by-room renovations, and demystifying power tools for beginners. Through his writing, Marcus shares practical tutorials and hard-learned lessons to help homeowners tackle their own projects with confidence.