🚨 In a DIY emergency or rush?
Skip the details and jump straight to our 30-second cheat sheet for the most crucial info.
Popcorn ceilings are one of those classic “weekend makeover” targets. I get it. The texture catches cobwebs, steals light, and makes a room feel dated. But before you grab a scraper and start snowing white dust all over the floor, you need to answer one question: could this texture contain asbestos?
Here’s the honest truth: you can’t reliably eyeball asbestos. Some ceilings are safe. Some aren’t. And the riskiest move is scraping a ceiling dry without knowing what you’re disturbing.
Why asbestos is tied to popcorn
Asbestos fibers were used in many building materials because they handled heat well and added strength. In ceiling texture, asbestos could help with fire resistance and durability. The problem isn’t the ceiling sitting there untouched. The problem is what happens when you sand, scrape, drill, or demo it.
When asbestos-containing material is disturbed, tiny fibers can become airborne. Those fibers can linger and get inhaled. That’s why the safety conversation matters before removal.
Risk, explained
I’m not here to scare you out of DIY. I’m here to steer you away from the one scenario that’s truly unnecessary: creating a house-wide dust event from a material you didn’t test.
Age clues (not proof)
If you’re trying to decide whether testing is worth it, the age of your home is a clue, not a verdict.
- Textured ceilings applied before about 1980: testing is strongly recommended. Asbestos use in textured coatings wasn’t cleanly cut off everywhere in the 1970s, and what matters is often when the texture was applied, not just the build date.
- 1980s applications: still worth testing. Products already in the supply chain, regional differences, and remodel history can muddy the timeline.
- 1990s and newer: lower likelihood, but not impossible. Specialty products and leftover stock can surprise you.
Remodel wildcard: if your home is older but the ceiling was retextured later, or only some rooms have popcorn, don’t assume one sample represents the whole house.
Bottom line
Age-based guessing is a good way to prioritize testing. It’s not a safe way to skip it.
Testing that actually works
If you want a real answer, you need a lab analysis. Many DIY test kits are basically a mailer plus instructions. That can be fine, as long as the sample ends up at an accredited lab and you follow safe collection steps.
What to look for
- Accredited lab: commonly NVLAP or AIHA-LAP accredited in the US, or a reputable local environmental lab that clearly lists credentials.
- Chain-of-custody form and clear labeling instructions.
- Method listed: PLM is standard for bulk building materials. TEM can be used for certain matrices or confirmatory work and is typically more expensive.
How many samples?
A practical rule is at minimum, one sample per distinct ceiling area. If your home has different textures, different paint layers, additions, or obvious patchwork, take separate samples. Inspectors and labs may recommend more depending on homogeneity and the size of the area.
What the lab report means
Lab results usually report whether asbestos was detected and may include a percentage. In many regulations, material at or above 1 percent asbestos is treated as asbestos-containing material (ACM). In real life, any detected asbestos is a reason to slow down and make a plan, because disturbance is what drives exposure risk.
Why dry scraping is the big mistake
Popcorn removal tutorials often show people scraping away happily, like it’s flaky frosting. If the ceiling contains asbestos, dry scraping is the fastest way to send fibers airborne.
Dry removal risks:
- Creates fine dust that travels through the house and into HVAC returns
- Contaminates carpets, furniture, and clothing
- Increases your exposure risk because you’re directly under the falling debris
Even if the ceiling turns out to be non-asbestos, dry scraping is still miserable and messy. Wet methods reduce dust for everyone.
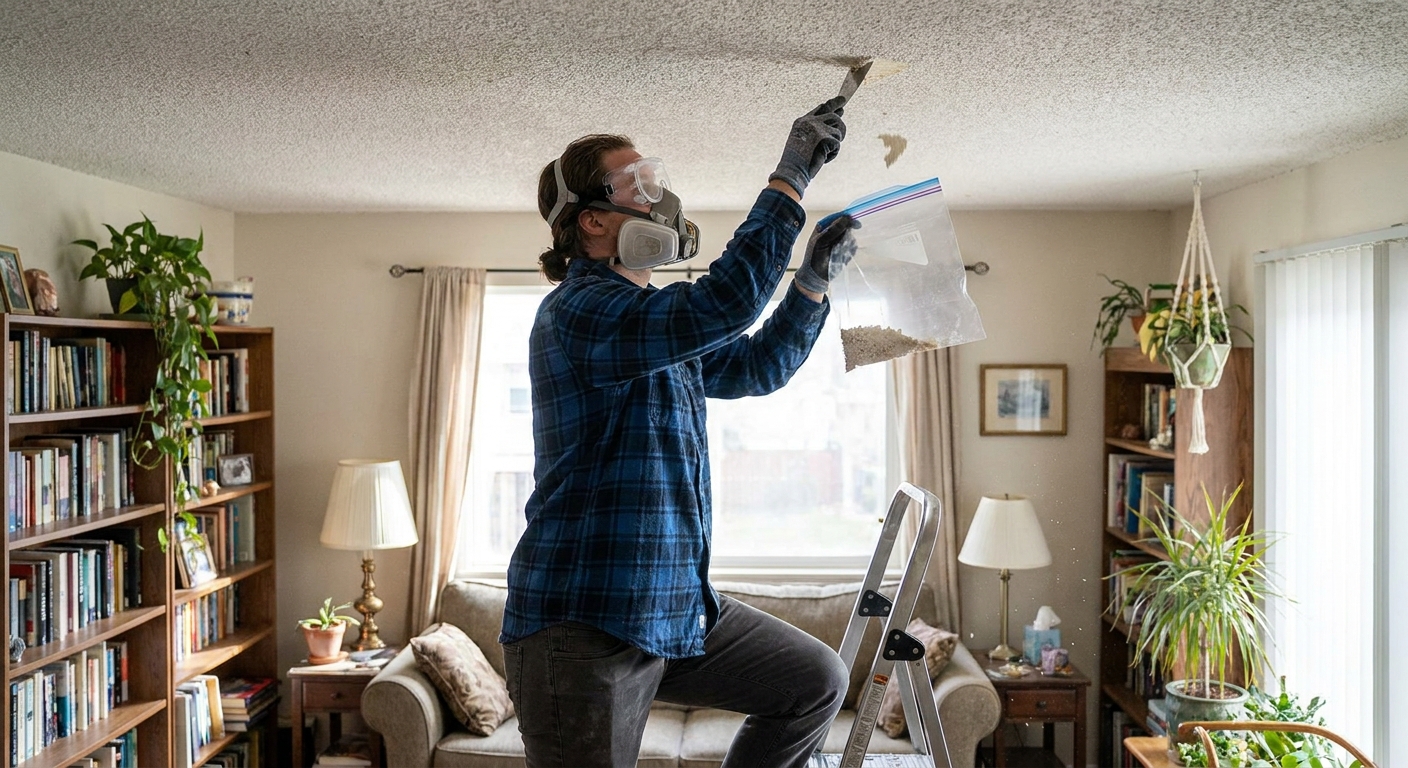
How to sample safely
If you’re testing, treat the ceiling like it contains asbestos until proven otherwise. Your goal is to collect a tiny sample while keeping dust down and preventing cross-contamination.
What you need
- Spray bottle with water plus a drop of dish soap (helps wetting)
- Disposable gloves
- P100 elastomeric respirator (strongly preferred)
- Sealed safety goggles
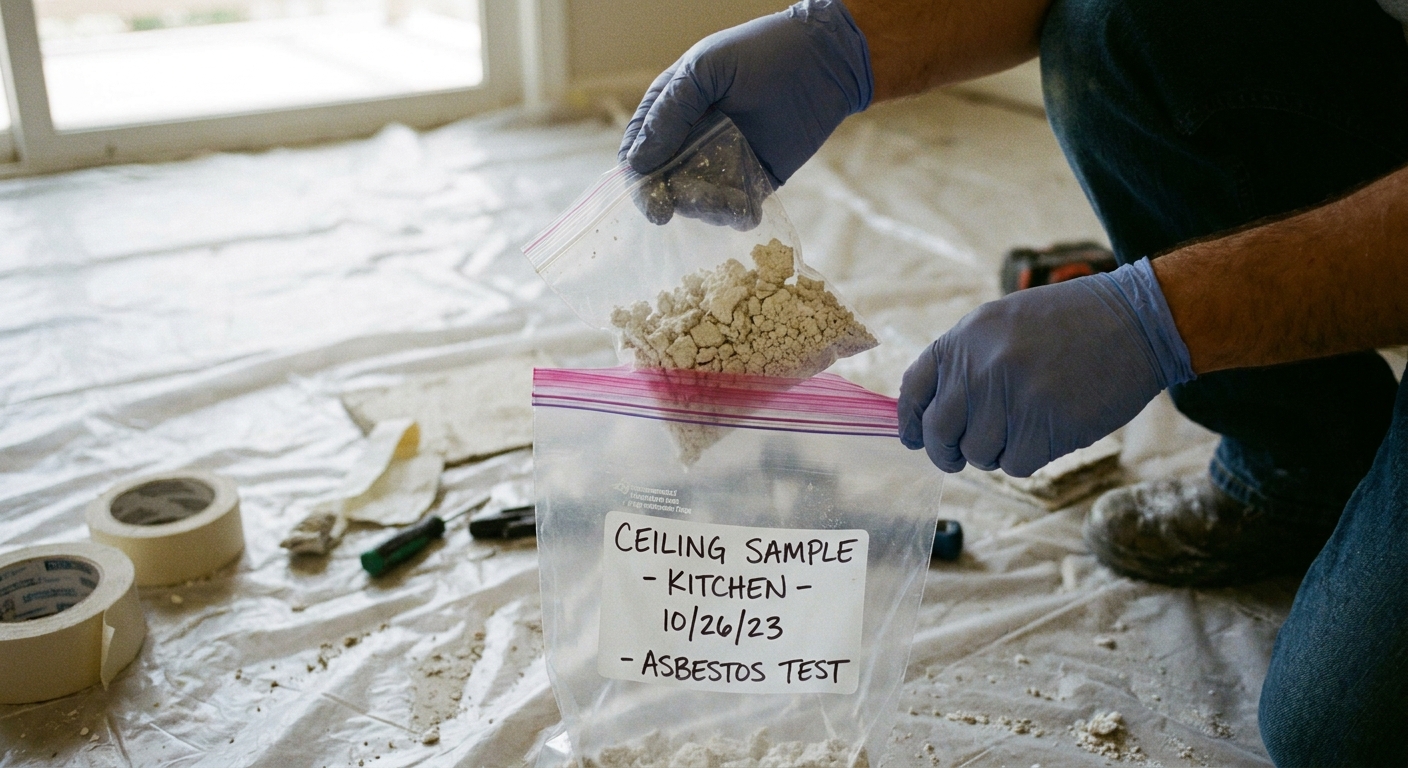
- Two sealable bags per sample (double-bagging)
- Permanent marker for labeling
- Plastic sheeting or a drop cloth
- A clean putty knife or utility knife
Quick reality check: in regulated asbestos work settings, an N95 isn’t considered adequate respiratory protection. For a homeowner taking a small sample, a P100 is still the smart move. If you don’t have one, pause and get proper PPE or hire a pro to sample.
Step by step
- Turn off HVAC and close doors to limit air movement.
- Lay plastic under the spot you’re sampling.
- Mist the area until the texture is damp, not dripping.
- Remove a small amount (often 1 to 2 tablespoons worth). If there are multiple layers, include them.
- Bag it immediately, seal it, then place that bag into a second bag.
- Wipe the tool with a damp paper towel and bag the towel too.
- Clean the area with damp wipes, then fold up the plastic inward so debris stays contained.
- Label clearly (room, location, date), then send to the lab per instructions.
My neighbor-to-neighbor tip: don’t vacuum with a regular shop vac. If you need a vacuum for cleanup in a suspected asbestos situation, it should be a HEPA-rated unit designed for hazardous dust.
If it’s negative
If the lab report says the texture is non-asbestos, you can move forward with a lot more confidence. You still want dust control because popcorn removal creates a mountain of debris and can irritate your lungs.
Wet removal basics
- Mist and wait: spray a manageable section and let it soak a few minutes so it releases cleanly.
- Scrape gently: a wide scraper helps, and a drywall knife can get you into corners.
- Protect the room: plastic walls, taped seams, covered vents, and a clear exit path.
- Work in sections: don’t soak the entire ceiling at once. You can damage drywall facing if you overdo the water.
Painted popcorn is different
If the popcorn has been painted, it often won’t soak and release the same way. People then switch to sanding, which creates a lot of fine dust. That’s one more reason testing first is smart. Painted texture can also hide patchwork or repairs that deserve separate sampling.
One more older-home note
If you’re planning to skim coat, sand, or otherwise disturb old paint during the repair and finishing stage, lead paint can be another issue in older homes. It’s a separate test, but it’s worth thinking about before you kick up more dust.
PPE I’d use
Even with a negative test, I treat ceiling work as “overhead dust work.” Here’s what I consider the baseline for scraping, patching, and sanding.
- Respirator: half-face respirator with P100 filters is my go-to for dusty work.
- Eye protection: sealed goggles if debris is falling, not just glasses.
- Head covering: a disposable cap or a hoodie you can wash immediately.
- Clothing plan: long sleeves, and change clothes after. Don’t sit on the couch in your ceiling-dust outfit.
- Gloves: nitrile or work gloves depending on the task.
If your test is positive for asbestos, PPE and containment requirements are a different category. That’s when you stop and reassess the plan.
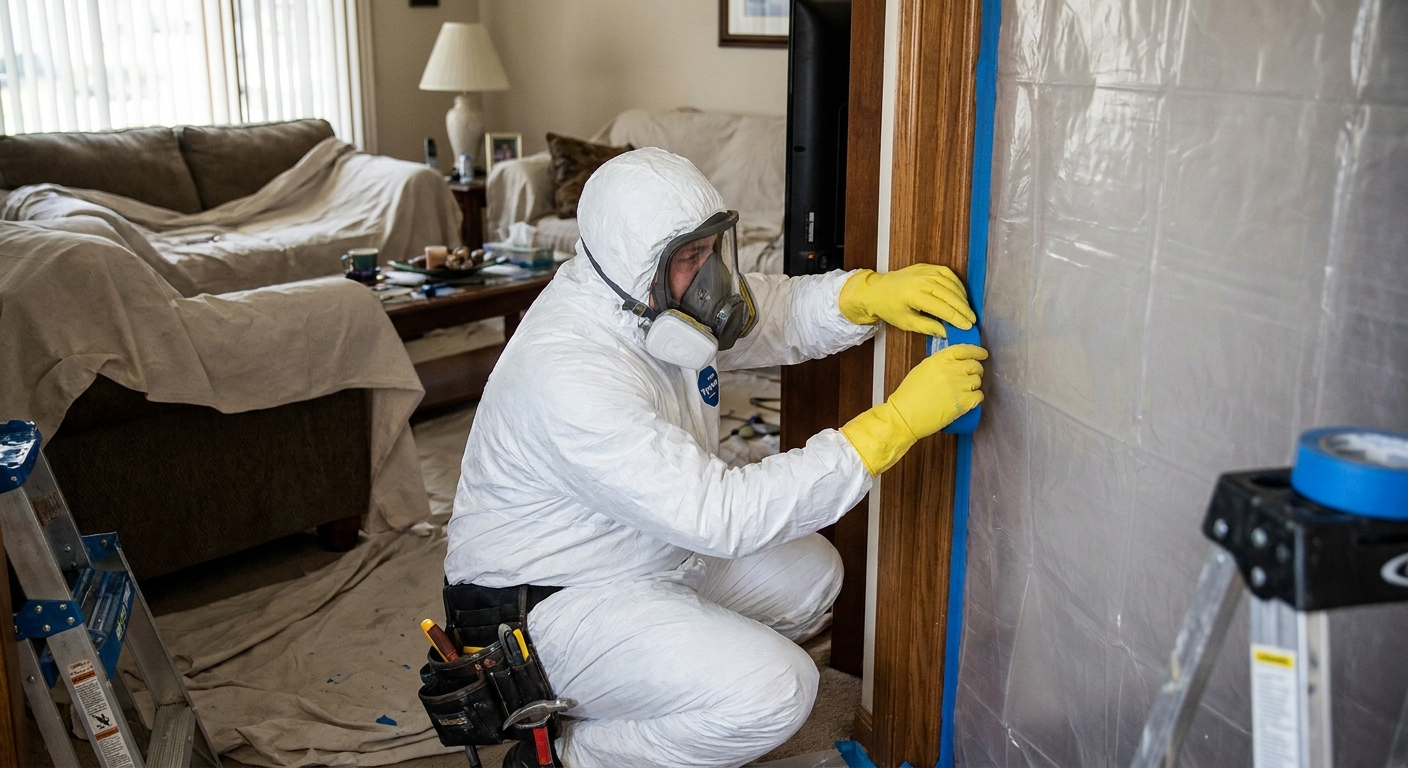
If it’s positive
If the lab confirms asbestos, you’ve got a decision to make. In many cases, the safest move is to hire a licensed asbestos abatement professional. They have training, containment systems, negative air machines, and disposal pathways that most homeowners don’t.
Also important: in some municipalities and states, DIY asbestos removal is legally prohibited, even for small jobs. In those areas, professional abatement isn’t just “recommended,” it’s required. Always check local rules before you touch it.
Common options
- Professional abatement and removal: highest cost, highest confidence, best for large areas or planned remodels.
- Encapsulation: sealing the material in place with a product specifically designed as an asbestos encapsulant. Not all paints or primers qualify, so product selection matters.
- Covering: installing drywall over the ceiling (with careful fastening planning). This avoids disturbing the texture, but it still requires care around penetrations like lights, fans, and vents.
Don’t sand it, dry scrape it, or “just do a little area” without understanding local rules and proper containment. Small jobs can still create big contamination.
When to call a pro
Even the most determined DIYer should pass the baton in a few situations. I’d seriously consider calling a licensed abatement company if:
- The ceiling tested positive and you want it fully removed
- You have kids, elderly family, or immune-compromised people in the home
- The popcorn is friable, meaning it’s crumbly and can be easily broken into dust, or it’s already shedding
- You have forced-air HVAC and can’t confidently isolate the work area
- The project is whole-house or includes adjacent demo (walls, soffits, can lights)
- You need documentation for an insurance claim or a formal renovation plan
Other materials to watch
One more heads up if your project is growing beyond the ceiling texture. In older homes, asbestos can also show up in other places you might disturb during a renovation, like joint compound used on drywall seams and repairs. And if you’re poking around attics, vermiculite insulation is another well-known asbestos concern.
Resale and disclosure
Disclosure rules vary by location, so treat this as practical reality, not legal advice. Generally speaking:
- If you know a material contains asbestos, you may be required to disclose that knowledge when selling.
- If you test and document that a ceiling is non-asbestos, that paperwork can reduce buyer anxiety.
- If you remove asbestos improperly and contaminate the home, that can create bigger problems than the popcorn ceiling ever did.
My personal approach is simple: keep your lab results, keep your receipts, and keep a short project log. Future you will appreciate it.
Quick decision guide
Haven’t tested yet
- Assume it could contain asbestos
- Don’t scrape dry
- Collect a damp sample with proper PPE or hire someone to sample
- Check local rules, since some places restrict sampling and many restrict removal
Tests negative
- Use wet removal and contain the mess
- Wear solid PPE anyway
- Plan for skim coating and sanding afterward, and think about lead paint in older homes
Tests positive
- Stop DIY scraping and check legal requirements in your area
- Strongly consider professional abatement
- Consider encapsulation with a true encapsulant or covering instead of removal
- Don’t sand or dry scrape
If you take only one thing from this article, let it be this: the safest popcorn ceiling removal starts before the scraper ever touches the ceiling.
The 30-Second Cheat Sheet
Essential takeaways for: Popcorn Ceiling Removal: Asbestos Risk and Safe Testing Steps
Before you scrape
- Don’t dry scrape a popcorn ceiling you haven’t tested.
- Age clues help, but don’t prove safety: asbestos was most common in texture applied before about 1980 (and can show up into the 1980s depending on region, product, and leftover stock). Newer homes are lower risk, not a guarantee.
- Lab testing is the only reliable answer. Use a reputable kit that sends samples to an accredited lab, or hire a local asbestos inspector/environmental tester.
- Know your local rules: some municipalities or states legally prohibit DIY asbestos removal and require licensed abatement and specific disposal methods.
Safe sampling steps
- Turn off HVAC and limit airflow.
- Mist the spot with water plus a drop of dish soap.
- Scrape a small sample into a bag, double-bag, label it, and clean up with damp wipes.
- Avoid regular vacuums or shop vacs unless they’re HEPA-rated for hazardous dust.
If the test is negative
- Use a contained wet method to reduce dust.
- Wear PPE: P100 respirator preferred, sealed eye protection, gloves, and a clothing plan.
- If you’ll sand or skim coat painted surfaces in an older home, consider lead paint risk too.
If the test is positive
- Stop DIY scraping. In many places, removal is a licensed job by law. Consider licensed abatement, encapsulation with a true encapsulant, or covering with drywall.
- Professional abatement is especially smart for large areas, shedding texture, or homes with vulnerable occupants.
Resale reality
- If you know it’s asbestos, you may need to disclose. Keep lab reports and project records.
💡 Tip: Scroll up to read the full article for detailed, step-by-step instructions.
⬆️ Back to topAbout Marcus Vance
Content Creator @ Grit & Home
Marcus Vance is a lifelong DIY enthusiast and self-taught home renovator who has spent the last decade transforming a dilapidated 1970s ranch into his family's dream home. He specializes in budget-friendly carpentry, room-by-room renovations, and demystifying power tools for beginners. Through his writing, Marcus shares practical tutorials and hard-learned lessons to help homeowners tackle their own projects with confidence.