Start here: safety and quick reality checks
If your portable air conditioner is humming away but the room still feels sticky, you are usually dealing with one of a few common problems. The good news is most of them are setup or maintenance related, not major repairs.
Safety first: Unplug the unit before you remove panels, clean filters, or reach near the fan intake. The exhaust hose and the back of the unit can get hot during operation, so let it cool down a few minutes before handling.
- Plug it straight into the wall: Avoid extension cords and power strips. They can cause voltage drops that keep the compressor from starting or make cooling weak. If you must use one, it should be heavy-duty and manufacturer approved, but the best answer is still a wall outlet.
- Give it time: After turning on cooling, wait 10 to 15 minutes to confirm you are getting colder air. Cooling the whole room can take longer depending on heat, sun, and insulation.
- Confirm the mode: Make sure it is set to Cool (not Fan or Dry) and the set temperature is well below room temperature. Also check for Eco or Sleep modes that can reduce cooling output.
- Close the room: Shut doors, pull blinds on sunny windows, and turn off heat-producing appliances nearby.
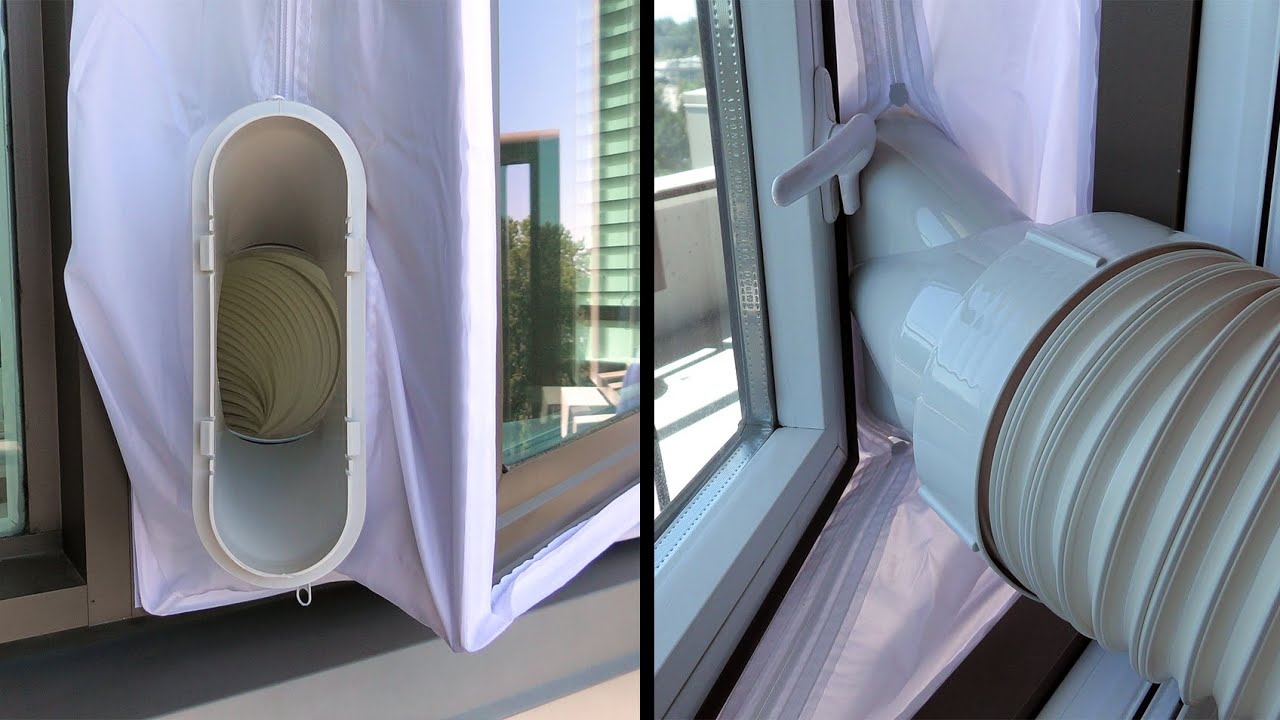
Step 1: Fix the vent hose and window seal
Venting is the most common culprit. A portable AC uses a refrigeration system that pumps heat out of the room, then must dump that heat outside. If the hot air is leaking back into the room, it will feel like it is running nonstop with barely any payoff.
What to check
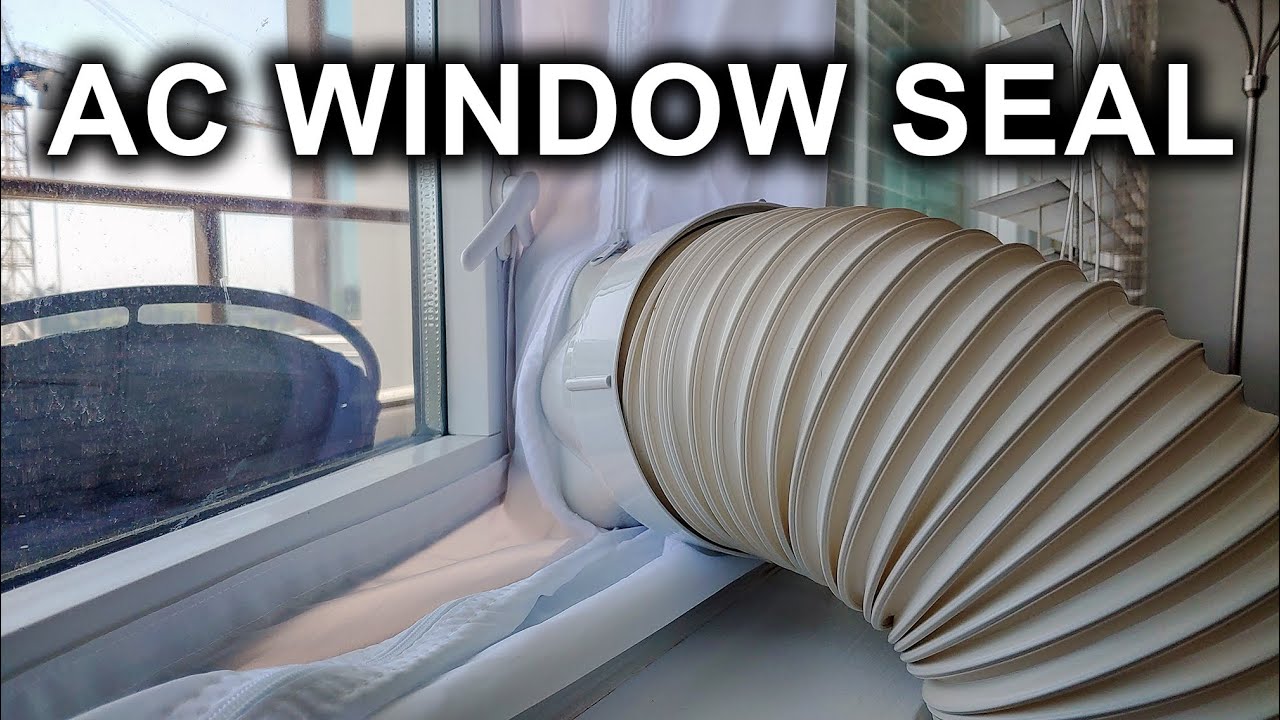
- Hose is attached tight: Confirm the hose is fully locked into the unit and the window adapter.
- Hose is short and straight: Long runs and big bends restrict airflow and reduce cooling. Keep it as short and direct as possible.
- No kinks or soft spots: A crumpled hose chokes the exhaust.
- Window kit actually seals: Gaps around the kit let hot outdoor air in and can also let exhaust back into the room.
My thrifty fix: If the window kit is loose, use adhesive foam weatherstripping around the edges and a strip of painter’s tape to snug things up. You are not building a museum display, you are building a seal.
Do not do this: Do not extend the exhaust hose longer than the manufacturer allows. It usually hurts performance and can overheat the unit.
Single-hose vs dual-hose note
Single-hose portable ACs pull some indoor air to cool the condenser, then blow that air outside through the hose. That can create slight negative pressure and pull warm air in from other parts of the house. Dual-hose models bring in outside air for the condenser and usually reduce that warm-air pull, so they tend to cool better in real life. If you have a single-hose unit, sealing the room well matters even more.
Bonus tip: That exhaust hose radiates heat back into the room. Keeping it short and out of direct sun helps. Some people insulate the hose, but only do that if your manual allows and you do not block airflow or vents.
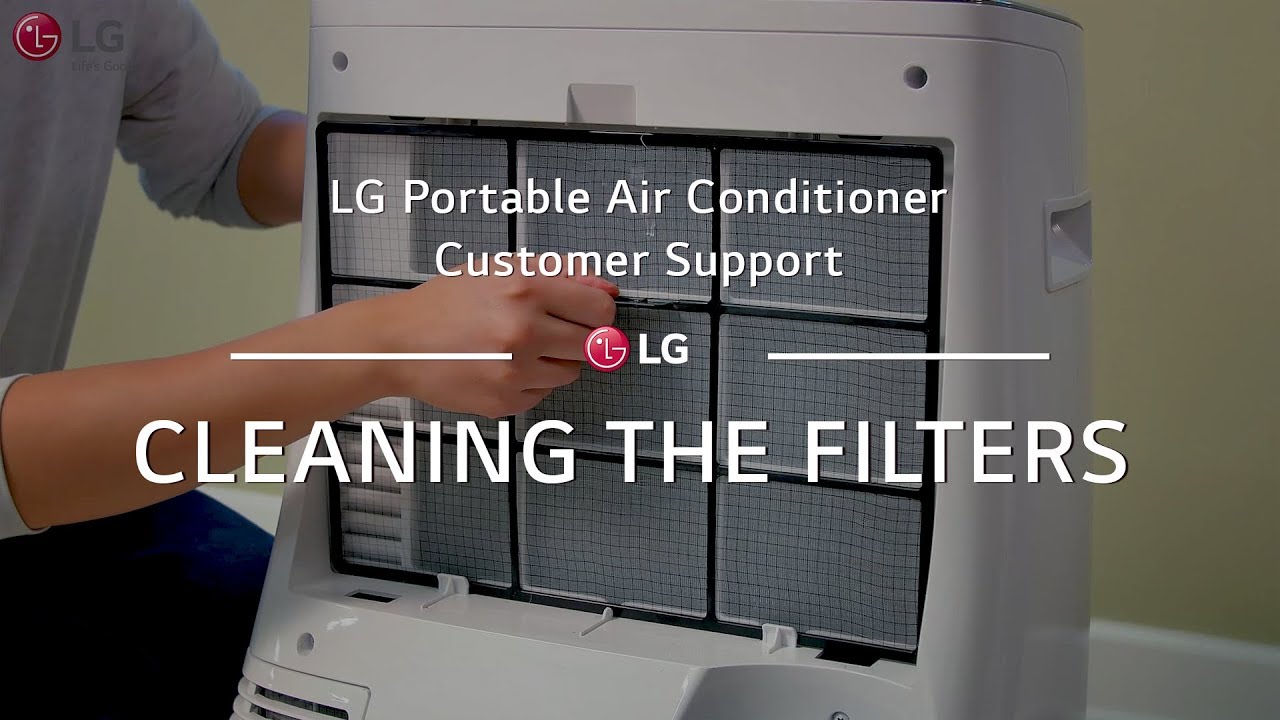
Step 2: Clean the air filter and clear airflow
A clogged filter reduces airflow across the evaporator coil, which means less heat gets pulled out of the room. It is like trying to breathe through a dusty sweatshirt.
Do this
- Unplug the unit.
- Remove the intake filter (usually a slide-out screen on the back or side).
- Vacuum dust off first, then rinse with warm water if the manual allows.
- Let it dry completely before reinstalling.
Also check the basics
- Clearance: Give the intake side plenty of breathing room (follow your manual, but 12 to 20 inches is a common target).
- Placement: Keep the unit close to the window so you can use a shorter hose, and keep it away from heat sources like lamps or TVs.
- Pet hair and lint: If you have pets, you may need filter attention every couple of weeks during heavy use.
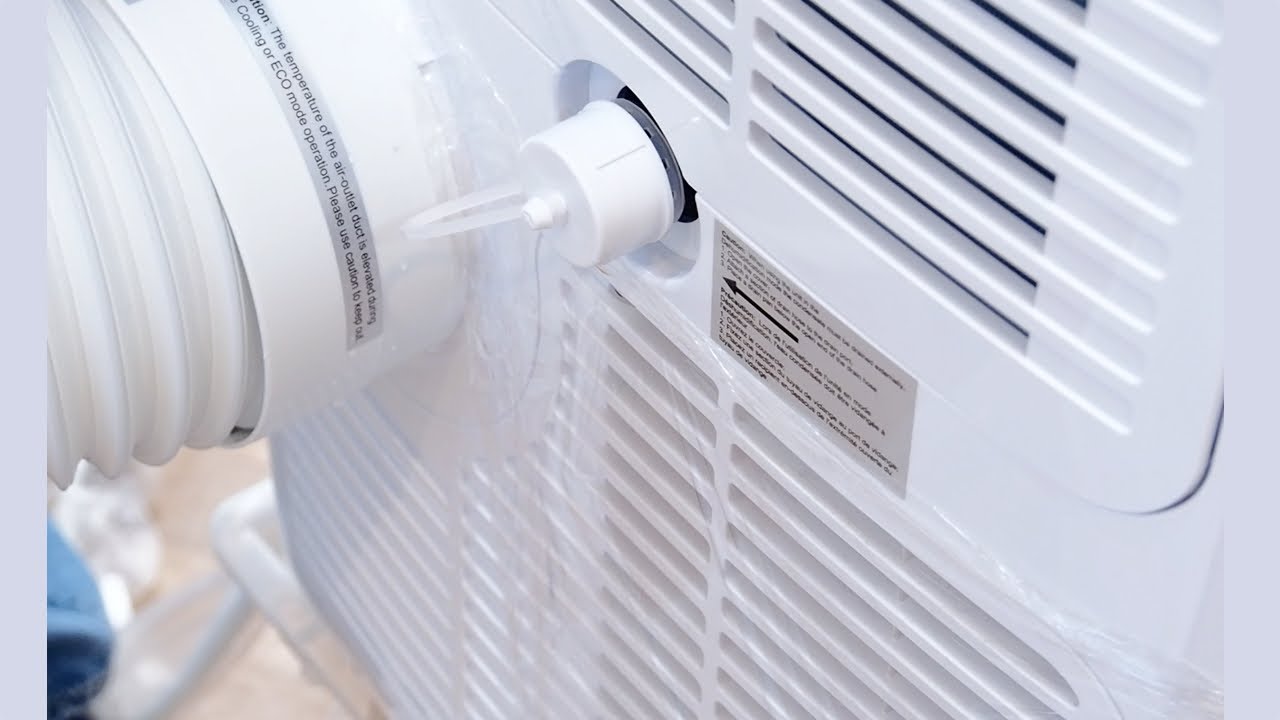
Step 3: Deal with drainage and condensate issues
Portable ACs remove moisture as they cool. Where that water goes depends on the model. When the unit cannot manage condensate correctly, it may shut off cooling, switch to a weaker mode, or throw a full-tank light.
Common scenarios
- Internal bucket is full: Many units stop cooling to prevent overflow. Empty the tank and reset the unit.
- Drain plug or cap is leaking: A missing or loose cap can drip and may trigger a shutoff or full-tank warning.
- Continuous drain setup is wrong: If you run a hose to a floor drain, it must slope downward the whole way. Any uphill loop can trap water and back up into the unit.
- High humidity overload: In very humid weather, some units spend lots of energy dehumidifying. The room may feel less sticky before it feels colder.
Quick fix checklist
- Empty the reservoir and confirm the float or sensor is not stuck.
- Verify the unit is level so water flows to the correct collection point.
- Clean the drain port and reseat the plug firmly.
Safety note: Water and electricity do not mix. Mop up any leaks before you plug the unit back in.
Step 4: Make sure the unit is big enough
This one hurts, because you can do everything right and still lose if the unit is undersized. Portable air conditioners are often marketed by BTU, but portable ratings can be confusing. Two units with the same advertised BTU can perform very differently depending on how they are rated.
Know the rating game
- ASHRAE BTU (often the big number): This is an older testing standard and it tends to look better on the box.
- SACC (Seasonally Adjusted Cooling Capacity): This is the DOE rating that better reflects real-world performance for many homes. If you see both numbers, use the lower SACC number when comparing units and sizing a room.
Rule-of-thumb sizing
- Start around 20 BTU per square foot as a quick baseline, but only if you are using a realistic rating. For portable units, that usually means sizing with SACC, not the larger ASHRAE number.
- Add capacity for sunny rooms, kitchens, or rooms with lots of people and electronics.
- If the room connects to open hallways or an open-concept space, treat it like a larger area.
Signs of an undersized portable AC
- It runs constantly and never reaches the set temperature.
- Air coming out is cool, but the room temperature barely drops.
- The exhaust hose is very hot and the unit feels like it is working overtime.
Reality check: On brutal days, a portable AC may not get you from 95°F down to 68°F. A more realistic goal is steady comfort in the 70s, especially in sunny rooms or older homes.
Thrifty move before you upgrade: “Shrink the room.” Use a door draft stopper, close off adjacent spaces, and seal obvious air leaks. You would be surprised how often that turns a struggling unit into a decent one.
Step 5: Check for icing and dirty internals
If airflow is restricted or the unit is operating outside its preferred range, the evaporator coil can get too cold and start icing. When that happens, cooling drops fast.
What you might notice
- Weak airflow from the front grille
- A musty smell
- Water dripping after shutdown (ice melting)
- Visible frost if you can see the coil area through the filter opening
What to do
- Turn the unit off and run Fan mode for 30 to 60 minutes to thaw.
- Clean the filter again and make sure the intake is not blocked.
- Try a slightly higher set temperature if you were cranking it to the lowest number all day.
If the inside is packed with dust beyond the filter, you may need a deeper cleaning. Follow your manual. Do not poke metal fins with tools or screwdrivers. They bend easily and you can reduce performance further.
Step 6: Refrigerant leak red flags
Portable ACs are sealed refrigerant systems. If refrigerant is low, the unit will often run but struggle to cool, and it can ice up. Unlike cleaning a filter, this is not a typical homeowner repair.
Red flags that point to a sealed-system issue
- It used to cool well, and now it barely cools even with a clean filter and perfect venting.
- The unit ices repeatedly, even with good airflow.
- You hear unusual hissing and performance steadily declines.
- Oily residue near internal tubing (not always visible on portable units).
What to do: Check your warranty and contact the manufacturer or a qualified HVAC tech. Many portable units cost more to repair than they are worth if the sealed system is compromised.
When replacement makes more sense
I love fixing things, but I also love not throwing good money after bad. A portable AC is a workhorse, and once certain components start failing, replacement is often the most budget-friendly option.
Replacement is worth considering if
- The unit is 8 to 10+ years old and performance has been fading season after season.
- You have a likely refrigerant leak or compressor problem.
- The cost of service is close to half the price of a new, properly sized unit.
- You have a single-hose model in a tough space and want a real upgrade in comfort (dual-hose can be a noticeable improvement).
Tip while shopping: Look for clear room-size guidance, a strong warranty, and a window kit that actually fits your window style. A great unit with a leaky vent setup still performs like a mediocre one. And when you compare models, prioritize SACC over the bigger ASHRAE number.
Fast troubleshooting checklist
- Confirm Cool mode, disable Eco/Sleep if needed, and set temp lower than room temp.
- Plug directly into a wall outlet (avoid extension cords and power strips).
- Seal the window kit and keep the exhaust hose short and straight.
- Clean and fully dry the air filter.
- Empty the tank and verify drain setup slopes down.
- Check clearance around the intake and exhaust (follow the manual).
- Thaw the unit if it is icing (Fan mode).
- If it still will not cool, suspect sizing issues (check SACC) or a sealed-system problem.
If you want to sanity-check sizing, tell me your room dimensions, ceiling height, how sunny it is, and the unit’s SACC rating. That is usually enough to spot whether the unit is fighting a losing battle.
About Marcus Vance
Content Creator @ Grit & Home
Marcus Vance is a lifelong DIY enthusiast and self-taught home renovator who has spent the last decade transforming a dilapidated 1970s ranch into his family's dream home. He specializes in budget-friendly carpentry, room-by-room renovations, and demystifying power tools for beginners. Through his writing, Marcus shares practical tutorials and hard-learned lessons to help homeowners tackle their own projects with confidence.