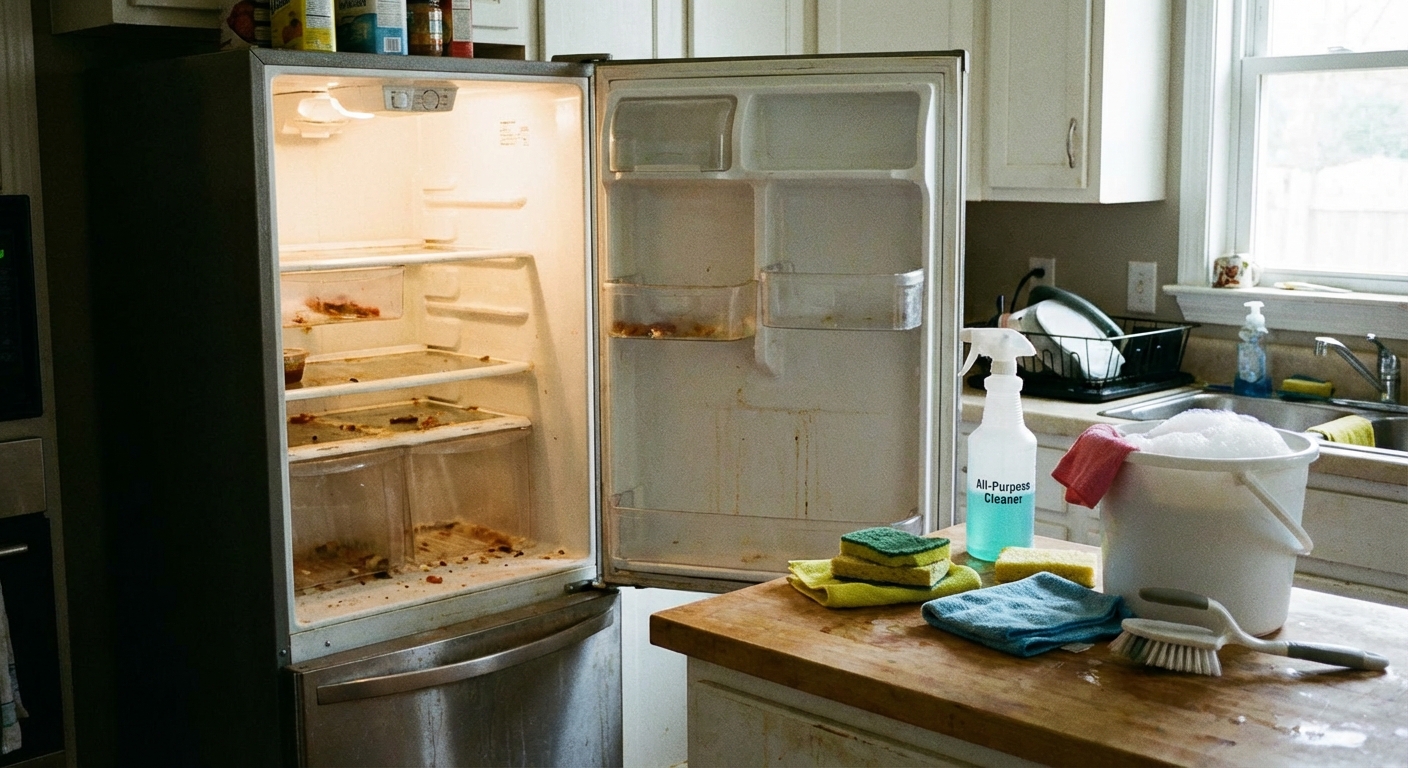
There are few household smells that can humble you faster than a refrigerator that suddenly reeks when you crack the door. The good news is most fridge odors come from a short list of usual suspects: a forgotten container, a sticky spill you cannot see, or a little hidden moisture that is growing something funky.
I’m going to walk you through how I tackle this at home, starting with finding the source (fast), then doing a deep clean that actually removes the odor instead of masking it.
Time estimate: 10 minutes to find the culprit, 45 to 90 minutes for a full deep clean (longer if you’re dealing with a drip pan or clogged drain).
Before you start: quick safety and setup
- Unplug the fridge or flip the breaker if you’ll be cleaning inside, removing drawers, or working near the fan area. This keeps the light and fans off and avoids electrical surprises.
- Move food to a cooler with ice packs. If you only have a small cooler, work in stages and keep doors closed as much as possible.
- Gather supplies you likely already own: dish soap, baking soda, white vinegar, microfiber cloths, a non-scratch sponge, an old toothbrush, and a towel.
- Avoid abrasive scrubbers and powders that can scratch plastic. Scratches can trap stink later.
- Avoid bleach inside the fridge unless the manufacturer specifically recommends it. Bleach can damage some plastics and leaves a smell that likes to linger.
Step 1: Find the odor source (10-minute detective work)
Don’t start scrubbing yet. First, figure out what kind of smell you’re dealing with. It helps you target the right area and avoid cleaning the whole fridge twice.
Common fridge smells and what they usually mean
- Sour milk smell: spilled dairy, old leftovers, or a leak under a drawer.
- Rotten or “something died” smell: meat juices, a tipped container that seeped into seams, or (rare but real) something behind or under the fridge.
- Musty or moldy smell: moisture sitting in the drain trough, a clogged drain tube, or a dirty drip pan.
- Sweet, rotten fruit smell: produce drawer spill or a forgotten bag in the back.
- Fishy smell: seafood packaging leak or a drip that ran down a shelf lip.
What to check first
- Throw out obvious offenders. Open every container. Smells hide in “mostly fine” leftovers.
- Check the back corners. I’ve found more lost cheese slices and tipped salsa jars back there than I care to admit.
- Inspect the produce drawers. Lift them out and look underneath. Liquids love to pool under drawer rails.
- Look for dried drips on shelf edges. Those little front lips on glass shelves catch spills, and they can stink for weeks.
- Check porous packaging. Cardboard (like a baking soda box that got damp) and paper can hold onto odors.
- Don’t forget the ice. If the smell is lingering, dump old ice and plan to wash the ice bin.
If you still can’t pinpoint it, assume there’s a hidden spill or a moisture issue and proceed with the deep clean below. That solves most cases.
Step 2: Empty the fridge and remove what comes out
This is where most people (including younger me) try to take shortcuts. It’s tempting to clean around things. That usually means the smell comes back in two days.
- Remove all shelves, bins, drawers, and door compartments that are designed to lift out.
- Take photos before you pull everything if you’re worried you’ll forget where parts go.
- Don’t wash cold glass shelves in hot water. Let them come closer to room temp first to avoid cracking.

Step 3: Wash shelves and drawers the right way
Simple wash solution (safe for most fridges)
- Fill a sink or tub with warm water.
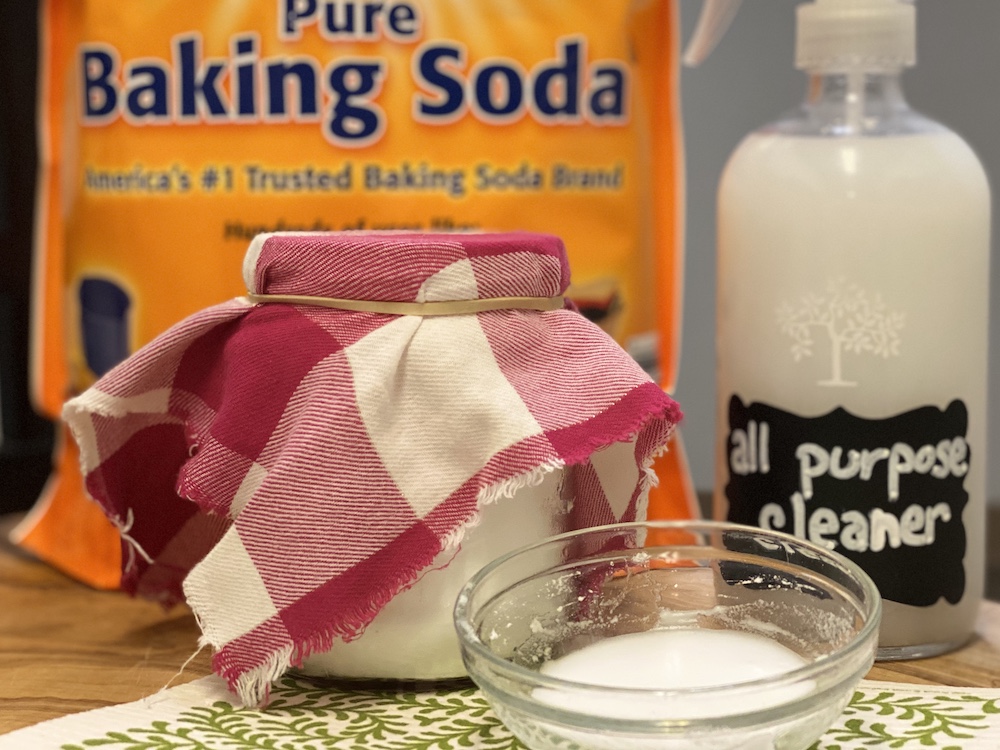
- Add a few drops of dish soap.
- For odor cutting power, add 2 tablespoons baking soda per quart of warm water (or roughly 1/2 cup per gallon).
Scrub and rinse
- Use a non-scratch sponge for plastics and glass.
- Use an old toothbrush for corners, slider tracks, and drawer handles.
- Rinse well and dry fully. Odor loves leftover moisture.
Marcus note: If you have that “sticky mystery film” on drawer bottoms, it’s usually sugar, juice, or sauce residue. The baking soda in the wash water makes a bigger difference than people expect.
Step 4: Deep-clean the interior (where smells hide)
Once the fridge is empty, you can finally clean the surfaces that usually get skipped: seams, shelf supports, and the little ledges that catch drips.
My go-to interior cleaner
Pick one of these. Don’t mix them in the same bottle, since vinegar (acid) and baking soda (base) neutralize each other.
- Option 1: Baking soda wipe
- Mix 2 cups warm water with 2 tablespoons baking soda.
- Option 2: Vinegar wipe
- Mix 1:1 white vinegar and warm water for cutting odor and film.
If the fridge is especially funky, I’ll use them sequentially: baking soda wipe first, then a vinegar wipe, then a plain-water wipe to finish.
Wipe top to bottom so you’re not dripping on areas you already cleaned. Pay special attention to:
- Shelf support rails and grooves
- Back wall vents where air circulates (wipe carefully, don’t poke tools into openings)
- Bottom floor under drawers
- Door shelves and the lip at the bottom of the door
Drying tip: Once you’re done, leave the door open for 10 to 15 minutes (if food is out and safe) so everything fully dries before you restock.
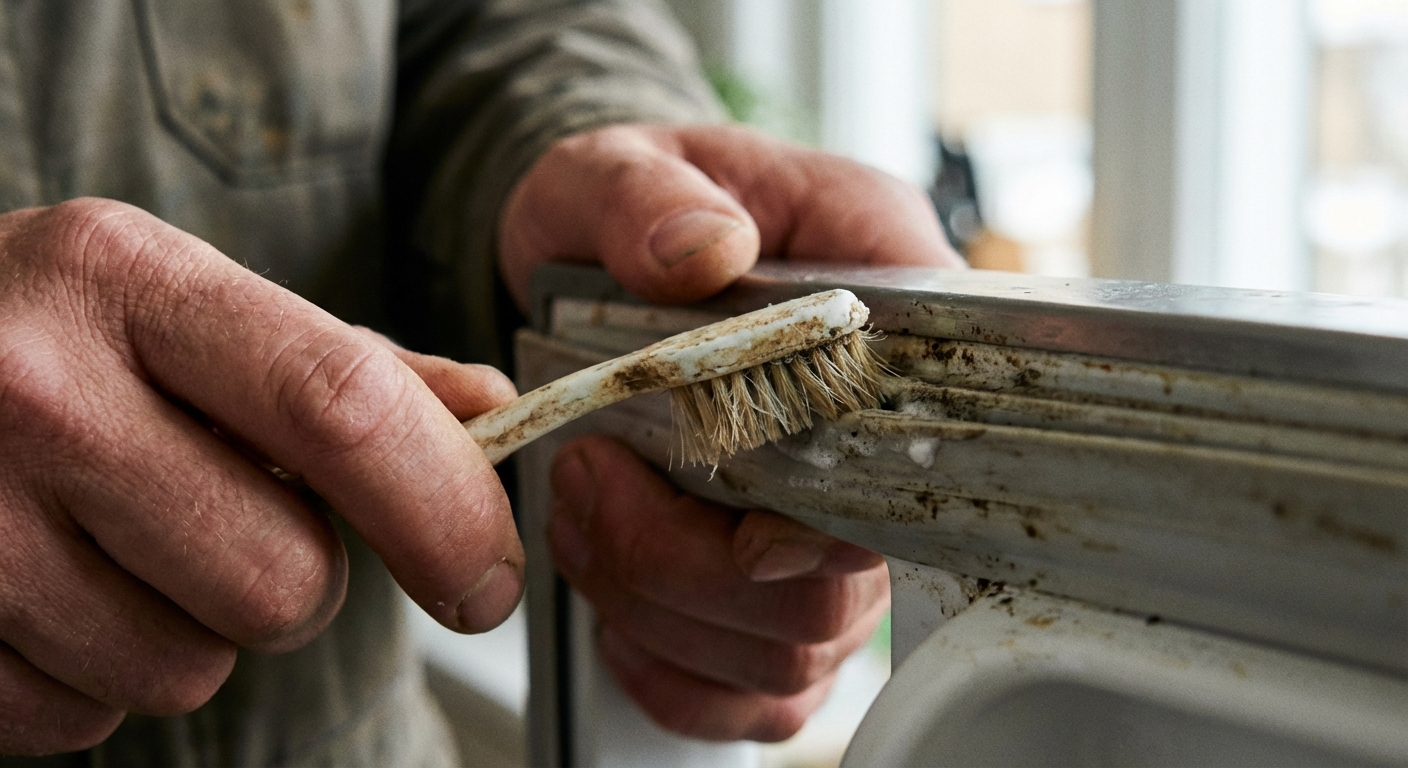
Step 5: Clean the door gasket (quiet odor culprit)
The rubber gasket around the door traps crumbs, sticky drips, and moisture. When it gets funky, the whole fridge smells off.
How to clean it
- Dip an old toothbrush in warm soapy water.
- Gently scrub the folds and corners.
- Wipe clean with a damp cloth, then dry thoroughly.
Tip: While you’re here, look for splits, warping, or areas that don’t seal. A poor seal can cause condensation and recurring musty smells.
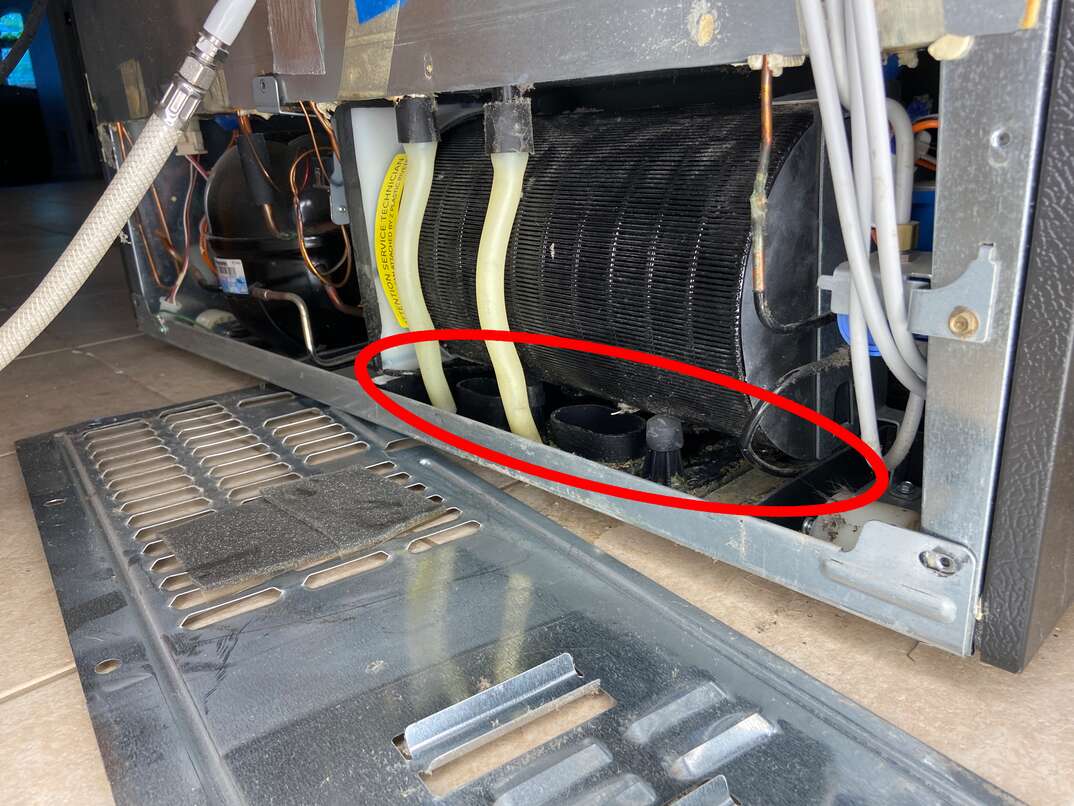
Step 6: Clean the drip pan (big smell, often forgotten)
If your fridge smells musty even after cleaning inside, the drip pan is a prime suspect. Many refrigerators evaporate defrost water in a pan underneath. Dust, pet hair, and standing water can create a nasty odor.
Where it is
Depending on your model, the drip pan may be:
- Behind the front kick plate (grille) at the bottom
- Accessible from the back near the compressor
How to clean it
- Unplug the refrigerator.
- Remove the kick plate or rear access panel as needed.
- Slide the drip pan out carefully. Some are not designed to be removed, so check your manual if it feels fixed in place.
- Dump any water, then wash with warm soapy water.
- For stubborn odor, wipe with a 1:1 mix of white vinegar and water, then rinse and dry.
My hard-learned lesson: Put a towel down before you pull the pan. The first time I did this, I tipped it just enough to make a gross little puddle that made the whole job take twice as long.
Step 7: Check the drain tube and defrost drain
A clogged defrost drain can cause water to collect inside the fridge or freezer, leading to mildew smells and sometimes a sheet of ice.
Signs the drain is clogged
- Water pooling under the crisper drawers
- Ice buildup on the freezer floor (for bottom-freezer models)
- Recurring musty odor that returns quickly after cleaning
How to clear it (general method)
- Unplug the fridge.
- Find the drain opening inside (often at the back near the bottom of the refrigerator compartment or under the freezer panel).
- Flush with warm water using a turkey baster or squeeze bottle.
- If water doesn’t go down, gently work a flexible plastic drain snake or a zip tie into the opening. Don’t use anything sharp that can puncture tubing.
If your model has a rear drain tube that empties into the drip pan, make sure it’s seated properly and not kinked.
Step 8: Deodorize the fridge (after cleaning)
Once everything is clean and dry, deodorizing is the finishing move. This is where baking soda and activated charcoal shine. They absorb odors instead of covering them up.
Option A: Baking soda (cheap and effective)
- Place an open box of baking soda on a middle shelf.
- For faster results, pour baking soda into a shallow bowl to increase surface area.
- Replace every 1 to 3 months depending on how odor-prone your fridge is.
Option B: Activated charcoal (strong odor absorber)
- Use a fridge-safe activated charcoal bag or container.
- Set it on a shelf with airflow around it.
- Follow the package directions for “recharging” in sunlight if applicable.
Option C: Coffee grounds (in a pinch)
Dry coffee grounds in a bowl can help with lingering smells, but they’re not my first pick because they can add their own scent. Use only after the real cleaning is done.

Step 9: Put food back smart
Before you reload, give anything going back in a quick sniff test and wipe any sticky bottoms. Then set yourself up for fewer future cleanouts.
- Use airtight containers for leftovers, especially onions, garlic, fish, and saucy foods.
- Keep raw meat on a rimmed tray or in a bin. If a package leaks, you only clean the tray.
- Label leftovers with a piece of tape and a date. The best deodorizer is not letting mystery containers evolve.
- Do a weekly two-minute sweep: toss wilted produce, wipe small spills immediately, and check the back for forgotten items.
Prevention checklist
- Wipe spills the same day. Dried drips become odor glue.
- Store strong-smelling foods sealed. Blue cheese and cut onions will perfume everything if they’re not contained.
- Replace baking soda regularly. Set a reminder if you need it.
- Clean the gasket every month or two. It’s quick and pays off.
- Vacuum the front grille area a few times a year. Less dust around the fridge means less funk around the drip pan area.
- Keep the fridge at the right temp: about 37 to 40°F for the refrigerator and 0°F for the freezer. Warmer temps can accelerate spoilage and odors.
When a bad smell could be something else
Most fridge odors are just food or moisture. But if you notice any of the following, it’s worth digging deeper or calling for service:
- Chemical or burning smell: unplug and investigate. It could be electrical, a failing fan motor, or dust heating up near the compressor area.
- Odd chemical smell plus poor cooling: many refrigerants are close to odorless, so a smell does not automatically mean a leak. Still, if cooling is weak or temperatures won’t hold, it’s service territory.
- Persistent odor after full cleaning: check the drip pan again, verify the drain is flowing, dump and wash the ice bin, and inspect behind the fridge for spills or (yes) a dead pest.
If you want the biggest bang for your effort, my order of operations is: hidden spills under drawers, then gasket, then drip pan, then drain tube. That sequence has solved nearly every “why does it still smell?” fridge I’ve helped family and neighbors with.
About Marcus Vance
Content Creator @ Grit & Home
Marcus Vance is a lifelong DIY enthusiast and self-taught home renovator who has spent the last decade transforming a dilapidated 1970s ranch into his family's dream home. He specializes in budget-friendly carpentry, room-by-room renovations, and demystifying power tools for beginners. Through his writing, Marcus shares practical tutorials and hard-learned lessons to help homeowners tackle their own projects with confidence.