
A stuck refrigerator water filter is one of those DIY moments where it feels like the fridge is winning. The good news is you usually do not need brute force. In fact, too much force is exactly how the plastic housing cracks and turns a small annoyance into a leak.
This page is strictly about removing a physically stuck filter without damaging the filter head or housing. Quick terms: the filter head is the part built into the fridge that the filter locks into. The housing is the plastic surround and guides that support it.
If your filter comes out fine but you have slow dispensing, weird taste, or ice maker issues, those are different troubleshooting paths.
Before you yank on it: identify the filter style
Most stuck-filter battles go sideways because the removal method does not match the style. Take 20 seconds and confirm which you have.
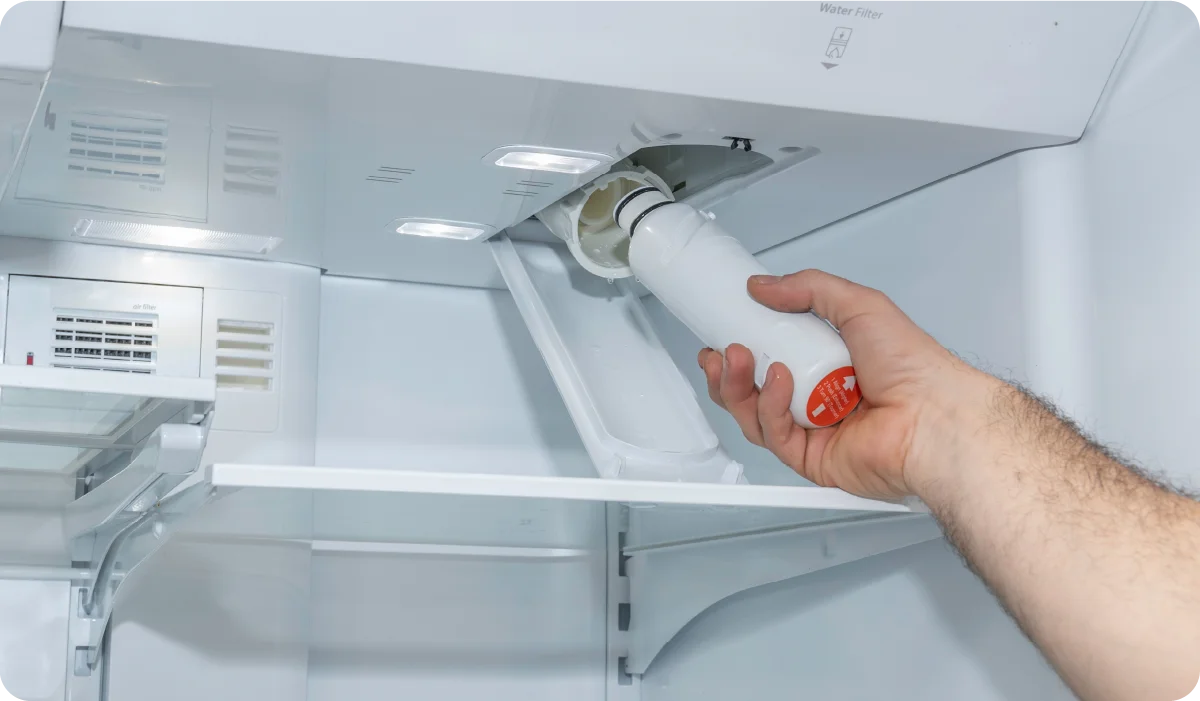
Cartridge filters inside the fridge
- Often in the ceiling, upper right corner, or a side wall compartment.
- Remove nearby bins or a shelf if it is blocking your hands from pulling straight.
- Make sure any filter door or trim cover is fully open before you start.
Twist-in (twist-lock) filters
- Common in the grille at the bottom, inside the fridge ceiling, or in the upper right corner.
- Most models turn counterclockwise to release, often about a quarter-turn, then pull out. Some models differ.
- Look for arrows, padlock icons, or “Lock/Unlock” marks on the housing and follow those if they conflict with generic advice.
Push-button or push-to-eject filters
- Usually inside the fridge compartment.
- You press a button and the filter pops out far enough to grab.
- If the button feels mushy or the filter barely moves, it can be jammed or the latch mechanism can be failing.
Quick note on inline filters
Some refrigerators use an external inline filter (behind the fridge, in the basement, or under the sink). This guide is for cartridge-style filters that lock into the fridge. Inline filters remove differently (usually push-to-connect fittings) and the “twist or eject” steps below will not apply.
Safety and setup
I have learned the hard way that a stuck filter plus pressurized water is how you end up mopping at midnight. Take a minute to set yourself up.
1) Turn off the water supply
- If your fridge has its own shutoff valve behind it, close it.
- If you cannot access it, shut off the nearest valve feeding the refrigerator line, often under the sink or in the basement.
2) Relieve pressure at the dispenser
- Hold a cup under the water dispenser and press for 10 to 20 seconds.
- This bleeds off line pressure and reduces the chance of a sudden spray when the filter unseats.
3) Protect the area
- Lay down a towel or a shallow pan under the filter area.
- Use a small flashlight so you can see the locking tabs and stop points.
4) Electrical common sense
- Unplugging the fridge is usually not necessary for a filter swap.
- If you are working through a lower grille area, be mindful of nearby wiring, fans, and sharp edges. Do not poke tools blindly.
Remove a stuck twist-in filter
With twist-in styles, the filter can bind up from a stuck O-ring, mineral buildup, or being overtightened during the last change.
Step 1: Push in slightly, then turn
This sounds backwards, but it works. Put one hand on the filter and apply light inward pressure (toward the housing) while turning in the unlock direction. That takes load off the locking lugs and helps it rotate.
Step 2: Improve your grip
- Use a dry rubber dish glove or a rubber jar-opener pad for traction.
- If the filter is smooth, wrap it with a wide rubber band for extra bite.
- Avoid metal pliers directly on the plastic. They can crush the cartridge and crack the housing when it finally lets go.
Step 3: Use the manufacturer tool (if you have it)
Some brands provide a small plastic cap or wrench that fits the end of the filter. If your refrigerator came with one, it is worth tracking down. It spreads force evenly and reduces the chance of snapping a tab.
Step 4: Warm the seal area a little
If the O-ring is sticking to the head, a little warmth can help break that seal.
- Use a towel soaked in warm water and hold it against the housing area for 1 to 2 minutes.
- Do not use a heat gun. Concentrated heat can warp plastic and create permanent leaks.
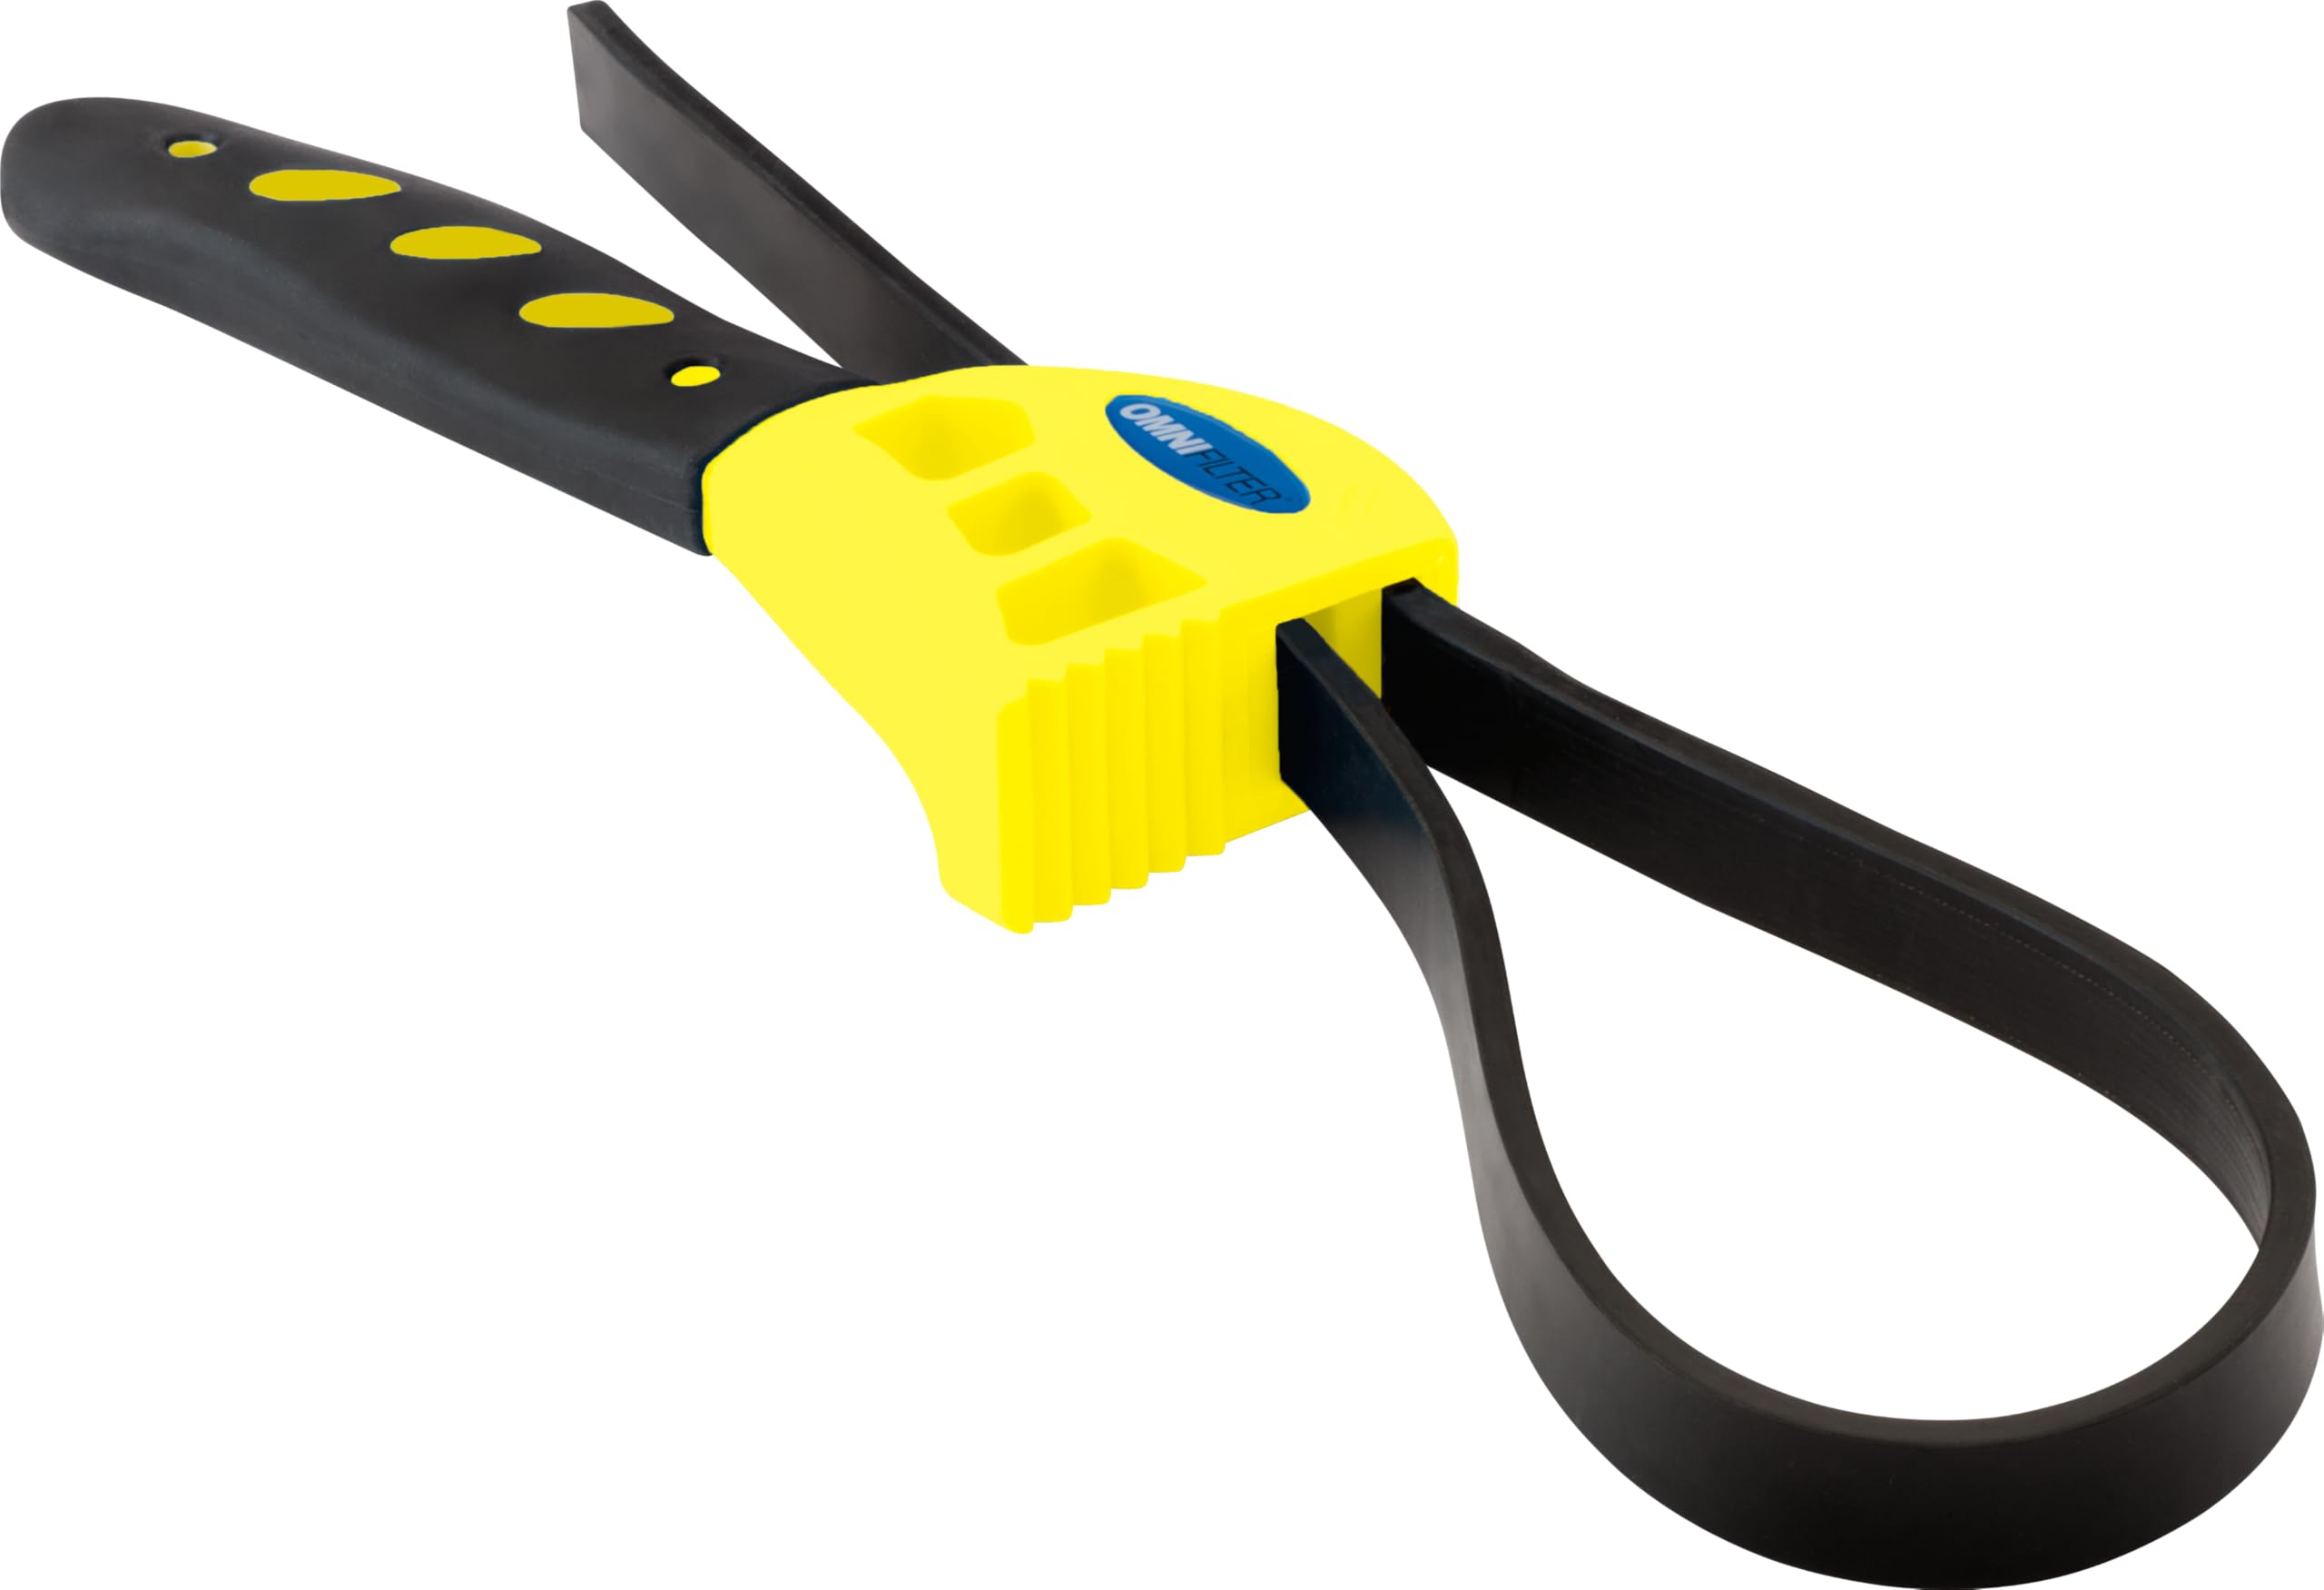
Step 5: Strap wrench (last resort)
If the filter still will not budge, a small rubber strap wrench can provide controlled torque without chewing up plastic.
- Set the strap near the base of the filter, close to the housing, not at the far end.
- Turn slowly and keep the force aligned with the rotation. Do not twist sideways.
Stop if you see this
- The housing visibly flexes with moderate force.
- You see stress whitening, cracks, or pieces flaking off.
- The filter suddenly sprays water even after you shut off the valve and relieved pressure.
Remove a stuck push-button filter
Push-button styles typically get stuck when the cartridge is not fully seated, the latch is jammed, or the filter swelled and is dragging inside the guide rails.
Step 1: Press and hold the eject button
Press and hold the button for 2 to 3 seconds. While holding, use your other hand to pull the filter straight out. Many people tap the button and release too quickly, which lets the latch re-engage.
Step 2: Push in, then eject
Push the filter in until it stops, then press the button and pull out. That small reset is often enough to unbind the latch.
Step 3: Check the cover and clearance
Some models have a small cover that must be fully open for the filter to eject. Make sure the cover is not catching the cartridge. Also remove bins or shelves that force you to pull at an angle.
Step 4: Use a non-marring grip aid
- Rubber gloves help.
- If there is a small lip to grab, you can use a plastic trim tool to help start it moving.
- Avoid flathead screwdrivers on the housing edge. One slip can crack the plastic.
Stop if you see this
- The button no longer springs back or feels broken.
- The latch area looks cracked or bent.
- You have to pry hard enough that the housing is bending.
If the filter end is stripped or the cap broke
This happens a lot on filters with small plastic handles or caps. The goal is to remove the cartridge without putting harmful force into the filter head.
Try these in order
- Rubber strap wrench around the cartridge body (for twist-in types).
- Friction wrap: a strip of rubber shelf liner around the filter, then hand-turn.
- Replace the reusable cap if your model uses one that snaps onto the new filter. If the cap is damaged, a new filter may not lock correctly.
What not to do
- Do not drill into the filter to “grab” it. Shavings can migrate into the water path.
- Do not clamp locking pliers on the housing. That is how hairline cracks form.
How to avoid cracking the housing
Filter housings are often part of a larger assembly and can be pricey. They can also crack in a way that only leaks under pressure, meaning you think you are done until the next day.
Rules I follow
- Pull straight. Side-loading the filter can snap guides and damage the O-ring seat.
- Follow the stop. If it is not rotating in the unlock direction, do not force it past the resistance point.
- Rubber tools before metal tools.
- Do not overtighten the new filter. Twist-lock types usually seat with a firm turn to the stop. If you have to white-knuckle it, it is too tight.
When to replace the filter head or housing
Sometimes the filter is not the real problem. If the parts that lock and seal the cartridge are damaged, you can fight it every six months and still end up with leaks.
Replace the head assembly if you see any of these
- Cracks around the filter seat, threads, or latch area.
- Deformed locking tabs that no longer hold the filter securely.
- Repeated leaking at the filter after installing a known-good filter and correctly seating it.
- Eject button failure that is consistent or feels broken and the filter will not latch.
- O-ring seat damage, like gouges or chunks missing where the filter seals.
If you are on the fence, dry everything thoroughly first. Then install a new filter, turn the water back on, and inspect with a dry paper towel around the housing for 2 to 3 minutes. If you see fresh moisture that keeps coming back, treat it as a warning sign and address the sealing surface before you walk away.
After you get it out: install and check
Install the new filter
- Confirm the model number matches your refrigerator, not just “looks close.”
- Be cautious with off-brand filters. Small tolerance differences can contribute to sticking or leaks on some models.
- For twist-lock: push in and rotate in the lock direction to the stop, then stop.
- For push-in: push until it clicks and sits flush.
Turn water back on and flush
- Open the shutoff valve.
- Flush per your refrigerator manual. Many brands specify a number of gallons (often around 2 to 4 gallons), which may take several minutes at the dispenser.
- Check the filter area for drips during and after flushing.
Quick troubleshooting
- Filter turns a little then stops hard: likely not aligned with the locking lugs. Push in, line up, and try again. Also confirm you are turning in the unlock direction for your model.
- Filter will not eject when button is pressed: hold the button down while pulling straight. If it still fails, the latch may be damaged.
- Filter comes out, but housing drips afterward: the filter may not be fully seated, the O-ring may be nicked, or the housing may be cracked.
- Stress lines or flakes on housing: stop and plan on replacing the head assembly before pressurizing again.
When to call for service
I am all for DIY, but I also like dry floors. Call a pro or the manufacturer if:
- The filter is stuck and the housing visibly flexes when you apply moderate force.
- You see cracks or the housing is already leaking.
- The refrigerator is built-in and moving it risks damaging cabinetry or the water line.
- You suspect the filter head or latch is broken and you do not want to force it.
A service call is cheaper than replacing a filter head plus repairing water damage.
About Marcus Vance
Content Creator @ Grit & Home
Marcus Vance is a lifelong DIY enthusiast and self-taught home renovator who has spent the last decade transforming a dilapidated 1970s ranch into his family's dream home. He specializes in budget-friendly carpentry, room-by-room renovations, and demystifying power tools for beginners. Through his writing, Marcus shares practical tutorials and hard-learned lessons to help homeowners tackle their own projects with confidence.