🚨 In a DIY emergency or rush?
Skip the details and jump straight to our 30-second cheat sheet for the most crucial info.
I've spent more Saturdays than I can count staring at a dark oil shadow on concrete thinking, Seriously? I fixed the drywall seams perfectly and this is what beats me? The good news is oil and grease stains aren't magic. They're just stubborn because concrete is porous, so the stain sinks in and hangs on.
This guide walks you through the same process I use on my own driveway and garage floor: stop the spill from spreading, pull as much oil out of the pores as possible, then clean the surface without damaging the concrete. I'll be honest up front: a very old stain might never look brand new again, but you can almost always make it lighter and far less noticeable.
Know what you're dealing with
Before you grab a pressure washer and go to war, take 30 seconds to identify the stain. It'll help you pick the right method and avoid doing a lot of work for mediocre results.
- Fresh spill (minutes to a few hours): You can still absorb most of the liquid before it soaks deep.
- Recent stain (days to a few weeks): Oil has penetrated, but you can often lift it with degreaser plus agitation and a hot rinse.
- Old stain (months to years): The stain has migrated down into the pores. A poultice (a paste that draws oil out) is usually your best bet.
- Grease vs. oil: Grease (like wheel bearing grease) is thicker and often needs more dwell time and brushing. Motor oil spreads faster and penetrates quickly.
Quick reality check: If your concrete is unsealed and the stain is old, expect a “lighter shadow” rather than a total disappearance. If it's sealed and the sealer is still in good shape, you often have a better chance because the stain is more likely sitting on or near the surface. If the sealer's worn, failing, or the oil found a crack or joint, it can still soak in.
Safety and prep
Most driveway and garage cleanup products are alkaline, solvent-based, or both. None of that is great in your eyes or on your skin.
What to wear
- Nitrile gloves
- Eye protection
- Old clothes or coveralls
- Closed-toe shoes with decent tread (wet concrete is slick)
Before you start (quick checks)
- Test a small spot first: Especially on colored or stamped concrete, painted surfaces, or epoxy-coated garage floors. Some degreasers can dull gloss or shift color.
- Know your concrete: New concrete (under about 28 days) can be softer and easier to etch. Cracks and control joints can hold oil and make stains look like they “won't move.”
What to protect
- Nearby grass and plants: Pre-wet them with water, and rinse after you're done so overspray is diluted.
- Garage contents: Move cardboard boxes, bare metal tools, and anything that hates water or chemicals.
- Drains: Avoid washing oily runoff into storm drains. Use absorbent pads, socks, or kitty litter to catch sludge, and dispose of it according to local rules.
Ventilation note: If you're working in a garage, open the door and add a fan. Degreasers in enclosed spaces are a headache waiting to happen.
Disposal note: Oily absorbents and rags can be considered hazardous waste in some areas. Check local guidance before tossing it in the regular trash.
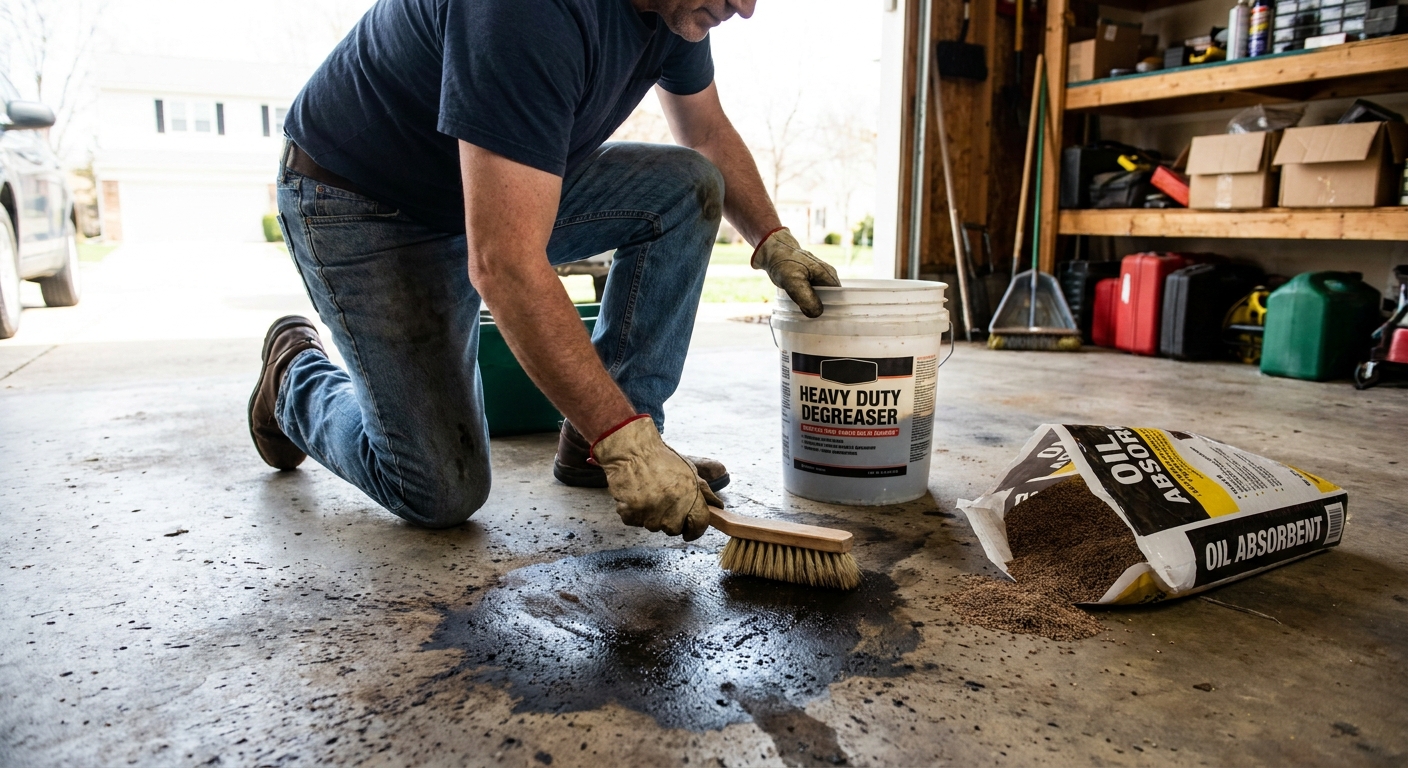
Step 1: Absorb fresh spills
If the spill is still wet, your job isn't “cleaning” yet. Your job is stopping the oil from becoming a permanent resident.
Materials
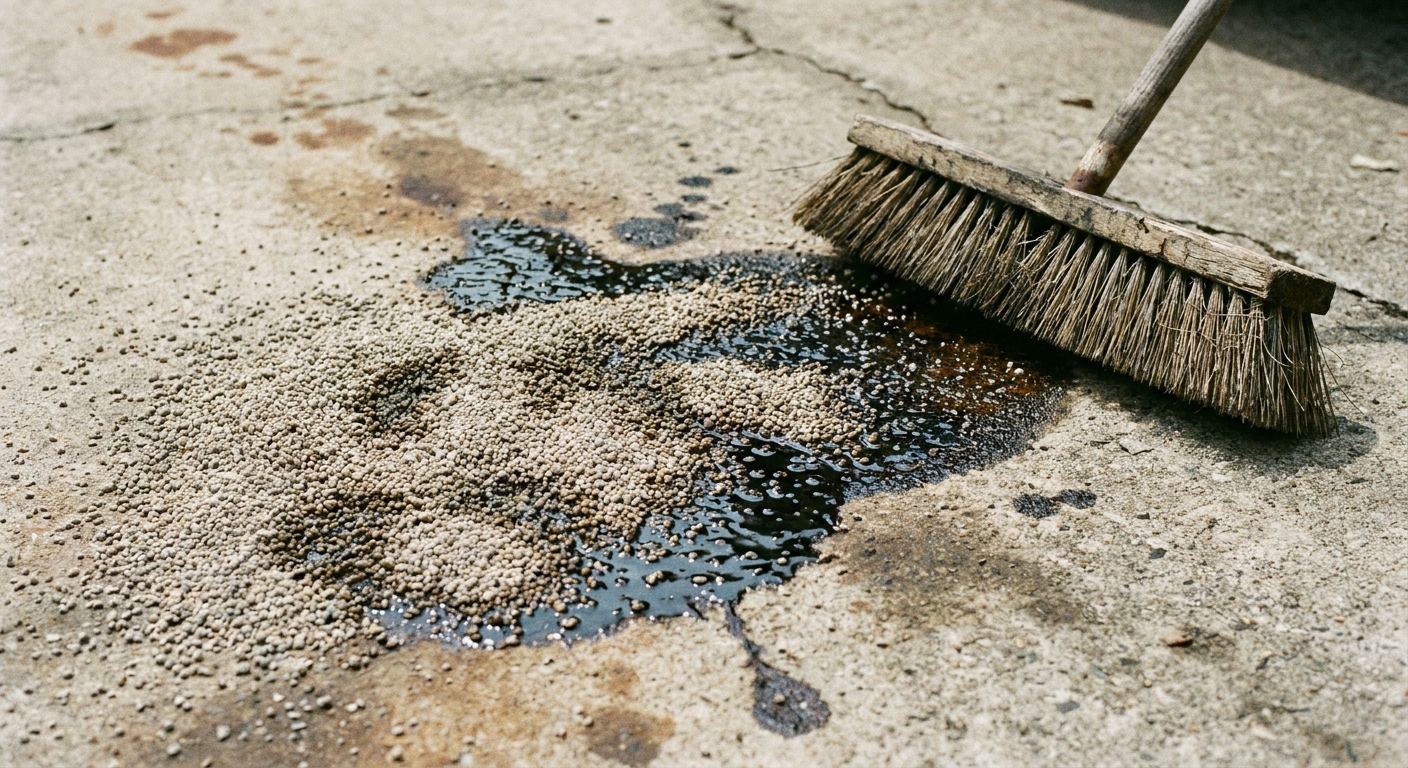
- Clay kitty litter, oil absorbent granules, or oil-dry
- Stiff broom or your boot (for grinding it in)
- Dustpan and broom
Steps
- Blot puddles first. If there's standing oil, use paper towels or shop rags to pick up the bulk. Don't smear it wider.
- Cover the spill completely. Pour absorbent over the whole area, plus a couple inches beyond the visible edge.
- Grind it in. This is key. Step on it and twist, or scrub it in with a broom. You're trying to push absorbent into the pores.
- Wait. Minimum 30 minutes. Overnight is even better for a bigger spill.
- Sweep up. Bag it and dispose of it properly.
My hard-learned lesson: The “light sprinkle and sweep” method looks tidy, but it leaves oil behind. Grinding absorbent in feels a little ridiculous. It works.
Step 2: Degrease most stains
For stains that aren't ancient, a good concrete-safe degreaser plus agitation does most of the heavy lifting. The goal is to break oil into tiny droplets so you can rinse it away.
Choose the right degreaser
- Concrete and driveway degreasers: Typically alkaline and designed to cling to vertical and flat surfaces.
- Enzyme or bio-based degreasers: Slower, often less harsh, and great for maintenance. They can work very well with longer dwell time.
- Dish soap: Fine for a small, fresh spot as a first pass, but it's usually not strong enough for set-in stains.
Steps
- Sweep the area. Dirt turns your scrubbing into mud.
- Decide wet vs. dry. Many water-based degreasers work best on lightly damp concrete, but some products want a dry surface. Follow the label.
- Apply degreaser and let it dwell. Follow the bottle. Most need 10 to 20 minutes. Don't let it dry out. If it starts drying, mist it with a little water (again, only if the product allows).
- Scrub hard with the right brush. Use a stiff nylon brush. Avoid metal wire brushes on most concrete, especially if it's newer or softer.
- Rinse thoroughly. Use a hose with a strong nozzle or a pressure washer on a safe setting (more on that below). Try to direct runoff to a catch area.
- Repeat if needed. Two moderate passes usually beat one aggressive pass that etches the surface.
Pro tip: If you're working in a garage and can't flood-rinse, use a wet-dry vac. Rinse with a small amount of hot water, scrub, then vacuum the dirty solution up. A squeegee plus absorbent socks around the perimeter helps keep runoff contained.
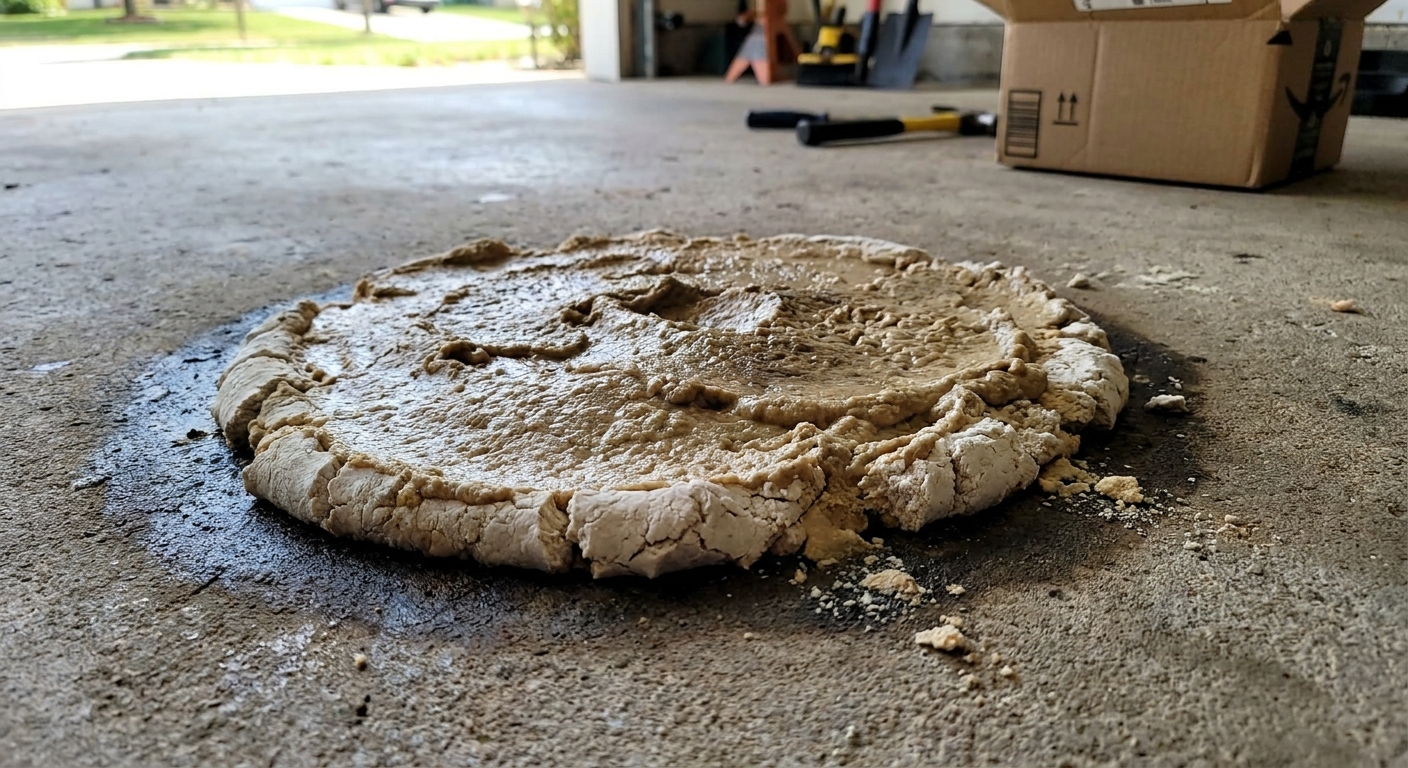
Use a poultice for old stains
If the stain is old, the concrete may be clean on the surface but still holding oil below. That's when a poultice earns its keep. A poultice is basically an absorbent paste that sits on the stain long enough to draw oil up and out of the pores.
Poultice options
- Poultice-style concrete oil stain remover (store-bought): Easiest and consistent. Look for products that dry to a crust and are specifically labeled for pulling oil from concrete pores.
- DIY poultice (absorbent + solvent): Some people mix clay kitty litter or diatomaceous earth with acetone or mineral spirits into a thick paste. It can work, but it's higher risk and easier to mess up.
If you do the DIY solvent method
- No ignition sources: Solvents are flammable. Keep it away from pilot lights, heaters, and sparks.
- Ventilation matters: I wouldn't do this in an attached garage without serious airflow.
- Test first: Solvents can discolor or soften some coatings and can affect decorative concrete.
- Dispose responsibly: Solvent-contaminated waste may be treated as hazardous waste. Check local rules.
Steps for a poultice remover
- Clean first. Degrease and rinse. You want to remove surface grime so the poultice can focus on what's in the pores.
- Apply a thick layer. Usually 1/4 to 1/2 inch thick.
- Cover if instructed. Some products work better covered with plastic to slow evaporation. Follow the label.
- Wait until fully dry. This can take 8 to 24 hours depending on humidity.
- Scrape and sweep. Dispose of the dried material properly.
- Reassess and repeat. Old stains often need two or three rounds.
What success looks like: The poultice dries with darker discoloration in the material. That's oil migrating into the poultice instead of living in your concrete.
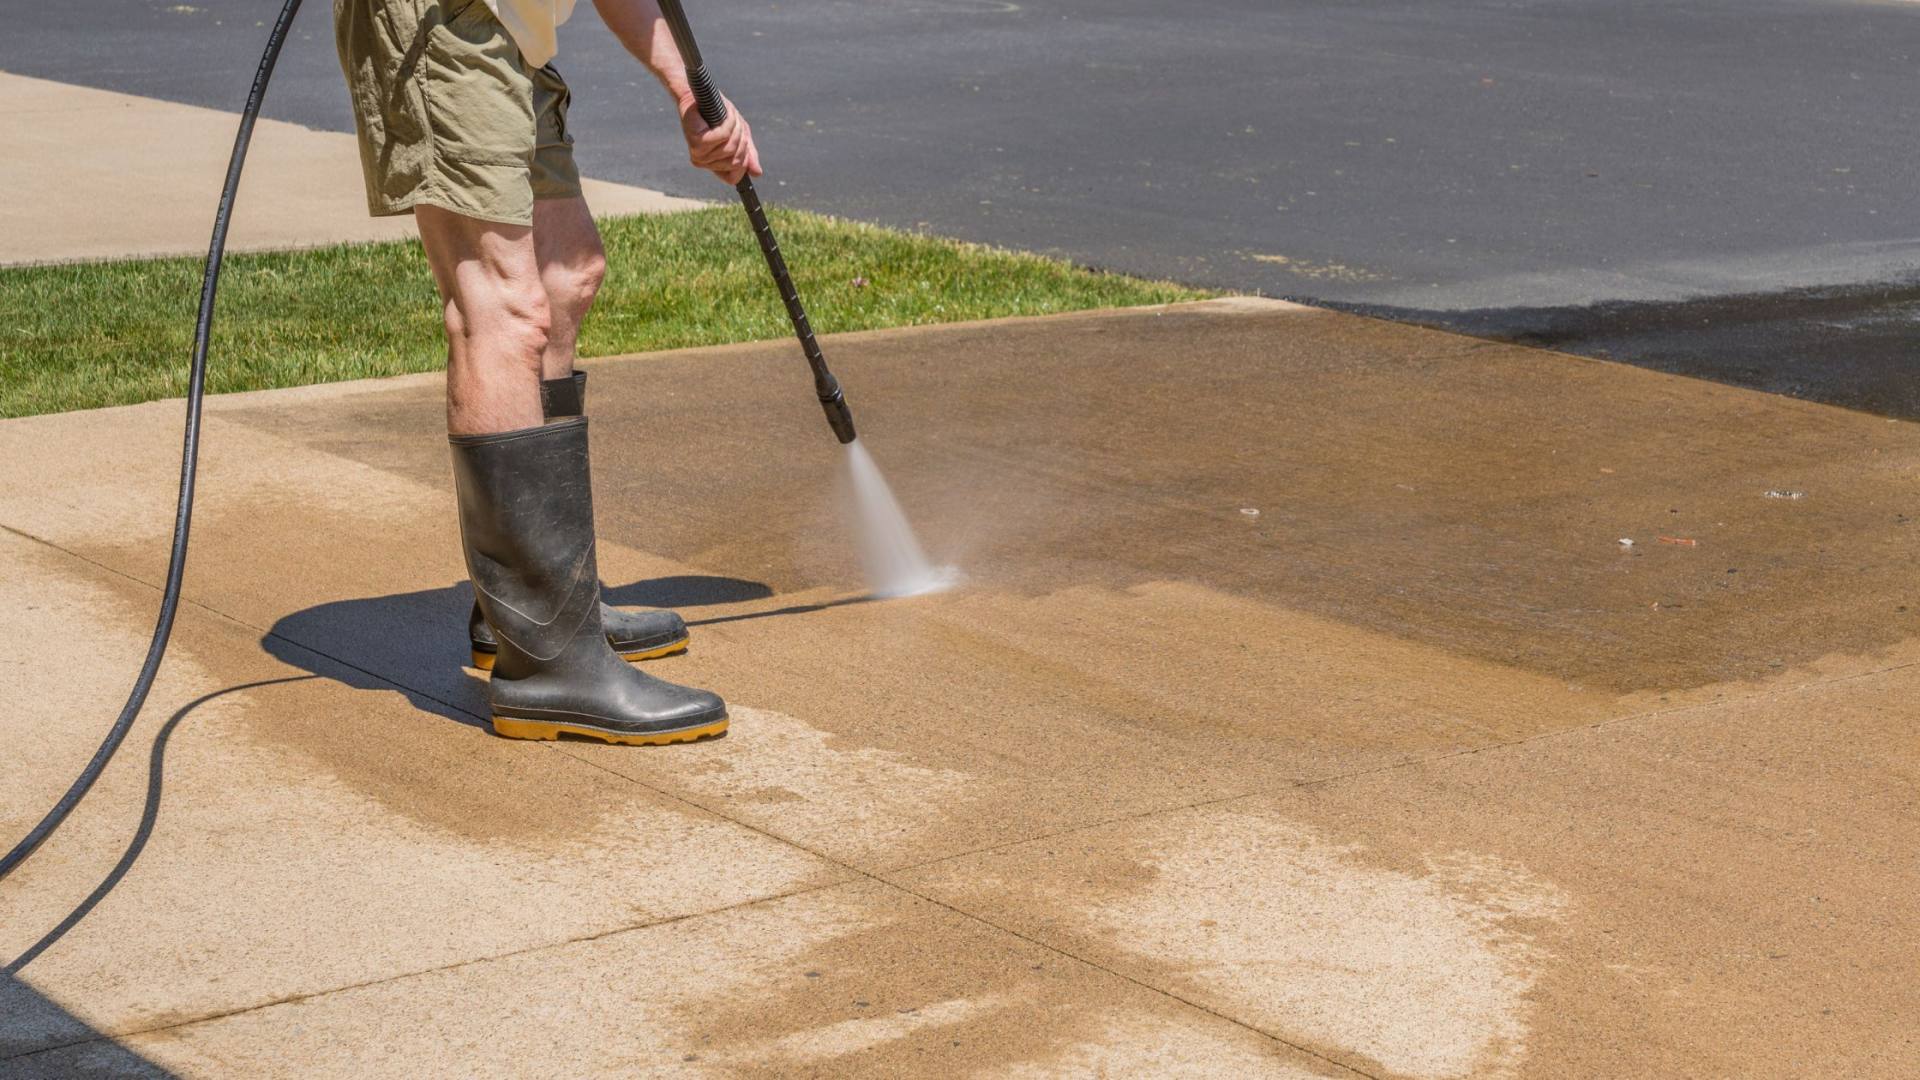
Pressure washing
A pressure washer can rinse away broken-down grease and brighten the slab, but it can also chew up the surface if you crank it up and hover in one spot.
Cautions that matter
- Etching risk: Too much pressure or holding the tip too close can leave visible stripes or a rough patch that looks worse than the stain.
- Spreading contamination: Blasting a wet, oily area before degreasing can spread oil, and it can also force oily water into pores, cracks, or joints.
- Uneven color: High-pressure cleaning one area can make it look cleaner than the surrounding slab. Sometimes you have to wash a larger section for it to blend.
How I do it
- Degrease first. Always.
- Use a wider fan tip. Avoid the zero-degree pinpoint tip for concrete stain work.
- Keep moving. Think “paint strokes,” not “jackhammer.”
- Stay back and sneak up. Start farther away, then move closer only if needed.
- Rinse toward a collection area. Use absorbent to capture sludge so it doesn't go everywhere.
Bottom line: Pressure washing is a rinse and blend tool, not a stain-removal strategy by itself.
Stubborn dark spots
Sometimes you do everything right and there's still a faint, darker patch. That doesn't always mean there's still liquid oil in the concrete. It can also be:
- Deep-set contamination: The pores below the surface are still stained.
- Aggregates showing differently: Cleaning can reveal the natural color differences in the slab.
- Shadowing from moisture: Recently cleaned concrete can look darker until it fully dries, especially in humid weather.
What helps
- Give it time: Let the area dry 24 to 48 hours before judging.
- Repeat a poultice: For old oil, this is usually the best next step.
- Clean a larger area: If you have a “clean halo,” wash the whole bay or a wider driveway section so it blends.
- Consider a tinted concrete sealer: If aesthetics are the goal and stains are permanent, a tinted sealer can help even things out.
After cleaning: reseal?
If your driveway or garage floor was sealed, heavy degreasing and pressure washing can weaken or strip that sealer. Resealing is optional, but it's one of the best ways to prevent the next stain from soaking in.
Check if sealer still works
Do a quick water test once the concrete is dry. Sprinkle a little water on the cleaned area.
- If it beads up: Sealer is likely still doing something.
- If it darkens and soaks in quickly: Sealer is worn or gone in that spot.
Resealing basics
- Wait until fully dry: Minimum 24 to 48 hours after cleaning, but after heavy washing or humid/cool weather it's often 48 to 72+ hours. Follow the sealer instructions and don't trap moisture under a film.
- Choose the right sealer: Penetrating sealers are great for a natural look. Film-forming sealers can add sheen but can also show wear patterns.
- Follow coverage rates: Over-applying sealer can leave sticky or blotchy spots.
Thrifty note: You don't always need to reseal the entire driveway. For a garage, I often reseal the full bay because it's manageable and keeps the look consistent.
Mistakes to avoid
- Using bleach as your main solution: Bleach can lighten organic stains, but it doesn't dissolve petroleum oil effectively. It can also discolor some concrete and harm nearby plants.
- Letting degreaser dry on the slab: Dried chemical residue can leave a haze and reduce effectiveness.
- Using a wire wheel or grinder right away: You can permanently change the texture and create a spot that always looks different.
- Rinsing oily sludge into the street: Besides being messy, it can be illegal in some areas and it's tough on the environment.
Tools and supplies
Here's a simple shopping and prep list. You don't need everything every time.
- Absorbent (kitty litter or oil-dry)
- Concrete-safe degreaser
- Stiff nylon scrub brush or deck brush
- Bucket and hose
- Pressure washer (optional)
- Poultice-style oil stain remover (for old stains)
- Nitrile gloves and safety glasses
- Wet-dry vac (helpful for garages)
- Absorbent socks/pads (helpful for runoff control)
FAQs
Will WD-40 remove oil stains from concrete?
WD-40 can loosen some grime, but it's also petroleum-based and can add its own residue. I skip it for stain removal and use a real concrete degreaser or a poultice product instead.
Does baking soda work?
Baking soda can absorb a small fresh spot and help with mild odors, but it's usually too gentle for motor oil that's soaked in. I consider it a “better than nothing” option if you're in a pinch.
Can I just use muriatic acid?
Acid etches concrete. It can change the surface and doesn't specifically target oil in pores. I don't recommend it for oil stains unless you truly know what you're doing and you're prepared for surface changes.
How long should I wait before parking on it?
After cleaning, wait until the area is fully dry so you don't trap moisture and grime. If you reseal, follow the sealer instructions. Many products allow foot traffic in about 24 hours, but vehicle traffic often takes longer.
The 30-Second Cheat Sheet
Essential takeaways for: Remove Oil and Grease Stains From Concrete
Fast plan (works for most oil and grease stains)
- If it's fresh: Blot puddles, then cover with kitty litter or oil-dry. Grind it in. Wait 30 minutes to overnight. Sweep up.
- Degrease: Lightly pre-wet concrete if the label allows, apply a concrete-safe degreaser, dwell 10 to 20 minutes (don't let it dry), then scrub hard with a stiff nylon brush.
- Rinse: Hose rinse or gentle pressure wash with a fan tip, keeping the wand moving. Capture oily runoff where you can.
- Old dark stain: Use a poultice-style oil stain remover. Apply thick, let it dry fully, then scrape and repeat as needed.
Degreaser vs. poultice
- Degreaser: Best for newer stains and surface grease. Quick results, may need 2 passes.
- Poultice: Best for old stains that soaked into pores. Slower, but it actually pulls oil out.
Pressure washing cautions
- Don't blast a wet oily spot first. Degrease first or you can spread oil and push it into pores, cracks, or joints.
- Avoid the zero-degree tip. Use a wide fan tip and keep moving to prevent etching.
What to expect from aged stains
- Old oil can leave a faint shadow even after cleaning.
- Let the concrete dry 24 to 48 hours before judging results.
Aftercare
- Test sealer by sprinkling water. If it soaks in fast, consider resealing once fully dry (often 48 to 72+ hours after heavy washing, depending on conditions and the sealer).
💡 Tip: Scroll up to read the full article for detailed, step-by-step instructions.
⬆️ Back to topAbout Marcus Vance
Content Creator @ Grit & Home
Marcus Vance is a lifelong DIY enthusiast and self-taught home renovator who has spent the last decade transforming a dilapidated 1970s ranch into his family's dream home. He specializes in budget-friendly carpentry, room-by-room renovations, and demystifying power tools for beginners. Through his writing, Marcus shares practical tutorials and hard-learned lessons to help homeowners tackle their own projects with confidence.