
Before you start
I still remember my first light swap in our 1970s ranch. I turned off what I thought was the right breaker, pulled the fixture down, and saw a tiny spark when my screwdriver touched a terminal. Nothing dramatic, but it was a solid reminder: electricity does not care how confident you feel.
The good news is that replacing a basic ceiling light is one of the most approachable electrical projects for a homeowner, as long as you respect the safety steps and know when to tap out and call a pro.
- Time: 30 to 90 minutes
- Difficulty: Beginner
- Typical cost: The price of the fixture, plus a few dollars in wire connectors if needed
Safety first
Turn off the correct breaker
Flip the light switch on so the light is currently on. Then go to your electrical panel and turn off the breaker you believe feeds that light. If you chose correctly, the light will go out.
Pro tip: If your panel is not labeled well, plug a lamp into the same room and use it as your on and off indicator while you try breakers.
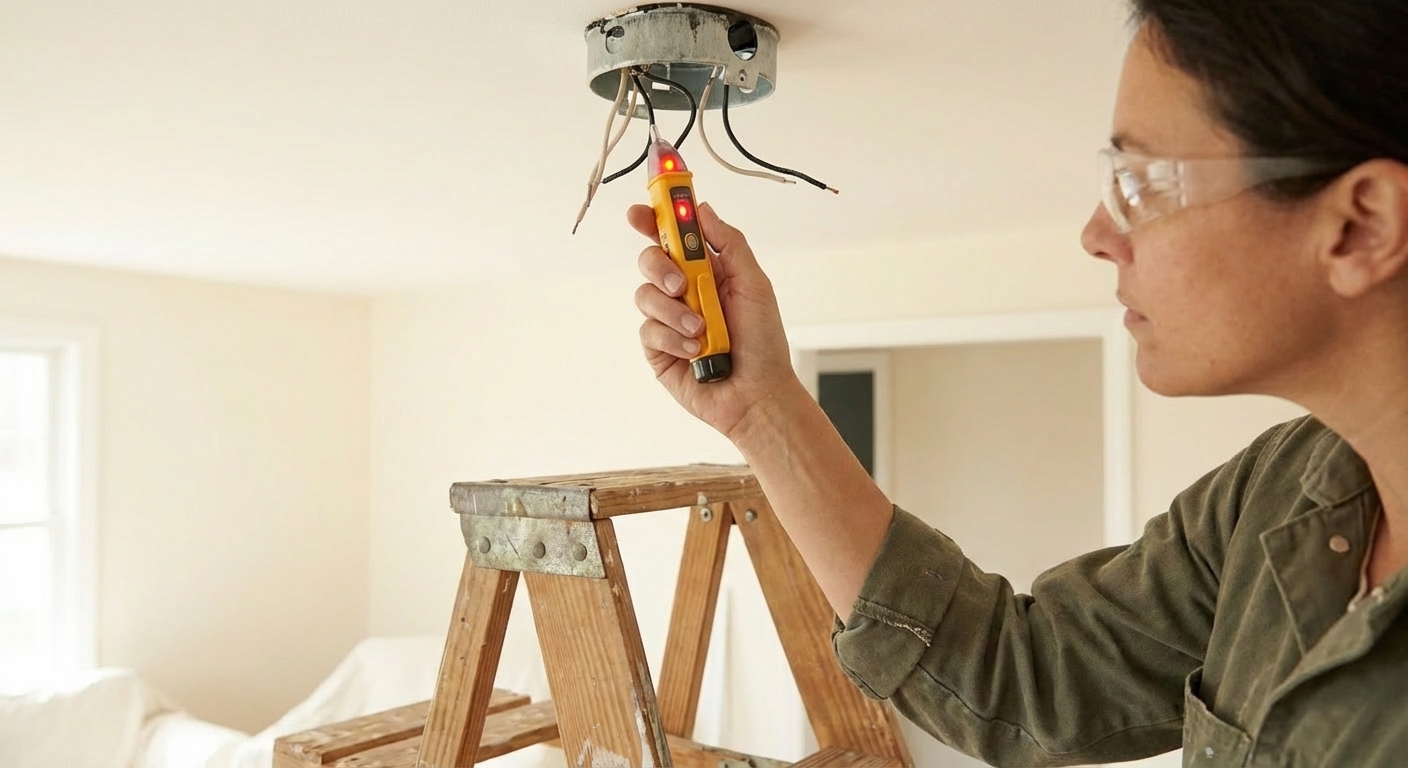
Verify power is off
Do not trust the switch. Do not trust the label. Verify.
- At the ceiling box, use a non-contact voltage tester near the wires once the fixture is loosened and accessible.
- If you have a multimeter, confirm there is no meaningful voltage between hot and neutral, and between hot and ground. Some meters can show small induced or ghost voltage even on a dead circuit. If you are unsure how to interpret the reading, stop and call a pro.
If your tester shows voltage at the box after you shut the breaker off, stop and find the correct breaker.
When to stop and call a pro
Replacing a fixture is usually straightforward, but these situations are electrician territory:
- You see aluminum wiring (often dull silver, common in some homes from roughly 1965 to 1975)
- The wire insulation is brittle, cracked, or crumbling
- The ceiling box is loose, broken, or buried behind drywall
- You find scorched wires, melted wire nuts, or a burnt smell
- The circuit is unusual (multiple hots, shared neutrals you cannot identify, or wire colors that do not make sense)
- The fixture is over a bathtub or shower or in a spot that may require damp or wet location rating, GFCI protection, or specific clearances and you are not sure what applies
There is zero shame in calling a licensed electrician when something looks off. The goal is a safe home, not a heroic story.
Tools and supplies
- New light fixture (and the mounting bracket that comes with it)
- Step ladder
- Non-contact voltage tester (highly recommended)
- Screwdrivers (Phillips and flathead)
- Wire strippers
- Needle-nose pliers (optional but helpful)
- Wire connectors (wire nuts), ideally new ones sized correctly
- Electrical tape (optional, for tidying connections)
- Safety glasses
If your new fixture is heavier or a different style, you may also need:
- A fixture-rated ceiling box (if the existing box is damaged or not rated for the fixture)
- A helper to hold the fixture while you connect wires
Quick note: Ceiling fans require a fan-rated box. Do not hang a fan from a standard light fixture box.
Step 1: Remove the old fixture
Support it first
Once the breaker is off and power is verified, remove any shades or globes first. Then loosen the screws holding the canopy (the decorative cover) to the ceiling bracket (the metal plate attached to the electrical box).
Lower the fixture gently. Many fixtures have a small hook or bracket tab that lets the canopy hang while you work. If yours does not, have someone hold it or rest it carefully while you disconnect.
Take a quick photo
This is my favorite cheap insurance. Snap a clear photo of how the existing wires are connected before you undo anything. When you are tired on a ladder, a photo is a lifesaver.
Disconnect the wires
Typically you will see:
- Black (hot) from the ceiling
- White (neutral) from the ceiling
- Bare copper or green (ground) from the ceiling or the box
To remove the old connectors, twist the wire nuts counter-clockwise until they come off. Separate the wires, then remove the old mounting bracket if your new fixture uses a different one.
Step 2: Identify the wires
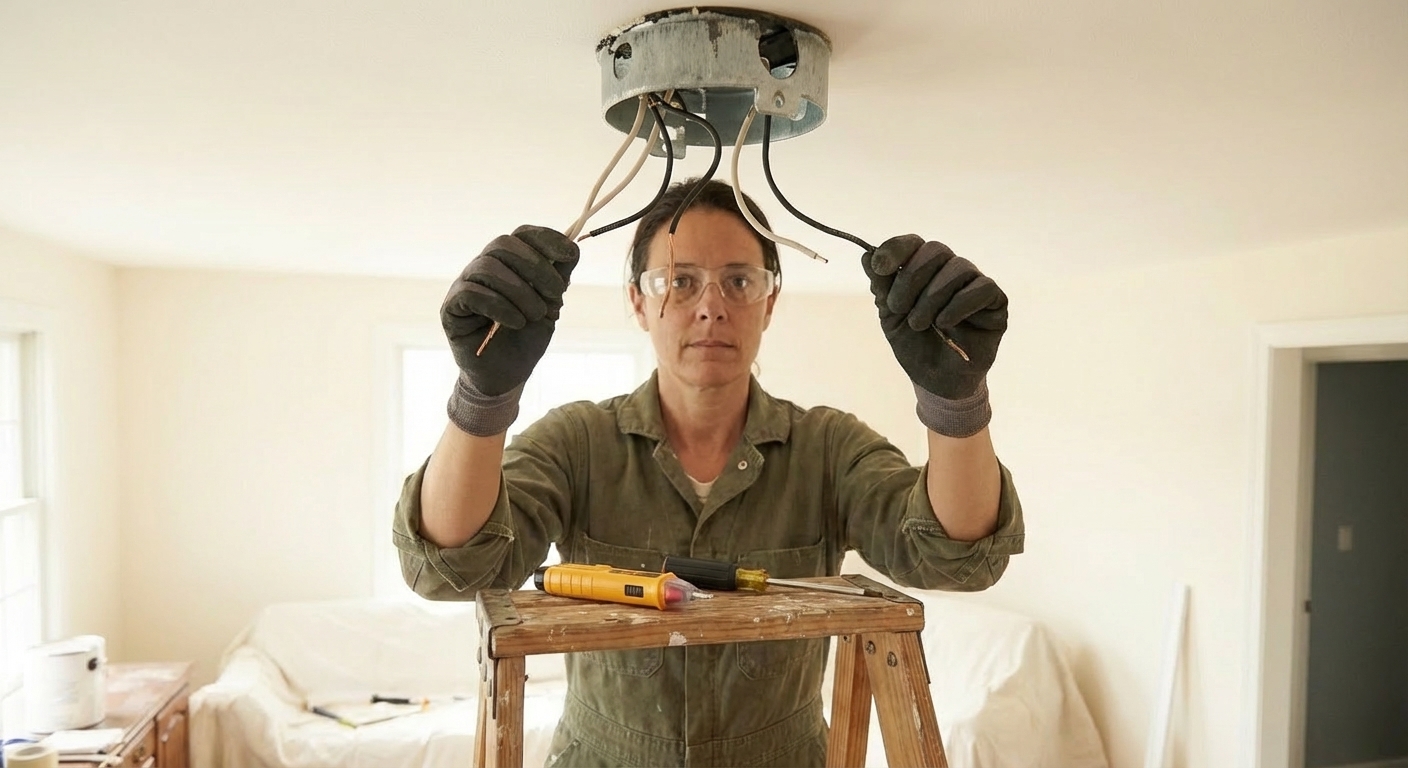
Most standard lighting circuits in North America follow these conventions:
- Hot: Black (sometimes red)
- Neutral: White
- Ground: Bare copper or green
Important: Color is a strong clue, not a guarantee. In older homes, you may see odd color choices, paint overspray, or a white wire being used as a hot in a switch loop (it should be re-marked, but it is not always). If anything looks confusing, stop and call a pro.
Multiple wires in the box
It is common to see more than one wire of the same color in the ceiling box because the circuit may continue on to another light or outlet. In many cases, the fixture connects to a single hot and a single neutral, while the rest stay tied together in the back of the box.
If you open the box and discover a crowded bundle of wires already tied together, do not start untangling it unless you are confident in what you are doing. Your goal is to replace a fixture, not rewire the circuit.
No ground wire?
Some older homes do not have an obvious bare copper ground in the box. Sometimes a metal box is grounded through metal conduit or armored cable, but sometimes it is not grounded at all.
- Do not connect ground to neutral.
- If you are not 100 percent sure the box is grounded, this is a good time to call a licensed electrician and have it checked.
Step 3: Install the bracket
Your new fixture should include a bracket that screws to the electrical box. Hold the bracket up to the box and install it with the provided screws.
- Make sure the bracket is tight and centered.
- If your fixture uses a threaded rod (often called a nipple) and decorative nuts, test-fit it so the canopy will sit snug to the ceiling later.
If the electrical box itself is loose, cracked, or does not accept screws firmly, stop and replace the box or call an electrician. A wobbly box leads to a wobbly fixture, and that is how connections work loose over time.
Step 4: Connect the wires
Here is the basic match-up for a typical fixture:
- Fixture hot (often black, sometimes another color) to ceiling hot (black or red)
- Fixture neutral (often white, sometimes marked with printing or ribbing) to ceiling neutral (white)
- Fixture ground (green wire or bare copper) to ceiling ground (bare copper or green), and to the metal box if required
If you find extra wires that look like travelers from a 3-way setup, or multiple hots you cannot confidently identify, stop and call an electrician.
Strip to clean copper
Before you twist on a connector, make sure the wire ends are clean and properly stripped. Most wire nuts and fixtures want about 1/2 inch to 5/8 inch of bare copper, but always follow the strip length on the wire connector package or the fixture instructions.
If the copper is nicked or mangled, clip it back and strip again. A clean strip makes a safer splice.
Wire nut basics
- Hold the wire ends even.
- Twist the connector on clockwise until it is snug and the wires feel firmly captured.
- Give each wire a gentle pull test. Nothing should slide out.
Stranded to solid tip: Many fixtures use stranded leads while house wiring is usually solid. A simple trick is to let the stranded fixture wire extend slightly past the solid house wire, then twist the wire nut on. This helps the nut grab both sets of conductors more reliably.
If your connections feel bulky or the nut never tightens, choose a correctly sized connector for the wire gauge and number of conductors. Wire nuts are not one-size-fits-all.
Grounding matters
Ground is your safety path. If your ceiling box is metal, it is often bonded to ground with a grounding screw or clip. Your fixture ground typically ties to the same grounding point. Follow the fixture instructions, and if you have questions about grounding a metal box, that is a good moment to call an electrician.
When the wires are connected, fold them gently into the box. Arrange splices neatly so conductors are not strained and the canopy can sit flat without pinching any wires.
Step 5: Mount the fixture
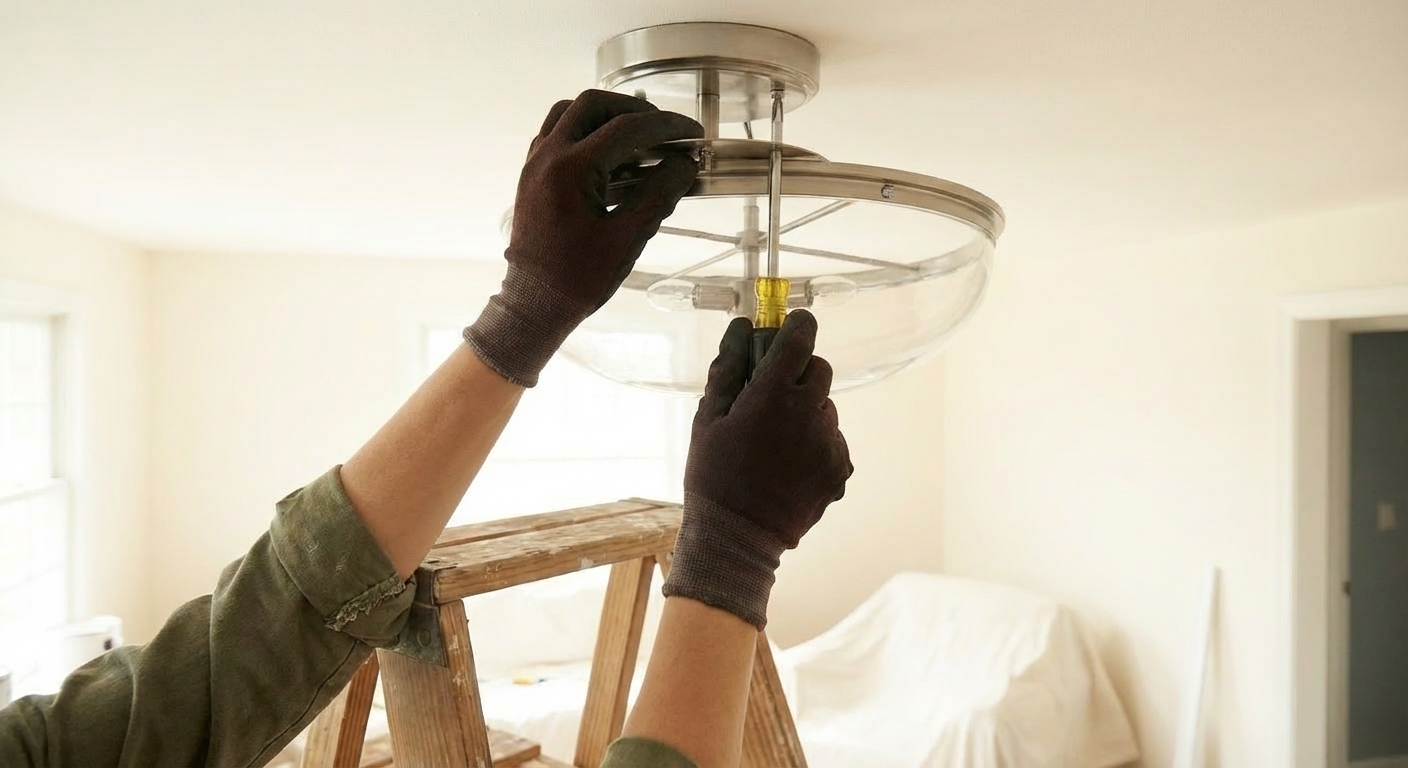
Lift the fixture into place and attach it to the bracket according to the manufacturer instructions. This is usually two screws or decorative nuts.
- Make sure no wires are pinched between the canopy and the ceiling.
- If the fixture rocks or leaves a gap, recheck the bracket and threaded rod length.
Install bulbs that match the fixture's wattage and type rating. If the fixture says LED only, take it seriously.
Step 6: Restore power
Turn the wall switch off, then flip the breaker back on. Turn the switch on and confirm the light works.
If it does not turn on
- Confirm the breaker is on and did not trip.
- Try a known-good bulb.
- Turn power back off and recheck your wire connections, especially hot-to-hot and neutral-to-neutral.
- Look for a loose wire in a wire nut, or a pinched wire under the canopy.
If the breaker trips immediately or you see sparks, turn the breaker off and call an electrician. That indicates a short or a wiring problem that needs proper troubleshooting.
Wire colors
- Ceiling black + fixture black: connect together (hot)
- Ceiling white + fixture white: connect together (neutral)
- Bare copper or green grounds: connect together (ground)
- Ceiling red present: often a switched hot, treat like hot, but do not guess if there are multiple switches
If your fixture has two black leads or other unusual leads, it may be a special fixture or multi-circuit setup. Follow the included instructions exactly.
Thrifty tips
- Reuse what is safe to reuse: a solid, properly rated ceiling box and good wiring do not need to be replaced just because the fixture is.
- Buy one extra pack of wire nuts: you will not regret having the right size on hand, especially if the old ones are brittle.
- Keep the old fixture until the new one works: if you need to return the new fixture or check parts, it is nice to have a backup.
FAQ
Breaker or switch?
Use the breaker. A switch only opens one conductor, and in some cases the ceiling box can still be energized. Always shut off the breaker and verify power is off with a tester.
What if my wires are not black and white?
Stop and identify the conductors properly, ideally with a multimeter and knowledge of your local wiring practices. If you are unsure, call a licensed electrician. Guessing is how things get unsafe fast.
Can I replace a chandelier the same way?
The wiring concept is similar, but the mounting and weight rating matter a lot more. If the fixture is heavy, you may need a reinforced, fixture-rated box and different hardware. When in doubt, get an electrician, especially for high ceilings or very heavy fixtures.
Call an electrician
If any of these are true, it is time to hand it off:
- The wiring is aluminum, damaged, or scorched
- The box is loose, cracked, or not rated for the fixture
- The breaker trips or you cannot verify the circuit is fully de-energized
- You open the box and the wiring does not match standard expectations (switch loops, travelers, extra hots)
- You are uncomfortable at any point on the ladder or with the process
Done right, replacing a light fixture is one of those projects that gives you instant payoff. You walk into the room, flip the switch, and think: I built that.
About Marcus Vance
Content Creator @ Grit & Home
Marcus Vance is a lifelong DIY enthusiast and self-taught home renovator who has spent the last decade transforming a dilapidated 1970s ranch into his family's dream home. He specializes in budget-friendly carpentry, room-by-room renovations, and demystifying power tools for beginners. Through his writing, Marcus shares practical tutorials and hard-learned lessons to help homeowners tackle their own projects with confidence.