🚨 In a DIY emergency or rush?
Skip the details and jump straight to our 30-second cheat sheet for the most crucial info.
If your electric water heater suddenly went lukewarm, takes forever to recover, or runs out of hot water way too fast, there is a good chance one heating element has given up (or is so scaled up that it cannot transfer heat well anymore). The nice part is that elements are relatively cheap, and replacing one is usually a Saturday-morning job for a careful DIYer.
This guide walks you through the whole process: shutting off power safely, confirming a bad element with a multimeter, draining enough water to work cleanly, swapping the element, then refilling and checking for leaks.
Quick note about symptoms: If you have no hot water at all , check the obvious stuff like a tripped breaker or the water heater’s reset button first. This article is for when power is present but heating is weak or inconsistent and an element test points to a failure.
Before you start
What is inside the tank
- Two heating elements: an upper element and a lower element. Many “not enough hot water” complaints are a lower element failure.
- Two thermostats: the upper thermostat controls overall operation and switches power between upper and lower circuits on most standard tanks.
- 240 volts: dangerous even if the water heater “seems off.” Treat it like a live panel until you prove otherwise with a meter.
Common signs
- Hot water runs out much faster than normal (often the lower element).
- Water heats, but recovery is slow (often heavy scale on an element, a failed element, or a thermostat issue).
- Breaker trips after a short run (could be an element short to ground, but also could be wiring or thermostat issues).
When not to DIY: If you see melted wiring, a charred thermostat, signs of water dripping onto electrical parts, or you are not comfortable using a multimeter on a 240V appliance, call a pro.
Tools and parts
- Replacement heating element matched to your tank: same voltage (usually 240V) and wattage (commonly 4500W or 5500W). Check the data plate on the tank or the old element marking.
- Element wrench (water heater element socket). It is the right tool and worth buying.
- Multimeter (AC volts and ohms settings).
- Non-contact voltage tester (helpful, but do not rely on it alone).
- Flathead and Phillips screwdriver
- 1/2 inch or adjustable wrench (for wire screws depending on model)
- Garden hose
- Bucket and a few towels
- New gasket (often included with the element). Do not reuse an old flattened gasket.
Optional but smart: Work gloves, safety glasses, and a small shop vac for any insulation dust or minor water drips.
Buying the right element
Match the style
- Screw-in elements are most common in residential tanks (often 1 inch NPSM threads).
- Bolt-in or flange elements exist on some models. If yours bolts in, buy the exact match.
Match the specs
- Voltage: match it exactly (most homes are 240V; some multi-family and light commercial setups can be 208V).
- Wattage: match the rating on the tank data plate or the old element unless the manufacturer says otherwise. Do not “upgrade” wattage as a DIY experiment.
- Watt density: if you have hard water, consider a low-watt-density element. They can resist scale buildup better and often last longer.
- Length and shape: lowboy tanks and tight clearances can require a shorter element. Bring the old one to the store if you can.
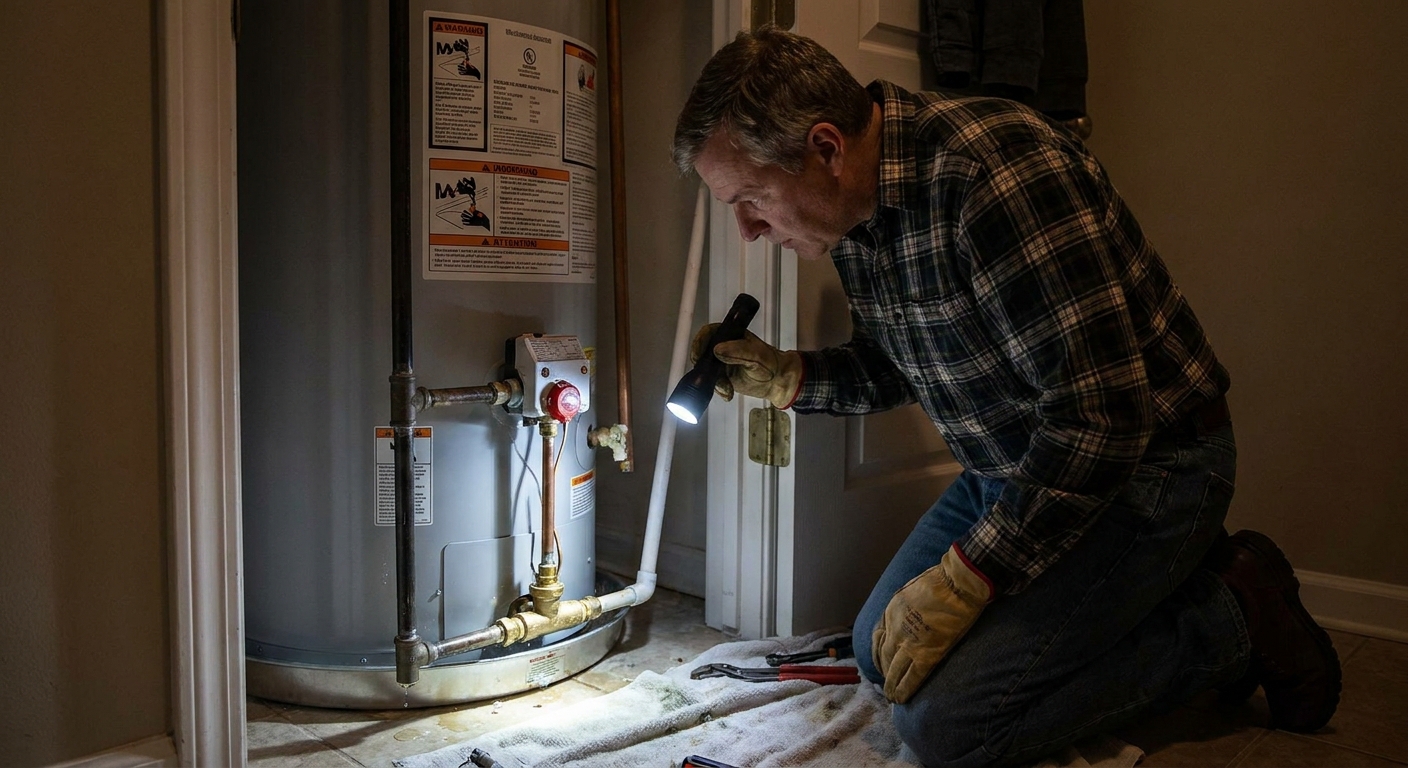
Step 1: Shut off power
1) Turn off the breaker
At your main electrical panel, turn off the double-pole breaker labeled “Water Heater” (often 30A, but check your data plate and panel label). If the labeling is questionable, shut off the main breaker and confirm with a meter.
2) Prove it is dead
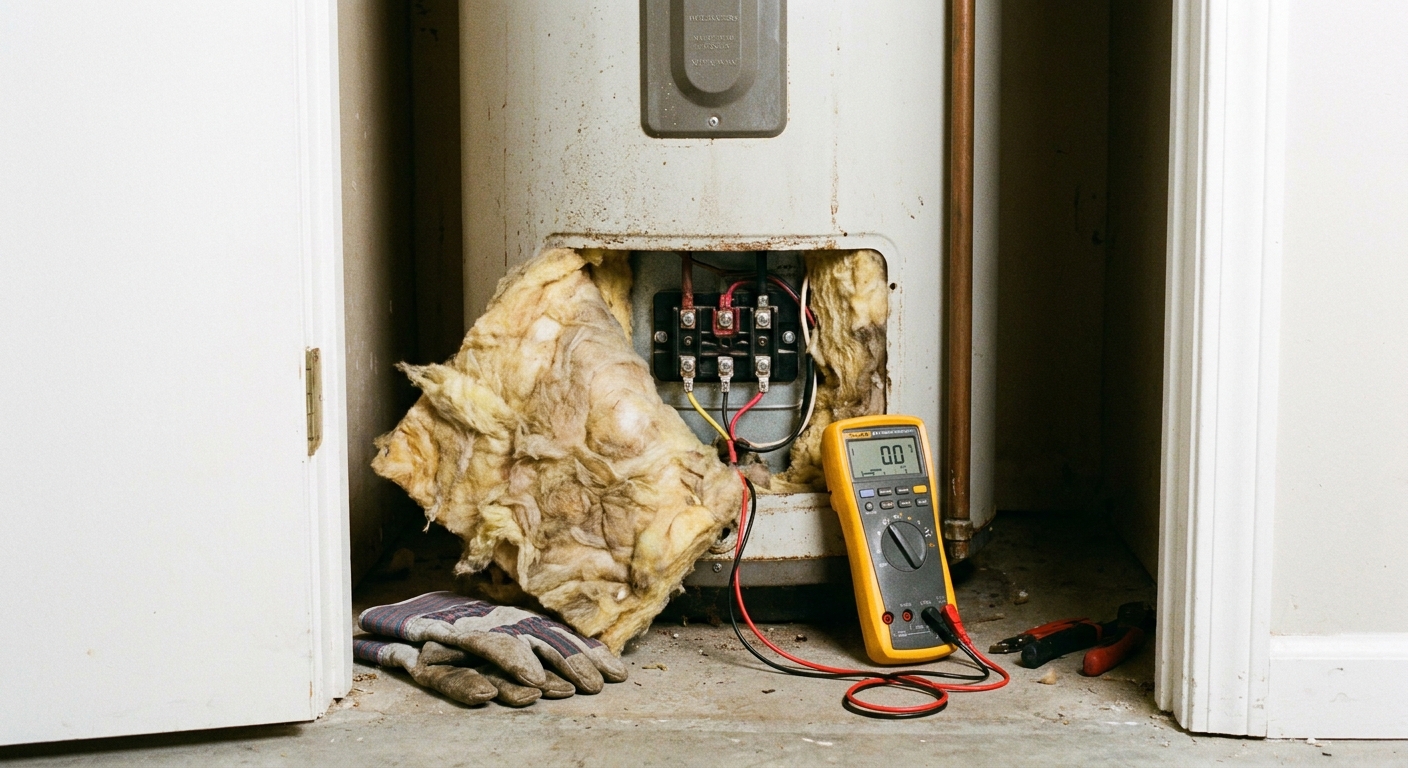
Remove the upper access panel. Fold the insulation back and peel the plastic vapor barrier back carefully.
- Set your multimeter to AC volts.
- At the upper thermostat (incoming power area), test hot-to-hot (L1 to L2). You should read 0 volts.
- Then test each hot-to-ground: L1 to bare tank metal, and L2 to bare tank metal. You should also read 0 volts on both tests.
- If you read voltage on any test, stop. The breaker is not off, the circuit is mislabeled, or there is a wiring issue.
My hard-learned rule: Never trust the breaker label, and never trust a non-contact tester by itself. Always verify with a meter.
Step 2: Test the element
Testing first saves you from draining a tank just to discover the real issue was a tripped high-limit reset or a bad thermostat.
1) Access the terminals
Remove the access panel for the element you want to test (upper or lower). Fold insulation back. You will see two screws where the wires attach to the element.
2) Disconnect the wires
Take a quick photo so you can put the wires back exactly the same. Then remove the two wires from the element screws.
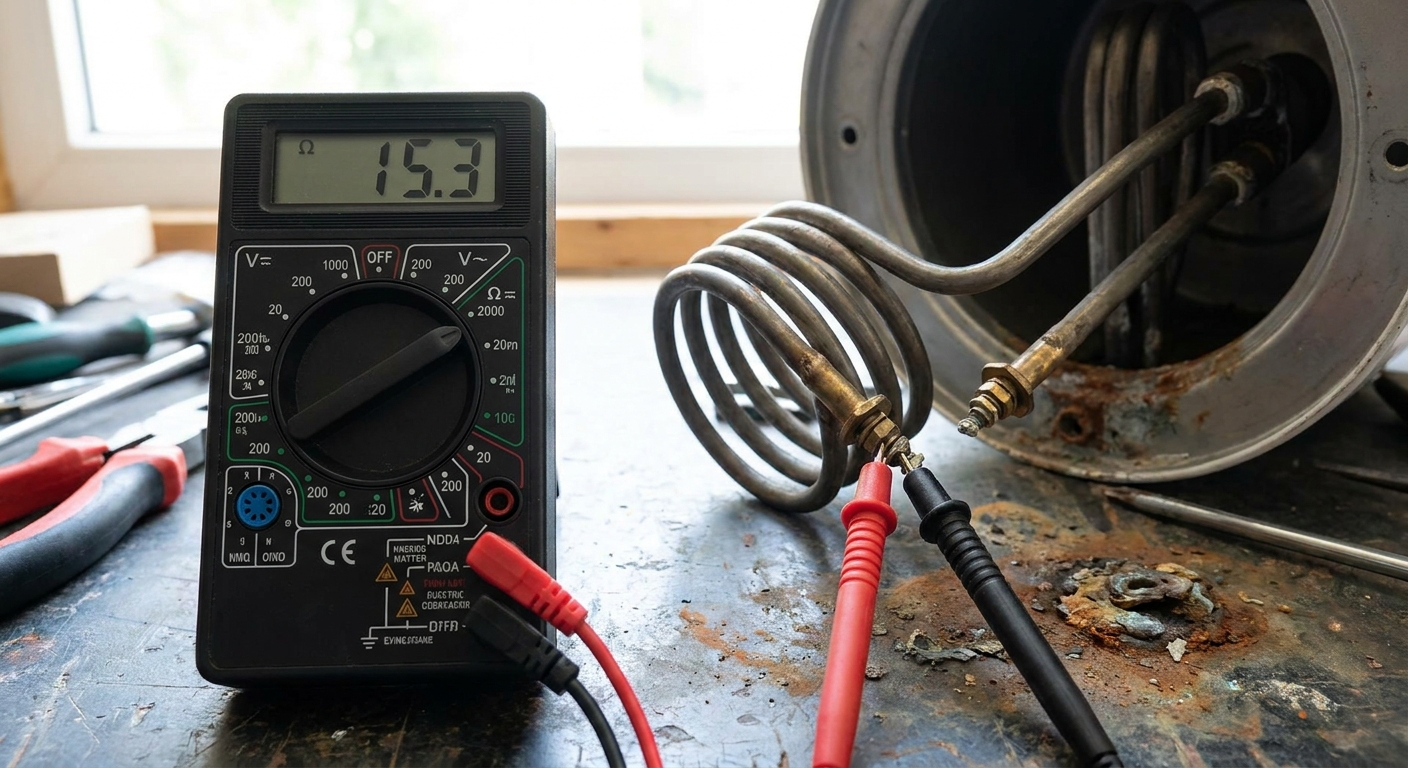
3) Check resistance
- Set multimeter to ohms (Ω).
- Touch one probe to each element screw.
What numbers should you see? You can estimate expected resistance with this simple formula: R = V²/W. For common elements at 240V:
- 4500W: about 12.8 Ω (often reads around 12 to 13 Ω)
- 5500W: about 10.5 Ω (often reads around 10 to 11 Ω)
If the meter shows “OL” or infinite resistance: the element is open and failed.
4) Check for a short to ground
This is the one that can trip breakers.
- Keep one probe on an element screw.
- Touch the other probe to bare metal on the tank (a clean spot).
- Repeat on the other element screw.
You should read OL or no continuity both times. If you get any measurable continuity or resistance to the tank, the element is grounded and should be replaced.
Step 3: Drain what you need
You do not always need to drain the whole water heater. You only need the water level below the element you are removing.
1) Shut off cold supply
Shut the cold water inlet valve above the tank.
2) Relieve pressure
Open a nearby hot water faucet (a sink or tub) to let air into the system and relieve pressure.
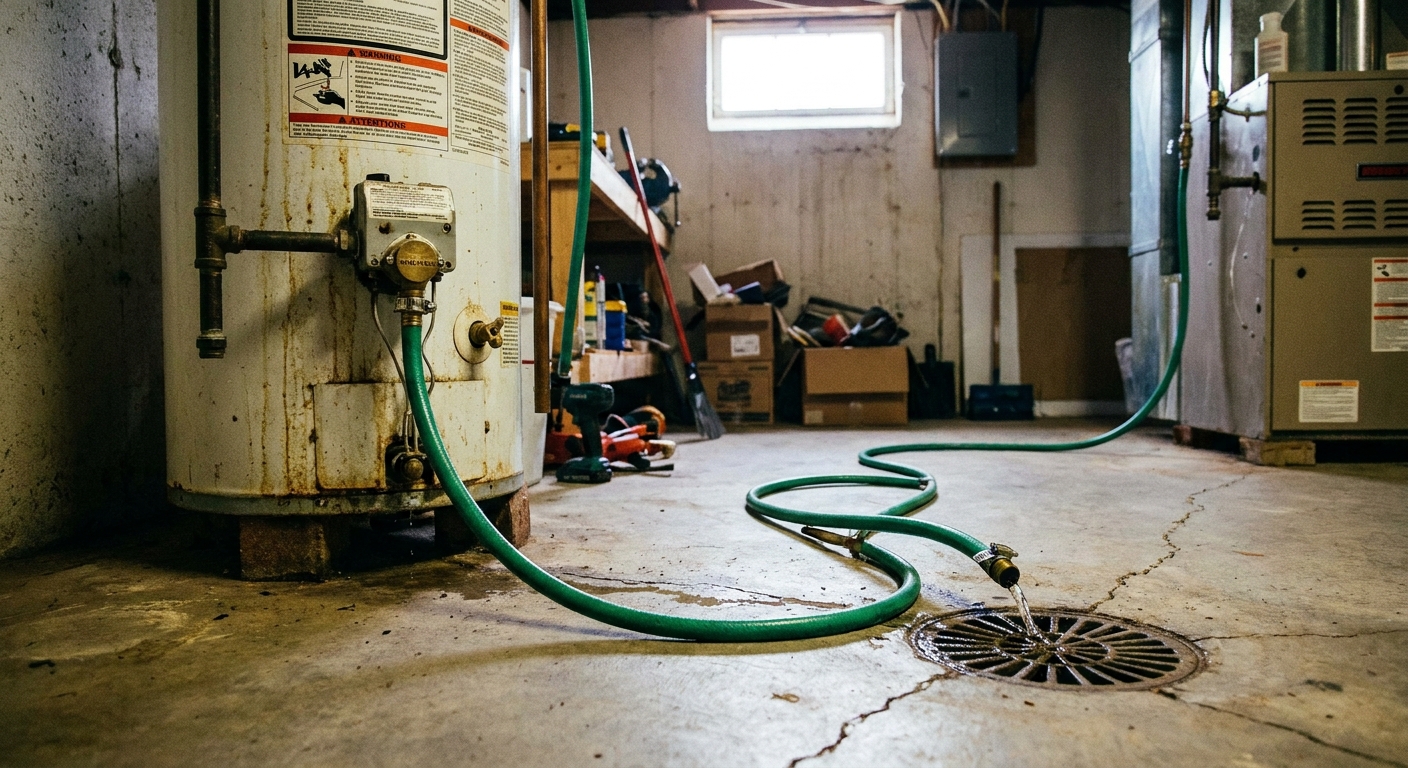
3) Hook up a hose
Connect a garden hose to the drain spigot at the bottom of the tank. Run the hose to a floor drain, driveway, or large bucket. Hot water can scald, so keep kids and pets away.
Quick caution: Many drain valves are plastic on older heaters. Do not force it. If it feels stuck, go slow so you do not snap the handle or valve body.
4) Drain below the element
Open the drain valve. If the tank is older, sediment can clog the drain. If the flow is weak:
- Make sure a hot faucet is open to let air in.
- Gently cycle the drain valve open and closed.
- If needed, briefly crack open the cold supply valve for a second to “burp” sediment, then shut it again. Do not walk away while doing this.
Bonus tip: Since you are already draining, this is a good opportunity to flush sediment until the water runs clearer. Not required for a quick element swap, but it can help recovery time and element life.
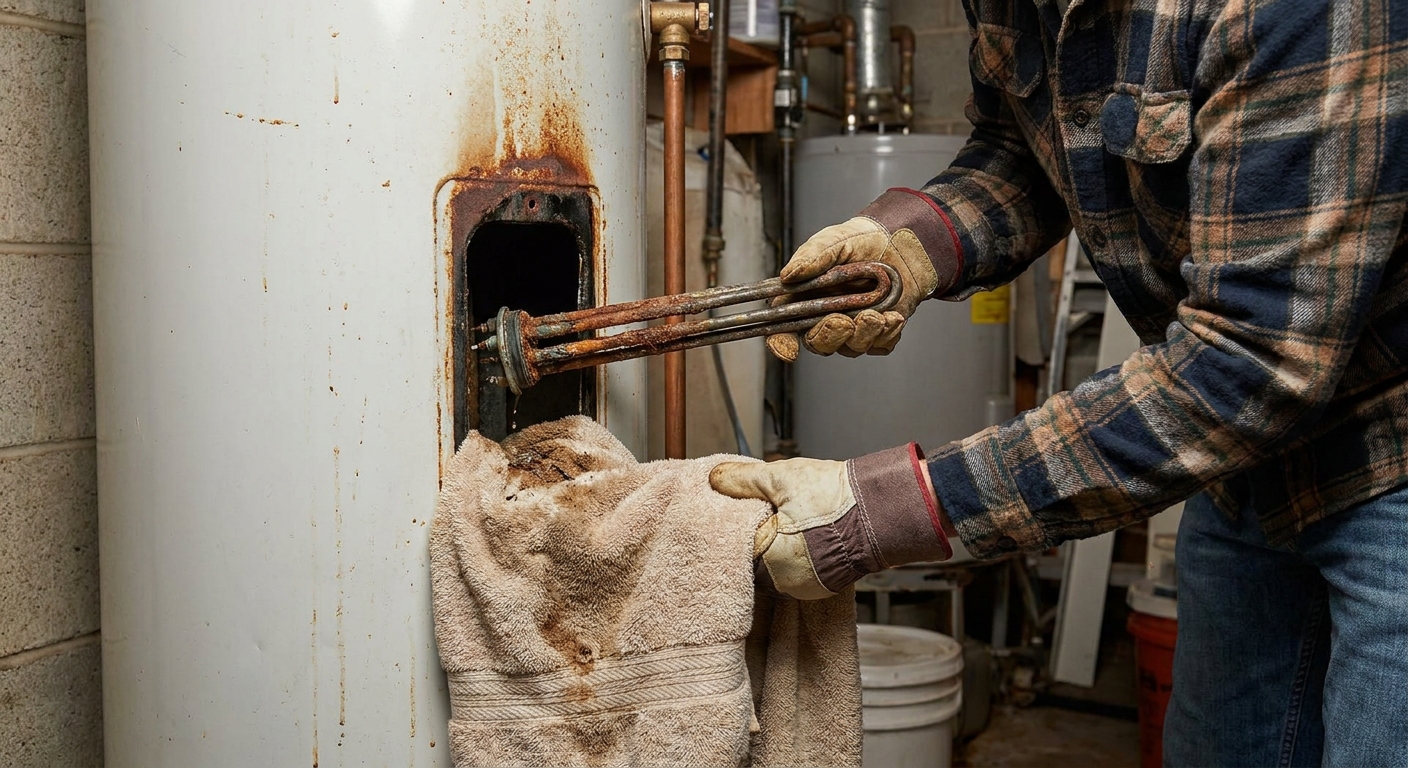
Step 4: Remove the old element
1) Move wires aside
Double-check both wires are disconnected from the element screws and tucked aside.
2) Loosen the element
Fit the element wrench over the element hex. Turn counterclockwise to loosen. Sometimes they are stubborn.
- If it will not budge, use a longer ratchet or breaker bar for leverage.
- Support yourself so you do not slam into the tank or rip wiring.
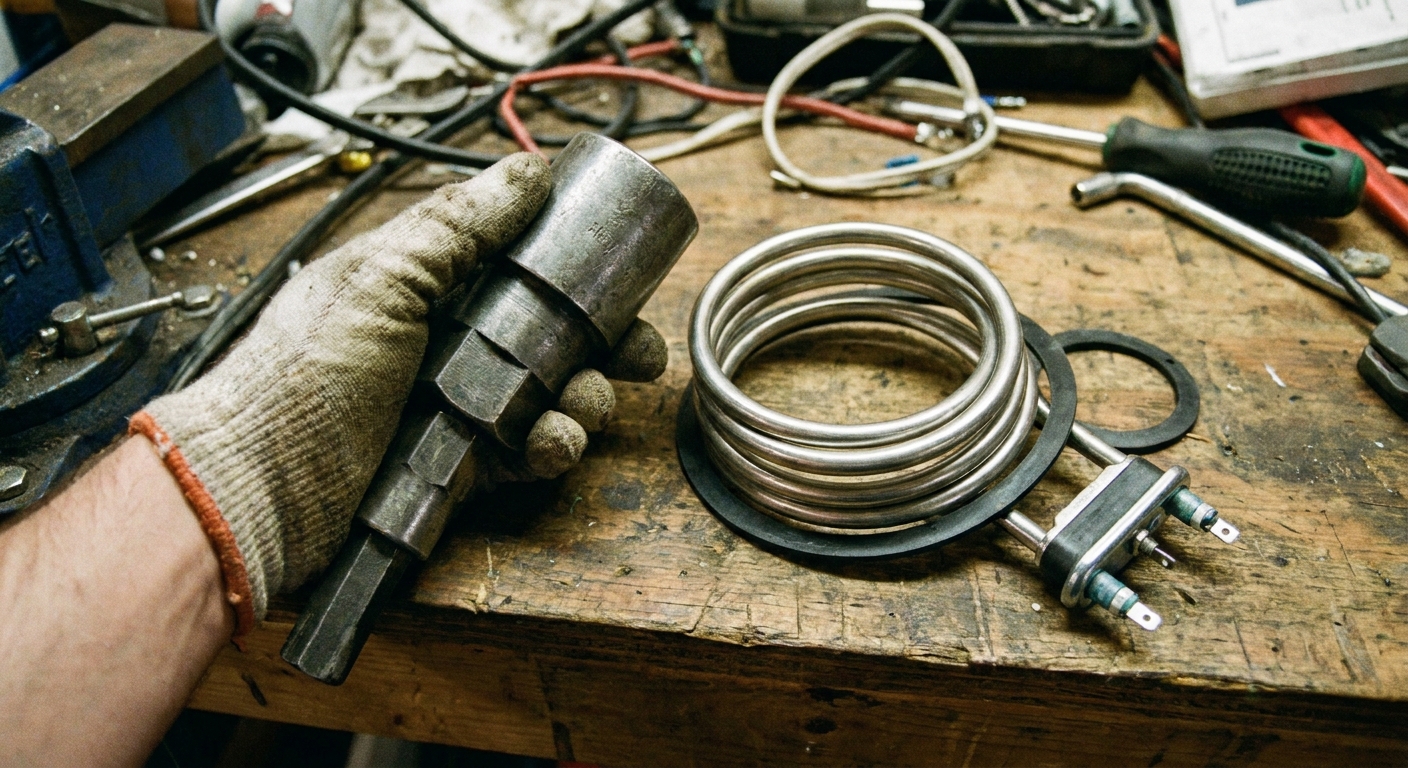
3) Pull it out
Have a towel ready. Even after draining, a little water usually escapes. Inspect the old gasket and the tank opening.
What you might see: Heavy mineral scale on the element. That is common in hard-water areas and is a good clue you found the culprit.
Step 5: Install the new element
1) Clean the surface
Wipe the tank’s element opening clean so the new gasket can seal. Do not gouge the metal or enamel. A rag and light scraping with a plastic scraper works well.
2) Install the gasket
Install the new gasket exactly as the manufacturer intends. Most screw-in elements seal with a flat gasket that sits between the element flange and the tank.
3) Thread in the element
Start by hand to avoid cross-threading. Then tighten with the element wrench.
How tight? Snug plus a bit more. Over-tightening can distort the gasket and cause leaks. If the manufacturer provides a torque spec, follow it.
4) Reconnect wires
Put the two wires back on the element screws exactly as before. Tighten firmly. Loose connections create heat and can damage the thermostat or wiring.
Step 6: Refill the tank
If you energize an element that is not fully submerged, it can burn out in seconds. This is the number one DIY mistake I see with element swaps.
1) Close the drain valve
Remove the hose and close the drain spigot fully.
2) Turn cold water on
Turn the cold inlet valve back on.
3) Purge air
Keep a hot water faucet open in the house. You will hear air sputtering. Let it run until water flows in a steady stream with no spitting.
4) Check for leaks
Look around the element you replaced. If you see any seepage:
- Gently tighten the element a little more.
- If it still leaks, shut water off, drain below the element again, and reseat the gasket.
Step 7: Restore power
1) Put insulation back
Put the plastic barrier back in place and tuck the insulation back as it was. This helps efficiency and protects the electrical compartment from moisture.
2) Reinstall panels
Screw both access covers back on.
3) Turn breaker on
Once you are 100 percent sure the tank is full and leak-free, restore power at the panel.
4) Allow recovery time
Recovery time varies by tank size, element wattage, and incoming water temperature, but roughly 60 to 150 minutes is a reasonable range for many homes. You should feel the hot water improve steadily.
After the repair
Check thermostat settings
With power off, take a look at both thermostats and make sure they are set to the same temperature. Many tanks are factory-set around 120°F , which is a good balance for most homes.
When to replace both elements
If your tank is older, both elements are heavily scaled, or one failed shortly after the other, replacing both elements can be a smart, thrifty reset.
Troubleshooting
Still no hot water
- Double-check the breaker.
- Check the high-limit reset (red button) on the upper thermostat after confirming power is off.
- Confirm you replaced the correct element (upper vs lower) and that your new element matches voltage and wattage.
Breaker still trips
- Re-test the new element for a short to ground (rare, but possible).
- Inspect wiring for damaged insulation or loose connections.
- A failing thermostat can also cause problems. If you see scorch marks, stop and call a pro.
Water smells like rotten eggs
That is usually not an element issue. It is often related to the anode rod and water chemistry. Put that on your next project list.
Cost and payoff
A heating element is often inexpensive, especially compared to a service call or a premature water heater replacement. If your tank is otherwise in good shape and not leaking from the body, swapping an element can buy you years of reliable hot showers for the cost of a couple of basic tools.
My thrifty take: If you are going to own one specialty socket as a homeowner, the element wrench is a solid choice. I have used mine enough times that it paid for itself fast.
The 30-Second Cheat Sheet
Essential takeaways for: Replace an Electric Water Heater Element
Safety first (do not skip)
- Turn off the double-pole water heater breaker.
- Verify 0 volts with a multimeter before touching anything: test hot-to-hot and each hot-to-ground (tank metal).
- Never turn power back on until the tank is completely full and air is purged.
Fast diagnosis
- Remove access panel, pull insulation back, disconnect the two element wires.
- Test resistance across the element screws: typically about 10 to 13 ohms depending on wattage.
- If meter reads OL / infinite, element is bad.
- Test each screw to tank metal: should read OL. If it shows anything other than OL, the element is grounded.
Replace the element (quick steps)
- Shut off cold supply, open a hot faucet.
- Drain water to below the element using a hose on the drain valve.
- Use an element wrench to remove the old element.
- Clean the opening, install the new gasket, thread in new element, snug tight.
- Reconnect wires firmly.
Refill and restart
- Close drain valve, turn cold supply back on.
- Run a hot faucet until water flows steady (no sputtering).
- Check element area for leaks.
- Reinstall insulation and covers, then turn breaker on.
If you have zero hot water
Before replacing parts, check for a tripped breaker or tripped reset button on the upper thermostat . This guide is for confirmed element failures.
💡 Tip: Scroll up to read the full article for detailed, step-by-step instructions.
⬆️ Back to topAbout Marcus Vance
Content Creator @ Grit & Home
Marcus Vance is a lifelong DIY enthusiast and self-taught home renovator who has spent the last decade transforming a dilapidated 1970s ranch into his family's dream home. He specializes in budget-friendly carpentry, room-by-room renovations, and demystifying power tools for beginners. Through his writing, Marcus shares practical tutorials and hard-learned lessons to help homeowners tackle their own projects with confidence.