🚨 In a DIY emergency or rush?
Skip the details and jump straight to our 30-second cheat sheet for the most crucial info.
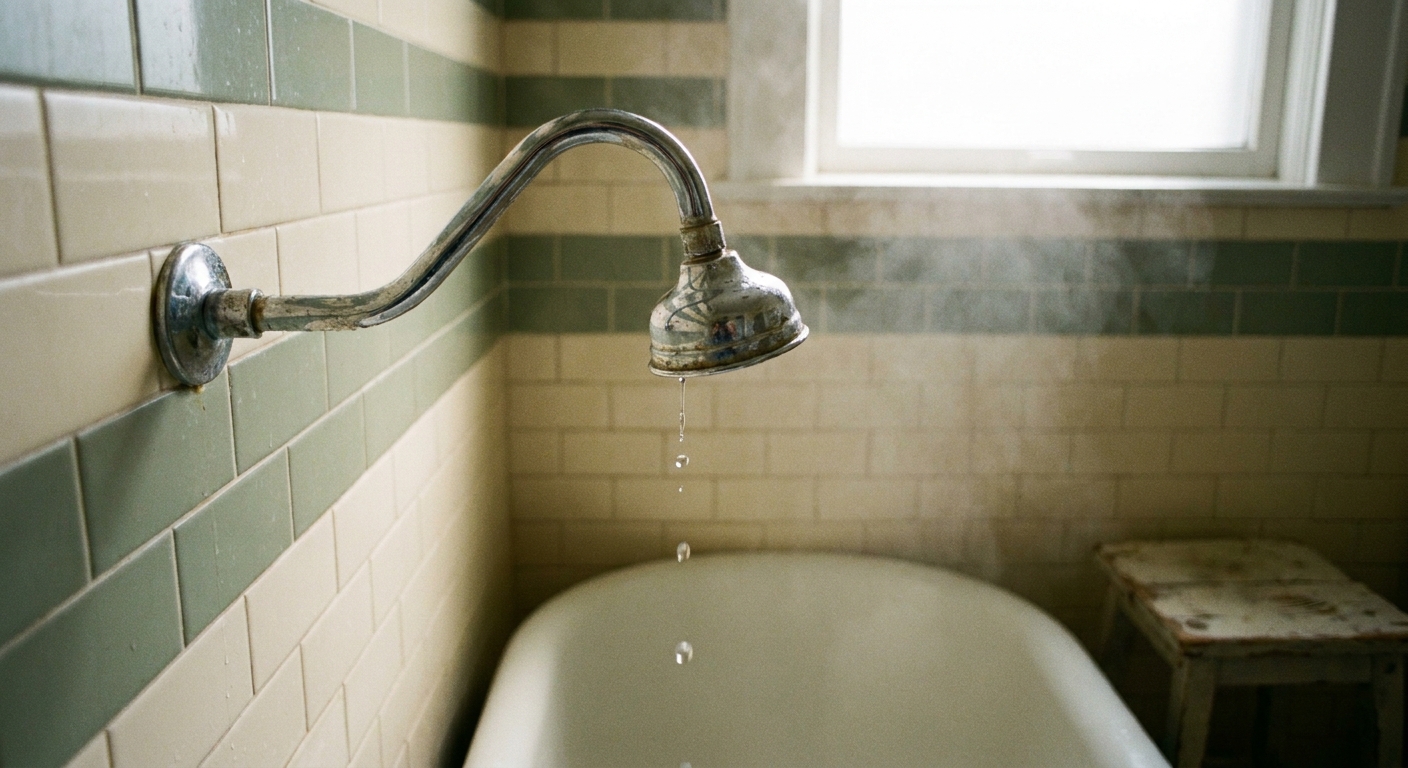
If your shower head keeps dripping after you turn the water off, you are not alone. I have chased this exact problem in my own 1970s ranch, convinced I had a major plumbing issue, only to learn that sometimes it is just leftover water draining out. Other times, it is a tired valve cartridge quietly letting water sneak by.
Let’s sort out which one you have and knock out the easiest fixes first.
First: Normal drain-down or a real leak?
When you shut the shower off, water still sitting in the vertical pipe feeding the shower arm (often called the riser) has to go somewhere. That water can drain out for a short time, especially with:
- A rain shower head or large head that holds extra water
- A handheld on a hose where the hose drains after shutoff
- Longer runs of pipe that simply hold more water
Quick rule of thumb
- Normal: Drips slow down and stop within about 30 to 120 seconds.
- Still can be normal: With very large heads, long risers, or hoses, it may take a few minutes to fully finish draining.
- Likely a problem: Dripping continues beyond several minutes, or you see a steady drip that never fully stops.
Simple stopwatch test
Turn the shower on for 30 seconds, shut it off, and time the drip. If it reliably stops within a couple minutes, you are probably seeing residual drainage. If it does not, keep reading.
Know your handle type
The fastest way to diagnose a post shutoff drip is to identify your valve style. Here is what typically fails on each one.
Single handle shower
Most single handle setups use a cartridge (or sometimes a ball style) that mixes hot and cold. When it wears out, water can seep past the seals even when “off,” which shows up as a never-ending drip at the head.
- Most common cause of constant dripping: worn cartridge or worn internal seals
- Common helper cause: mineral scale and grit damaging the seals over time
Two handle shower
These often use rubber washers on the stems. A drip after shutoff usually means one side is not sealing fully.
- Most common cause: worn washer, worn valve seat, or a loose packing nut
Three handle shower
Similar to two handle, plus a diverter in the middle. Dripping can still be caused by a hot or cold stem not sealing. Diverters more commonly cause “water comes out of both tub spout and shower head,” but depending on the design, they can contribute to leaks too.
- Most common cause: worn washer or seat on hot or cold stem
Fixes to try first
Before you take anything apart, do yourself a favor and set up for success:
- Plug the drain so tiny screws do not disappear.
- Cover the tub or shower floor with a towel to protect the finish.
- If you plan to open the valve, shut off the water and then relieve pressure by turning the shower on briefly after the shutoff.
1) Descale the shower head
Hard water scale can trap water and make the head “weep” longer than it should. It can also create pressure-related effects that make a small valve leak look worse.
What I do:
- Unscrew the shower head (use a rag and adjustable wrench if needed).
- Soak it in white vinegar for 30 to 60 minutes.
- Scrub the nozzles with an old toothbrush.
- Rinse well, reinstall, and test again.
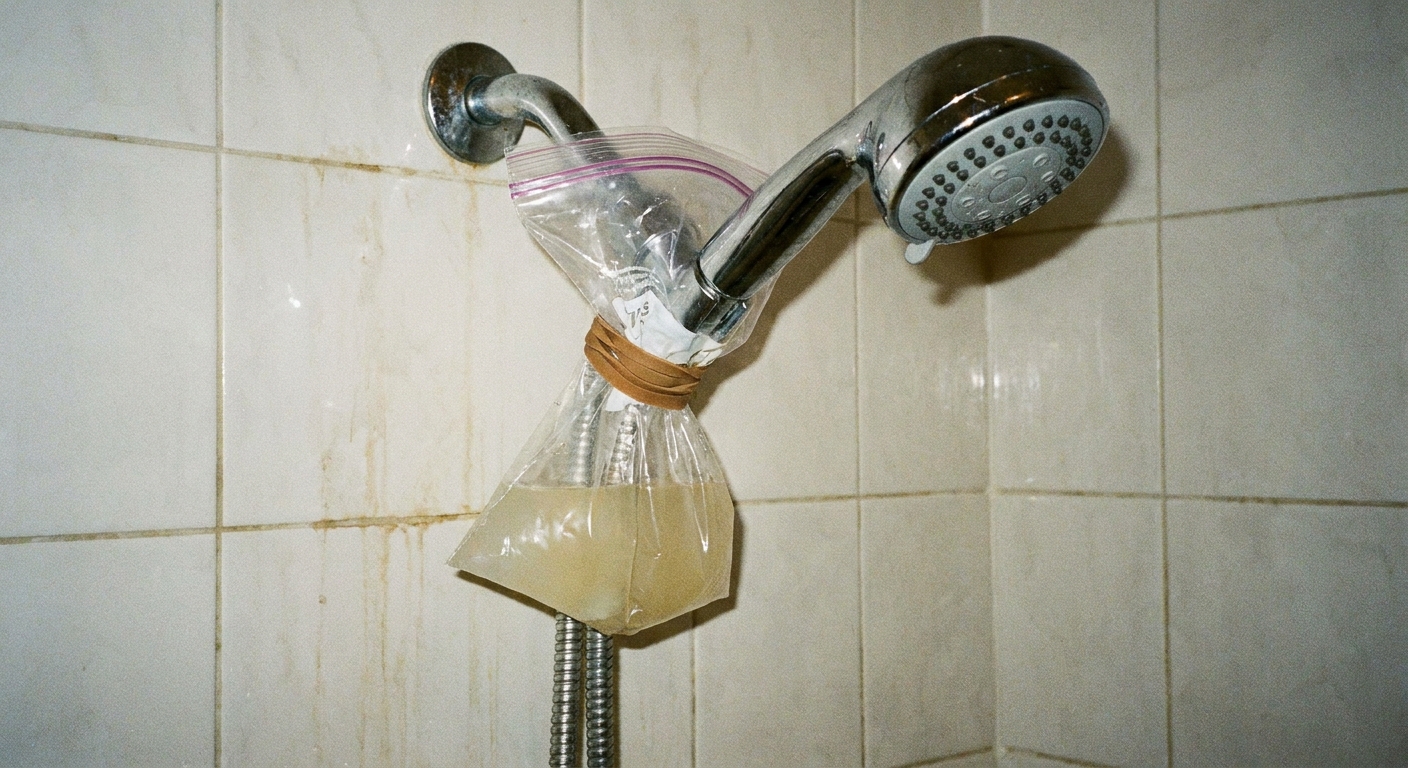
Tip: If you cannot remove the head, fill a plastic bag with vinegar and rubber band it around the head for an hour.
2) Remove the shower head and test the shower arm
This is my favorite “is it upstream?” test because it removes the shower head from the equation.
- Unscrew the shower head.
- Point the open shower arm into a bucket or hold a towel under it.
- Turn the shower on for 10 seconds, then turn it off.
What the results mean:
- If the arm drips briefly then stops: your valve is likely sealing, and the shower head was holding water or clogged with scale.
- If the arm keeps dripping: the leak is upstream, usually the cartridge, stems, seats, or seals.
Small but important: A few drops right after shutoff can still be normal because the arm itself holds some water. You are looking for a drip that does not quit.
3) Check the handheld hose
With handheld sprayers, the hose often drains after shutoff. That can look like a “leak” even when everything is fine.
- After turning off the water, lift the handheld up high, then lower it. You may see a short burst of draining.
- If the dripping stops once the hose is fully drained, you are probably fine.
If it still drips: look at the valve
If the shower arm keeps dripping with the head removed, the valve is letting water slip by. Here is how to tackle it based on your setup.
Single handle: service or replace the cartridge
This is the most common “keeps dripping” culprit.
High level steps:
- Shut off water to the shower (house shutoff if you do not have local stops), then relieve pressure.
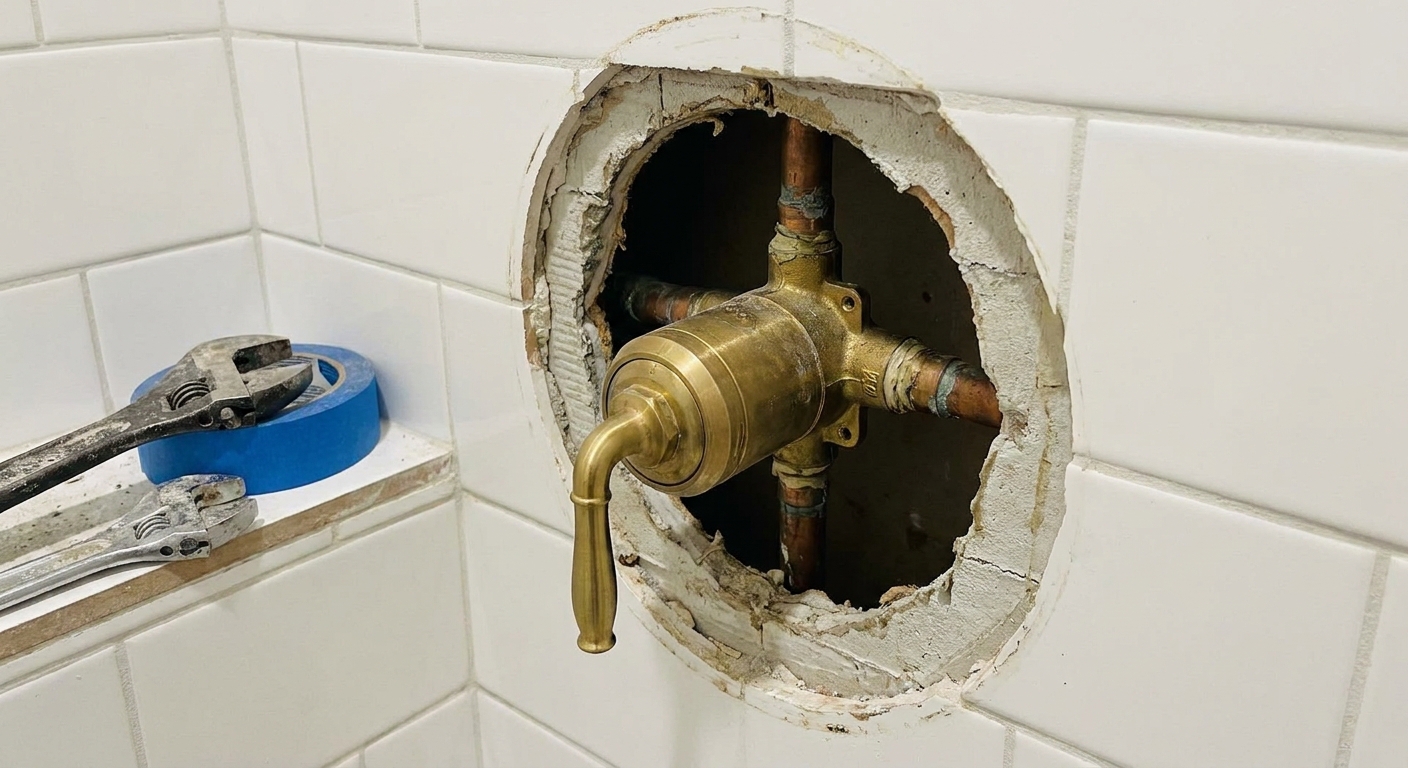
- Remove the handle and trim.
- Remove the retaining clip or pin that locks the cartridge in place (this is easy to miss and a common way people crack or gouge the valve body, especially on Moen-style valves).
- Pull the cartridge (you may need a cartridge puller, depending on brand and age).
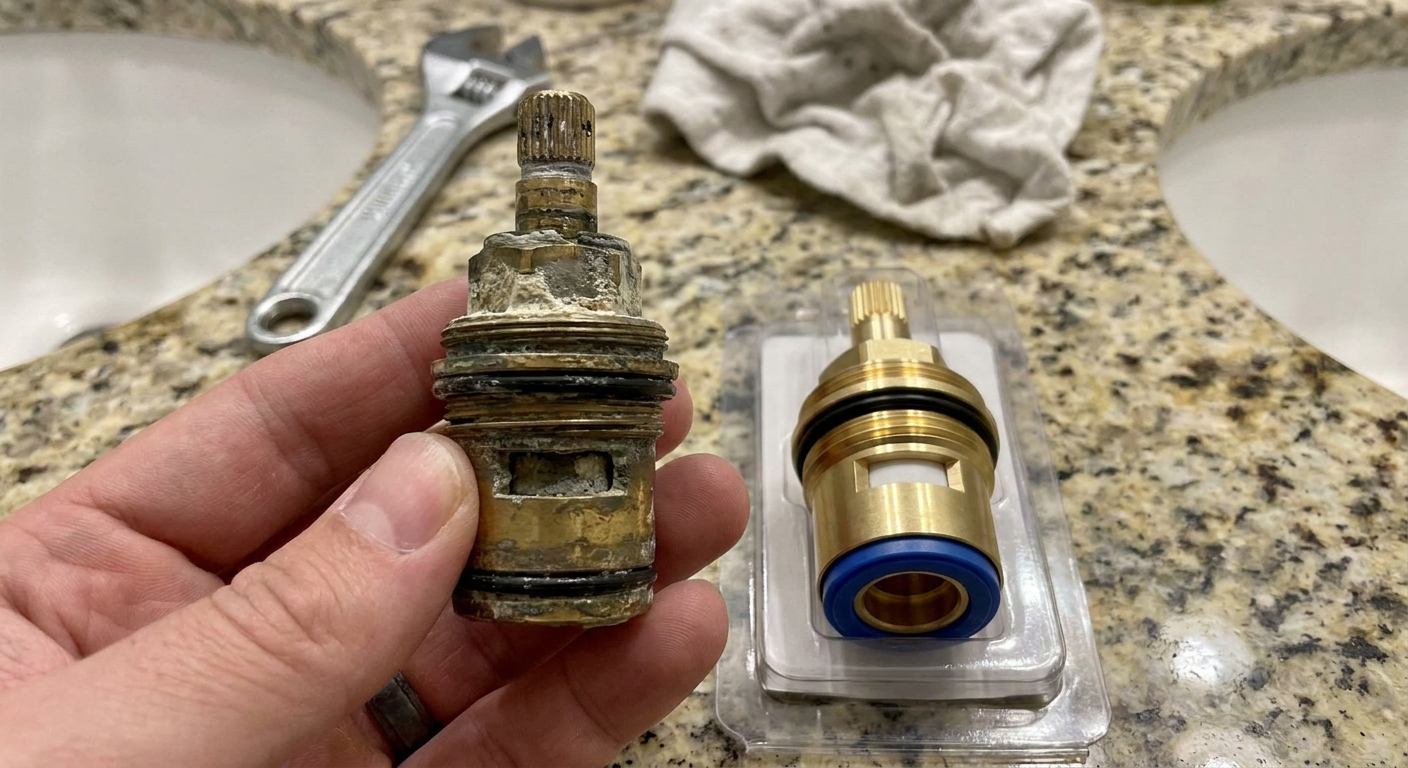
- Inspect for torn O-rings, debris, or heavy scale.
- Replace with the correct cartridge model and reinstall.
Also check: Some valves require replacing seats and springs along with the cartridge or internal parts (common on some Delta designs). If your repair kit includes them, use them.
DIY reality check: The hardest part is often identifying the brand and getting the right cartridge. Take a photo of the valve and cartridge before you buy parts, and bring the old cartridge to the store if possible.
Two or three handle: replace washers and inspect seats
When washers get stiff or chewed up, they stop sealing and you get drips.
- Shut off water, then relieve pressure.
- Remove handle and stem.
- Replace the rubber washer at the end of the stem.
- Inspect the valve seat inside the valve body. If it is pitted, it may need to be replaced or resurfaced with a seat tool.
Also check: If your valve design uses seats and springs, replace them while you are in there.
When it might not be the valve
Most of the time, a persistent drip is the shower valve. But there are a few upstream issues that can mimic it or make it worse.
Thermal expansion
If your home has a closed plumbing system (common with a check valve or pressure reducing valve), heating water can increase pressure. That extra pressure can push a little water past a marginal cartridge and create intermittent dripping.
- Clue: Dripping is worse after running hot water or later in the day.
- Possible fix: Check whether you have a properly functioning thermal expansion tank at the water heater (or consider adding one).
High water pressure
Excess pressure can make small valve seepage more noticeable.
- Clue: You also notice banging pipes, fast filling toilets, or frequent faucet drips.
- Guideline: Many plumbers like about 50 to 60 psi as a sweet spot. In many areas, 80 psi is a common maximum guideline or code limit.
Tub spout diverter
If you have a tub and shower combo, a failing diverter more commonly causes water to come out of the shower head while the tub is running. Depending on the valve style, it can also contribute to leaks or weird behavior, so keep it on the list if your symptoms do not match the usual cartridge or washer story.
When to call a plumber
I love a DIY win, but there are a few times I would bring in help.
- You cannot shut off the water to the shower, or the main shutoff does not fully stop flow.
- The valve is very old and parts are unavailable, or the cartridge is seized and you risk damaging the valve body.
- You see signs of a hidden leak: damp wall, loose tile, staining on the ceiling below, or a musty smell.
- You replace the cartridge or washers and it still drips. That can point to a damaged valve body, seat issues, or a diverter problem that is not beginner-friendly.
My order of operations
If you want the simplest, cheapest path to a fix, here is the exact order I would do it in at a neighbor’s house.
- Time the drip. Confirm it is not just residual drainage (and remember big heads and hoses can take longer).
- Clean the shower head for scale.
- Remove the shower head and test the open shower arm.
- If it still drips, replace the cartridge (single handle) or washers and inspect seats (two or three handle). Replace seats and springs too if your valve uses them.
- If the drip is intermittent and pressure-related, check water pressure and thermal expansion control.
Once you handle it, you will sleep better. Few things are more annoying than a drip you can hear across the hallway at night.
The 30-Second Cheat Sheet
Essential takeaways for: Shower Head Drips After Shutoff: Fixes to Try First
Is it normal or a problem?
- Normal: drips slow down and stop within about 30 to 120 seconds (residual water draining from the riser, head, or hose). With large rain heads, long risers, or handheld hoses, it can take a bit longer and still be normal.
- Problem: dripping continues for many minutes or never fully stops (usually a valve, cartridge, or seal issue).
Fastest diagnostic test
- Remove the shower head and test the open shower arm.
- If the arm keeps dripping: leak is upstream (cartridge, stem, seat, or diverter depending on valve style).
- If the arm stops but the head drips: clean or replace the shower head.
Fixes to try first
- Descale the shower head in white vinegar (30 to 60 minutes), scrub, rinse.
- Check handheld hose drain-down (often looks like a leak but is normal).
What usually needs replacing
- Single handle: replace the cartridge (often includes or pairs with seats and springs on some designs).
- Two or three handle: replace rubber washers, inspect or replace valve seats (and replace seats and springs where your valve uses them).
When the issue may not be the head or valve
- Thermal expansion or high water pressure can worsen intermittent dripping.
Call a plumber if
- You cannot fully shut off water, the cartridge is stuck, or you see signs of a hidden leak in the wall or ceiling.
💡 Tip: Scroll up to read the full article for detailed, step-by-step instructions.
⬆️ Back to topAbout Marcus Vance
Content Creator @ Grit & Home
Marcus Vance is a lifelong DIY enthusiast and self-taught home renovator who has spent the last decade transforming a dilapidated 1970s ranch into his family's dream home. He specializes in budget-friendly carpentry, room-by-room renovations, and demystifying power tools for beginners. Through his writing, Marcus shares practical tutorials and hard-learned lessons to help homeowners tackle their own projects with confidence.