🚨 In a DIY emergency or rush?
Skip the details and jump straight to our 30-second cheat sheet for the most crucial info.
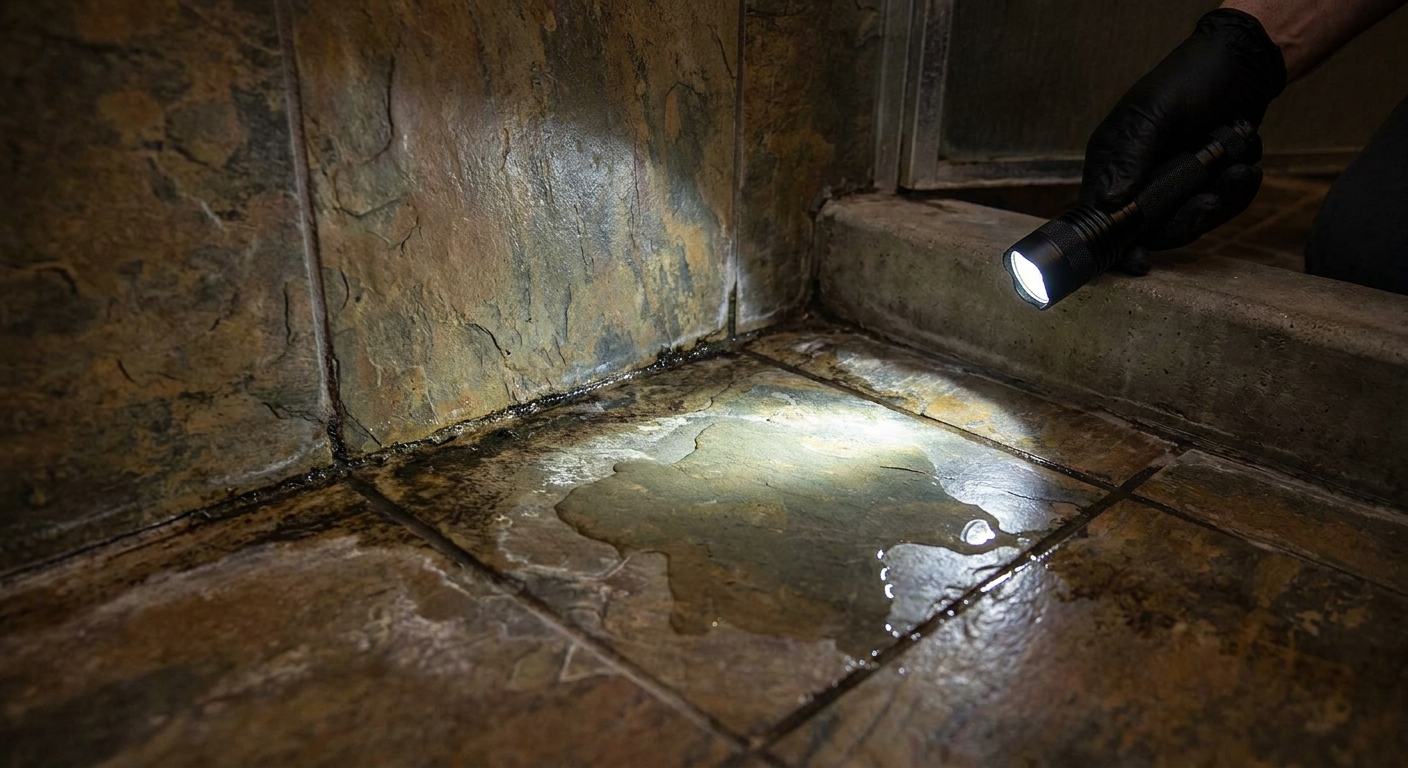
If you have water showing up outside the shower, staining the ceiling below, or making a baseboard look like it is melting, your first job is not to panic. Your first job is to figure out what kind of leak you have.
Most shower leaks come from one of four places:
- The plumbing (supply lines, valve body, or shower arm)
- The drain connection (drain body, trap, or the seal at the drain flange)
- The wet area surfaces (tile, grout, corners, curb, door sweep, or caulk)
- The waterproofing system (traditional liner, hot mop, liquid membrane, or a bonded sheet membrane under tile)
This guide focuses on distinguishing shower pan and waterproofing failures from surface leaks and drain leaks, plus the simplest tests that tell you what to do next.
First: stop the damage
Before you start testing, limit how much water is moving through the problem.
- Stop using the shower until you have a direction. A small leak can turn into a soaked subfloor fast.
- Dry what you can reach with towels and a fan.
- Check the room below (or the ceiling under the shower). If it is bulging, actively dripping, or sagging, set a bucket and consider cutting a small inspection opening in drywall to let it drain and dry.
- Take a few photos now. If you end up calling a pro or filing a claim, you will want a timeline.
If you see water near electrical fixtures or a ceiling light below, shut off power to that circuit and treat it like an urgent safety issue.
If you find active mold growth, soft framing, or you are dealing with older materials you are unsure about, pause and call a pro. This is one of those times when caution is cheaper than confidence.
Clues that point to the source
1) Signs it is not the pan
These patterns usually point to plumbing, the drain connection, or water escaping the enclosure.
- It leaks even when no one is showering. That is almost always a supply line, valve, or a pressurized fitting issue.
- It leaks only when the shower is running, and the leak shows up quickly (within a minute or two). That often points to the drain connection, or a valve or supply leak that only happens under flow .
- It leaks only when someone aims the spray at one wall. That points to a failed grout line, a cracked tile, a niche, a corner joint, a door sweep issue, or a missing bead of caulk.
2) Signs the pan or waterproofing is suspect
Pan and waterproofing failures tend to show a slower, soak-through pattern.
- Leak appears after several minutes of showering, not instantly.
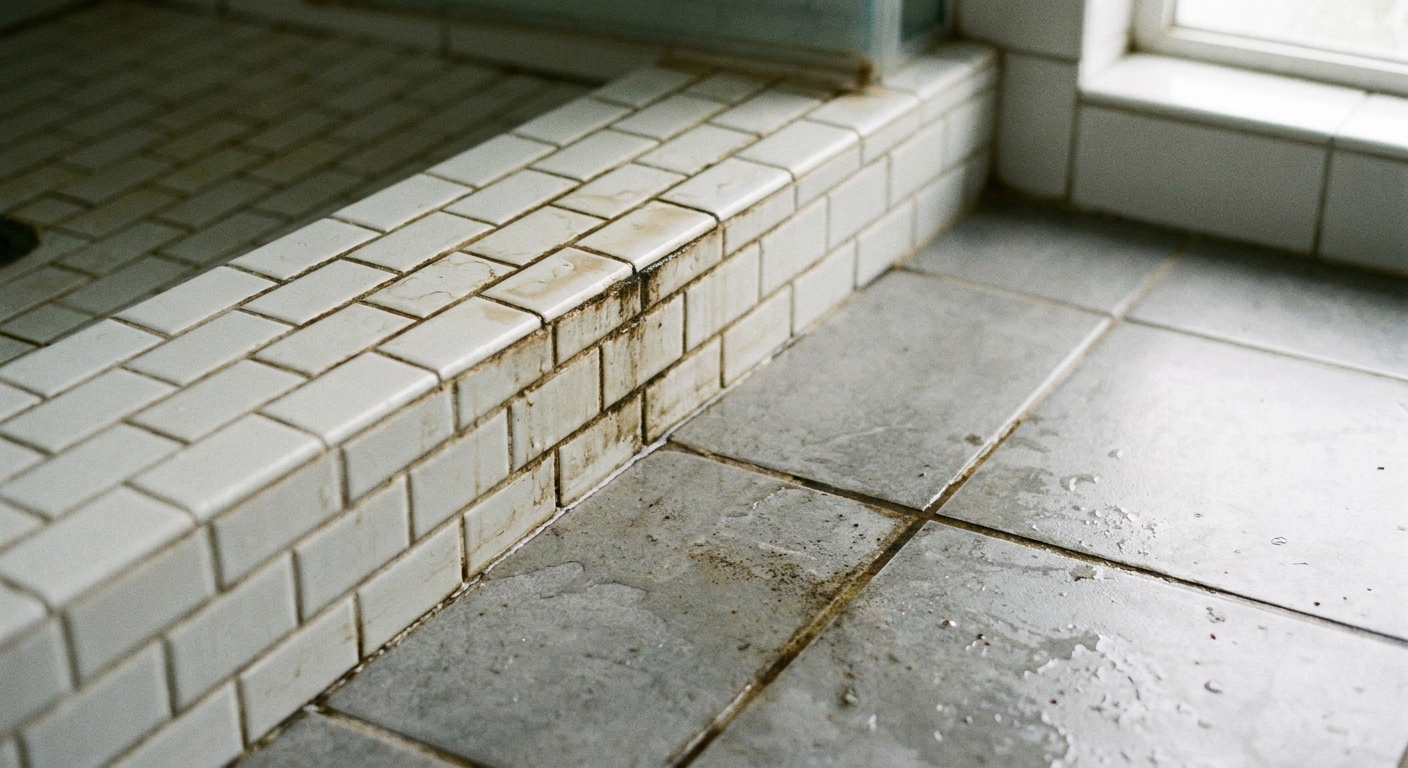
- Water shows up at the outside edge of the shower curb or at a nearby baseboard after regular use.
- Musty smell or persistent dampness around the shower even when the bathroom looks dry.
- Efflorescence (white, chalky mineral deposits) on grout near the perimeter.
- Loose tiles near the floor perimeter or curb, or grout that stays dark for a long time.
One more wrinkle, especially in older traditional mud bed showers: clogged weep holes in a clamping drain can keep the mud bed waterlogged. That can mimic a pan problem and show up as dark perimeter grout or damp curb areas.
Important reality check from a guy who learned this the hard way: grout is not waterproof. Even perfectly sealed grout lets moisture pass. The pan or waterproofing system underneath is what makes a shower actually watertight.
The 3 tests
These tests are simple and use household items. Do them in order. Each one answers a different question.
Test A: Targeted wetting test
Goal: Find leaks from corners, walls, door sweep gaps, curb joints, and caulk lines.
- Dry the shower and bathroom floor completely.
- Plug the drain with a proper test plug whenever possible. A rag can wick water and create confusing results.
- Using a cup, pour small amounts (think 1 to 2 cups) along one area at a time: corners, curb top, wall-to-floor joint, around the drain, the door threshold, and any bench or niche edges.
- Do not overtop the curb. You are testing details, not trying to flood the bathroom.
- Wait 5 to 10 minutes and check outside the shower and below.
What it means: If you can trigger the leak by wetting a specific corner, curb, or threshold area, you likely have a surface or joint failure, not a full pan failure. Also look closely at shower door frames and sweeps. Fasteners through the curb or a failing sweep can dump a surprising amount of water where it does not belong.
Test B: Drain-only test
Goal: Separate a drain plumbing leak from a pan or surface leak.
- Safest option: Use a bucket to pour water directly into the drain, or use a handheld shower aimed straight down if you have one.
- If you choose to remove the shower head, be careful. Some arms and finishes are easy to damage. Do not force it.
- Run water straight into the drain for 3 to 5 minutes without spraying the walls or soaking corners.
- Check the ceiling below or the area where you usually see water.
What it means: If it leaks during a drain-only test, the problem is likely drain plumbing (drain body seal, trap, or connection). It can also be a valve or supply leak that only shows up when water is flowing, so keep that on your radar if the timing feels inconsistent with the drain location.
Test C: Pan flood test
Goal: Confirm whether the pan liner or waterproofing under the tile is holding water.
Before you do this: If you are in a second-floor bathroom, be smart. Flood testing adds water load. Keep it shallow and controlled, and stay nearby. Curbless showers and steam showers are less forgiving. If either applies to you, it is worth involving a pro sooner.
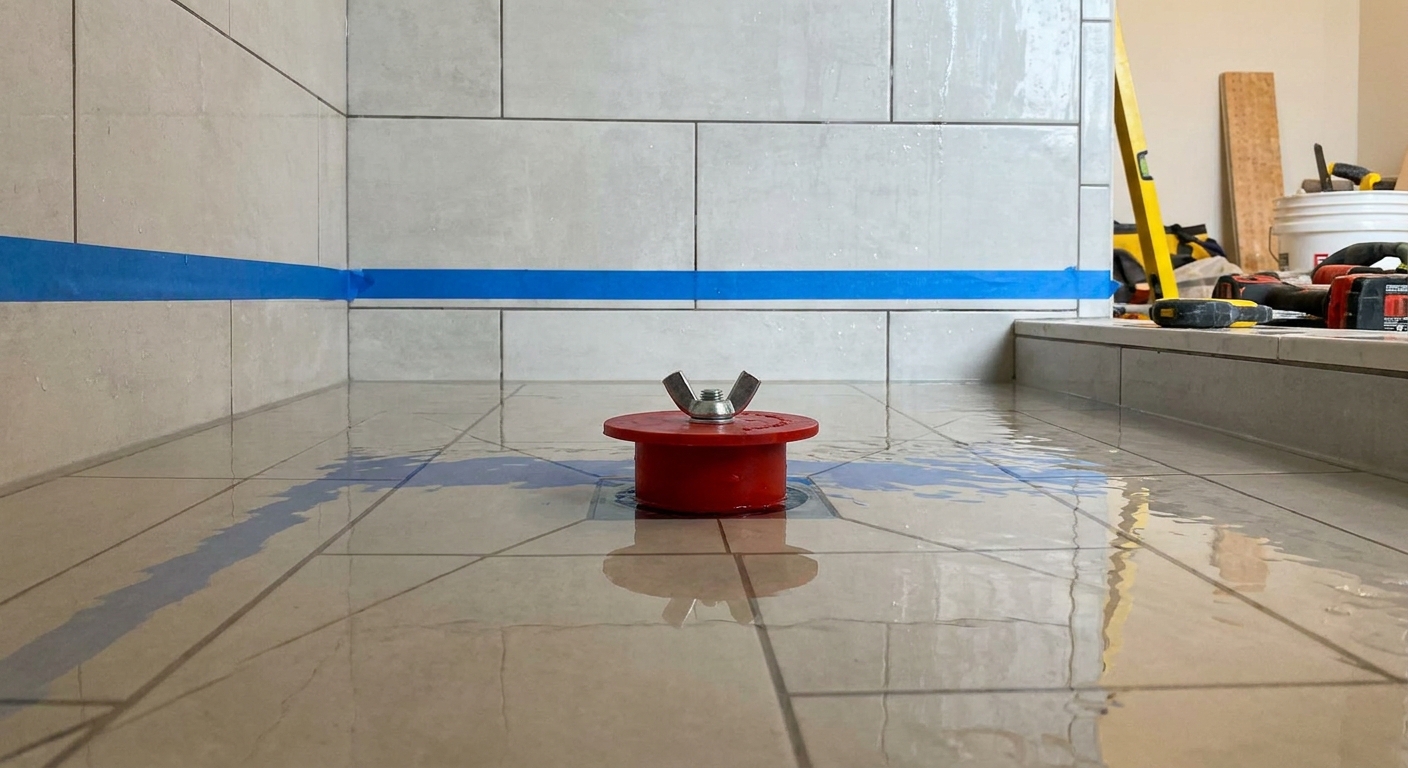
- Plug the drain properly. Use an inflatable test plug or mechanical test plug sized for your drain. Do not rely on a flimsy stopper.
- Fill the base with 1 to 2 inches of water. Not to the top of the curb. Just enough to cover the floor area.
- Mark the waterline. A small piece of painter’s tape on the wall tile works great.
- Wait 2 to 4 hours for a quick screening. Check below and outside the shower. Also check if the waterline drops.
- For real confirmation, go 24 hours. Many pros, inspectors, and standards treat a 24-hour flood test as the expectation. If you are measuring tiny changes, cover the water surface with plastic to reduce evaporation and do not run a fan directly across it.
What it means:
- If the waterline drops and you see moisture below, the pan waterproofing is compromised or water is escaping at the drain flange area.
- If the waterline holds steady and there is no leak, your pan is likely okay. Your issue is more likely spray, joints, corners, door sweep, curb penetrations, weep hole drainage, or drain plumbing under flow.
Caulking red flags
I have seen plenty of showers “fixed” with a heroic amount of caulk, only to leak again a month later. Caulk is important, but it is not a magic gasket for failed waterproofing.
Watch for these
- Caulk beaded over wet grout or moldy joints. It will not bond well.
- Caulk on the shower floor covering cracks or missing grout in traffic areas. That is usually a temporary patch at best.
- Caulk at the outside of the curb where water is already escaping. If water is getting there from behind, the bead just hides the symptom.
- Hard grout in corners instead of flexible sealant. Corners move. Grout cracks. Water follows.
Best practice: Use 100 percent silicone in changes of plane (wall-to-wall corners, wall-to-floor, curb joints) unless your tile manufacturer, waterproofing system, or warranty calls for a different sealant (for example urethane, silane-modified polymer, or a proprietary sealant). Let everything dry thoroughly before applying, and remove old caulk completely.
Common sources and next steps
1) Surface and joint issues
Typical symptoms: Leak happens only with spray in one spot, hairline cracks in grout, damp grout that never seems to dry, or a leak that appears right at the door or curb.
DIY scope:
- Re-caulk corners and curb joints (remove and replace, do not smear over)
- Check and replace a worn door sweep or adjust the door so water stays in the shower
- Inspect door frame screws and curb penetrations. Fasteners through the curb are a common leak path
- Spot re-grout small failed areas (after confirming the substrate is sound)
- Replace a cracked tile if you have spares and can access it without wrecking waterproofing
When DIY stops: If tiles are loose across a broad area, the setting bed may be compromised. That starts pointing to water behind the tile and potentially a failed waterproofing layer.
2) Drain connection issues
Typical symptoms: Leak appears quickly when water runs, leak triggered by the drain-only test, staining centered under the drain location.
DIY scope:
- Tighten or replace a strainer assembly if it is loose
- Clear hair and debris and verify the drain is not backing up
Likely pro work: If the drain body or trap is leaking and you cannot access it from below, repairs often involve opening the ceiling underneath or removing parts of the shower floor.
3) Pan liner or waterproofing failure
Typical symptoms: Flood test fails, leak shows up at curb or perimeter, chronic dampness, recurring mold smell, or damage that keeps returning after caulking.
Realistic next steps:
- Short-term: Stop using the shower. Dry the area. If you must use it, minimize water and plan for repairs immediately.
- Medium-term: Expect at least a partial rebuild of the shower base, and often the lower wall tile.
- Best practice: Full shower base rebuild with a modern waterproofing system installed correctly, including properly sloped substrate and correctly detailed curb and corners.
I know that is not what anyone wants to hear. But a failed liner is like a failed roof underlayment. You can patch symptoms for a while, but the structure underneath keeps getting wetter.
What pan replacement involves
Homeowners often ask, “Can I just replace the pan and keep my walls?” Sometimes, but it depends on how the waterproofing was built.
Traditional liner system
- Tile floor and mud bed come out
- Bottom row or two of wall tile often has to come out
- New liner is installed, wrapped correctly over the curb, and clamped at the drain
- Weep holes are protected so the mud bed can drain properly
- New mud bed is sloped correctly to the drain
Surface waterproofing systems
- Pan and walls are more integrated
- Repairs tend to be less surgical and more replace-the-waterproofed-assembly
Budget note: Even if you DIY demolition and rebuild, materials add up fast. The savings are usually in labor, not in cutting corners on waterproofing. Waterproofing is the part you want to overbuild.
Tools that help
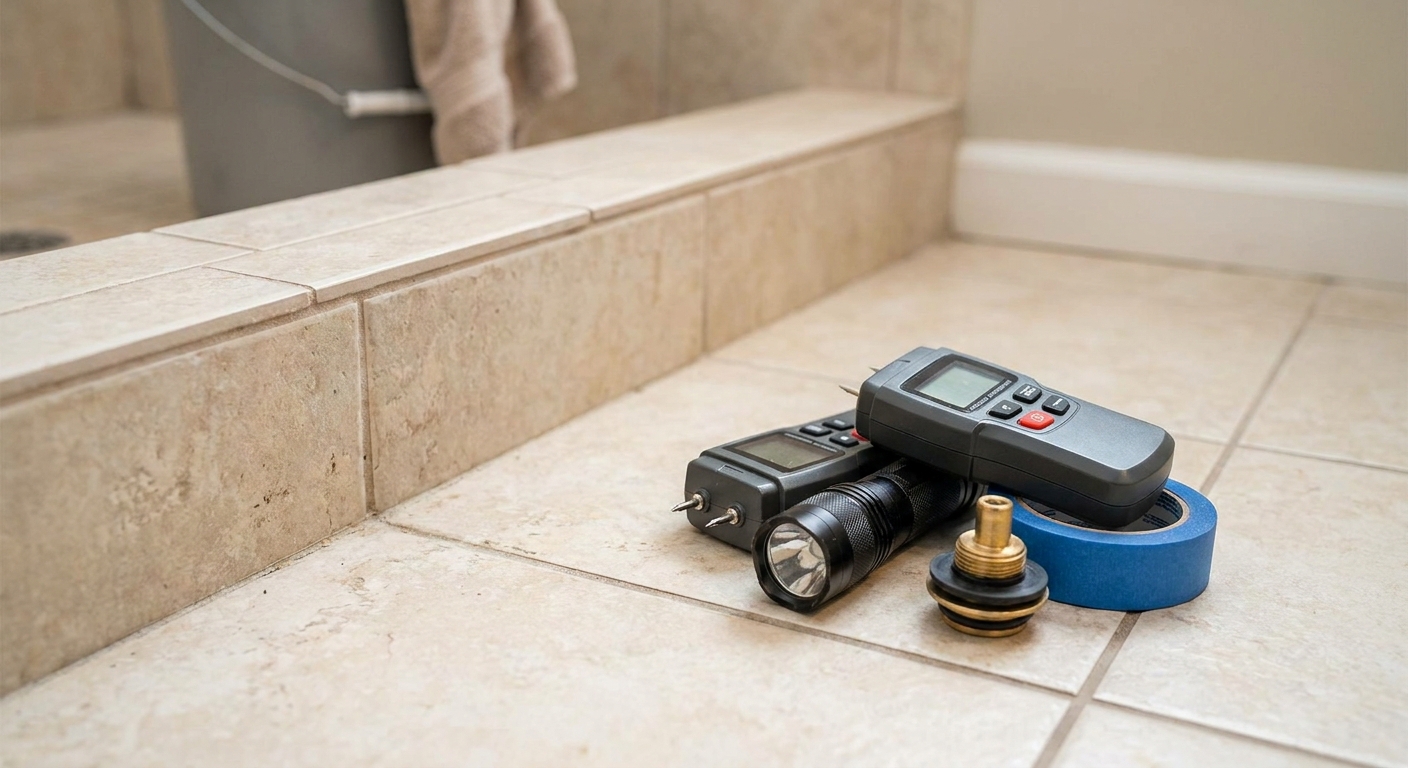
- Mechanical or inflatable test plug sized for your drain
- Painter’s tape for marking flood test waterline
- Flashlight for low-angle inspection across grout lines
- Moisture meter (optional, but helpful for tracking drying and confirming wet areas)
- 100 percent silicone (or the sealant your system specifies) for changes of plane
- Oscillating multi-tool for removing old caulk and, if needed, grout (carefully)
When to call a pro
If your flood test fails, or if there is significant damage below, it is time to bring in a tile pro or plumber who understands shower waterproofing.
Call a pro if:
- The shower is on an upper floor and the ceiling below is wet or sagging
- You see mold growth, rot, or soft subfloor around the shower
- The pan flood test fails (especially a 24-hour test)
- You have a curbless shower or steam shower and water is migrating into the floor or walls
Questions I would ask
- “Will you perform or document a 24-hour flood test after the new pan is installed?”
- “What waterproofing system are you using, and where exactly is the waterproof layer located?”
- “How do you detail the curb, corners, and any penetrations?”
- “If we replace the base, how far up the walls will we need to go?”
Anyone who gets vague about waterproofing details is someone I would be cautious about hiring.
FAQ
Can a shower leak through grout even if it is sealed?
Yes. Sealer helps with staining, not waterproofing. Water can still pass through grout and some types of stone. The waterproofing system underneath is what stops water from reaching framing.
Is it safe to keep using the shower if it only leaks a little?
Usually no. Small, consistent leaks often cause the worst hidden damage because they keep materials wet long enough for rot and mold to get established.
What if my shower is a tub-shower combo?
The basic troubleshooting logic still applies: isolate plumbing and drain leaks first, then look for water escaping at corners, the door or curtain, and the tub-to-wall joint. A shower pan flood test is for tiled shower bases, though. If you have a tub, focus on the drain and overflow connections, the tub shoe gasket, and the surround seams, and consider a plumber if the leak is showing up below.
The 30-Second Cheat Sheet
Essential takeaways for: Shower Pan or Tile Floor Leaking? Find the Source
Fast diagnosis (do this in order)
- Drain-only test: Get water going straight into the drain for 3 to 5 minutes without soaking walls or corners. If it leaks, suspect drain plumbing, drain body seal, or a supply/valve leak that only appears under flow.
- Targeted wetting test (drain plugged): With the drain properly plugged, wet one corner or joint at a time using small amounts (a cup or two). Do not overtop the curb. If one spot triggers the leak, suspect failed caulk, corner joint, grout crack, door sweep/frame, fasteners through the curb, or a niche.
- Pan flood test: Plug the drain with a real test plug, fill 1 to 2 inches, mark the waterline with tape, wait 2 to 4 hours for a quick screening. For real confirmation, do a 24-hour flood test (common pro and inspection standard). If level drops or leaks appear below, suspect pan liner or waterproofing failure (or the drain flange area).
Common telltales
- Leaks with no shower running: plumbing supply or valve issue (not the pan)
- Leaks quickly when water runs: drain connection or valve/supply under flow
- Leaks after 10+ minutes or at curb/perimeter: pan liner, waterproofing problem, or clogged weep holes on a traditional clamping drain
Caulk reality check
- Grout is not waterproof. Sealer is for stain resistance.
- Do not smear new caulk over old. Remove and replace with 100 percent silicone at corners and changes of plane, unless your tile system or warranty specifies a different sealant.
- If a flood test fails, caulk is not the fix.
Next steps
- If drain-only test fails: plan for drain or trap repair, often from below, and also rule out valve or supply leaks under flow.
- If pan flood test fails: stop using the shower and plan for a pan rebuild (often includes lower wall tile).
- If only a joint triggers it: remove and replace caulk, check door sweeps and curb penetrations, then retest before deeper demo.
💡 Tip: Scroll up to read the full article for detailed, step-by-step instructions.
⬆️ Back to topAbout Marcus Vance
Content Creator @ Grit & Home
Marcus Vance is a lifelong DIY enthusiast and self-taught home renovator who has spent the last decade transforming a dilapidated 1970s ranch into his family's dream home. He specializes in budget-friendly carpentry, room-by-room renovations, and demystifying power tools for beginners. Through his writing, Marcus shares practical tutorials and hard-learned lessons to help homeowners tackle their own projects with confidence.