🚨 In a DIY emergency or rush?
Skip the details and jump straight to our 30-second cheat sheet for the most crucial info.
When a sliding patio door lock will not engage, it feels like the door is “almost” closed but never quite home. In my experience, that is usually true. Most sliding door locks fail to latch because the door is sitting a hair too high, too low, or too far in or out to line up with the keeper (the strike plate the lock grabs).
The good news: you can fix most latch problems with a screwdriver, a flashlight, and a little patience. The better news: you do not have to guess. Once you understand what style of lock you have and what it is supposed to grab, the alignment checks become straightforward.
Identify your lock
Most sliding patio doors use one of two common locking styles. There are also multipoint variants, so if you see more than one hook or bolt, treat it as a multipoint system and plan on more careful adjustment.
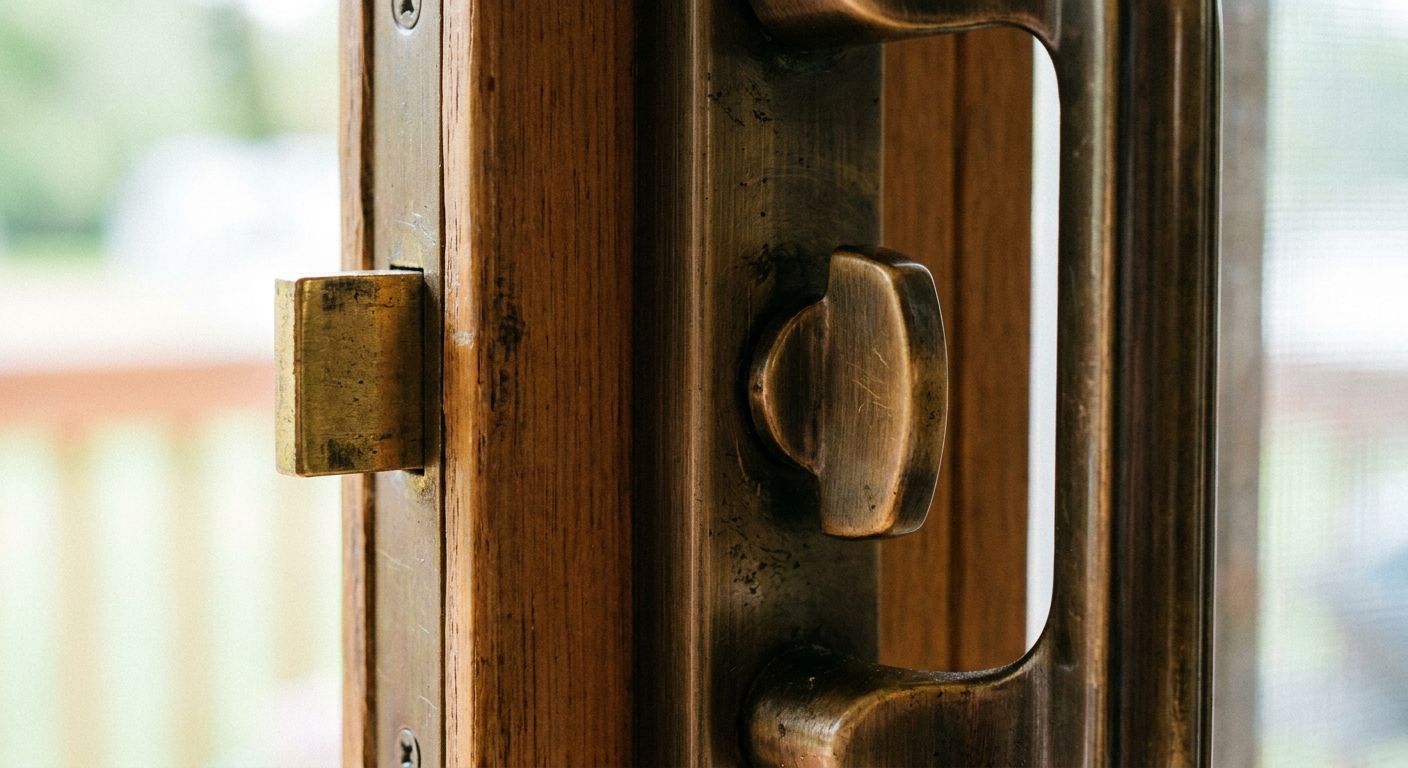
Thumbturn latch bolt
This is common on older or basic sliding doors. You rotate a thumbturn and a rectangular latch bolt slides into an opening in the strike plate on the jamb.
- What it needs: The latch bolt must line up with the strike plate opening.
- Typical failure: The bolt hits the face of the strike plate instead of entering the opening.
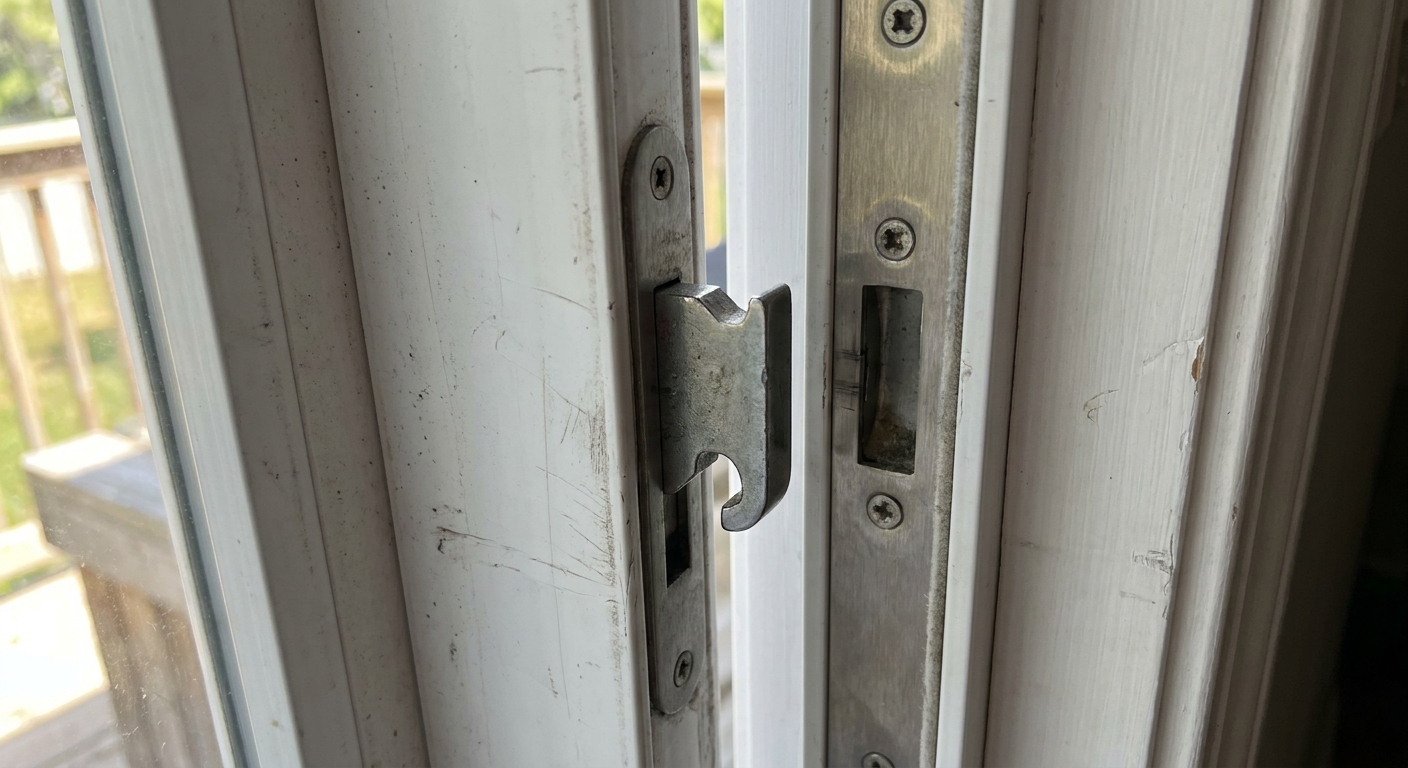
Mortise hook lock
This is very common on newer vinyl and aluminum doors. A hook-shaped bolt slides out of the door edge and hooks into the keeper on the jamb.
- What it needs: The hook must land at the right height and depth to catch behind the keeper.
- Typical failure: The hook scrapes, bottoms out, or slides past without catching.
Multipoint locks (quick note)
Some doors have dual hooks, shoot bolts, or a multipoint system that locks at more than one spot. If multiple points are not lining up at once, stop forcing it. You can still do the basic checks below, but multipoint hardware often has manufacturer-specific adjustments, and a pro visit can save you from bending something.
Quick tell: Open the door and look at the door edge near the handle. If you see a hook that moves in and out, it is a mortise hook lock. If you see a rectangular bolt, it is a thumbturn latch bolt. If you see two or more moving points, it is a multipoint setup.
Quick checks first
I like to spend two minutes reading the clues so I am not adjusting blindly.
1) Tighten the handle and lock screws
Before you touch the rollers, grab a screwdriver and check the handle mounting screws and any visible set screws. A slightly loose handle can shorten the latch throw, making it look like an alignment problem when it is really a hardware problem.
2) Mark the contact point
Close the door gently until it is fully against the jamb, then try to lock it. Do not force it. Open the door and look for shiny rub marks on the keeper or the lock bolt itself.
- Rub mark above the opening: door is sitting too high.
- Rub mark below the opening: door is sitting too low.
- Rub mark on the face, not near the opening: door is too far in or out, or the keeper is out of plane.
3) Lift the handle test
With the door almost closed, lift up on the handle. If the lock suddenly lines up, that strongly suggests a roller height issue or track wear near the closed position.
4) Clean the track
Sometimes the door is riding slightly up on debris. Vacuum the track and wipe it clean. Even a small pebble can shift the door enough to miss the keeper.
5) Light lubrication (optional but helpful)
If the door feels rough, a small amount of silicone spray on the track and rollers can help. Avoid oily lubricants that collect dirt. For the lock, use a light dry lubricant if it feels sticky, and go easy. You are not trying to grease the latch face, you are trying to help it move freely.
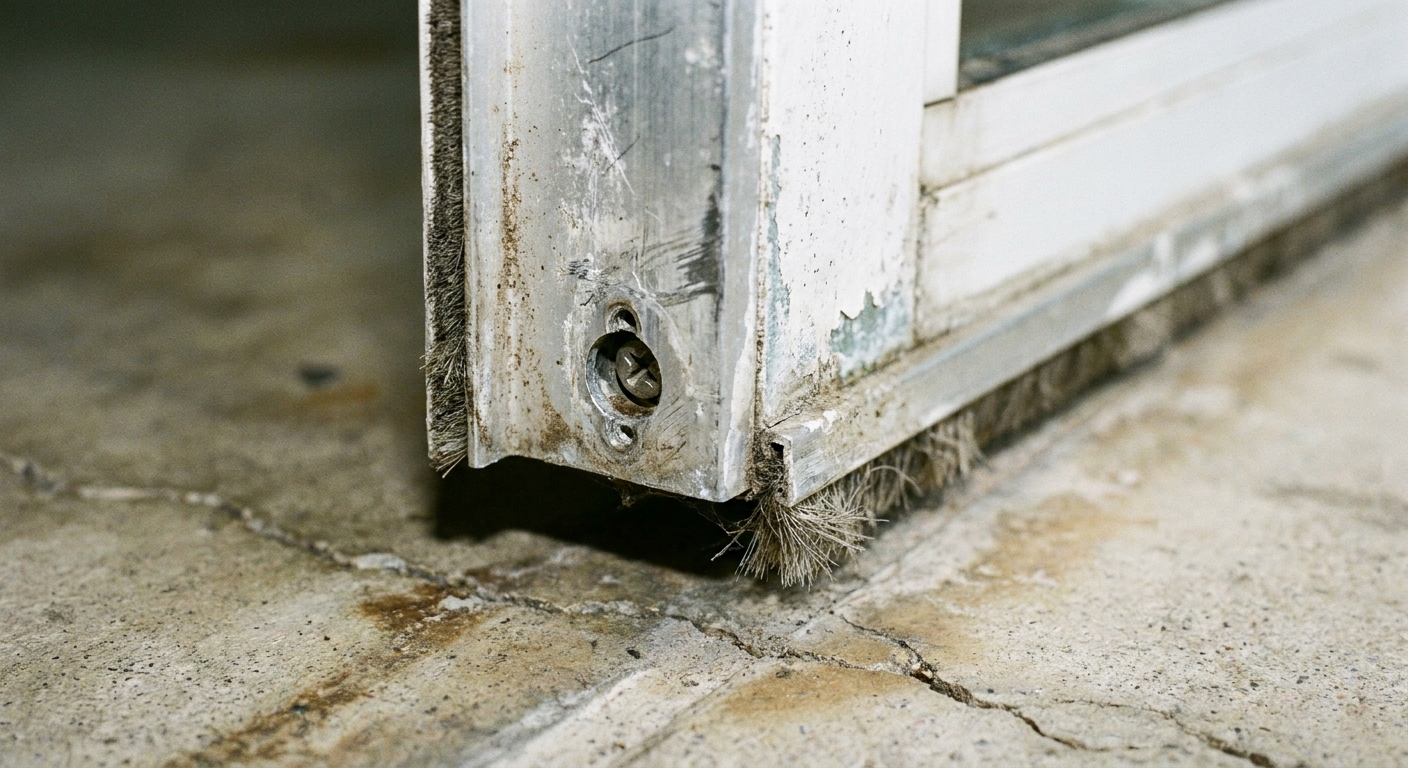
Fix #1: Adjust the rollers
If I had to bet on one fix that solves most “won’t latch” complaints, it is roller adjustment. Sliding doors typically have two roller adjustment screws at the bottom, one near each end.
Safety note
Sliding panels are heavier than they look. Keep a hand on the panel while adjusting, and do not raise the door so much that the rollers can climb out of the track or the panel starts rubbing hard at the head. If your door feels unstable, stop and get help.
Tools
- #2 Phillips or flathead screwdriver (depends on door)
- Flashlight
- Vacuum
Find the adjustment screws
Look along the bottom edge of the sliding panel, usually on the interior side. You may see small holes or plastic caps. Pop the caps off gently.
Adjust in small steps
- Close the door halfway so it stays upright but still moves.
- Turn one screw 1/4 turn, then the other screw 1/4 turn. Keep the panel level.
- Test the lock after each round of small adjustments.
What to watch: There is no universal rule for which direction raises or lowers because manufacturers vary. Instead of guessing, watch what changes. As you turn the screw, look at the reveal (the gap between the door panel and the frame) near the top and along the jamb. If the reveal tightens at the top or the panel starts binding, back off and go the other direction.
My real-world mistake: Early on, I cranked one side way up to “make it catch,” and the panel started binding at the top. Always adjust in small increments and keep the reveal consistent along the jamb.
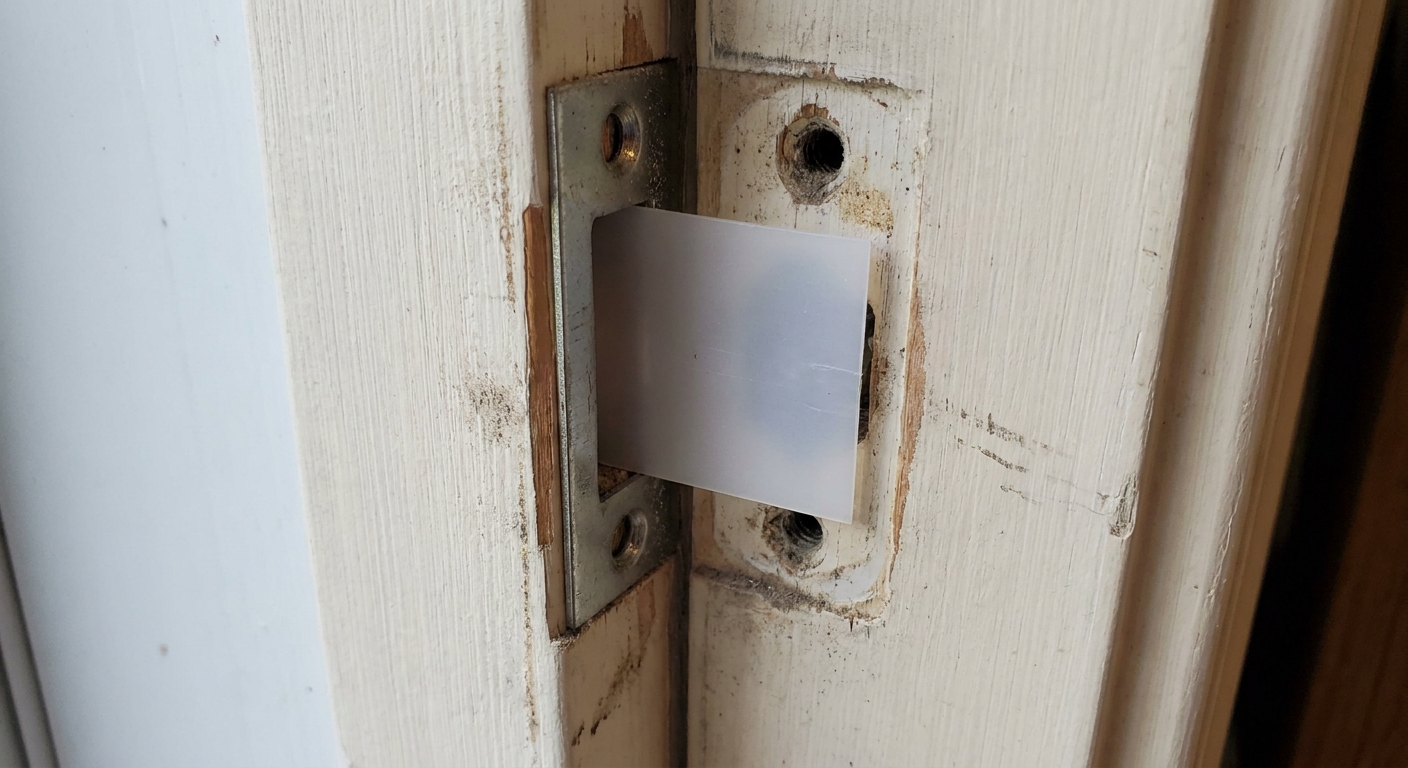
Fix #2: Shim the keeper
If the door rolls smoothly and feels square, but the lock is still just missing, shimming the keeper is a clean, reversible fix.
When shimming makes sense
- The latch is only off by about 1/16 to 1/8 inch
- The door closes nicely and does not feel like it is fighting the frame
- You can see the bolt hitting the keeper edge instead of entering cleanly
How to shim it
- Remove the keeper screws.
- Cut a shim. Good options: thin plastic shim stock, a strip of aluminum can, or stiff packaging plastic. In a pinch, a couple layers of cardstock works temporarily.
- Place the shim behind the keeper to move it toward the latch, or shim only one side to tweak the angle.
- Reinstall screws and test.
Important: Longer screws can help the keeper stay put, but only if there is solid backing or reinforcement behind the jamb. Many vinyl and aluminum doors have thin material or steel reinforcement in specific spots. If you are not sure what is behind the keeper, do not send long screws blindly. You do not want to hit the glass pocket or distort the frame.
Fix #3: Move the keeper
If you need more than a thin shim, you may need to reposition the keeper. This is common after a house settles or after the rollers have been adjusted significantly.
Step-by-step
- Close the door and extend the latch or hook.
- Mark where the latch wants to land on the jamb with painter’s tape and a pencil.
- Remove the keeper.
- Reposition it so the opening lines up with your mark.
- Pre-drill new pilot holes to avoid splitting.
- Install with screws, test, and fine-tune.
Patch note: If the old screw holes are now exposed, fill them with a glued-in toothpick or wood sliver, then re-drill. That keeps the keeper from slowly walking loose.
Frame and fixed panel checks
Sometimes the door panel is fine, but the jamb has shifted out of plumb or the frame has racked slightly. You will feel this when the door latches only if you push or lift in a certain direction.
Look for an uneven reveal
Look at the reveal (the gap between the door panel and the jamb) from top to bottom. If it is tight at the top and wide at the bottom (or vice versa), something is out of square.
What you can do
- Start with roller adjustment to center the panel in the opening.
- Confirm the fixed panel is actually fixed if your door has one. A loose fixed panel can let the frame flex and make the keeper seem “off” even if the sliding panel is adjusted correctly.
- Tighten accessible frame screws (do not over-torque). On some doors, there are screws hidden under caps along the jamb.
If the frame looks noticeably bowed or you see drywall cracks nearby, that is a bigger settling story. You can often still make the latch work with keeper adjustments, but keep an eye on whether the problem returns seasonally.
Track wear and door sag
On older doors, the track itself can wear into a shallow groove. The roller then rides lower in that groove near the closed position, and the latch ends up too low to engage.
How to spot track wear
- The door latches when partly open, but not when fully closed
- You feel a small dip or bump as the door reaches the jamb
- Visible groove or flattened spot in the track near the closed end
Practical fixes
- Clean thoroughly first. Dirt can mimic a worn groove.
- Raise rollers slightly to compensate for the dip.
- Consider a track cap if available for your door type. Some systems allow a stainless cap to cover worn aluminum track.
If the track is badly damaged or bent, that is when replacement parts or a pro visit becomes more cost-effective than wrestling it every week.
Hook lock issues
Hook locks are solid when aligned, but they are picky about two things: height and depth.
Hook hits but will not grab
- Cause: keeper is too far away, or the door is not snug against the jamb.
- Fix: shim the keeper toward the hook, or adjust rollers so the panel closes tighter.
Hook scrapes and feels gritty
- Cause: keeper opening is slightly misaligned or burred.
- Fix: reposition the keeper. If there is a sharp burr, lightly file it smooth.
Filing caution: File as little as possible. You are removing a sharp edge, not reshaping the keeper. If you change the geometry too much, the hook can get less secure, not more.
Lock works only when you push the door inward
- Cause: panel is proud of the jamb, often from roller height or a bowed jamb.
- Fix: roller adjustment first. Then keeper shimming as needed.
Note: If the mortise mechanism feels sloppy, does not spring smoothly, or the hook does not fully extend, the lock body itself may be failing. Alignment fixes cannot compensate for a broken mortise case.
Practical security add-ons
You do not need to spiral into worst-case scenarios to take patio door security seriously. I like layers that are cheap, easy, and make daily life simpler.
- Add a security bar or a cut-to-fit dowel in the track as a secondary stop. It is simple and effective.
- Use longer screws in the keeper only where the frame has solid backing or reinforcement.
- Replace worn weatherstripping so the door pulls in consistently at the jamb, which also helps the lock align.
None of these replaces a properly aligned latch. Think of them as backup, not a band-aid for a lock that barely catches.
When to call a pro
Most latch issues are DIY-friendly, but a few signs point to bigger problems.
- The glass panel looks racked, or the frame is visibly twisted.
- The track is bent or cracked, especially on aluminum.
- The lock mechanism is damaged, missing parts, or will not extend smoothly even with the door open.
- You have a multipoint lock and more than one point will not line up after basic roller and keeper checks.
- You have to slam the door to get it to latch. Sliding doors should close with steady pressure, not force.
If you are renting, this is also a good moment to loop in your landlord. Lock alignment is a safety and maintenance item, and it is usually inexpensive to address early.
The 30-Second Cheat Sheet
Essential takeaways for: Sliding Patio Door Lock Not Latching? Fix the Alignment
Fast diagnosis
- Identify the lock: latch bolt vs hook bolt, and note if you have a multipoint system with more than one hook/bolt.
- Look for rub marks on the strike plate or keeper to see if the door is too high or too low.
- Lift the handle test: if lifting makes it latch, you likely need a roller height adjustment or you have track wear near the jamb.
- Check for loose handle screws: a loose handle can shorten the latch throw and mimic misalignment.
- Clean the track first. Debris can shift the door enough to miss the keeper.
Fixes that work most often
- Adjust rollers at the bottom of the sliding panel in 1/4 turns, alternating sides to keep the door level and the reveal (the gap) even.
- Shim the strike plate or keeper (1/16 to 1/8 inch) if the latch is just barely missing.
- Reposition the strike plate if the mismatch is larger or the house has settled.
Track and settling clues
- Track groove near closed position: door drops slightly right at the jamb. Raise rollers or consider a track cap.
- Uneven gap along jamb: frame may be out of plumb. Start with roller adjustments, then keeper tweaks.
Practical security add-ons
- Add a track bar or dowel as a secondary stop.
- Use longer keeper screws only where there is solid backing or reinforcement.
Call a pro if
- The track is bent or cracked, the frame is visibly twisted, the multipoint system will not align, or the mortise mechanism does not extend smoothly even with the door open.
💡 Tip: Scroll up to read the full article for detailed, step-by-step instructions.
⬆️ Back to topAbout Marcus Vance
Content Creator @ Grit & Home
Marcus Vance is a lifelong DIY enthusiast and self-taught home renovator who has spent the last decade transforming a dilapidated 1970s ranch into his family's dream home. He specializes in budget-friendly carpentry, room-by-room renovations, and demystifying power tools for beginners. Through his writing, Marcus shares practical tutorials and hard-learned lessons to help homeowners tackle their own projects with confidence.