🚨 In a DIY emergency or rush?
Skip the details and jump straight to our 30-second cheat sheet for the most crucial info.
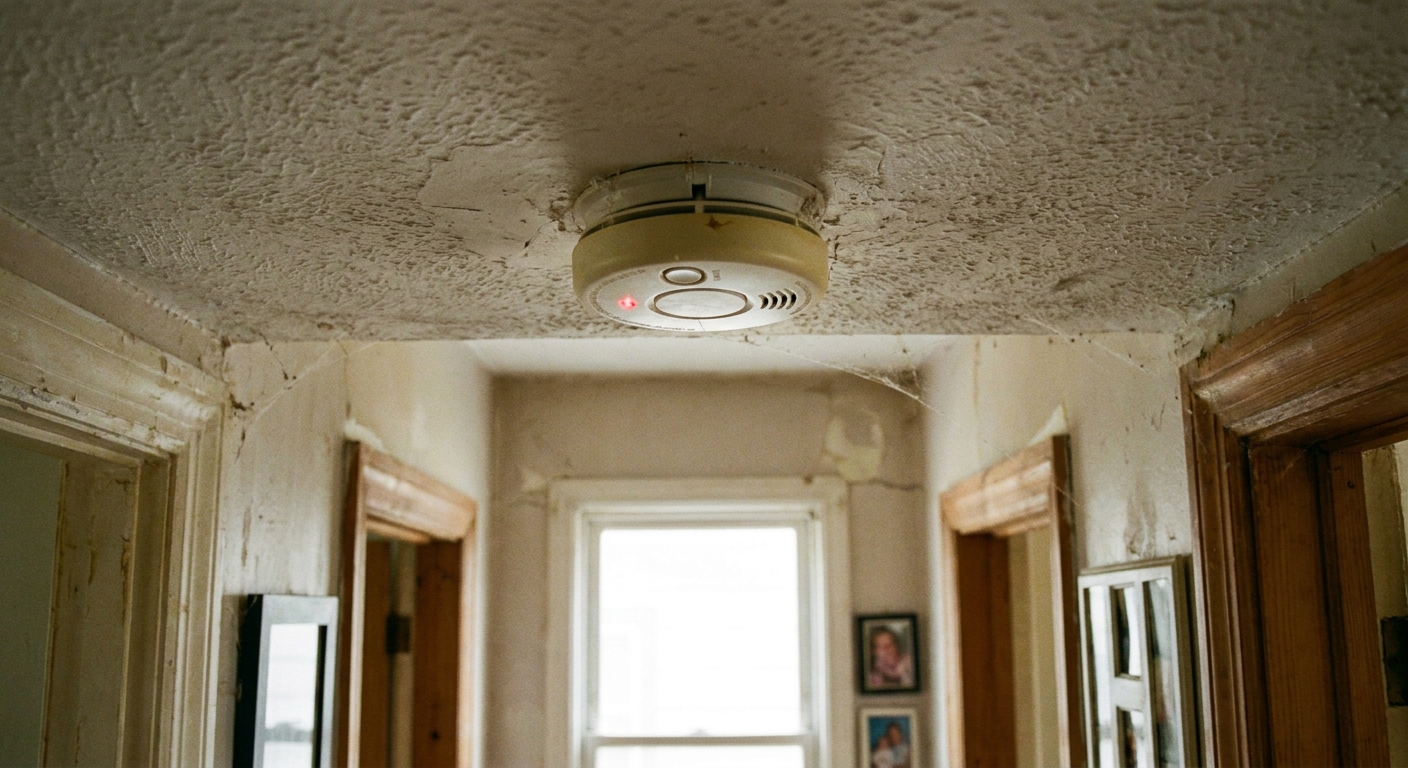
A smoke alarm that goes into a full alarm when there is no smoke is more than “annoying.” It trains everyone in the house to ignore the sound, and that is the last habit you want.
The good news is that most mystery alarms come down to a handful of causes: dust, tiny insects, steam or humidity, aerosol sprays, air movement from HVAC, bad placement, temperature swings and condensation, aging sensors, or an interconnected alarm loop where one unit is triggering the rest.
First, confirm it is not a chirp
This article is about full alarms, not the little “chirp… chirp… chirp” that happens on a schedule.
Quick sound check
- Low battery: a single chirp about once a minute is common, but cadence varies widely by brand and model.
- End-of-life warning: many newer alarms use a repeating chirp or pattern, but the exact pattern varies. Check the label inside the alarm or the manual.
- Smoke alarm event (full alarm): loud repeating alarm pattern, and if your alarms are interconnected, the whole house may join in.
If you are unsure, look for the sound pattern guide on the back of the unit or inside the cover. If the unit is 10 years old (common replacement interval), skip ahead to the replacement section.
Safety first during a mystery alarm
Even if you suspect a false alarm, treat it seriously until you rule out danger.
- Check for real hazards: kitchen, garage, furnace room, fireplace, and any space heaters.
- Get people and pets to fresh air if anything seems off.
- If you smell gas, hear a hissing sound, or feel dizzy: leave the house and call your utility or emergency services.
- Silence the alarm using the hush button if it is safe to do so.
- Hardwired caution: if it will not silence, only cut power to the circuit after you have confirmed there is no hazard and you are confident you know the correct breaker. If you are not sure, evacuate and call for help.
Smoke vs CO: do not mix them up
A quick but important detour because combo units trip people up. Many smoke and CO alarms use different sounds, voice prompts, and LED colors for smoke vs carbon monoxide.
- If you have a combo unit: check the label on the back or inside the cover for the sound and light codes.
- If you have CO symptoms like headache, nausea, confusion, or dizziness, do not troubleshoot. Get to fresh air and call for help.
Common causes of full false alarms
1) Dust and renovation leftovers
My own worst offender was after sanding drywall compound. I vacuumed the room, felt like a responsible adult, and still had nuisance alarms for weeks. Fine dust floats, gets pulled into the sensing chamber, and can scatter light inside a photoelectric alarm or disrupt the ionization chamber.
Clues: alarms started after sanding, sweeping, attic work, or HVAC filter changes. The alarm may happen when the furnace blower kicks on.
2) Tiny insects in the sensing chamber
It sounds ridiculous until you see it. Small bugs can crawl inside and set off the sensor, especially in basements, near exterior doors, or in humid seasons.
Clues: random alarms at night, seasonal patterns, or one specific unit being the repeat troublemaker.
3) Steam, humidity, and aerosol sprays
Steam from a shower, humidifier output, hairspray, deodorant spray, and even some cleaners can trigger alarms, especially if the unit is too close to a bathroom or the airflow pushes steam right past the alarm.
Clues: alarms occur during showers, right after someone uses spray products, or on very humid days.
4) Placement near vents, returns, or ceiling fans
Fast-moving air can carry dust and steam into the alarm, and it can also dilute smoke during a real fire, delaying detection. Either way, alarms do not love being in the blast zone of a vent.
Clues: alarms coincide with heat or AC cycling on, or happen only when the ceiling fan is running.
5) Temperature swings and condensation
This one is sneaky. Unfinished attics, drafty hallways near exterior doors, and spots near poorly insulated ceilings can see quick temperature changes. That can lead to condensation in or around the alarm, and some units respond badly to that moisture.
Clues: alarms cluster on very cold mornings, during the first heat cycle of the season, or after a big weather swing.
6) The alarm is old (sensor drift and contamination)
Smoke alarms do not last forever. Over time, sensors get less stable due to contamination, component aging, and environmental exposure. That is why most manufacturers recommend replacement at 10 years (sometimes sooner, depending on model).
Clues: frequent false alarms, yellowed plastic, or a date of manufacture over 10 years old.
7) Interconnected alarms looping the whole house
If your alarms are interconnected (hardwired with a third signal wire, or wirelessly linked), one unit can trigger all of them. The real culprit might be in a guest room, an attic stairwell, or a basement hallway.
Clues: multiple alarms sound at once, and it is hard to tell where it started. Also, mixing brands or incompatible model lines in an interconnected system can cause nuisance alarms and odd behavior.
8) Ionization vs photoelectric: the wrong tool for the location
This is a big one. Many nuisance alarms in real homes trace back to an ionization alarm installed where a photoelectric alarm would usually behave better, especially near kitchens or bathrooms.
- Ionization alarms tend to be more sensitive to tiny particles and can be more prone to nuisance alarms from cooking aerosols.
- Photoelectric alarms are often less prone to nuisance alarms in those same spots, but they are not magic. Steam and aerosols can still set them off.
If your “no smoke” alarm is really “steam and tiny particles,” switching alarm type can be a clean fix. In some setups, a heat alarm in the right place (per local code and manufacturer guidance) can also reduce nuisance alarms near kitchens or in garages without sacrificing safety.
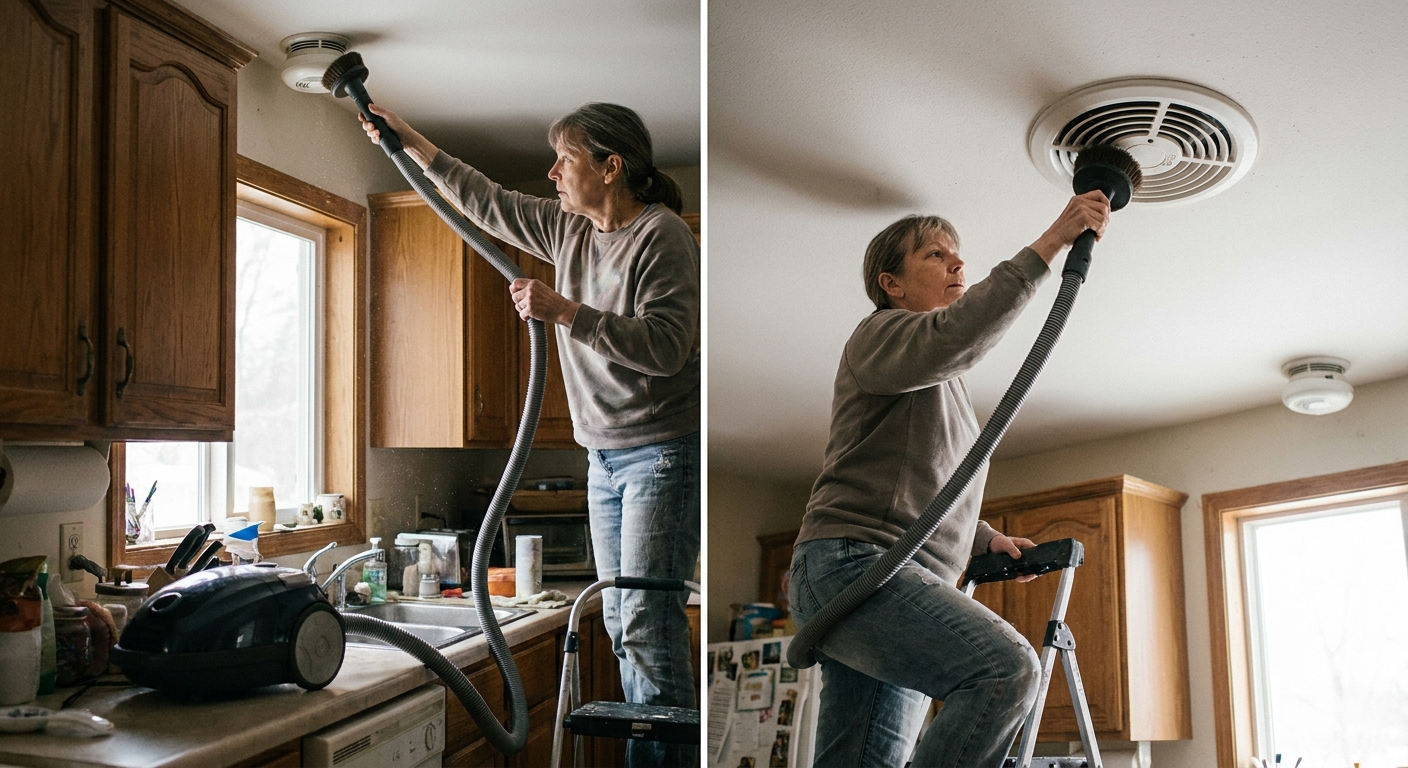
Cleaning checklist
If I could go back in time, I would tell myself this: do not just wave a towel at it. Cleaning needs to pull contaminants out of the vents without forcing debris deeper inside.
What you need
- Vacuum with a soft brush attachment
- Compressed air (optional, use gently)
- Microfiber cloth
- Step stool
- New batteries (if battery-powered or battery backup)
Step-by-step
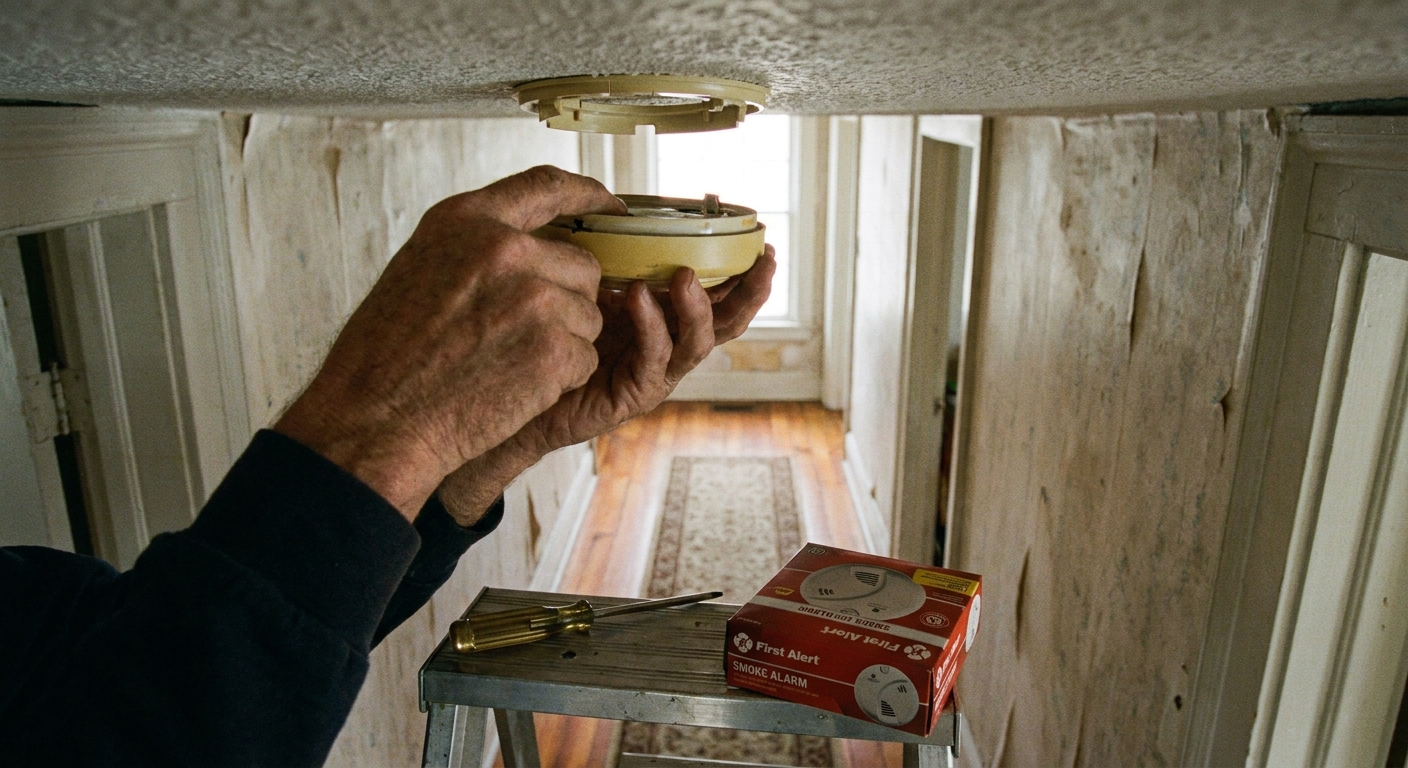
- Hush and remove power. For hardwired alarms, switch off the correct breaker. For battery alarms, remove the battery.
- Take the unit down. Twist off the mounting ring. Unplug the wiring harness if present.
- Vacuum the vents thoroughly. Use the brush attachment around all vent openings.
- Blow out gently. If you use compressed air, short bursts from a few inches away. You are trying to lift dust out, not sandblast the sensor.
- Check for insects. Look inside vent slots with a flashlight. If you see any, keep vacuuming. Avoid sprays inside the detector.
- Wipe the exterior. Dry microfiber only. No cleaners, no water.
- Reinstall, restore power, then test. Reconnect, turn the breaker back on, install a fresh battery if needed, then press and hold the test button.
DIY note: If your alarm is combo smoke and CO, follow the manufacturer guidance, and do not assume a smoke issue is the only possibility.
Placement checklist
If cleaning does not solve it, the next most likely culprit is where the alarm lives.
Common bad locations
- Within a few feet of a bathroom door where steam rolls out
- Near a kitchen where cooking particles drift into hallways
- Directly next to HVAC supply registers or returns
- At the top of stairwells where airflow funnels
- In the “dead zone” near ceiling corners where air can stagnate (follow manufacturer spacing guidance)
Rules of thumb
- Follow the manufacturer instructions for distance from vents, ceiling fans, and cooking appliances.
- Kitchen distance: many manufacturers recommend placing smoke alarms roughly 10 to 20 feet from cooking appliances to reduce nuisance alarms, but the correct distance varies. Use your manual and local code.
- Use bathroom ventilation. A stronger bath fan and keeping the door closed can prevent steam triggers without moving the alarm far.
- Do not remove alarms to solve nuisance issues. Move them properly, do not delete them.
If you are unsure what your local code requires for placement and quantity, calling your local fire department non-emergency line can be genuinely helpful. Many are happy to give general guidance.
Interconnected alarms: find the starter
In an interconnected system, the loudest alarm is not always the one that initiated the event.
Steps that usually work
- Look for indicator lights or memory features. Many alarms show a blinking red LED, an error code, or a “memory” indicator after an alarm event.
- Silence from one unit, then watch. The initiating unit often re-triggers first if the underlying issue remains.
- Check the problem zones. Bathrooms, near kitchens, near returns, basement, garage entry hallway.
- Compatibility check. If your system is hardwired or wirelessly linked, confirm all units are compatible. Mixing brands or model lines can cause nuisance alarms or failures to interconnect.
- If it keeps happening, isolate and replace one at a time. Start with the oldest unit or the one closest to steam, vents, or a drafty exterior wall.
Garage note: Smoke alarms are often a nuisance inside garages due to exhaust and dust. Many jurisdictions prefer or allow a heat detector in garages instead, but requirements vary. Follow local code and manufacturer guidance.
Hardwired caution: If you are not comfortable diagnosing wiring, do not guess. A loose connection or wrong compatibility between models can cause odd behavior. An electrician can confirm proper interconnect wiring and compatible units.
When to replace the unit
I am as thrifty as they come, but there is a point where troubleshooting becomes false economy.
Replace the smoke alarm if:
- It is 10 years old or older (check the date of manufacture on the back)
- It has repeated false alarms after cleaning and correcting placement
- The alarm has been exposed to heavy dust events (major renovation) and never behaves right afterward
- The case is cracked, warped, or the unit has been painted
- The model is not compatible with the rest of an interconnected system
What to buy next
- For many living areas, homeowners often have good results with photoelectric smoke alarms to help reduce nuisance alarms.
- Consider a dual-sensor model if you want broader detection coverage (and fewer “which type is best” debates).
- If you have interconnected alarms, buy units that are compatible with your existing brand and model line, or plan to replace the set for reliability.
Quick troubleshooting flow
- Full alarm? Treat it as real until you confirm safety.
- Smoke or CO? If it is a combo unit, check the alarm codes. If you suspect CO or anyone has symptoms, get outside.
- One unit or the whole house? If the whole house, hunt for the initiating unit using indicator lights and memory features.
- Clean it (vacuum vents, gentle air, no sprays).
- Control moisture (bath fan, door closed, relocate away from steam paths).
- Check HVAC influence (move away from vents and returns per manufacturer guidance).
- Consider condensation (drafty exterior areas, attics, big temperature swings).
- Check age (10 years means replace, no debate).
- Still happening? Replace the suspect unit first, then consider compatibility or electrical issues if the problem persists.
When to call a pro
DIY is great, but there are a few red lines where I would rather you spend the money than gamble.
- You suspect electrical wiring issues with hardwired interconnected alarms.
- Your interconnected system includes mixed brands or uncertain compatibility and things are behaving oddly.
- The alarm is paired with CO detection and you have any symptoms like headache, nausea, or dizziness.
- You have repeated alarms and cannot identify the initiating unit, especially in a larger home.
- Your system is older and you want to upgrade to modern interconnected alarms and are unsure about compatibility.
False alarms are common, but they are also fixable. Once you get the right combination of clean sensor, good placement, and proper replacement timing, the house gets quieter and safer, which is a win on both counts.
The 30-Second Cheat Sheet
Essential takeaways for: Smoke Alarm Keeps Going Off With No Smoke? False Alarms and Fixes
What “full alarm with no smoke” usually means
- Not a battery chirp: you are dealing with dust, bugs, humidity or steam, aerosol sprays, temperature swings or condensation, bad placement near HVAC, aging sensors, or an interconnected alarm issue.
Do this in order
- Confirm safety first: quick check for real smoke, fire, gas smell, or unusual heat. Evacuate if anything seems wrong.
- Know what is alarming: smoke vs CO sounds can differ on combo units (often voice prompts or different light colors). Check the label or manual.
- Figure out the pattern: one alarm or all alarms (interconnected system)? Mixed brands or incompatible models can cause weird behavior.
- Clean the unit: power off, remove, vacuum vent openings with a brush, gentle compressed air, wipe exterior dry only, reinstall, restore power, then test.
- Address humidity and airflow: keep bathroom door closed during showers, run the bath fan longer, and move alarms away from steam paths and away from HVAC supply and return vents per manufacturer instructions.
- Check placement basics: many manufacturers recommend keeping smoke alarms roughly 10 to 20 feet from cooking appliances (varies by model and local code). When in doubt, follow the manual.
- Check the date: if it is 10+ years old, replace it.
Replace instead of troubleshooting if
- It is 10 years old, yellowed, painted, cracked, or keeps false alarming after cleaning and placement fixes.
- It is incompatible with the rest of your interconnected alarms.
Choosing the right type
- Photoelectric alarms are often less prone to nuisance alarms near kitchens and bathrooms, but steam and aerosols can still trigger them.
- Dual-sensor models are a solid “set it and forget it” upgrade if budget allows.
- Kitchen and garage note: in some locations a heat alarm may be a better fit (especially near kitchens or in garages), if allowed or required by your local code and manufacturer guidance.
Call a pro when
- You suspect wiring or interconnect problems in hardwired alarms, or you have a mixed brand/model system.
- Any alarm includes CO detection and you have symptoms like headache or dizziness.
💡 Tip: Scroll up to read the full article for detailed, step-by-step instructions.
⬆️ Back to topAbout Marcus Vance
Content Creator @ Grit & Home
Marcus Vance is a lifelong DIY enthusiast and self-taught home renovator who has spent the last decade transforming a dilapidated 1970s ranch into his family's dream home. He specializes in budget-friendly carpentry, room-by-room renovations, and demystifying power tools for beginners. Through his writing, Marcus shares practical tutorials and hard-learned lessons to help homeowners tackle their own projects with confidence.