🚨 In a DIY emergency or rush?
Skip the details and jump straight to our 30-second cheat sheet for the most crucial info.
Spider mites are one of those pests that can make a healthy houseplant look tired almost overnight. The tricky part is they are tiny, they prefer dry air, and they multiply fast. The good news is that you can usually beat them indoors with a simple, repeatable routine: isolate, rinse, wipe, spray, and repeat until you have gone a full cycle with no new damage.
How to tell it’s spider mites
Most people notice the damage before they ever see the mites. If your plant has a dusty, faded look that will not wipe off, spider mites jump to the top of my list.
Classic symptoms
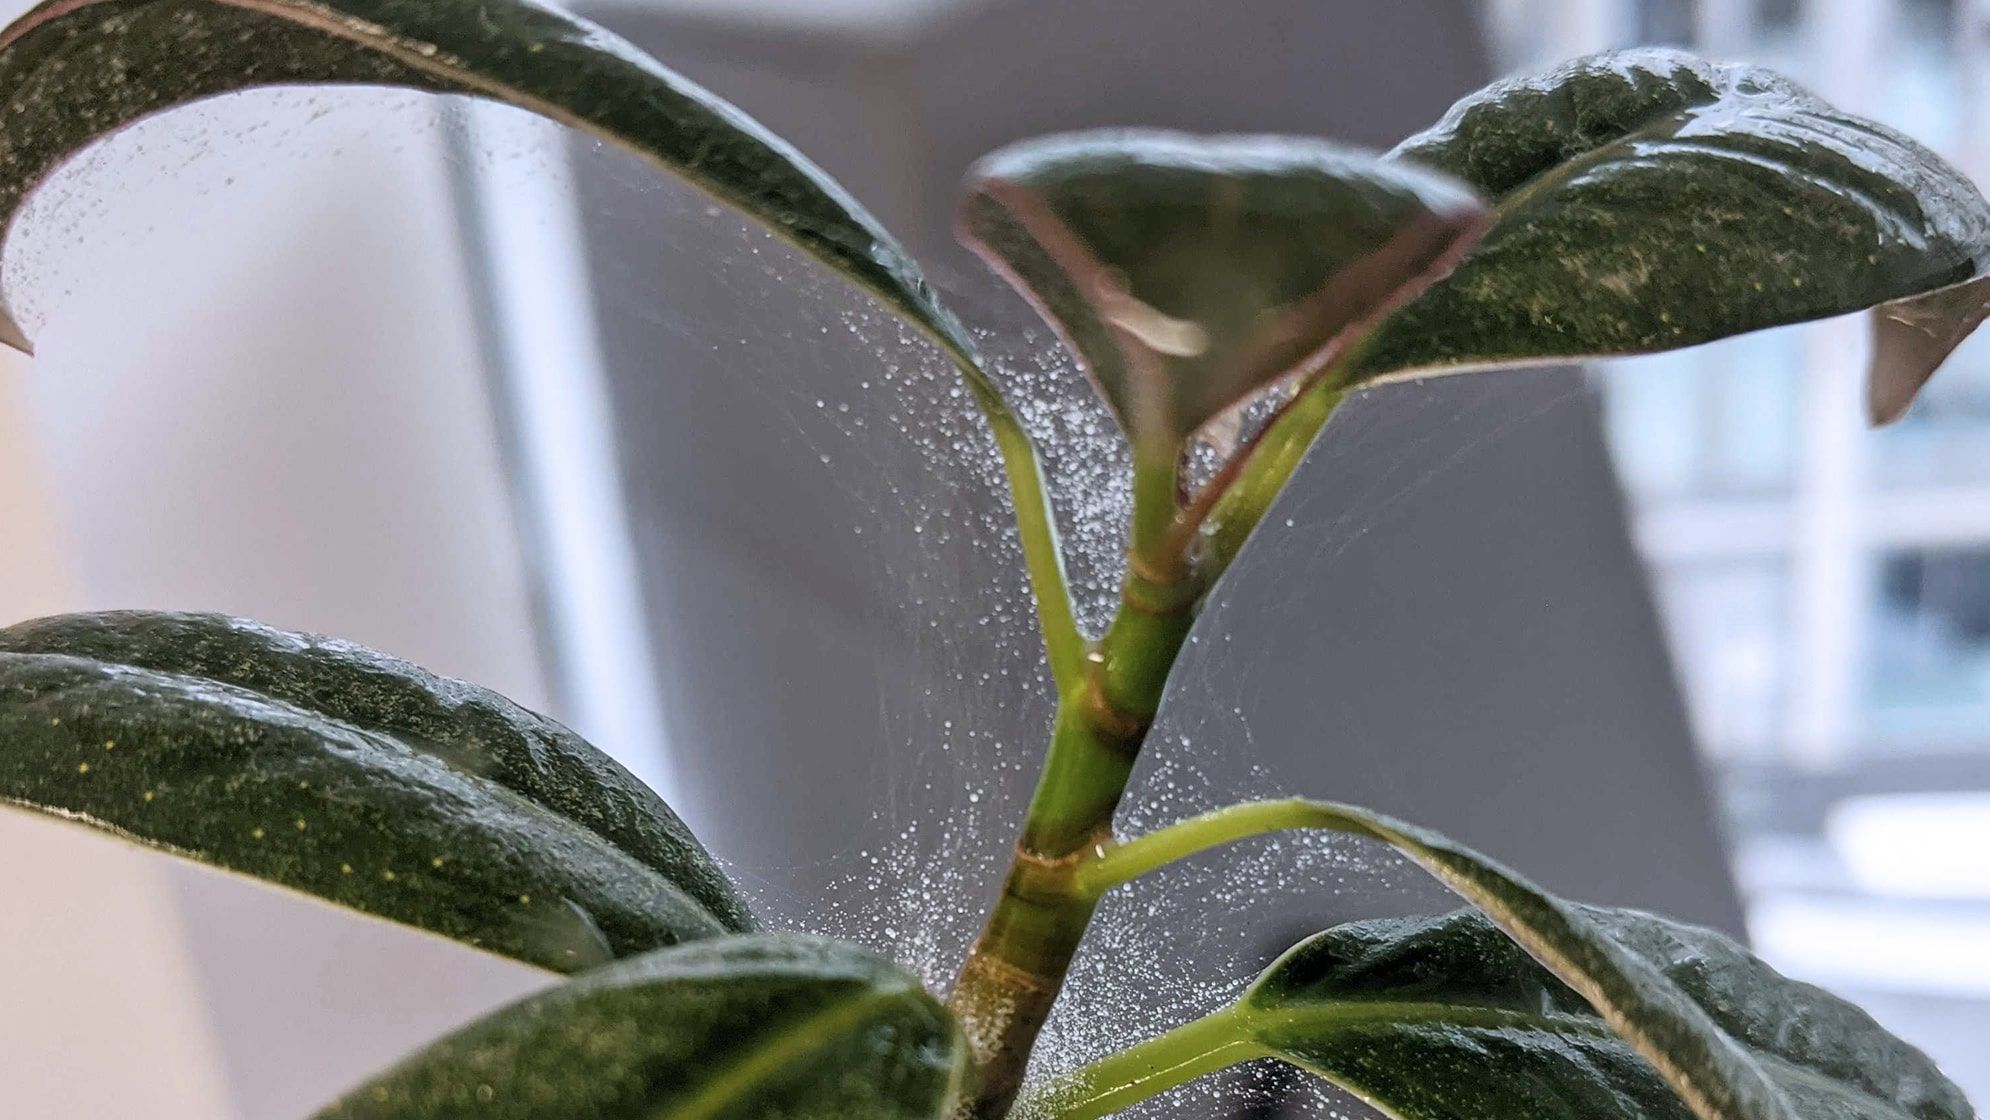
- Fine webbing in leaf joints, between stems, and along the underside of leaves.
- Stippled leaves that look speckled or sandblasted, often starting as tiny pale dots.
- Bronzing or yellowing as the feeding damage spreads.
- Leaf drop when an infestation gets ahead of you.
Quick tests that help
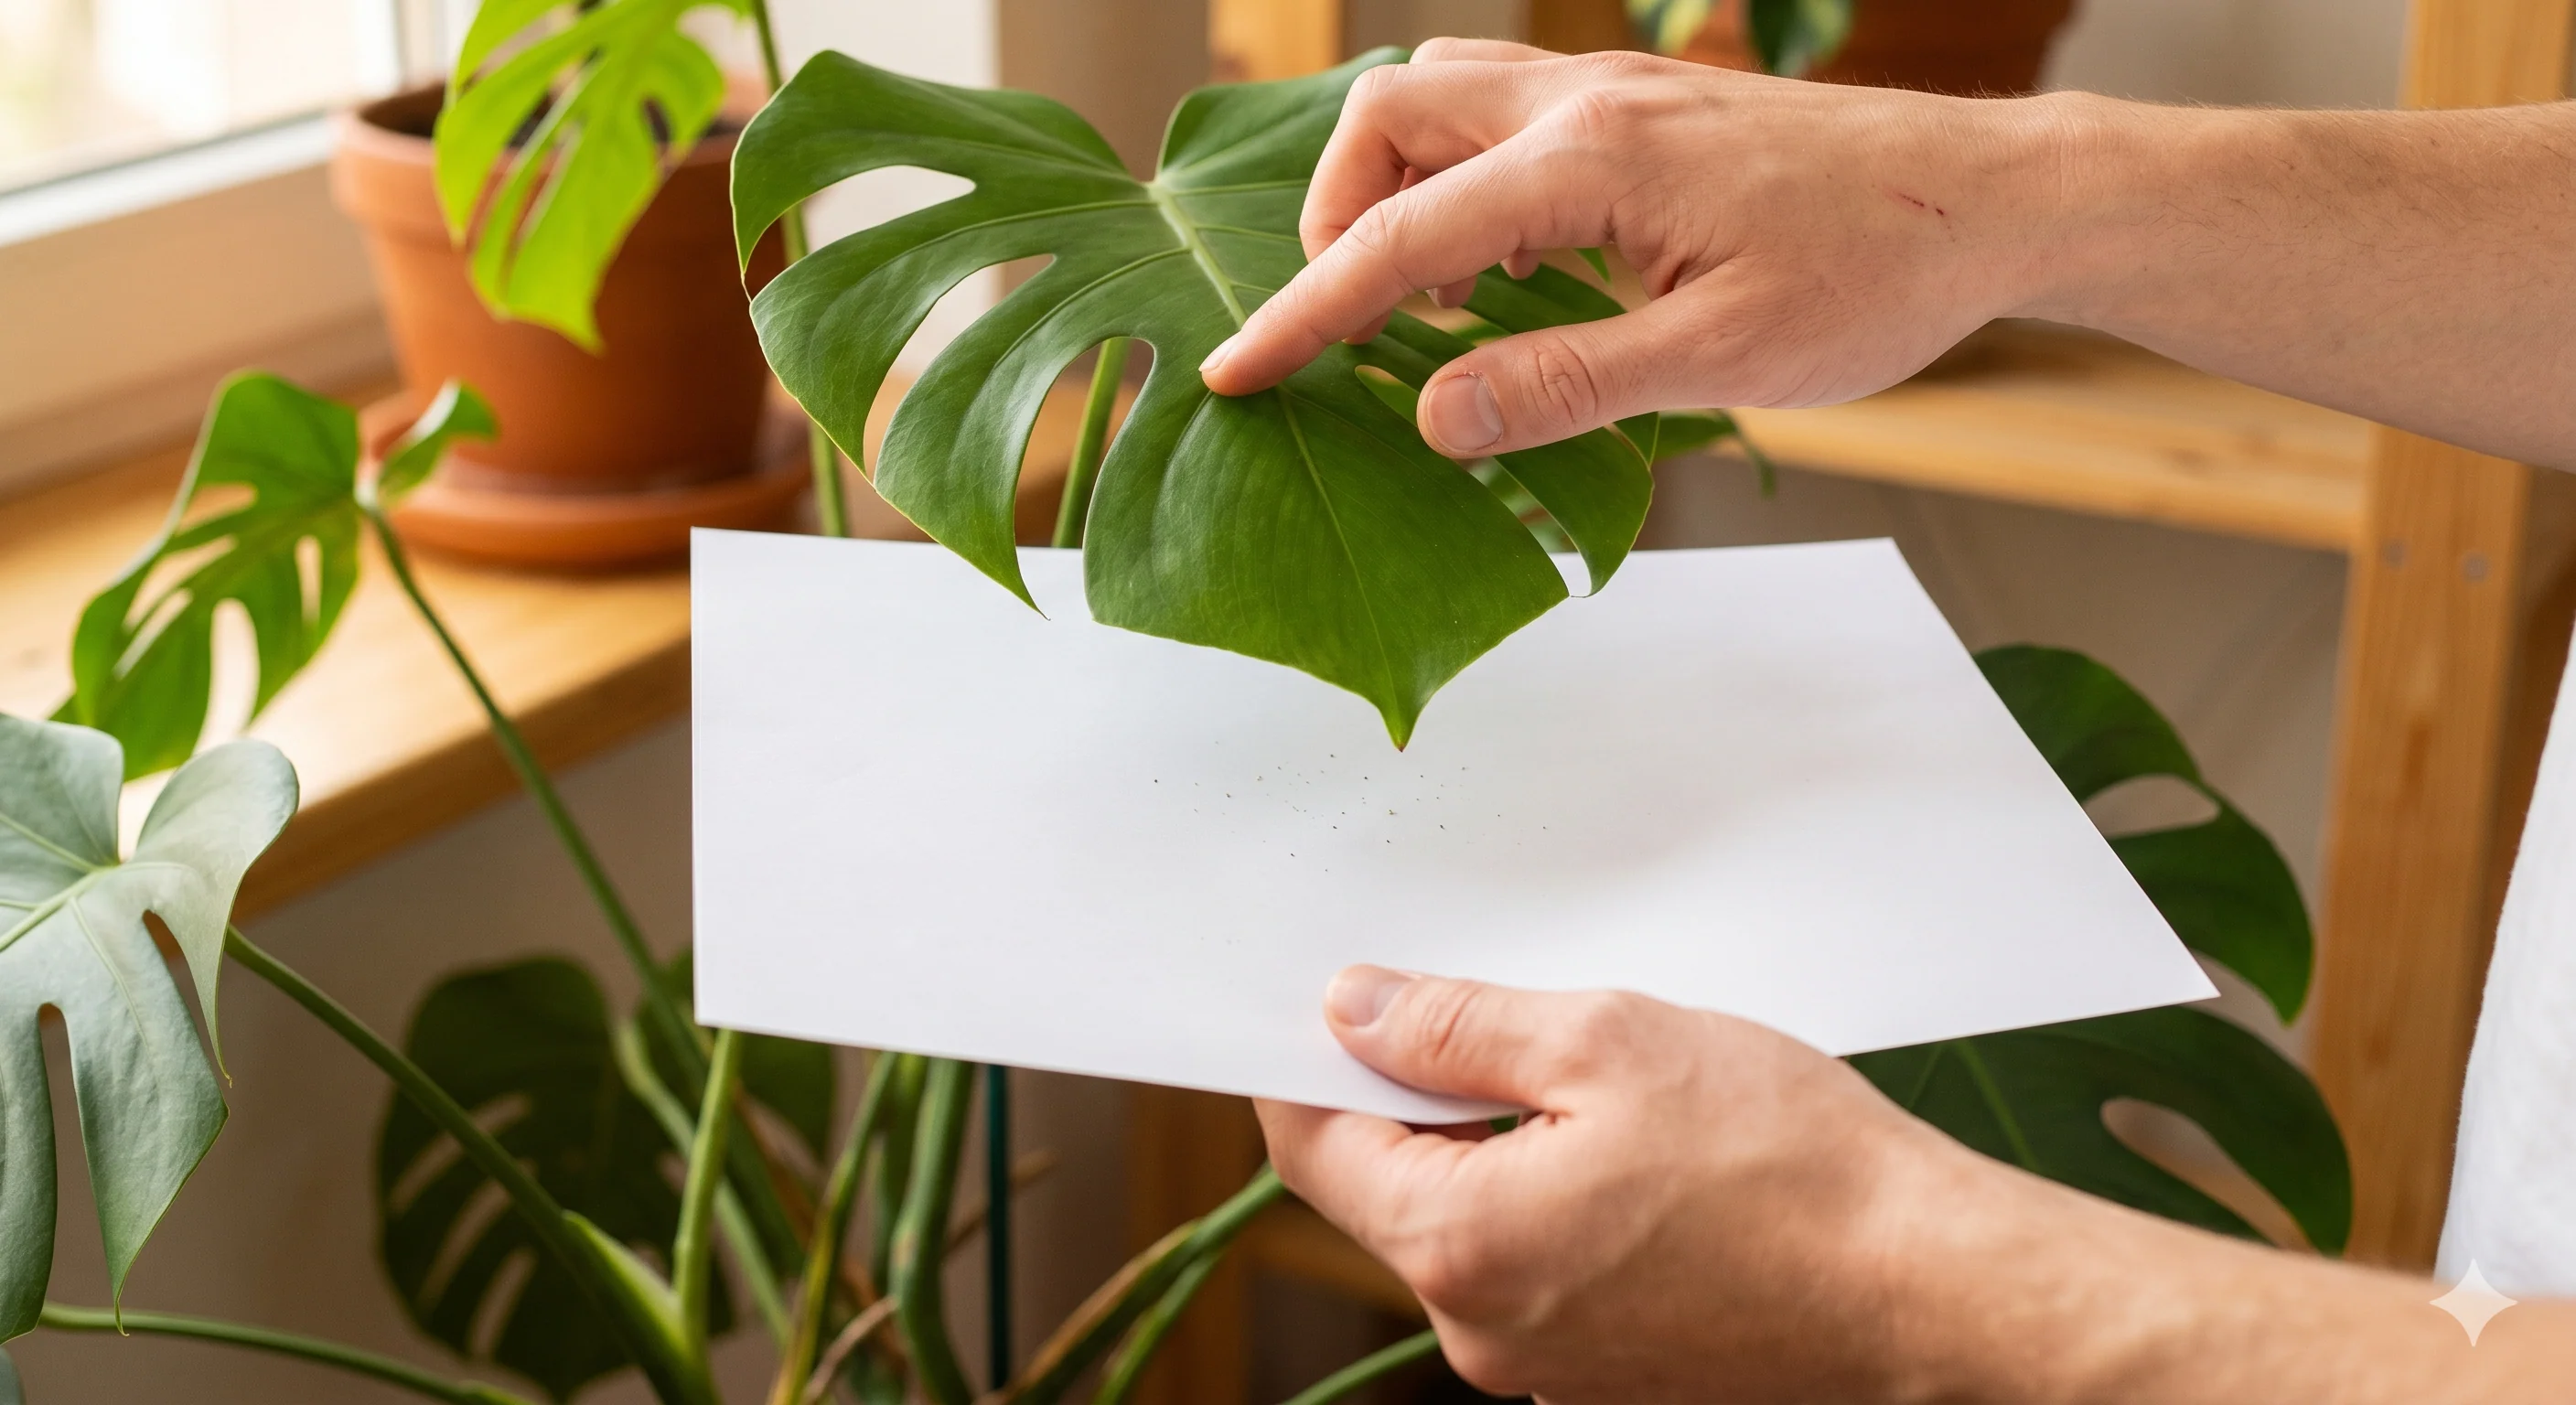
- White paper tap test: Hold a sheet of white paper under a leaf and tap the leaf. If you see tiny moving dots on the paper, that is a strong clue.
- Underside inspection: Use your phone flashlight and look under leaves. Mites like the sheltered underside and tight corners near the petiole.
Heads up: Webbing can also be from harmless house spiders. Spider-mite webbing is usually finer, tighter, and paired with stippling damage on leaves.
First move: isolate
Spider mites crawl, but their biggest trick is hitchhiking. They move plant-to-plant when leaves touch, when you carry a pot through the house, or when you prune and then handle a different plant.
Isolation checklist
- Move the plant to a separate room if you can. If not, put it at least several feet away from others.
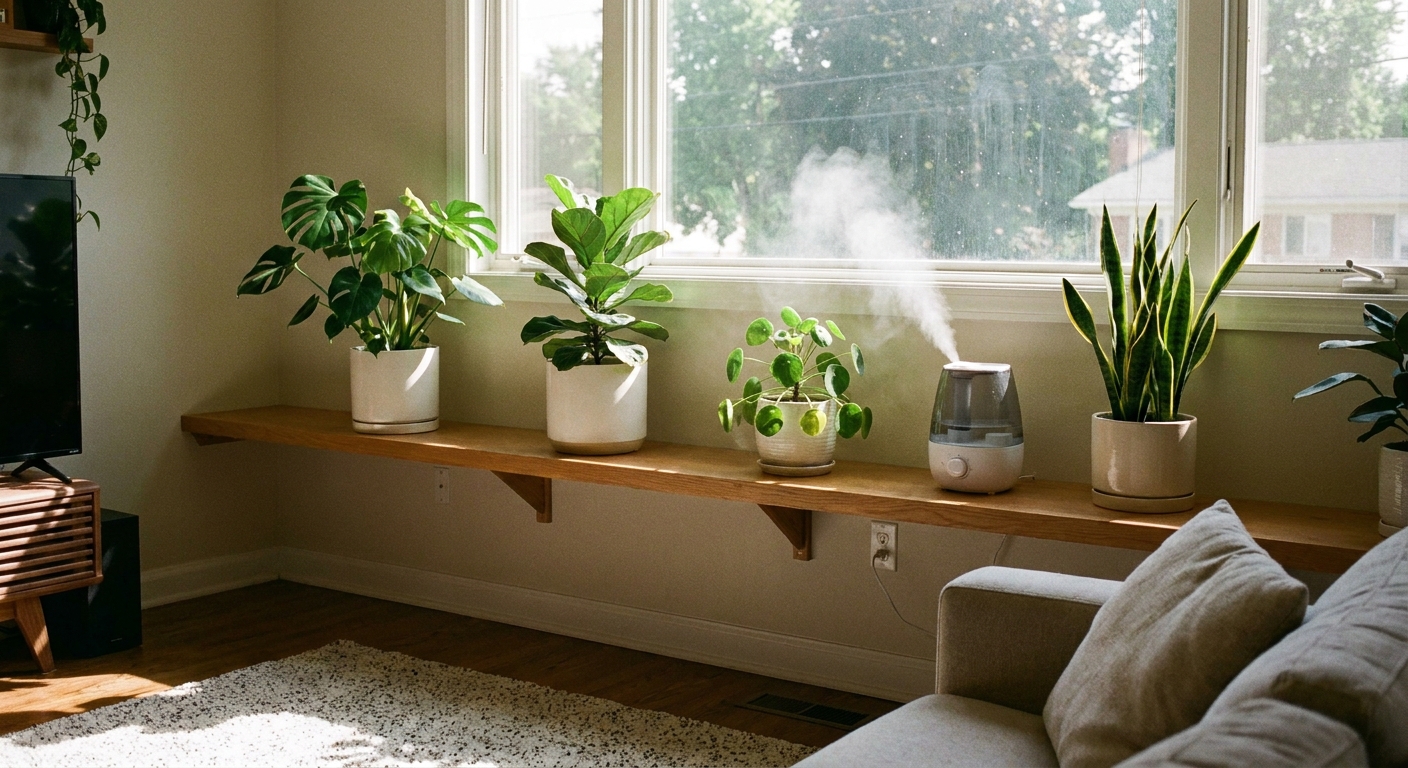
- Pause any heavy, routine misting in the immediate area. It does not solve mites, and consistently damp surfaces can invite other issues in some homes. Focus on a humidifier instead.
- Wipe the shelf, windowsill, or plant stand with warm soapy water.
- If leaves are touching neighboring plants, separate them immediately.
Rinse and wipe
If I could only do one thing for spider mites, I would physically remove as many as possible before spraying anything. Sprays work better when you are not asking them to fight through layers of webbing and dust.
Option A: shower rinse
- Cover the soil with a plastic bag or foil to keep it from washing out.
- Use lukewarm water and a gentle to medium spray.
- Rinse the undersides of leaves first, then the tops, then stems.
- Let the plant drip dry in the tub, then return it to its isolation spot.
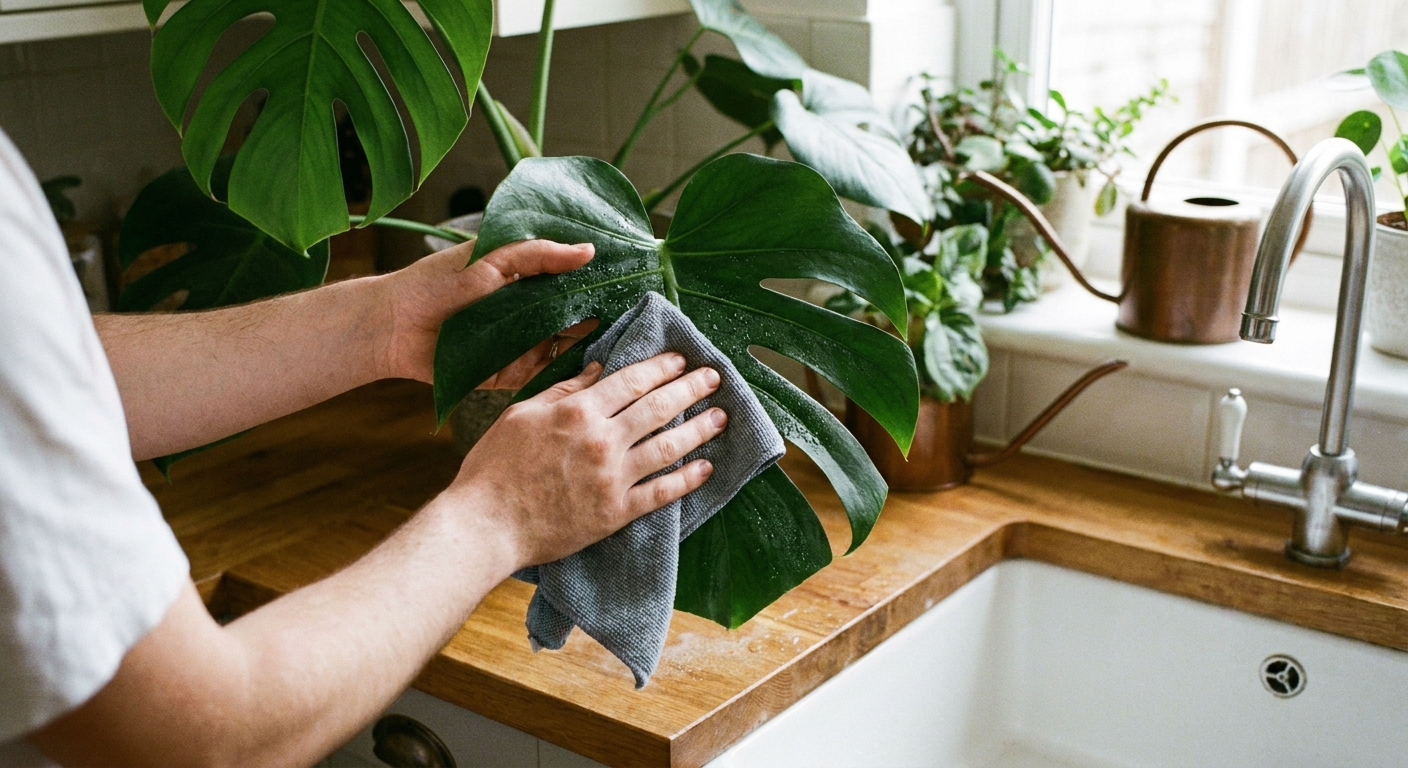
Option B: wipe down
For pothos, philodendron, rubber plants, dracaena, and anything with broader leaves, wiping is incredibly effective.
- Mix a bowl of lukewarm water with a couple drops of mild dish soap.
- Use a soft microfiber cloth or cotton pads.
- Support each leaf with your hand and wipe both sides, especially the underside along the midrib and into leaf joints.
Important: Dish soap is fine for a wipe-down, but it is not the same as insecticidal soap. I do not recommend DIY dish-soap sprays, since they are more likely to burn foliage.
Mistake I have made: blasting delicate plants with a hard shower spray. If your plant has fragile leaves, go gentle or choose wiping instead.
Indoor treatments that work
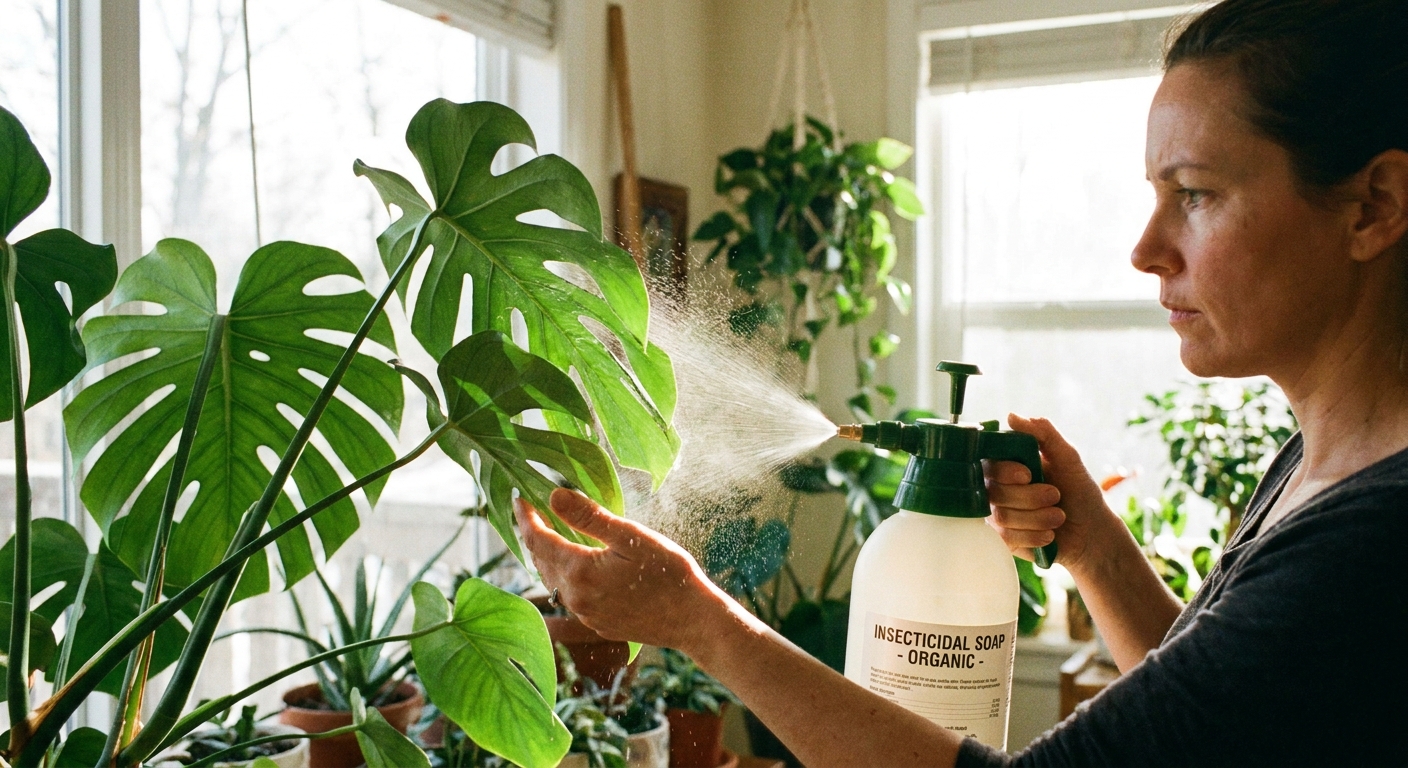
Once you have rinsed or wiped, it is time for a treatment that finishes the job. Spider mites are not insects, which is one reason some general bug sprays disappoint. The most reliable indoor options are insecticidal soap and horticultural oil.
Where to spray
Go in a simple order so you do not miss the hotspots: undersides first, then leaf axils and joints, then stems, and finally the tops of leaves. Coverage matters more than enthusiasm.
Insecticidal soap
Insecticidal soap works by contact. That means coverage matters more than strength.
- Use a ready-to-spray product labeled for houseplants, or a concentrate mixed exactly per label.
- Spray until the plant is evenly wet, focusing on leaf undersides, leaf joints, and stems.
- Keep the plant out of direct sun until dry to reduce leaf spotting.
Horticultural oil (including neem-based oils)
Oils can smother mites and may help reduce egg hatch when coverage is thorough, but they can also cause leaf burn if misused. Indoors, I treat oil like a precision tool, not a fog machine.
- Choose a product specifically labeled horticultural oil or a houseplant-safe neem oil spray.
- Test on a few leaves first and wait 24 hours if you are not sure how your plant will react.
- Apply in the evening or away from bright sun and hot windows.
- Do not apply to drought-stressed plants. Water the day before if needed.
A warning about systemic insecticides
Many houseplant owners reach for systemic granules or drenches (like imidacloprid). For spider mites, that is usually a dead end. Systemics are designed for insects, not mites, and they can sometimes make mite outbreaks worse by disrupting beneficials and plant chemistry. Stick with contact sprays labeled for mites, plus consistent follow-up.
Soap vs oil
- Start with insecticidal soap if you want simple, low-odor, and low risk.
- Use horticultural oil if mites keep coming back and your plant tolerates it well.
- Do not mix products unless the label says you can. Mixing increases the risk of leaf damage.
If you need to escalate
- Miticides: If the label specifically lists spider mites, it can be an effective next step. Use only products labeled for indoor plants, and follow all label intervals and ventilation guidance.
- Predatory mites: For a chemical-free option, beneficial predatory mites can work very well in a contained space (like a cabinet, tent, or greenhouse). They are living organisms with specific temperature and humidity needs, and they do not pair well with recent oil or soap residues.
Safety note: Follow the product label for indoor use, ventilation, and pet safety. Even “natural” sprays can irritate lungs and eyes.
Fix the environment
Spider mites thrive in hot, dry, still air. Many infestations start in winter because heaters dry the air and plants sit close to warm windows or vents.
Humidity fixes
- A small humidifier near plants is more effective than misting and keeps humidity consistent.
- Group plants with a little space between them. They create a slightly more humid microclimate, but you still want airflow.
- Pebble trays are not a cure-all. They can help a little, but they rarely move the needle enough for mites in a dry house.
Gentle airflow
- Run a small fan on low across the room, not directly blasting the plant.
- Keep plants away from heater vents and radiators.
- Give leaves breathing room. Crowded foliage is a mite playground.
Repeat schedule
This is where most DIYers lose the battle. You spray once, the plant looks better, and two weeks later it looks worse. That is the life cycle talking.
A simple routine
- Day 1: Isolate. Rinse or wipe. Spray insecticidal soap or horticultural oil.
- Day 4: Inspect undersides. Rinse if you see webbing. Spray again (or follow the label interval).
- Day 7: Spray again.
- Day 10 to 14: Spray again, then reassess.
In warm, dry rooms, mites can develop quickly, which is why repeating every 3 to 4 days early on is so effective. In cooler conditions, you may be able to stretch the interval. Either way, do not exceed what the product label allows.
When you can stop
When you see no new stippling, no webbing, and you pass the white paper test for at least two weeks. I still like to keep the plant isolated a bit longer if it was a heavy infestation.
Pruning and repotting
Prune the worst leaves
If a few leaves are heavily stippled and webbed, trimming them off reduces the mite population immediately. Bag the clippings and take them out to the trash.
Repotting is optional
Spider mites mainly live on foliage, not in the potting mix. Repotting can stress the plant, which makes it less able to recover. I repot only if the plant also has soil issues like compacted mix, poor drainage, or root problems.
If it’s severe
- Do a harder rinse and a full wipe down, then consider switching from soap to oil (or vice versa) on the next treatment, as long as labels allow and you are not stacking products back-to-back.
- If the plant is inexpensive and the infestation keeps spreading, it is okay to cut your losses. Protecting the rest of your collection matters.
Prevention habits
- Quarantine new plants for 3 to 4 weeks before they join the rest.
- Inspect undersides every time you water. Make it part of the routine.
- Rinse dusty leaves monthly. Dust helps pests hide and stresses plants by blocking light.
- Keep stress low with proper light and consistent watering. Weak plants get hit first.
Look-alikes
Not every speckled leaf is spider mites. Before you start spraying, consider these common imposters:
- Low humidity or underwatering: crispy edges, dull leaves, no webbing.
- Sun scorch: bleached patches on the side facing the window, usually not evenly stippled.
- Thrips: silvery streaks and black specks (frass), and the insects are slightly larger than mites.
If you are seeing fast spread plus webbing and stippling, treat cautiously as spider mites while you confirm what you are dealing with. If you later spot thrips or another pest, adjust the plan accordingly.
The 30-Second Cheat Sheet
Essential takeaways for: Spider Mites on Houseplants
How to identify spider mites
- Fine webbing in leaf joints and under leaves.
- Stippled speckles that look like tiny pale dots or “sandblasting.”
- Use the white paper tap test: tap a leaf over white paper and look for tiny moving dots.
Do this first (fastest results)
- Isolate the plant immediately so mites do not spread.
- Rinse the plant in the shower (undersides first) or wipe leaves with a damp cloth.
Best indoor treatments
- Insecticidal soap: spray thoroughly, especially leaf undersides, leaf joints, and stems. Works by contact, so coverage matters.
- Horticultural oil (including neem-based): effective, but test first and keep out of hot sun to avoid leaf burn. May help reduce egg hatch with good coverage.
- Predatory mites (biological control): a chemical-free option for stubborn infestations, especially in a plant cabinet or grow space.
Repeat schedule to break the cycle
- Day 1: Rinse or wipe, then spray.
- Day 4: Spray again (or follow the product label interval).
- Day 7: Spray again.
- Day 10 to 14: Spray again, then reassess.
In warm, dry rooms, mites develop faster, so a 3 to 4 day rhythm early on helps. Do not over-apply; always follow label directions.
Stop only after 2 weeks with no new webbing or stippling and you pass the paper test.
Fix the conditions mites like
- Raise humidity with a humidifier (better than misting).
- Add gentle airflow and keep plants away from heater vents.
Biggest mistakes
- Spraying once and stopping.
- Missing the undersides, leaf axils, and stems.
- Using systemic granules (like imidacloprid). They do not control spider mites and can make outbreaks worse.
- Spraying oils in bright sun or on a thirsty, stressed plant.
💡 Tip: Scroll up to read the full article for detailed, step-by-step instructions.
⬆️ Back to topAbout Marcus Vance
Content Creator @ Grit & Home
Marcus Vance is a lifelong DIY enthusiast and self-taught home renovator who has spent the last decade transforming a dilapidated 1970s ranch into his family's dream home. He specializes in budget-friendly carpentry, room-by-room renovations, and demystifying power tools for beginners. Through his writing, Marcus shares practical tutorials and hard-learned lessons to help homeowners tackle their own projects with confidence.