First, stop the water fast
If a sprinkler zone keeps running after the controller says it is off, treat it like a small plumbing emergency. Often it is a valve that is stuck open or cannot seal, but controller, wiring, or a stuck station relay can also cause a constant run. Either way, the first job is to stop the water.
Quick shutdown options (most convenient to most disruptive)
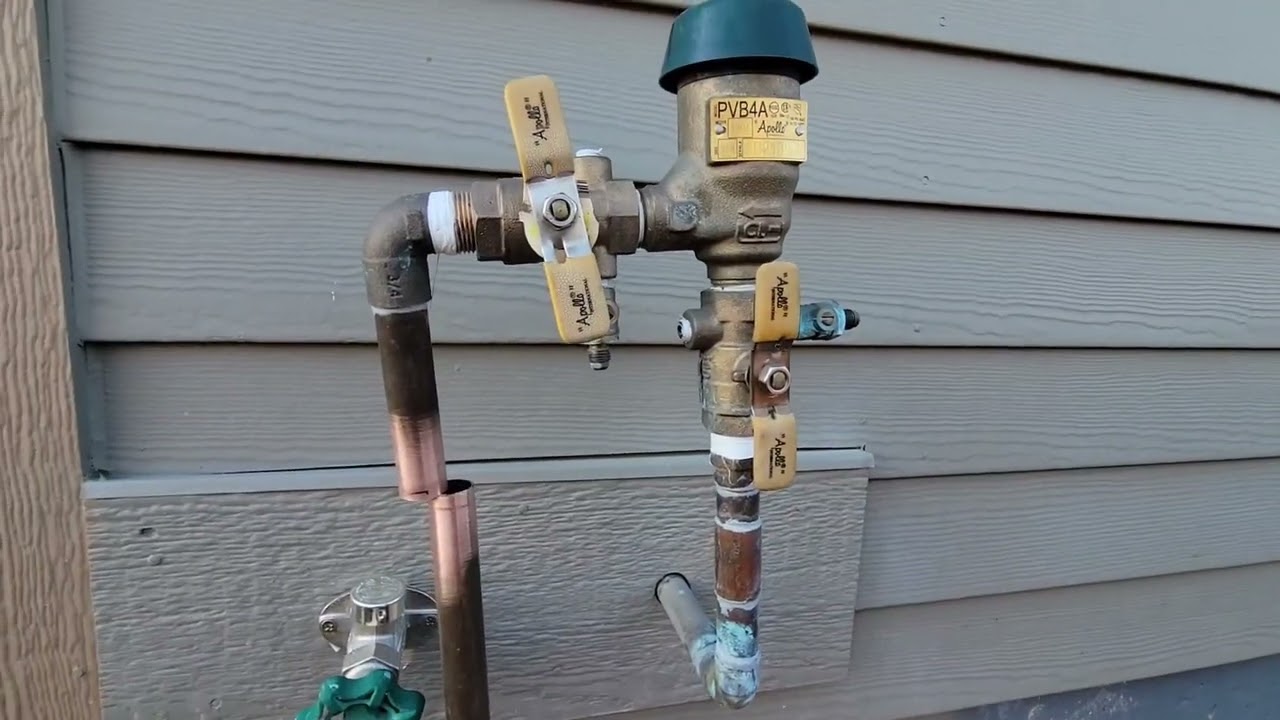
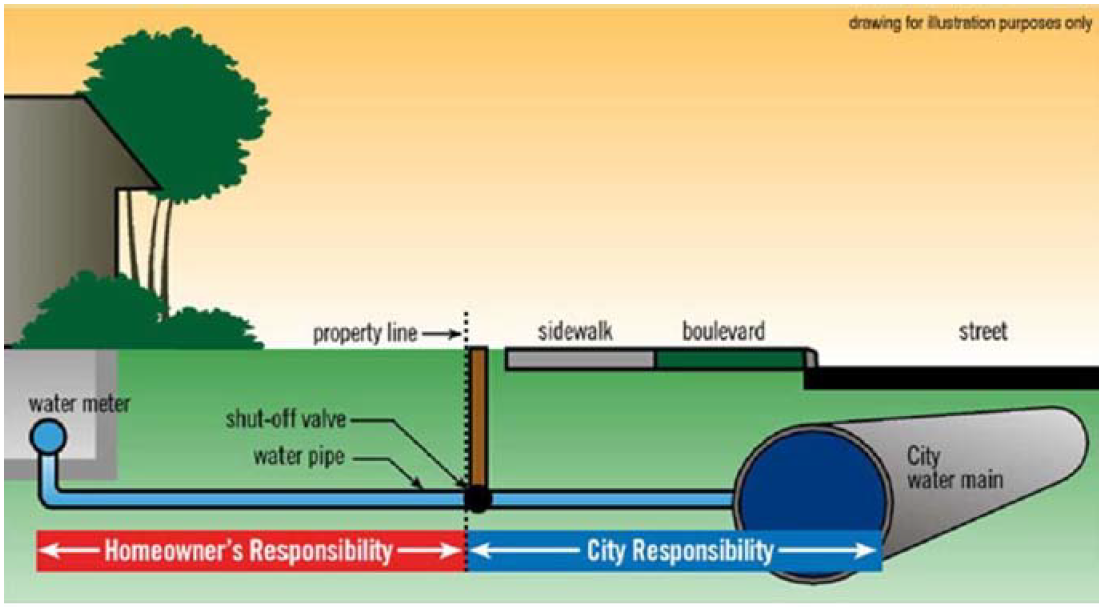
- Use the irrigation shutoff if you have one. Look near the backflow preventer, pressure vacuum breaker, or where the irrigation line tees off from the house supply. It is often a ball valve with a lever handle.
- Close the upstream isolation ball valve feeding the backflow if accessible. Some backflow assemblies also have a downstream isolation valve, and closing both fully isolates the system.
- Turn off the home’s main water if you cannot find an irrigation shutoff or the irrigation isolation valve is seized.
Note on backflow test cocks: those small slotted screws are for testing and draining. They are not intended as shutoff valves and usually will not stop flow. Use them only to relieve pressure or confirm water is present when troubleshooting.
If water is gushing from a valve box
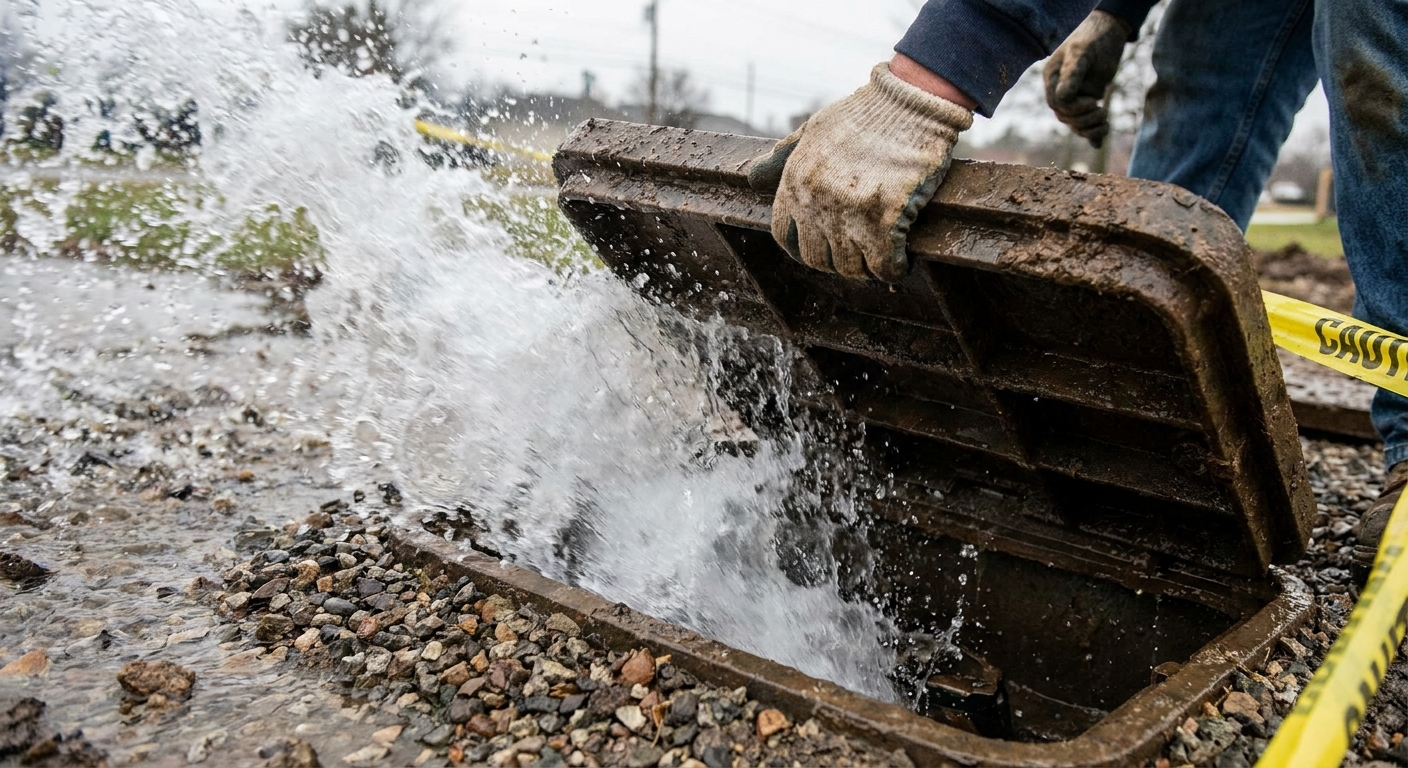
- Flip the controller to OFF first, then shut water off as above.
- Do not try to hold fittings together by hand. Once the pressure is off, you can troubleshoot safely.
- Quick safety note: wet valve boxes and exposed wiring do not mix. If you are handling bare station wires, kill power to the controller first.
Why a sprinkler valve keeps running
Most residential systems use an electric irrigation valve for each zone. Inside the valve is a flexible rubber diaphragm that seals against a seat. Water pressure helps it close. When the solenoid energizes, it relieves pressure above the diaphragm so the valve opens and the zone runs.
When a zone will not shut off, one of these is usually to blame.
1) Debris under the diaphragm (most common)
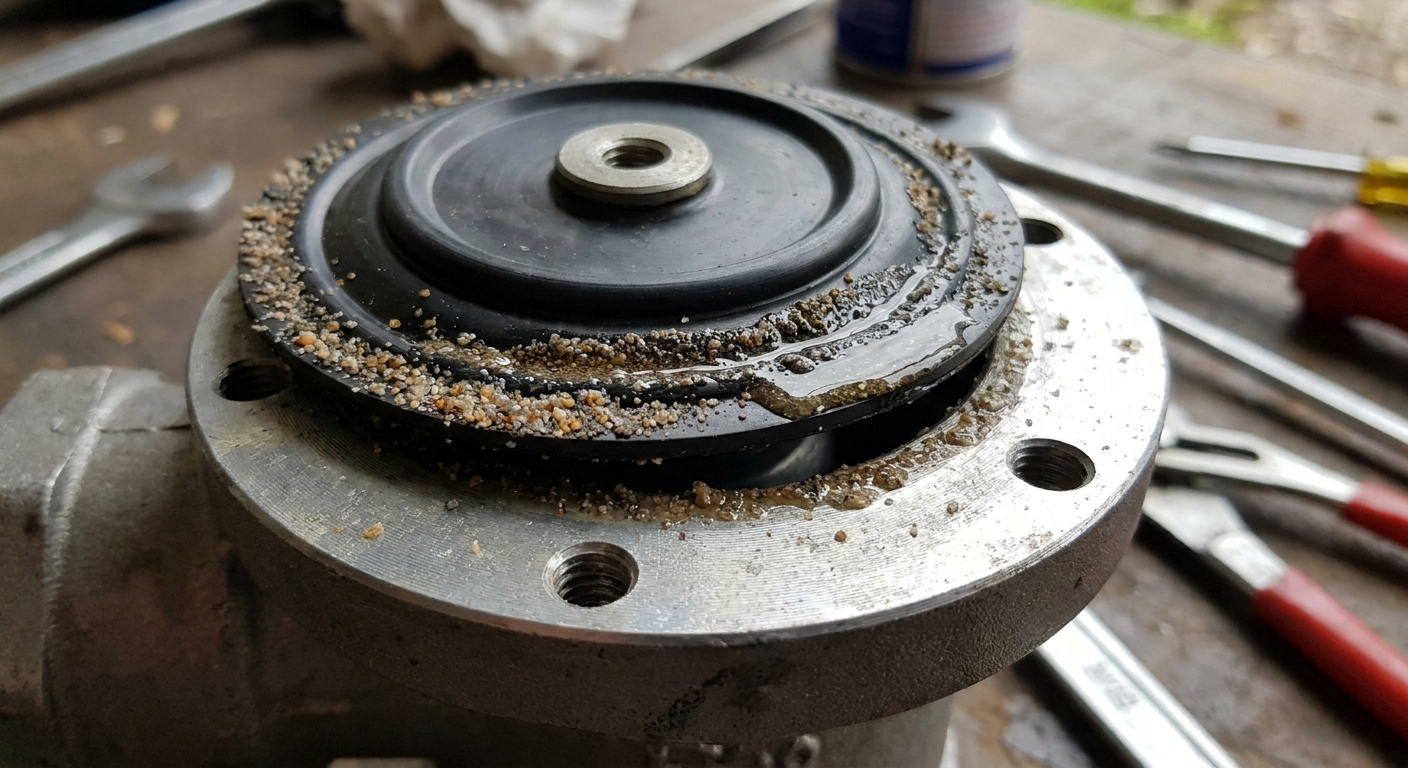
Sand, tiny pebbles, bits of PVC shavings, or mineral scale can get caught where the diaphragm should seal. Even a grain or two can hold the valve slightly open, and that is all it takes to keep heads flowing.
2) Torn or warped diaphragm
Rubber diaphragms age. Heat, chlorine, and hard water do them no favors. A tear, a stiff diaphragm, or a deformed edge can prevent a full seal.
3) Manual bleed or flow control not set right
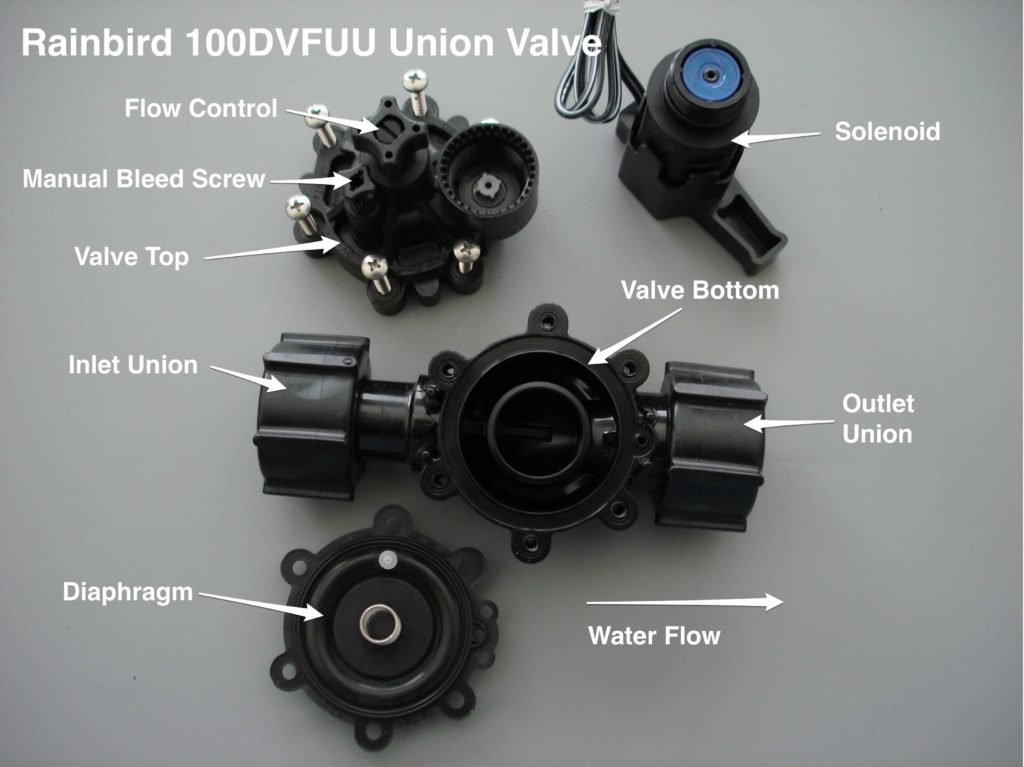
Many valves have a manual bleed screw or lever. If it is cracked open, the valve can stay on. Some valves also have a flow control knob. If it is partially closed or damaged, it can cause odd behavior, including slow closing or a valve that will not fully shut.
4) Solenoid or controller issue (less common, but real)
A solenoid can fail mechanically and not let the valve re-seat. On the electrical side, constant run can be caused by a stuck station relay/triac, a cross-wired connection (zones tied together), or a master valve or pump start relay problem that keeps water moving when it should not.
5) Valve installed backward or plumbing damage (less common)
Most valves have a flow direction arrow. Backward installation can behave strangely. Also, if a valve body is cracked or the bonnet is warped from over-tightening, it may never seal again.
Before you dig in: quick checks
Check the controller first (but do not assume it is guilty)
- Make sure the zone is not stuck in a manual run cycle.
- Confirm start times are not overlapping and stacking runs.
- If the controller is off (or unplugged) and the zone still runs, the problem is almost always mechanical at the valve.
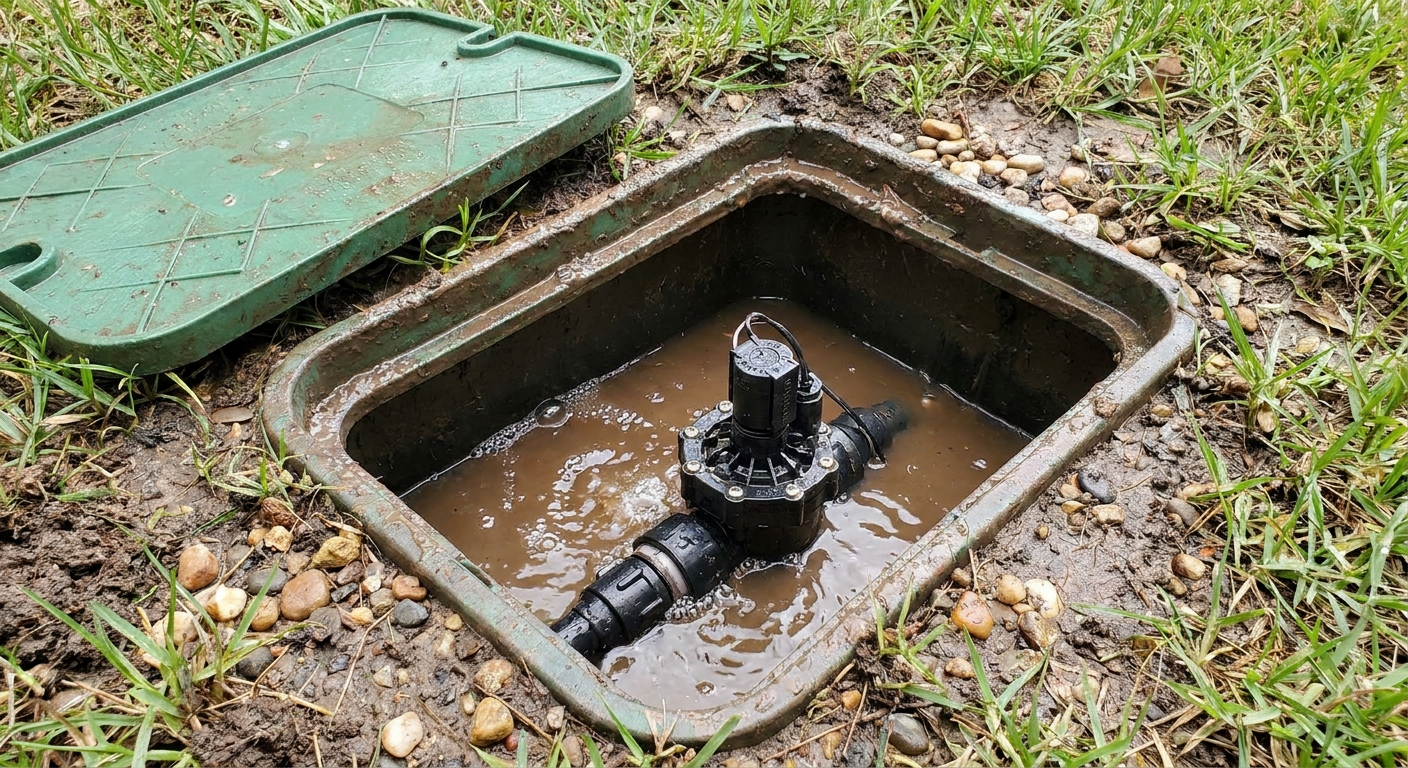
Verify the correct valve is the one running
Open the valve box and listen and feel. The running zone valve will typically vibrate slightly and you may hear water movement. If multiple valves share a box, take a minute to confirm you are working on the right one.
Look for a manual bleed screw or lever
Make sure it is fully closed. I have personally chased a “bad valve” for an hour only to find a bleed screw backed out a quarter turn after some earlier testing.
Check the flow control (if your valve has it)
If there is a flow control knob on top of the valve, make sure it is not cranked down. For many valves, fully open is counterclockwise, but check your model so you do not force it.
If you are on a well or pump system
A pump start relay or master valve issue can mimic a “zone stuck on,” especially if water seems to keep moving even when no single zone should be running. Keep it in mind if your symptoms do not match one valve.
Step-by-step: clean a valve that won’t shut off
This is the fix I try first because it is cheap and often works. Plan on 30 to 60 minutes if the box is accessible and not full of mud.
Tools and supplies
- Phillips or flat screwdriver (varies by valve)
- Adjustable pliers
- Small brush and clean rag
- Bucket or towels
- Silicone grease (optional, for O-rings only)
1) Shut off irrigation water and relieve pressure
- Turn off the irrigation shutoff valve.
- At the valve box, open the manual bleed for a second to release pressure, then close it again.
2) Open the valve bonnet
Most valves have several screws around the top (bonnet). Remove them evenly. If the top is stuck, wiggle gently. Do not pry so hard you crack the plastic.
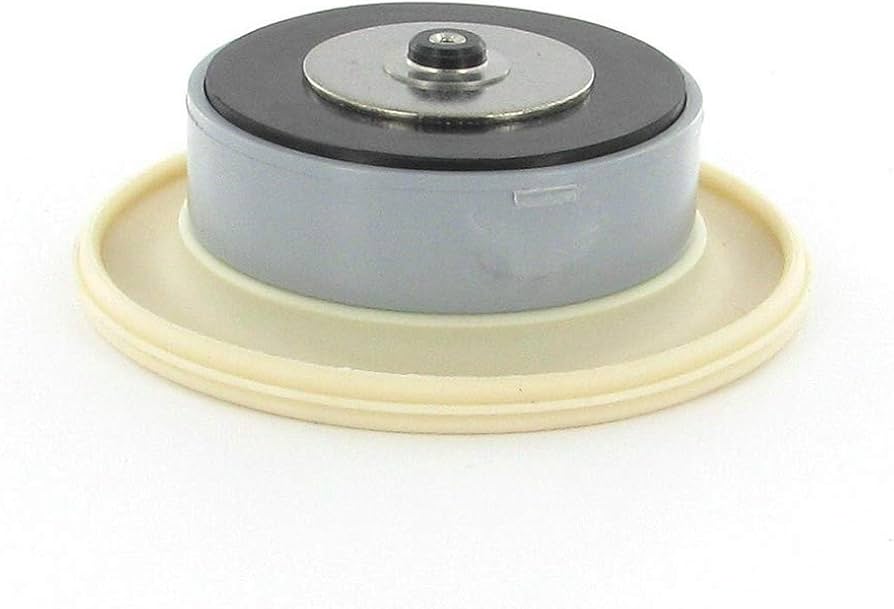
3) Lift out the diaphragm and spring
Take a quick photo with your phone before you pull parts out. Orientation matters on some models, especially if the diaphragm has a tab or indexed shape.
4) Clean the sealing surfaces
- Wipe the valve body seat where the diaphragm seals.
- Rinse the diaphragm. Look for sand, grit, or a small pebble embedded in the rubber.
- Check the tiny bleed port in the diaphragm area for blockage. A soft brush is your friend here.
5) Inspect for damage
- Diaphragm: any tear, cracking, stiff edges, or misshapen areas means replacement.
- Spring: if it is rusted solid or broken, replace it if available for your model (not as common, but it happens).
- Bonnet: check for cracks around screw holes.
6) Reassemble carefully
- Set the spring and diaphragm back exactly as they came out.
- Seat the bonnet squarely.
- Tighten screws in a crisscross pattern, snug but not gorilla-tight. Over-tightening is how plastic bonnets warp.
7) Turn water back on and test
- Turn the irrigation supply back on slowly.
- Run the zone from the controller for a minute, then stop it.
- Watch for 2 to 3 minutes. A valve with debris will often “seem fixed” and then creep back on if something is still stuck.
When cleaning doesn’t work: replace parts or the valve
Option A: Replace just the diaphragm
If the valve body is in good shape and the brand is common, you can often buy a diaphragm kit. Match the brand and model stamped on the valve. A “close enough” diaphragm is a great way to repeat this repair next weekend.
DIY pro tip: the gut swap. If you can buy the exact same complete valve at a hardware store, you can often do a no-cut repair by swapping the new internals into your existing installed valve body. Unscrew the bonnet on the new valve and move over the bonnet, spring, diaphragm, and solenoid to the old valve body in the ground. It is the fastest way I know to guarantee a perfect fit without cutting PVC.
- Pros: cheaper, no pipe cutting, fast.
- Cons: not every valve has readily available parts, and a cracked body still means full replacement.
Option B: Replace the whole valve
If the valve is old, brittle, cracked, or an off-brand with no parts support, replacement is usually the cleanest fix.
How to choose the right replacement
- Match valve size (commonly 1 inch or 3/4 inch).
- Match connection type: threaded (female pipe thread) or slip (glued PVC).
- Match flow direction and install with the arrow pointing toward the zone line.
- Use a compatible solenoid (most residential controllers use 24 VAC valves).
Basic replacement steps (PVC systems)
- Shut water off and drain pressure.
- Dig enough to expose straight pipe on both sides of the valve. Go wider than you think you need so you are not fighting collapsing mud.
- Cut out the old valve with a PVC cutter or saw.
- Dry fit the new valve with couplings. Use repair couplings or telescoping couplings if you have tight spacing.
- Prime and glue (or thread seal) per connection type.
- Let glue cure as directed, then test for leaks and proper shutoff.
Solenoid troubleshooting
If it seems like the valve is being held open, the solenoid and its little plunger are worth a look.
What to check
- Manual bleed: first, close it fully. If closing the manual bleed immediately stops the zone, the bleed was likely left open or is leaking. Fix that before you blame the solenoid.
- Solenoid tightness: finger-tight plus a small nudge is usually enough. Over-tightening can bind or crack plastic threads.
- Debris under the solenoid plunger: on many valves you can remove the solenoid and rinse the cavity. Keep dirt out of the open port.
- Electrical issue: a constant run is more likely from a stuck station relay/triac, cross-wired stations, or a master valve or pump start relay problem than from a simple short. A dead short more often blows a fuse or triggers a controller fault.
If you have a multimeter and feel comfortable, you can measure resistance across the solenoid leads. Many 24 VAC irrigation solenoids are typically around 20 to 40 ohms, but check the manufacturer spec for your model. A dead short or an open circuit usually means replacement.
Common mistakes I see
- Cranking bonnet screws too tight: it can warp the top and create a permanent seep. Snug and even beats tight and stressed.
- Mixing up diaphragm orientation: take that quick phone photo before pulling parts.
- Letting dirt fall into the open valve: keep the valve box clean and set parts on a towel, not in the mud.
- Replacing the controller first: tempting, but the valve is often the culprit when water will not stop.
When to call a pro
I am all for DIY, but there are a few times it is smarter to bring in help.
- You cannot locate an irrigation shutoff and need the system back on quickly.
- The backflow preventer is leaking or appears damaged. Backflow devices can have code requirements and test requirements in many areas.
- You have multiple zones stuck on, muddy washouts, or suspected mainline breaks.
- Your valve manifold is buried, cramped, and requires re-plumbing several valves at once.
- You suspect a controller relay/triac issue, pump relay issue, or anything that requires electrical diagnosis you are not comfortable doing.
Prevent it next time
- Flush after repairs: anytime you cut PVC or work on the system, flush the line before letting valves run normally. PVC shavings love to lodge in valve seats.
- Keep valve boxes clean: remove soil and mulch that can work its way into the valve during service.
- Cycle zones monthly in season: catching a slow-closing valve early is much easier than discovering it at midnight when the yard is a swamp.
- Know your shutoff: take five minutes today and locate the irrigation shutoff valve. Future you will be grateful.
Fast reference: symptoms and likely causes
- Zone runs constantly, even with controller OFF: debris under diaphragm, torn diaphragm, manual bleed open or leaking, solenoid plunger jammed, stuck station relay/triac, cross-wired stations.
- Zone stops eventually but takes minutes: debris on the seat, diaphragm wear, clogged bleed port, flow control not set right, pressure or flow issues (spring is a less common cause).
- Only a few heads keep trickling: valve not fully sealing, or a low-head drain issue on sloped yards. If it keeps trickling for a long time, suspect the valve.
- Water in valve box but heads are off: leaking fittings, cracked valve body, or loose bonnet screws.
- Drip zone keeps wetting even after shutoff: some drain down is normal if there is no check valve, but ongoing flow points back to the zone valve not sealing cleanly.
If you tell me two things, I can help you diagnose
If you are still stuck, track down (1) your valve brand and model, and (2) whether the zone runs even when the controller is unplugged. Those two details narrow the problem fast.
About Marcus Vance
Content Creator @ Grit & Home
Marcus Vance is a lifelong DIY enthusiast and self-taught home renovator who has spent the last decade transforming a dilapidated 1970s ranch into his family's dream home. He specializes in budget-friendly carpentry, room-by-room renovations, and demystifying power tools for beginners. Through his writing, Marcus shares practical tutorials and hard-learned lessons to help homeowners tackle their own projects with confidence.