🚨 In a DIY emergency or rush?
Skip the details and jump straight to our 30-second cheat sheet for the most crucial info.
If your tankless water heater has started throwing error codes , taking forever to get hot, or turning into a “lukewarm at best” machine, there’s a good chance the heat exchanger is scaled up. I learned this the hard way after we moved into our 1970s ranch and I assumed “on demand” meant “maintenance free.” It does not.
The good news: if your unit has isolation or service valves, descaling is a very doable DIY job. You are basically giving the heat exchanger an internal bath to dissolve mineral buildup, then rinsing it clean so your flow and heat transfer come back.
Time and cost reality check: plan on about 1 to 2 hours start to finish and roughly $10 to $30 in descaler if you already have a pump and hoses. If you are buying everything, a flush kit can be the cheapest path because it bundles the parts.
When descaling is due
Some tankless units politely remind you. Others just get worse until you can’t ignore them. Here are the most common signs.
Symptoms you can feel
- Hot water is not hot enough even though your setpoint has not changed.
- Water goes lukewarm mid-shower , then recovers slowly.
- Reduced hot water flow at multiple fixtures, especially noticeable at showers.
- Longer wait time for hot water and more temperature “hunting.”
Clues from the unit
- Error codes related to overheating, abnormal combustion, or flow. Exact code meanings vary by brand, so check your manual.
- The unit may sound like it is working harder (fan and burner ramping up). This can happen with scaling, but it can also point to venting or airflow problems, so do not treat it as a slam dunk diagnosis.
- Maintenance light or a service reminder on the display.
Hard water makes it sooner
If you live in a hard water area, scale can build quickly. It is common to flush once a year in hard water homes, sometimes even every 6 to 9 months if you have very high mineral content and no softener.
My rule of thumb: if you notice flow loss or temperature instability and you have not flushed in a year, flushing is a sensible first move before you assume the unit is failing.
Before you start
Read the manual
Different brands have different do not do this rules. Some specify only certain descalers or maximum flush times. If you have a condensing tankless, your manual may also include maintenance items like the condensate trap or neutralizer.
Tools and supplies
- Submersible utility pump (a small 1/6 HP style pump works for most homeowners).
- Two washing machine hoses or tankless service hoses (usually 3/4 inch).
- Bucket (5 gallon is typical).
- Descaling solution: food grade citric acid powder or plain white vinegar.
- Optional but beginner-friendly: a pre-packaged tankless flush kit that includes the bucket, pump, hoses, and sometimes descaler.
- Adjustable wrench or pliers.
- Flathead screwdriver if your service valves use slotted caps.
- Gloves and eye protection.
- Towels and a shallow pan for drips.
Quick pump and hose note
Most small utility pumps have a garden-hose-thread outlet. If your hoses or service ports need an adapter, grab it before you start. Nothing kills momentum like holding a dripping hose in one hand while you Google thread sizes with the other.
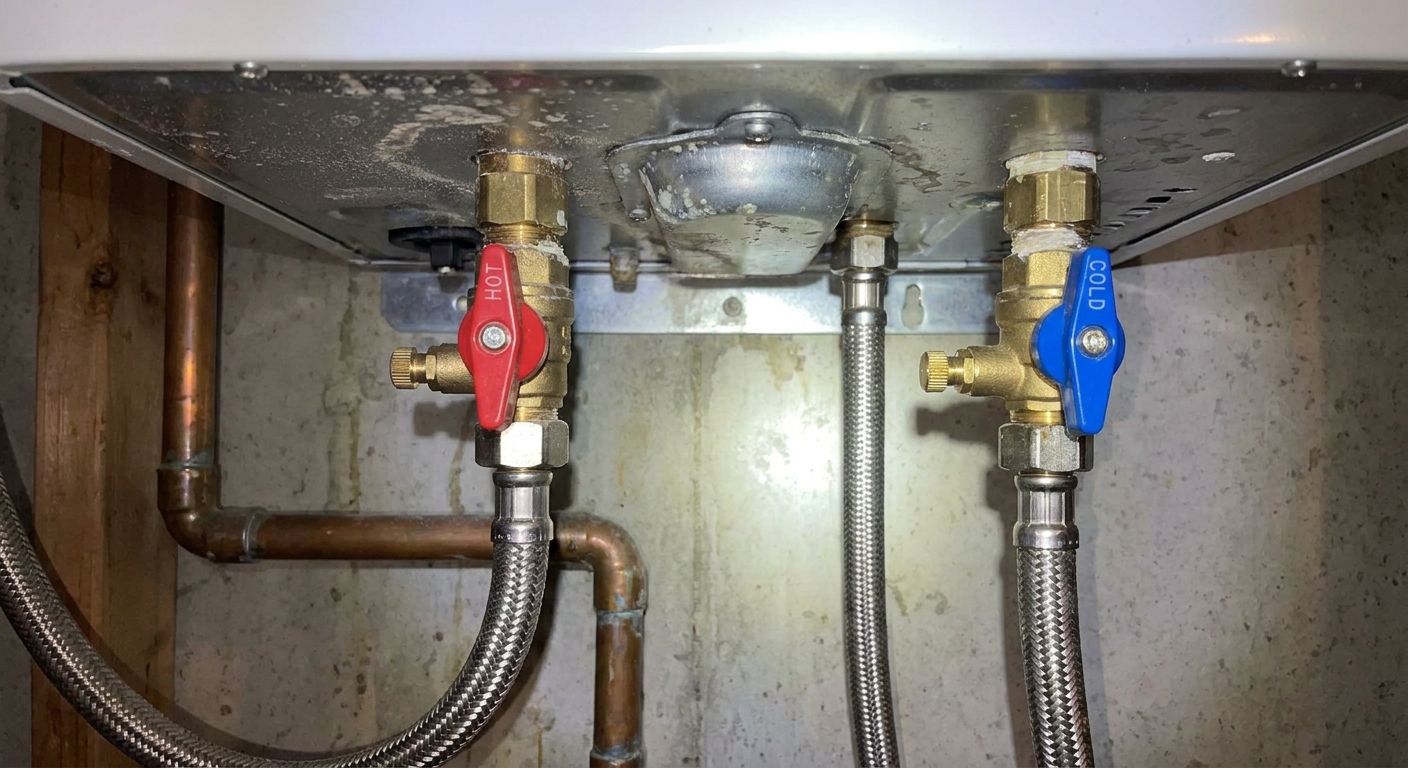
Check for service valves
Look under the unit for a pair of isolation valves on the hot and cold lines with small capped ports. These are the “service valves” that make flushing straightforward.
If you do not have service valves, stop here and call a pro to add them. It is a worthwhile upgrade.
Safety and shutdown
Take your time here. A calm setup prevents most DIY disasters.
1) Turn off power and gas
- Electric unit: switch off the breaker.
- Gas unit: turn the unit off at the control panel, then shut off the gas valve as a simple, foolproof safety step. You want zero chance of burners firing while you have chemicals circulating and hoses connected.
2) Shut off the water to the heater
Close the cold inlet isolation valve and the hot outlet isolation valve. This isolates the heater from the rest of the plumbing so your flush solution circulates through the heat exchanger instead of your house.
If your isolation valves do not fully shut off (it happens), you may need to shut off the cold water supply upstream as well.
3) Relieve pressure and cool down
Open a hot water faucet in the house for a moment, then close it. This helps depressurize the lines.
Heads up: If your unit is still hot, let it cool a bit. You do not want to crack open service ports with scalding water trapped inside.
Pro tip that saves shirts: when you open service port caps later, do it very slowly with a towel wrapped underneath to catch any leftover pressure and drips.
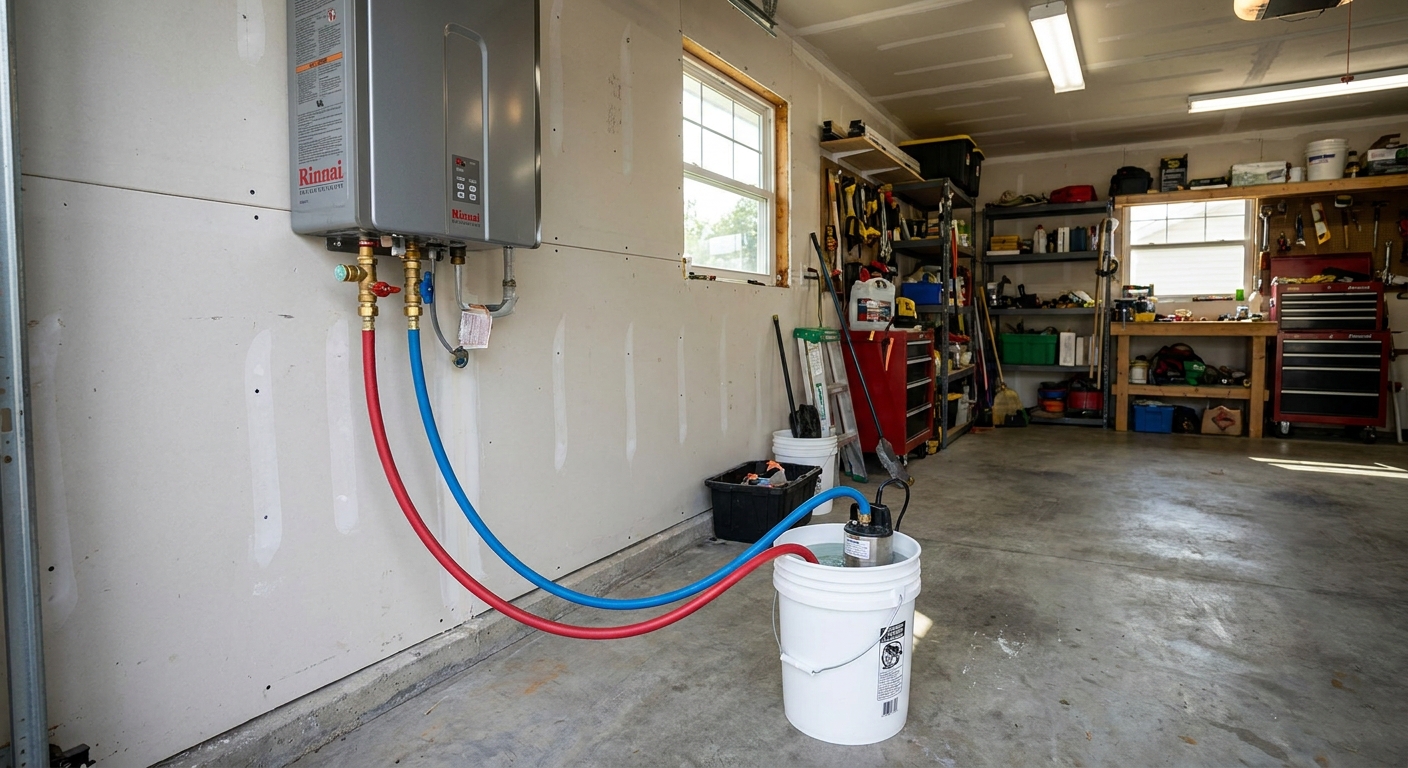
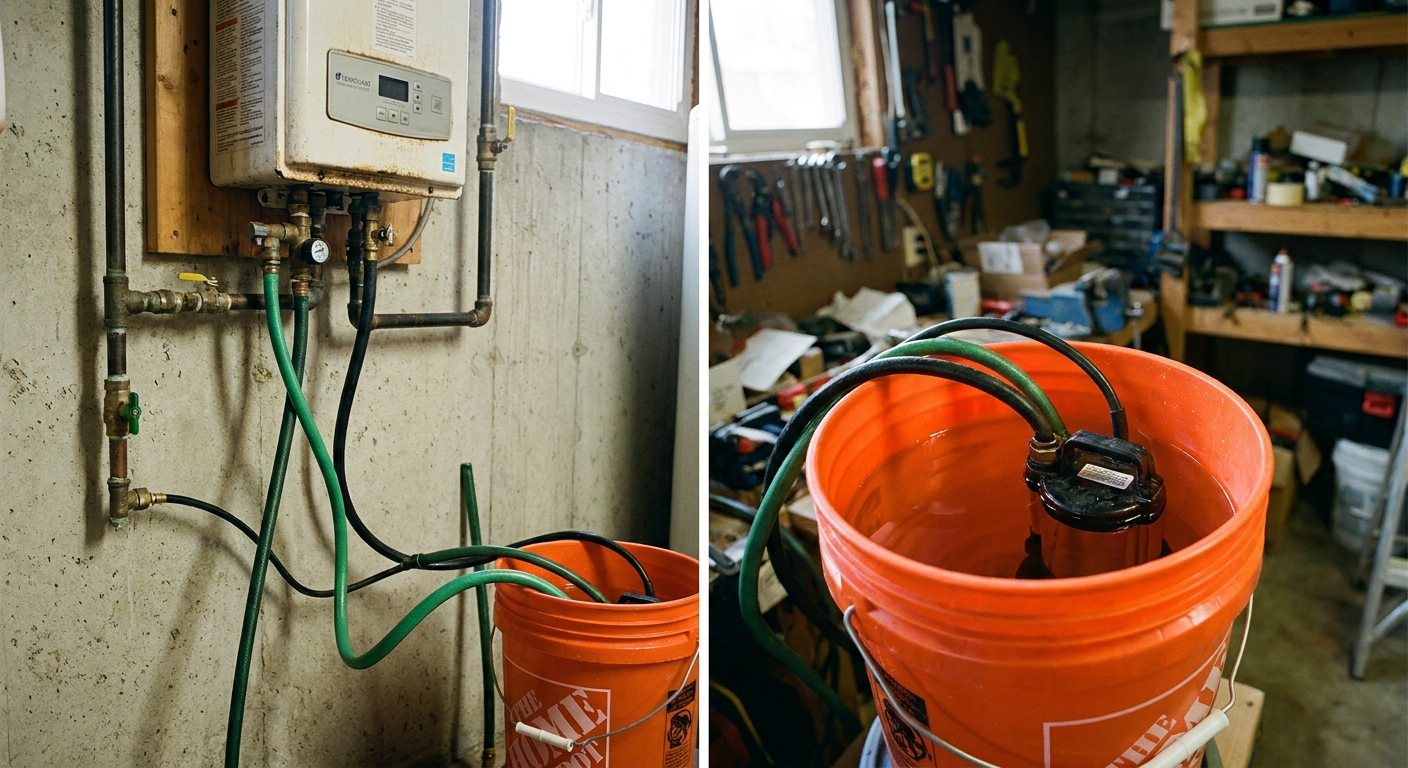
Pump setup
You are going to create a loop: bucket → pump → heater → back to bucket.
Hose connections (typical)
- Connect a hose from the pump outlet to the cold service port so the pump pushes solution into the heater.
- Connect a hose from the hot service port back into the bucket as the return line.
Place the pump in the bucket. Keep the return hose end in the bucket so it does not whip around when the pump starts.
If you have a recirculation system: follow your manufacturer guidance. Some setups can allow solution to migrate into the recirc loop if check valves are missing or stuck. When in doubt, this is a good moment to call a tech.
Citric acid vs. vinegar
Both can work. The best choice depends on how scaled up your unit is, how sensitive your nose is, and what the manufacturer recommends.
Citric acid (my go-to)
- Pros: Effective on mineral scale, typically less odor than vinegar, easy to store as powder, often preferred by manufacturers.
- Cons: Costs more than vinegar, you need to mix it.
Typical mix: follow your manual first. Many homeowners aim for roughly a 3 to 6% solution. As a practical DIY range, that is about 4 to 8 ounces per gallon (roughly 30 to 60 grams per liter) of warm water depending on the product and how hard your water is.
White vinegar (works, but know the tradeoffs)
- Pros: Cheap, available anywhere, no mixing math.
- Cons: Strong smell, can be slower on heavy scale, you may need more time or a second flush.
Tip from my own mistakes: If you use vinegar, do it when you can ventilate the space. The first time I flushed with vinegar in a closed utility room, my whole downstairs smelled like a pickle jar for a day.
What not to use
Avoid harsh acids or random “mystery” cleaners. You do not want to damage the heat exchanger, sensors, or seals. When in doubt, use a manufacturer-approved descaler.
Step-by-step flush
Valve positions during the flush
- Hot and cold isolation valves: closed
- Service port caps: removed (after pressure is relieved)
- Service port valves: open (so the loop can circulate)
1) Open service ports slowly
With the hot and cold isolation valves closed and pressure relieved, wrap a towel under the service ports and crack the caps very slowly. A little residual hot water is normal. Slow is the whole game here.
2) Connect hoses, then open the service port valves
Attach your hoses to the hot and cold service ports. Once hoses are secure and aimed into the bucket, open the service port valves so solution can circulate through the unit.
3) Fill the bucket
Add your descaling solution to the bucket. Warm water helps dissolve powder and can speed cleaning, but do not use boiling water.
4) Start the pump and circulate
Plug in the pump and circulate the solution through the heater.
- Light to moderate scaling: 30 to 45 minutes
- Heavier scaling or hard water homes: 60 minutes is common
Manual wins: if your manufacturer specifies a maximum time (some do, like 45 minutes), follow that and repeat a shorter cycle rather than running extra long.
You will often see tiny bubbles or discoloration as the solution works. That is normal.
5) Keep the loop happy
If flow seems weak in the loop, check for kinked hoses and make sure the pump intake stays submerged. Do not run the pump dry.
6) Shut off the pump and drain safely
Turn off and unplug the pump. Close the service port valves. Let the hoses drain back into the bucket before you disconnect them.
Disposal: many homeowners can pour used vinegar or citric solution down a utility sink with plenty of water, but follow local rules. If you are on a septic system or just want to be extra cautious, consider neutralizing with baking soda (add it slowly until fizzing stops), then flush with lots of water.
Rinse (do not rush)
Descaling is only half the job. You also want the loosened minerals and acidic solution out of the heat exchanger.
1) Flush with fresh water
- Remove the pump from the bucket and dump the used solution.
- Rinse the bucket, then fill it with clean water.
- Put the pump back in and circulate clean water for 5 to 10 minutes.
2) Restore normal flow
- Close the service port valves and remove the hoses.
- Reinstall the service port caps snugly.
- Open the cold inlet isolation valve slowly.
- Open the hot outlet isolation valve.
3) Purge air at a faucet
Open a hot faucet for 30 to 60 seconds to burp air out of the lines. Expect some sputtering.
4) Power and gas back on, then test
Restore power and turn the unit on. If you shut off the gas valve (you did), turn it back on.
Run hot water and check:
- Stable temperature
- Improved flow
- No leaks at service ports or isolation valves
- No error codes
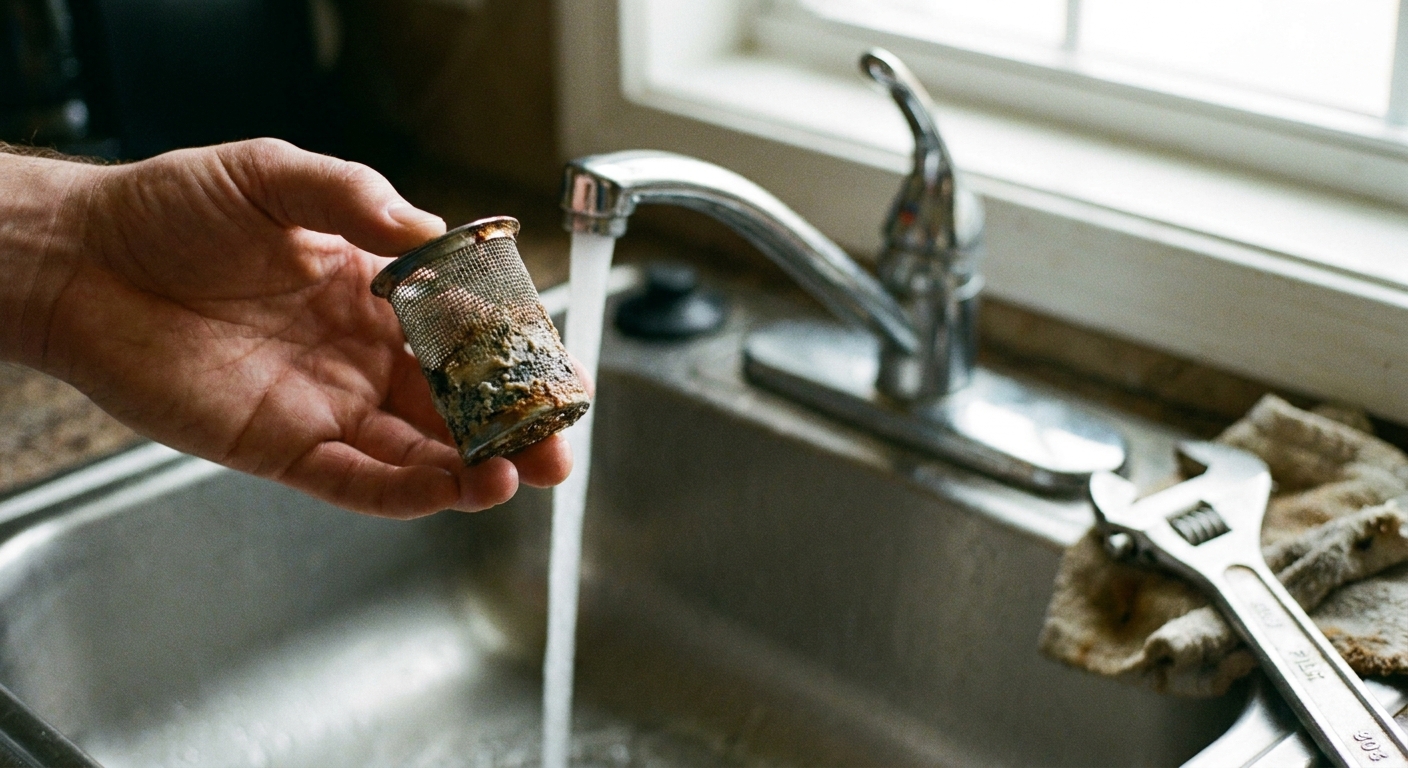
Clean the inlet filter
Most tankless units have a small cold-side inlet screen filter. If it is clogged, it can mimic scale symptoms like low flow and temperature swings.
With water off and pressure relieved, remove the filter, rinse it under running water, and reinstall it. Your manual will show the exact location.
Maintenance timing
The “right” schedule depends mostly on water hardness and usage.
- Soft water or homes with a water softener: every 18 to 24 months is often fine.
- Average water hardness: once per year is a solid default.
- Hard water (or lots of showers, big family): every 6 to 12 months.
If you want to be extra organized, write the date on a piece of painter’s tape on the side of the unit or set a calendar reminder. Future you will appreciate it.
Call a pro
I love DIY, but I love not flooding my house even more. Consider professional service if any of these apply:
- You do not have service valves. A tech can add them, and it is a worthwhile upgrade.
- You smell gas, suspect venting issues, or see soot. That is a safety call. Combustion problems can mean carbon monoxide risk.
- The unit keeps throwing the same error code after a proper flush and rinse.
- You have leaks at internal components, corrosion, or evidence of freezing damage.
- You are not comfortable shutting off gas, power, or water.
One honest note: If your tankless is heavily scaled and has been neglected for years, flushing can expose weak spots that were “sealed” by mineral buildup. That does not mean flushing caused the problem. It means the unit needed attention earlier.
After-flush troubleshooting
Still not hot enough
- Verify the set temperature on the controller.
- Clean the inlet filter.
- Check for a clogged shower cartridge or aerator restricting flow.
- If you have a mixing valve, confirm it is working correctly.
Low flow on hot only
- Filter screen is the first suspect.
- Make sure service port valves are closed and caps are tight, and that the isolation valves are fully open in normal operation.
- Check for kinks or partially closed valves on the hot side.
Error codes persist
Look up the code for your exact brand and model. Some codes point to flame sensing, venting, or ignition issues that descaling will not solve.
My thrifty flush-day checklist
- Have two towels down before you crack open any caps.
- Open service port caps slowly, like you are defusing a very boring bomb.
- Use a clear bucket if you have one so you can see debris.
- Do the rinse cycle. Always.
- Take a photo of your valve positions before you start.
- If something feels confusing, pause and pull the manual up on your phone.
Once you have done it one time, it goes from “intimidating” to “Saturday morning maintenance.” And getting that strong, steady hot water back feels like you just gave your whole house an upgrade.
The 30-Second Cheat Sheet
Essential takeaways for: Tankless Water Heater Descale and Flush
When to descale
- Error codes related to flow or overheating
- Hot water not hot enough or temperature swings
- Reduced hot water flow across multiple fixtures
- It has been 12+ months in average water, or 6 to 12 months in hard water
What you need
- Submersible utility pump
- Two 3/4 inch hoses (washing machine or tankless service hoses)
- 5 gallon bucket
- Citric acid descaler or white vinegar
- Optional: pre-packaged tankless flush kit (bucket, pump, hoses, descaler)
- Gloves, eye protection, towels
Basic steps
- Turn off power. For gas units, shut off the gas valve. Let unit cool.
- Close hot and cold isolation valves. Relieve pressure at a hot faucet.
- Open service port caps slowly with a towel. Connect hoses to hot and cold service ports. Create loop: bucket → pump → cold port → heater → hot port → bucket.
- Circulate descaler 30 to 90 minutes (follow your manual if it differs).
- Dump solution and circulate clean water 5 to 10 minutes to rinse.
- Close service port valves, remove hoses, reinstall caps, open isolation valves, purge air at a faucet.
- Power back on (and gas back on) and check for leaks, stable temperature, no error codes.
Citric acid vs. vinegar
- Citric acid: strong on scale, less odor, often manufacturer-friendly
- Vinegar: cheap and available, but smells and may need longer circulation
Do not skip
- Rinse cycle (removes acid and loosened minerals)
- Cleaning the inlet screen filter while water is off
Call a pro if
- No service valves installed
- Gas smell, soot, venting concerns
- Leaks, corrosion, freeze damage
- Error codes persist after a proper flush and rinse
💡 Tip: Scroll up to read the full article for detailed, step-by-step instructions.
⬆️ Back to topAbout Marcus Vance
Content Creator @ Grit & Home
Marcus Vance is a lifelong DIY enthusiast and self-taught home renovator who has spent the last decade transforming a dilapidated 1970s ranch into his family's dream home. He specializes in budget-friendly carpentry, room-by-room renovations, and demystifying power tools for beginners. Through his writing, Marcus shares practical tutorials and hard-learned lessons to help homeowners tackle their own projects with confidence.