If your thermostat suddenly goes blank, stops responding, or your house never seems to hit the temperature you set, it’s tempting to assume the thermostat is dead. I’ve been there. The truth is, a lot of “bad thermostat” calls end up being something simple like dead batteries, a tripped switch, or one setting that got bumped.
Below are five fixes I recommend trying before you replace anything. They’re ordered from easiest to slightly more hands-on. I’ll also tell you when to stop and call a pro, because there are a couple of thermostat situations where DIY brave isn’t the right move.
Quick note about me: I’m Marcus, a homeowner who’s done a lot of my own troubleshooting (and made a few mistakes along the way). I’ll keep this practical and safe.
Before you start: safety and tools
You don’t need a full tool chest for this. Here’s what helps:
- Fresh batteries (AA or AAA, depending on your thermostat)
- A small flathead and Phillips screwdriver
- A soft paintbrush or clean makeup brush
- A can of compressed air (optional)
- Flashlight
Safety note: If you remove the thermostat from the wall to look at wiring, turn off power to your HVAC at the furnace switch and at the breaker panel first. Thermostat control wiring is usually 24V on most modern North American forced-air systems, but some older boilers and millivolt systems are different. Either way, you can still damage equipment if you short the wrong terminals together.
Fix #1: Replace the batteries
This is the lowest-effort, highest-payoff step. Some thermostats will keep the screen lit while the battery voltage is too low to reliably control heating and cooling. Others go fully blank.
Symptoms this often solves
- Blank thermostat screen
- Thermostat is on but not calling for heat or AC
- Buttons or touch controls lag or don’t respond
- HVAC turns on and off oddly, especially on battery-powered models
What to do
- Pop off the thermostat faceplate (most pull straight off).
- Replace the batteries with brand-new ones. Don’t mix old and new.
- Re-seat the faceplate firmly so it clicks into place.
- Wait 1 to 5 minutes, then test heat or cool again.
Marcus tip: If you’ve got a smart thermostat that’s hardwired with a C-wire, it may not use batteries at all. Still, some models use batteries as backup, so it’s worth checking the manual or battery compartment.
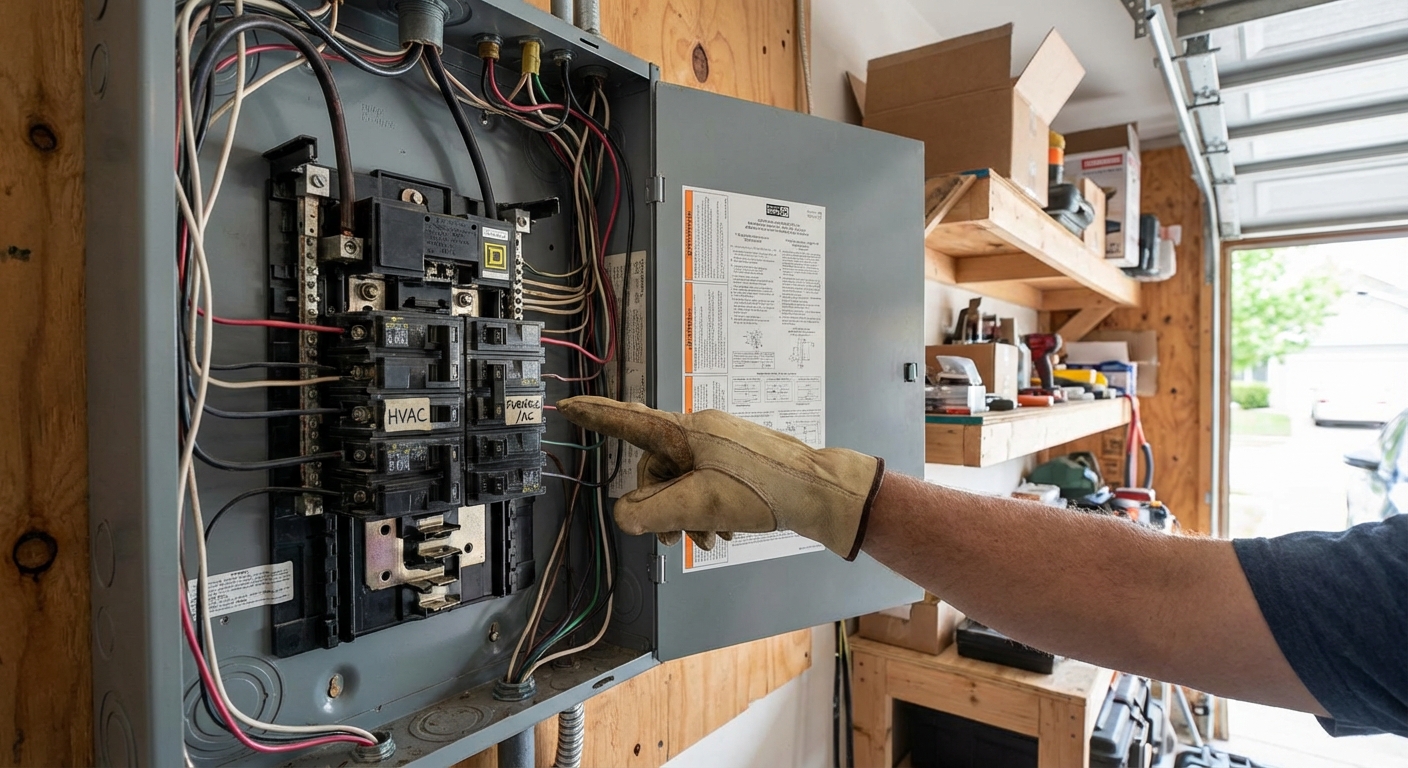
Fix #2: Check switches and breakers
A thermostat can look dead when the real problem is that the HVAC equipment isn’t getting power. Sometimes the system has power but a safety switch is open, like the one behind the furnace access panel.
Symptoms this often solves
- Blank thermostat on a hardwired smart thermostat
- Thermostat works but nothing happens when you call for heat or AC
- System stopped after you changed the furnace filter or bumped the furnace
What to check (in this order)
- Furnace or air handler switch: Many units have a light-switch-style disconnect nearby. Make sure it’s ON.
- Breaker panel: Look for a tripped breaker labeled Furnace, Air Handler, HVAC, or AC. Flip it fully OFF, then back ON.
- Furnace door: If the blower compartment door isn’t seated, a safety interlock switch prevents operation. Reinstall the panel snugly.
- Outdoor AC disconnect (cooling issue only): If cooling is the only issue, confirm the outside disconnect hasn’t been switched off. If you’re not sure what you’re looking at, don’t pull it apart or open covers. Call a pro.
When to pause: If a breaker trips again right away, stop resetting it. That can indicate an electrical fault. Call an HVAC tech or electrician.
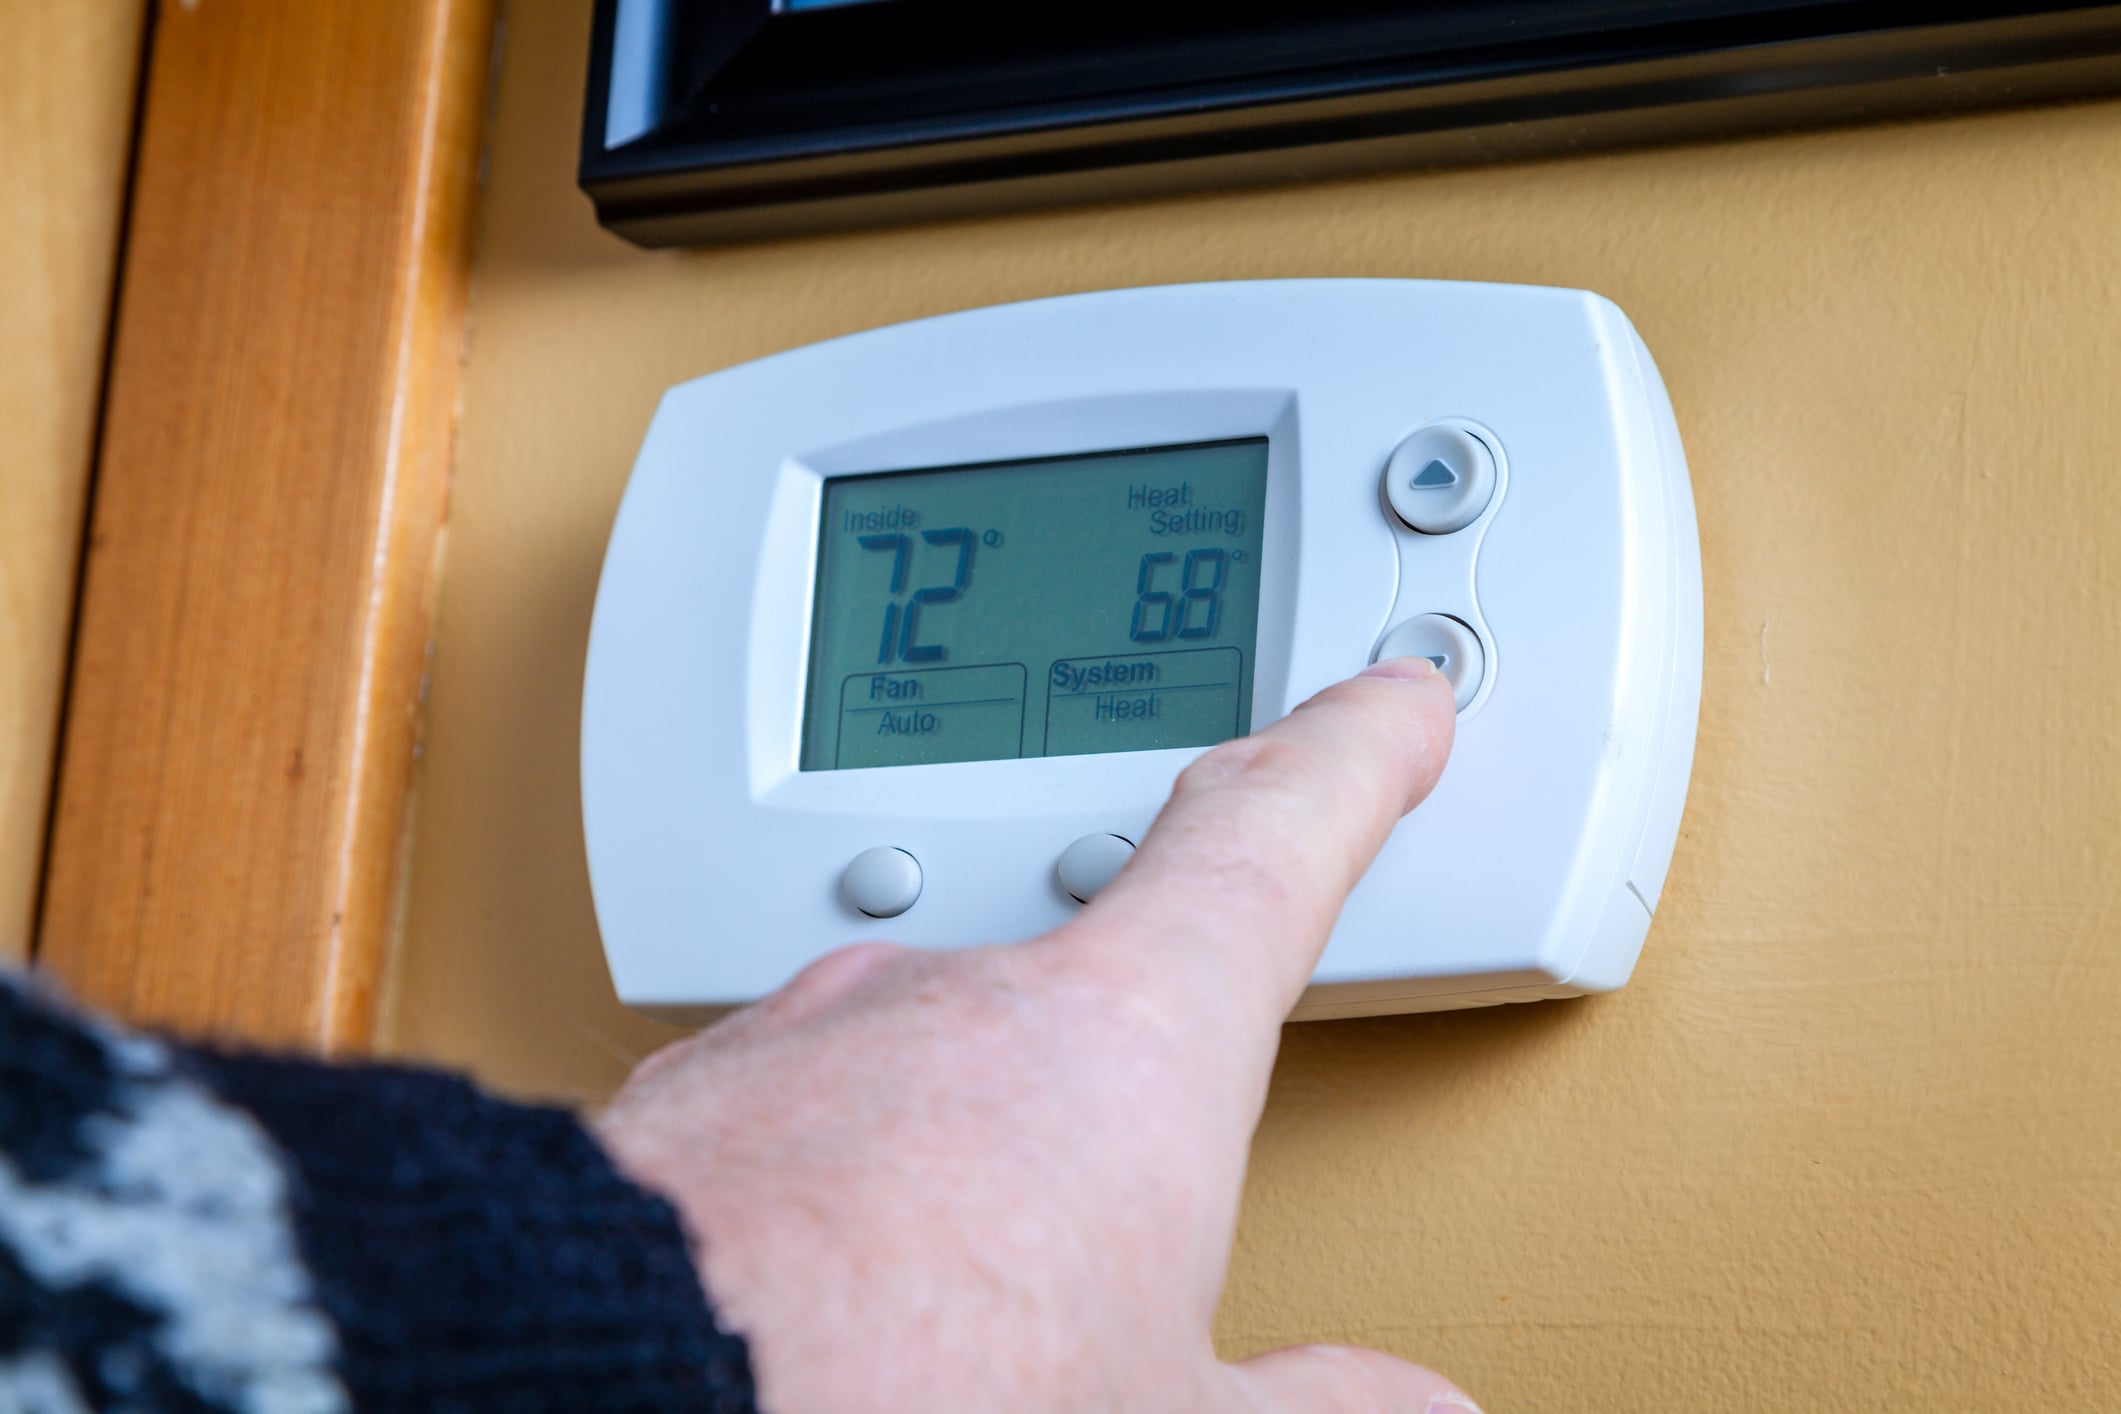
Fix #3: Confirm settings
I’ve “fixed” a thermostat by noticing it was set to the wrong mode. It happens. A house guest bumps something. A power outage resets a schedule. A smart thermostat updates and resumes a program you forgot existed.
Common setting mix-ups
- Mode is wrong: Set to COOL when you want HEAT, or vice versa.
- Fan set to ON: This runs the blower constantly and can feel like the system is acting weird. Try AUTO.
- Schedule or eco mode: The thermostat is obeying a programmed setback temperature.
- Hold not enabled: You set a temperature, but the next scheduled event changes it back.
- Temperature limits: Some thermostats have installer settings that cap heating or cooling setpoints.
Two quick tests
- Heat test: Set to HEAT and raise the setpoint 3 to 5 degrees above room temp. Wait up to 5 minutes.
- Cool test: Set to COOL and lower the setpoint 3 to 5 degrees below room temp. Wait up to 5 minutes.
Note: Many systems have built-in delays to protect the compressor, so nothing happens for a few minutes can be normal, especially on cooling.
Heat pump note: If you have a heat pump, you may see AUX or EM heat. AUX heat can kick on during cold snaps or defrost cycles. EM heat is usually for emergencies and can be expensive to run. If you’re unsure which mode you should be in, check your thermostat’s help screen or manual.
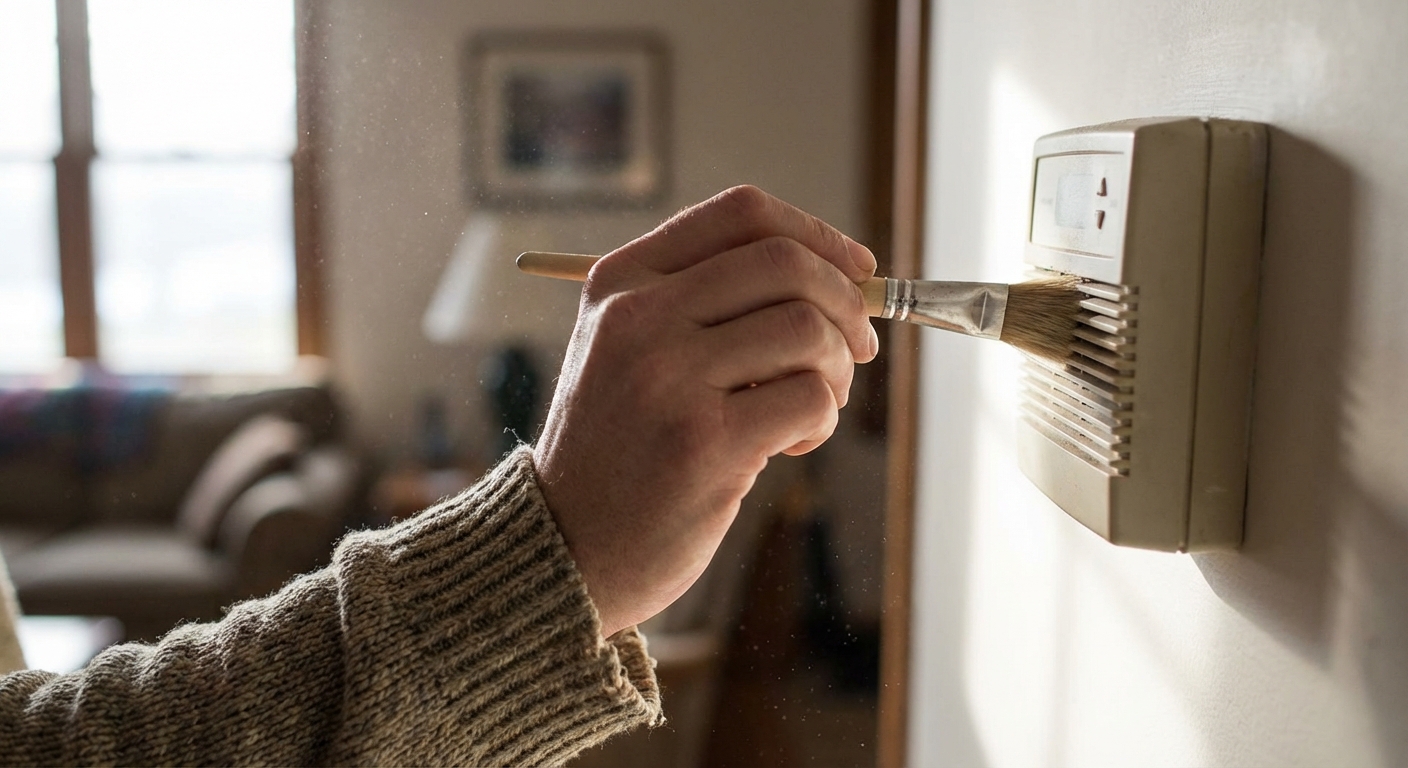
Fix #4: Clean the thermostat
Thermostats measure the air around them. Dust, pet hair, and even a little drywall sanding residue can insulate the sensor or interfere with airflow through the thermostat housing. That can make the temperature reading inaccurate, which leads to comfort problems and short cycling.
Symptoms this often solves
- Room temperature reading seems wrong
- System short cycles (turns on and off too frequently)
- System overshoots or undershoots the set temperature
How to clean it safely
- Turn the thermostat OFF (or turn off HVAC power if you plan to remove it).
- Remove the faceplate if it’s designed to come off.
- Use a soft brush to remove dust from vents and openings.
- If needed, use compressed air in short bursts to clear dust, keeping the can upright.
- Wipe the exterior with a dry or slightly damp microfiber cloth. Don’t spray cleaner directly on the thermostat.
Quick reality check: Cleaning can help if the sensor is insulated by dust or the thermostat is in a bad airflow spot. If your system is truly short cycling because of equipment, airflow, or a safety limit problem, this won’t fix it. I’m mentioning it now so you don’t waste an afternoon chasing the wrong thing.
Also check the thermostat location: If the thermostat is in direct sun, near a lamp, above a supply register, or on a wall that backs up to an unconditioned space, it can read wrong even when it’s clean. Sometimes the real fix is relocating the thermostat, which is doable but usually not a quick afternoon job.
Fix #5: Check wiring and re-seat
If you’ve got a blank screen (on a hardwired unit), intermittent heating or cooling, or totally unresponsive controls, the thermostat may not be making a solid connection. Wires can loosen over time, especially if the thermostat was installed without enough copper under the terminal clamp.
Stop here if you’re not comfortable
If opening the thermostat makes your palms sweat, that’s a good sign to call a pro. The wiring is low-voltage, but a wrong move can blow a fuse on the control board or damage equipment.
What to do
- Turn off power to the furnace or air handler at the breaker and the nearby switch.
- Pull the thermostat straight off the wall plate (or remove the face if it’s a two-piece design).
- Take a clear photo of the wiring so you can put everything back exactly.
- Gently tug each wire to confirm it’s firmly clamped. If one is loose, reinsert it and tighten the terminal.
- Look for corrosion or damaged copper. Trim and re-strip if needed, keeping the exposed copper short (about 1/4 inch in many setups).
- Re-seat the thermostat firmly on the base and restore power.
What the letters usually mean (quick cheat sheet): R (power), C (common), W or W1 (heat), Y or Y1 (cool), G (fan), O or B (heat pump reversing valve). Not every system uses every terminal, and O versus B varies by brand and installer settings.
Marcus mistake I learned from: Don’t let the bare ends of wires touch each other while the system is powered. I once popped the low-voltage fuse on the control board doing exactly that. It’s often a small automotive-style fuse, commonly 3A or 5A, located on the furnace or air handler control board. If you suspect it’s blown, that’s a good moment to call a tech unless you’re confident working safely around the equipment.
If it still isn’t working
At this point you’ve covered the most common thermostat-specific issues. If you’re still stuck, the problem may be elsewhere in the HVAC system, or the thermostat may truly be failing.
Blank screen after batteries and power checks
- Thermostat may be defective
- No 24V power from the equipment (blown fuse on control board, transformer issue)
Not reaching set temperature
- Could be thermostat placement or sensor accuracy
- Could be HVAC capacity, clogged filter, dirty coils, low refrigerant, or duct issues
Short cycling
- Could be dirty sensor or thermostat in a hot spot
- Could be oversize equipment, airflow problems, or a safety limit tripping
Unresponsive touchscreen
- Try a reboot (many models have a reset in settings)
- Check Wi-Fi or app lockout settings on smart thermostats
- If the screen is cracked or glitching, replacement is often the practical fix
When to call a pro
Call an HVAC tech if:
- A breaker keeps tripping
- You smell burning, see charring, or hear buzzing at the thermostat or equipment
- You suspect a control board fuse or transformer issue
- Your system runs briefly then shuts down repeatedly (safety control problems)
Replacing the thermostat is reasonable if:
- The screen is failing or unreadable
- You’ve confirmed good power and solid wiring but it still won’t call for heat or AC
- It’s an older unit with inconsistent temperature control and you want better comfort
If you do replace it, take a picture of the current wiring and match terminals letter-for-letter, not color-for-color. Whoever wired it last may have used a different color scheme.
My no-panic checklist
- Replace batteries (or confirm it’s truly hardwired)
- Confirm furnace switch, breaker, and furnace door interlock
- Verify mode, fan setting, and schedule or hold
- Clean vents and sensor area
- Power off, take a photo, then check for loose wires and re-seat the thermostat
Work through those five steps and you’ll solve a big chunk of thermostat problems without spending a dime beyond batteries. And if you still end up replacing it, you’ll do it with confidence that you’re not masking a bigger HVAC issue.
About Marcus Vance
Content Creator @ Grit & Home
Marcus Vance is a lifelong DIY enthusiast and self-taught home renovator who has spent the last decade transforming a dilapidated 1970s ranch into his family's dream home. He specializes in budget-friendly carpentry, room-by-room renovations, and demystifying power tools for beginners. Through his writing, Marcus shares practical tutorials and hard-learned lessons to help homeowners tackle their own projects with confidence.