
If your toilet tank refills normally but the bowl water level stays low after a flush, you are not imagining it. The toilet is supposed to send a small stream of water from the fill valve into the overflow tube, which tops the bowl back up through internal bowl passages.
When that refill stream is missing, blocked, or the toilet cannot breathe or drain correctly, the tank can look perfect while the bowl looks “hungry.” The good news is most of the fixes are cheap and DIY-friendly.
One quick note: Toilets vary a bit by design, but the basic refill tube and overflow setup is common. If something looks wildly different in your tank, use the same troubleshooting logic: watch what refills the bowl, and watch what might be siphoning it down.
Quick safety and sanity checks
Before we chase parts, do these fast checks. They keep you from solving the wrong problem.
- Confirm the symptom: Flush once. Does the tank refill to the normal line but the bowl ends up low? That is what this guide covers.
- Check the shutoff valve: Make sure the supply valve at the wall is fully open. A partially closed valve can refill the tank slowly and make the bowl refill weak or inconsistent.
- Listen after a flush: You should hear the tank filling, and you should also hear a faint trickle into the overflow tube for the first part of the refill.
- Take the lid off once: Keep fingers clear of moving parts and do not set the lid on a tile floor. I put mine in the tub on a folded towel.
How the bowl refills
A toilet uses two separate water paths after you flush:
- Main tank refill: The fill valve brings water back into the tank.
- Bowl refill: A small hose called the refill tube sends water into the overflow tube. That water goes down through internal bowl refill passages and restores the bowl’s standing water level.
Under normal conditions, the bowl level returns to a fairly consistent height because it is set by the built-in trap weir. So if the bowl is staying low, it usually means one of two things: the bowl is not being refilled properly, or something is siphoning or leaking it down afterward.
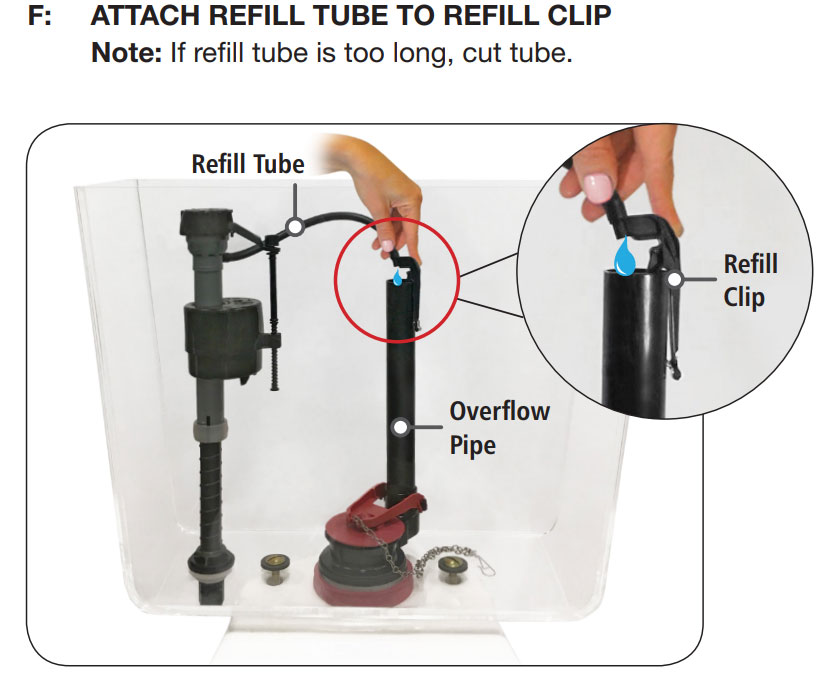
Most common cause: refill tube is off or wrong
What you will see
- The thin refill tube is dangling loose in the tank, spraying randomly.
- The tube is kinked or pinched.
- The tube is pushed too far down into the overflow tube.
Why it matters
If the refill tube is not delivering water into the overflow tube, the bowl will not top off. If it is shoved too deep or submerged, it can create a siphon effect and pull water out of the bowl during refill. Many refill clips are designed to maintain an air gap for this exact reason, and some plumbing codes require it.
Fix
- Clip the refill tube to the overflow tube so it points down into the opening.
- Do not insert it deep into the overflow. The tube should discharge above the overflow opening or just barely into it, depending on the clip design.
- Replace the clip if it is missing. Universal clips are cheap.
Test: Flush. During refill you should see a steady stream from the refill tube into the overflow tube.
Common cause: flapper closes too soon
If the bowl level is low because the flush itself is weak or cut short, the culprit is often the flapper (or canister-style seal) closing too fast.
Common signs
- The flush feels short, like it quits early.
- You have to hold the handle down to get a stronger flush.
- The chain is so tight the flapper cannot lift fully, or so loose it gets hung up.
- The flapper is warped, swollen, slimy, or does not float like it used to.
Fix
- Set the chain slack so there is a little play, but not so much that it can tangle under the flapper.
- Clean the sealing surfaces if you see buildup around the flapper seat or canister seal.
- Replace the flapper or seal if it looks distorted or is not behaving consistently. These are low-cost parts and are often the easiest win.
Fill valve: weak or missing refill stream
Sometimes the tube is positioned correctly, but there is barely any water coming out of it. That usually points to the fill valve itself.
Common signs
- Tank refills slowly, or stops and starts.
- Refill tube has little to no flow even though the tank is filling.
- You have to jiggle the float or tap the valve to get it to behave.
Try this first: clean the fill valve inlet (5 minutes)
- Turn off the water at the shutoff valve (clockwise).
- Flush and hold the handle down to drain most of the tank.
- Place a small cup under the supply line connection at the bottom of the fill valve.
- Disconnect the supply line (hand-tight plus a little with pliers if needed).
- Briefly crack the shutoff valve open into the cup to confirm decent water pressure, then close it again.
- Check the fill valve inlet screen (some have a small filter) and rinse any grit.
If you are on older plumbing or you just had street work in your neighborhood, sediment can be the whole story.
When to replace the fill valve
If cleaning does not restore a strong refill stream, replacement is usually the most cost-effective move. Modern universal fill valves are inexpensive, and the install is straightforward for most DIYers.
- Plan on 30 to 60 minutes if it is your first time.
- Bring a towel and a shallow pan. There is always a little water.
- Set the water level to the manufacturer’s mark, typically about 1 inch below the top of the overflow tube.
Rim jets: weak rinse and swirl
Rim jets are the small holes under the toilet rim that send water into the bowl during a flush and help rinse the sides. If they are clogged with mineral deposits, the toilet can flush poorly and leave streaks or a weak swirl.
This is usually more of a flush performance issue than a true standing bowl water level issue. That said, a weaker flush can change the bowl’s siphon action and make the final result look off, especially if you also have a borderline refill or drain problem.
How to check
- Flush and watch the water coming from under the rim. Are some areas dead or weak?
- Look for crusty buildup around the rim holes.
Simple cleaning approach
- Use a stiff nylon brush and white vinegar for light buildup.
- For heavier mineral scale, a descaling product made for toilets works faster. Follow label directions and ventilate the bathroom.
- A small piece of wire can help clear a jet, but be gentle. You do not want to chip porcelain.
Vent problems: bowl siphons low
Your plumbing system needs air to drain correctly. A blocked vent stack can create suction and pull extra water out of the bowl after the flush, leaving the bowl low even though the tank refill system is fine.
Clues pointing to a vent issue
- Gurgling sounds from the toilet or nearby sinks and tubs.
- Toilet bowl water level drops after flushing.
- Other drains in the bathroom act slow or burp air.
What you can do safely
- Check for an obvious clog in the toilet itself with a quality plunger and, if needed, a closet auger. A partial obstruction can mimic vent trouble.
- Listen while other fixtures drain. If the toilet gurgles when a tub drains, venting jumps higher on the suspect list.
When to call a pro
Clearing a roof vent often involves ladder work and sometimes a drain camera. If you are not comfortable on a roof, this is a good time to tap out and call a plumber.
Downstream restriction: partial clog
A toilet can flush okay-ish yet still leave the bowl low if the waste line is partially restricted. The toilet starts to siphon, then loses momentum, and the bowl does not recover normally.
Signs you might be dealing with a partial clog
- The bowl rises higher than normal during the flush, then slowly goes down too far.
- You need multiple flushes to clear solids.
- Other fixtures are slow, especially on the same floor.
DIY checks
- Use a closet auger to rule out an obstruction in the toilet trapway.
- Try a plunger with a good seal (flange-style for toilets). Ten to fifteen strong plunges beats light splashing around.
If the problem keeps coming back or multiple drains are affected, skip the chemical drain cleaners and call for a professional snake and, if needed, a camera inspection. Chemicals are hard on plumbing and rarely solve a real restriction in a main line.
Overflow tube and tank checks
Two quick things inside the tank can also affect bowl refill behavior:
- Overflow tube damage: If the overflow tube is cracked, tank water can spill into the overflow prematurely during filling, which can throw off refill behavior and waste water. In most cases the real fix is replacing the flush valve and overflow tube assembly (often sold together).
- Wrong water level setting: If the tank water level is set too low, there may not be enough water volume for a proper flush. Adjust the fill valve so the tank fills to the marked line or about 1 inch below the top of the overflow tube.
Rare but real: bowl is losing water
If the bowl level drops when the toilet has not been used, that is a different clue. It can be venting or a drain issue, but it can also be simpler.
- Evaporation: In a rarely used bathroom, the water in the bowl can slowly evaporate.
- Hairline crack: A crack in the bowl or trapway can leak water. A quick DIY check is to add a few drops of food coloring to the bowl water (not the tank), wait 15 to 30 minutes, and look for colored water on the floor. If you see any, stop using the toilet until you solve it.
- Subtle refill cycling: A leaking flapper usually shows up as the tank refilling occasionally, but it can also make bowl behavior feel inconsistent. If you hear the fill valve kick on randomly, do a standard tank dye test too.
Fast troubleshooting order
If you want the shortest path to an answer, here is the order I use in my own house.
- Pop the lid and watch a flush. Confirm the refill tube is streaming into the overflow tube.
- Fix the refill tube position and make sure it is not shoved deep or submerged in the overflow.
- Check tank water level and adjust if it is low.
- Check the flapper or canister timing. If you have to hold the handle down, adjust the chain or replace the seal.
- Test refill stream strength. If weak, clean the fill valve inlet screen and confirm supply pressure.
- Replace the fill valve if the stream is still weak or inconsistent.
- If the bowl still ends low, suspect siphoning or drainage issues: partial clog, venting, or a rare bowl leak.
When to call a plumber
I am all for sweat equity, but a few scenarios are worth professional help:
- Multiple drains gurgle or back up, especially on the lowest level of the home.
- The toilet bowl level drops over time and you have ruled out simple refill tube issues and evaporation.
- You suspect a roof vent blockage and you do not have safe roof access.
- You have repeated clogs or the toilet works briefly after plunging, then goes right back to low bowl level.
- You suspect a cracked bowl or you find any water on the floor around the base.
My confidence check
After any adjustment or part swap, I run this simple test:
- Flush once and watch the refill tube stream for 10 seconds.
- Let the tank finish filling.
- Wait 5 minutes and verify the bowl level stays stable.
If the bowl is stable and the flush is strong, you are back in business.
About Marcus Vance
Content Creator @ Grit & Home
Marcus Vance is a lifelong DIY enthusiast and self-taught home renovator who has spent the last decade transforming a dilapidated 1970s ranch into his family's dream home. He specializes in budget-friendly carpentry, room-by-room renovations, and demystifying power tools for beginners. Through his writing, Marcus shares practical tutorials and hard-learned lessons to help homeowners tackle their own projects with confidence.