Unfinished basements have a special talent for feeling like a completely different planet than the rest of your house. Cold slab. Bare bulbs. That damp smell you cannot quite describe. The good news is you do not need a luxury budget to make a basement feel warm and “finished.” You need a plan, a few key building steps in the right order, and lighting that does not scream “storage room.”
I have made plenty of mistakes learning this the hard way, including framing before I truly solved a minor water issue and then pulling wet insulation back out later. So we are going to do this in the smart order: dry it out, build the shell, then make it cozy.
If you want quick wins while you plan the bigger project, start with a dehumidifier (with a drain hose) and a couple of warm lamps. A basement that is dry and well-lit instantly feels more livable, even before the first stud goes up.
Start with the not-fun stuff: water, air, and smell
Before you buy a single 2x4, do a quick basement reality check. A cozy family room cannot coexist with ongoing moisture.
Basement moisture checklist
- Look for stains and white powder on walls or slab (efflorescence). That is a sign moisture is moving through the masonry.
- Check after a hard rain. The basement can look fine for weeks and then show its true colors during a storm.
- Smell the air. Musty odors often mean humidity, hidden mold, or both.
- Measure humidity. A cheap hygrometer is worth it. For comfort and mold control, aim for around 40% to 50% relative humidity, and try to keep it under 50% (seasonal swings are normal).
Fixes that usually pay off
- Gutters and downspouts first: extend downspouts at least 6 feet away from the foundation (more is often better) and make sure the soil slopes away from the house.
- Seal obvious cracks with appropriate masonry crack repair products.
- Run a dehumidifier and plan for a drain hose to a floor drain or condensate pump so you are not emptying buckets forever.
- Address radon: if your area is known for radon, test now. Mitigation is easier before everything is finished.
If you have standing water or active leaks, stop and solve that problem first. Finishing over water issues is like painting over rot. It looks good right up until it does not.
Code and safety: handle it early
This is the part people love to skip, and it is also the part that keeps you from ripping out brand-new drywall.
- Permits and inspections: call your building department early. Many areas require permits for finishing a basement, and you typically need rough-in inspections (framing, electrical, sometimes insulation) before drywall.
- Egress rules: if there is any chance this space becomes a bedroom now or later, check emergency egress requirements. Even for “just a family room,” local code may still have rules for emergency escape windows, window wells, or door access. Do not guess here.
- Ceiling height and stairs: basements often have minimum ceiling height requirements and handrail rules.
- Smoke and CO alarms: finished spaces often trigger requirements for smoke alarms and carbon monoxide alarms, especially if you have gas appliances anywhere in the home.
Plan the layout like a family room
Once the basement is dry and stable, shift into “how will we actually live down here” mode. A family room needs pathways, seating zones, storage, and outlets where people use them.
Quick layout decisions to make early
- TV wall: choose one wall for the TV and build everything else around sight lines.
- Walkway clearance: allow about 36 inches behind seating if you need a comfortable path.
- Mechanical access: leave clear access to the furnace, water heater, cleanouts, and shutoff valves. You can hide them, but you cannot bury them.
- Storage: plan for a closet, built-ins, or at least one “stuff wall” so toys and games do not take over the seating area.

HVAC and airflow: do not forget comfort
A basement can look finished and still feel like a cave if it is not heated, cooled, and able to move air. Plan this before walls and ceilings go up.
Common ways to condition a finished basement
- Tie into existing HVAC: you may be able to add supply registers and, just as important, a return path so air can actually circulate. Sometimes that means a dedicated return, sometimes transfer grilles or an undercut door, depending on the setup and code.
- Mini-split heat pump: great for basements that are hard to balance with the main system. It gives you heating and cooling without ripping apart ductwork.
- Keep humidity in mind: even with heat and AC, basements often still need a dehumidifier in summer.
If you have atmospherically vented appliances (older water heaters, some furnaces), talk to a pro before you tighten up the basement. Combustion air and venting are not DIY guessing games.
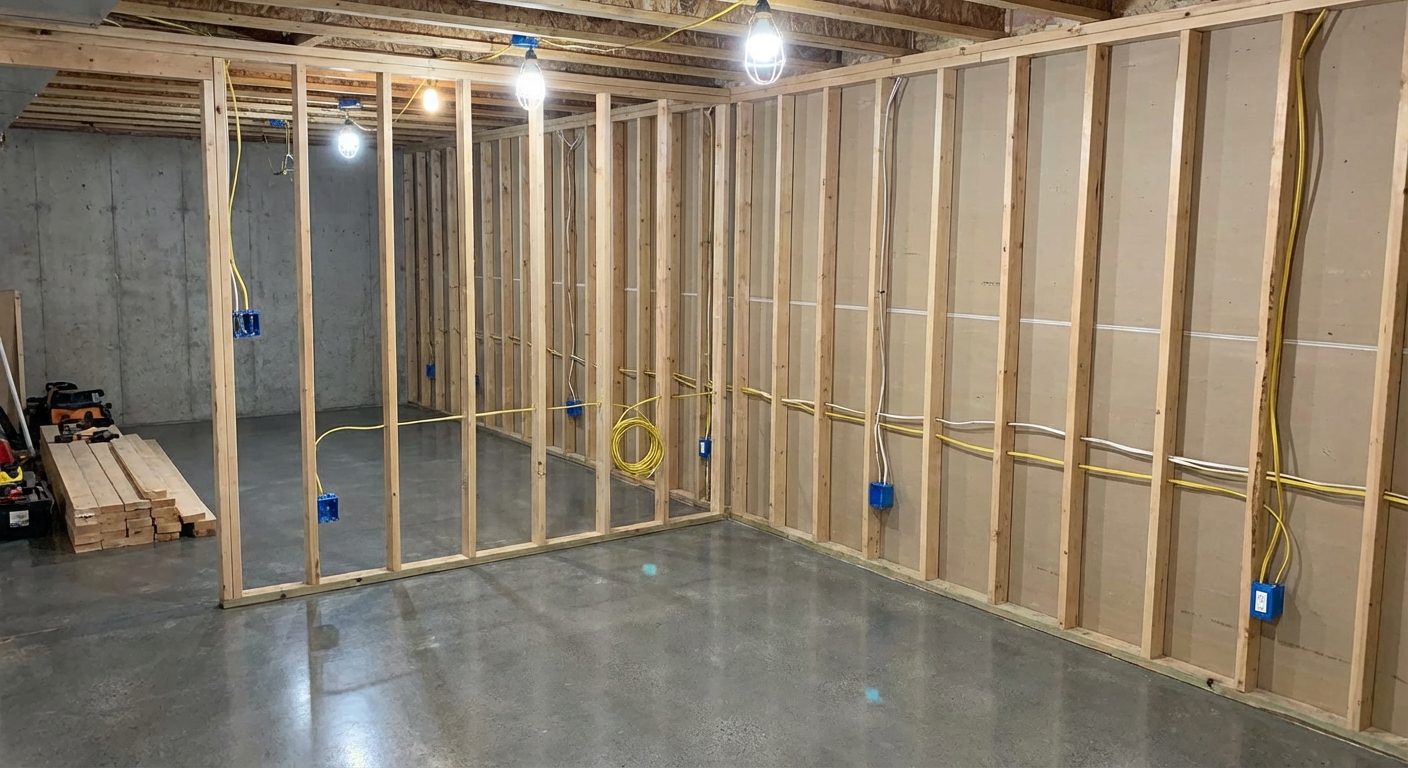
Framing basement walls the right way
Framing is where the basement starts feeling like a room. You are basically building a new interior wall system inside the concrete shell.
Do you frame tight to the concrete?
Usually, no. Basements move moisture and temperature differently than above-grade rooms. Most DIY-friendly approaches leave a small gap between the framing and the foundation wall so wood is not pressed against damp concrete.
Basic framing steps
- Snap layout lines on the slab with a chalk line so walls stay straight.
- Use pressure-treated lumber for bottom plates where wood meets concrete.
- Isolate wood from concrete with a sill gasket or foam gasket under the bottom plate.
- Fasten bottom plates with appropriate concrete fasteners.
- Build walls in sections if your ceiling height is tight. Tip them up into place and shim to plumb and snug.
- Frame around obstacles like steel posts, duct trunks, and cleanouts with access in mind.
Fire blocking matters
Most codes require fire blocking and draft stopping in framed wall cavities and soffits so fire and smoke do not race through hidden gaps. Your inspector will care about this, and you should too. Ask your building department what they expect in your area.
Pro tip from my own “oops” file
Do not assume basement floors are level. Mine was not. I had to shim several wall sections and it is way easier to plan for that than to fight drywall later.

Insulation and vapor control
Basements feel gloomy partly because they are cold. Insulation is what turns “below grade” into “hangout space.” The trick is insulating without creating a moisture sandwich.
Common basement insulation approaches
- Rigid foam against the foundation wall, then a framed wall in front of it. This helps reduce condensation risk and improves comfort.
- Fiberglass or mineral wool in stud cavities after rigid foam is installed, or if your local code allows your chosen assembly.
Basement wall assemblies depend on climate zone and local code, so verify what is required where you live. One important note: in many climates, interior polyethylene sheeting on basement walls can cause problems when combined with foam or other low-perm layers. Also, foam products often require a thermal barrier or ignition barrier (commonly drywall) for fire safety. This is exactly why a quick call to your building department is worth it.
Electrical and low-voltage
Nothing makes a basement feel like an afterthought faster than extension cords. Plan outlets, lighting, and internet before drywall.
Where I like outlets in a family room basement
- Behind the TV plus a recessed box if you want a clean wall-mount look.
- On both sides of the couch for lamps and chargers.
- Near game or craft areas so the hot glue gun does not end up on the floor.
- Plan circuits intentionally: a mini fridge, treadmill, or a real home theater setup may need dedicated circuits or load planning.
Basements commonly require GFCI and AFCI protection in many jurisdictions, and wiring usually needs a permit and inspection. If you are not comfortable with electrical work, this is a great place to hire a pro for the rough-in while you handle framing, insulation, and finishing. You still save serious money and sleep better at night.

Drop ceilings: a basement-friendly ceiling
A drop ceiling is not just “the cheap option.” In a basement, it is often the smartest option because you will eventually need access to plumbing shutoffs, duct dampers, and the mystery pipe your house came with.
Why drop ceilings work so well downstairs
- Easy access for repairs and upgrades
- Hides ductwork and uneven joists
- Improves acoustics with the right tiles
- DIY-friendly compared to drywall ceilings around pipes and bulkheads
One important code-friendly detail: junction boxes must remain accessible. A drop ceiling can help with that. If you choose a drywall ceiling instead, plan proper access panels where needed.
Drop ceiling installation basics
- Find your lowest obstruction (duct, beam, pipe) and set ceiling height from there.
- Install wall angle level around the perimeter.
- Hang main runners with hanger wire anchored to joists above.
- Add cross tees to create the grid.
- Install tiles after most messy work is done.
Choose tiles intentionally. Bright white tiles bounce light and make the room feel taller. If you want cozy, look for tiles with a subtle texture instead of the super shiny “office” look.

Warm lighting that feels like upstairs
If you do one thing for “cozy,” do lighting. Basements usually have one sad bulb in the middle of the ceiling. A family room needs layered light.
The simple lighting recipe I use
- Ambient light: recessed lights or slim LED fixtures in the drop ceiling for general brightness.
- Task light: a floor lamp by the sofa, a table lamp near reading spots, or lighting over a game table.
- Accent light: wall sconces, picture lights, or LED strips behind a TV or on shelving for warmth.
Color temperature: pick warm
For a cozy family room, aim for 2700K to 3000K bulbs and fixtures. That is the “warm white” range that feels like living-room light, not a garage.
Dimmers are basement magic
A dimmer lets you crank the lights for cleaning and drop them for movie night. It is one of the cheapest “luxury upgrades” you can add.

Flooring that fixes the cold slab
Concrete is tough, but it is not cozy. Your flooring choice changes the whole vibe.
Basement-friendly flooring options
- Luxury vinyl plank: durable, water-resistant, and DIY-friendly.
- Carpet tiles: warm underfoot and easy to replace if one gets wrecked.
- Laminate rated for basements: check moisture requirements carefully.
If your slab feels icy, consider a subfloor system designed for basements or a thin foam underlayment approved for your flooring.
One unglamorous but important step: follow the flooring manufacturer’s slab moisture testing requirements if you want your warranty to mean anything. The old plastic-sheet trick can be a quick clue, but it is not the same as the test your flooring brand is asking for.

Finishing touches that make it feel real
This is where the basement stops feeling like a project and starts feeling like a place people choose to spend time.
My go-to cozy upgrades
- Paint in light, warm tones: soft greige, warm off-white, or a muted color that reflects light.
- Big area rug: it visually defines the seating zone and cuts echo.
- Soft materials: curtains, fabric ottomans, pillows, and blankets add warmth fast.
- Closed storage: a media console, cabinets, or built-ins to hide clutter.
- Sound control: acoustic-friendly ceiling tiles and rugs help a lot in open basements.
If you are on a budget, spend money where you feel it: lighting, a good rug pad, and comfortable seating. You can thrift end tables and slowly upgrade decor as the space proves itself.
A simple build order
If you are the organized type, here is the sequence that keeps you from doing work twice.
- Fix water issues, manage humidity, test for radon if needed
- Confirm code requirements, permits, egress rules, and inspection steps
- Plan layout and storage, map HVAC plan and airflow
- Frame walls and soffits, add fire blocking, block for TV mounts and handrails
- Rough-in electrical and low-voltage (and schedule rough-in inspections)
- Insulate and handle vapor control correctly for your area
- Install drop ceiling grid (tiles later)
- Hang drywall, tape, mud, prime, paint
- Flooring
- Install ceiling tiles and final lighting
- Trim, doors, and finishing details
- Furnish and enjoy the first movie night
My final neighbor advice
A basement family room is not about hiding every pipe and making it look like a magazine. It is about warmth, light, and comfort. Solve moisture first, make sure the plan is legal and safe, frame with intention, keep junction boxes accessible, and layer warm lighting like you would upstairs. Do that, and the basement stops being the place you avoid and becomes the place everyone migrates to.
If you want, tell me what you are working with: ceiling height, any water history, whether there is an egress window, and whether you want a TV wall, a play area, or both. I can help you map a layout and a materials list that fits a real-world budget.
About Marcus Vance
Content Creator @ Grit & Home
Marcus Vance is a lifelong DIY enthusiast and self-taught home renovator who has spent the last decade transforming a dilapidated 1970s ranch into his family's dream home. He specializes in budget-friendly carpentry, room-by-room renovations, and demystifying power tools for beginners. Through his writing, Marcus shares practical tutorials and hard-learned lessons to help homeowners tackle their own projects with confidence.