Most shower clogs are not mysterious plumbing disasters. They are just a gross little braid of hair, soap scum, and skin oils camping out right under the drain cover. The good news is you can usually fix it in under an hour with basic tools and a little patience.
I have unclogged more shower drains than I care to admit while renovating our 1970s ranch. The pattern is almost always the same: start with the simplest, least destructive method, then work your way up until the water drains like it should.
Before you start
Quick safety and setup
- Skip chemical drain openers. They can damage some plumbing, wreck finishes, and make the drain dangerous to work on if you end up needing to snake it. They can also be a bad idea with septic systems, and if the trap is fully blocked the chemical can just sit there.
- If someone already poured chemicals, do not plunge or snake yet. Flush with lots of water (as much as the drain will allow) and wear eye protection. If the drain will not take water at all, it is safest to call a pro rather than wrestle a drain full of caustic soup.
- Wear gloves and protect your eyes. You will be pulling and flushing gunk, and it can splash.
- Know what drain you have. Most showers have a strainer-style cover held by one or two screws. Many newer drains are snap-in covers that need gentle prying to pop off. Some tubs have a stopper mechanism. If you are working on a tub/shower combo, check the stopper and overflow area first because hair loves to snag there too.
- Test the clog. Run the water for 10 seconds. If it pools immediately, the clog is likely close to the surface. If it drains slowly, the clog may be farther down the line.
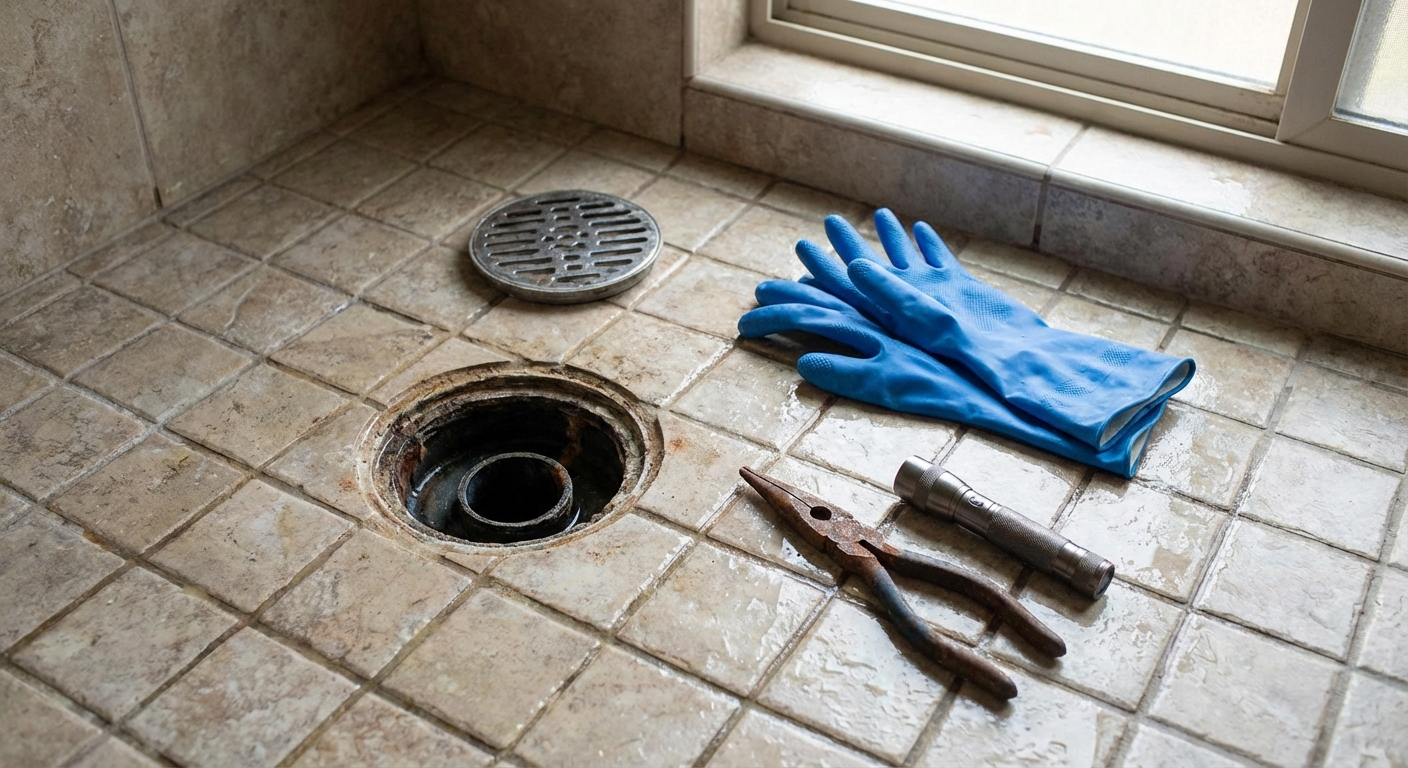
What to grab (you probably already own most of this)
- Screwdriver (usually Phillips)
- Flathead screwdriver (for snap-in covers, used gently)
- Flashlight
- Old rag or paper towels
- Needle-nose pliers or hemostats (optional but handy)
- Plastic zip tie or hair-removal tool
- Plunger (flat-bottom cup plunger, not a toilet flange plunger)
- Drain snake (hand auger) or small drum auger
- Baking soda and white vinegar (best for light maintenance)
- Biological or enzymatic drain cleaner (optional, pipe-safe maintenance)
- Kettle or pot for hot water (or just hot tap water)
- Wet/dry vacuum (optional)
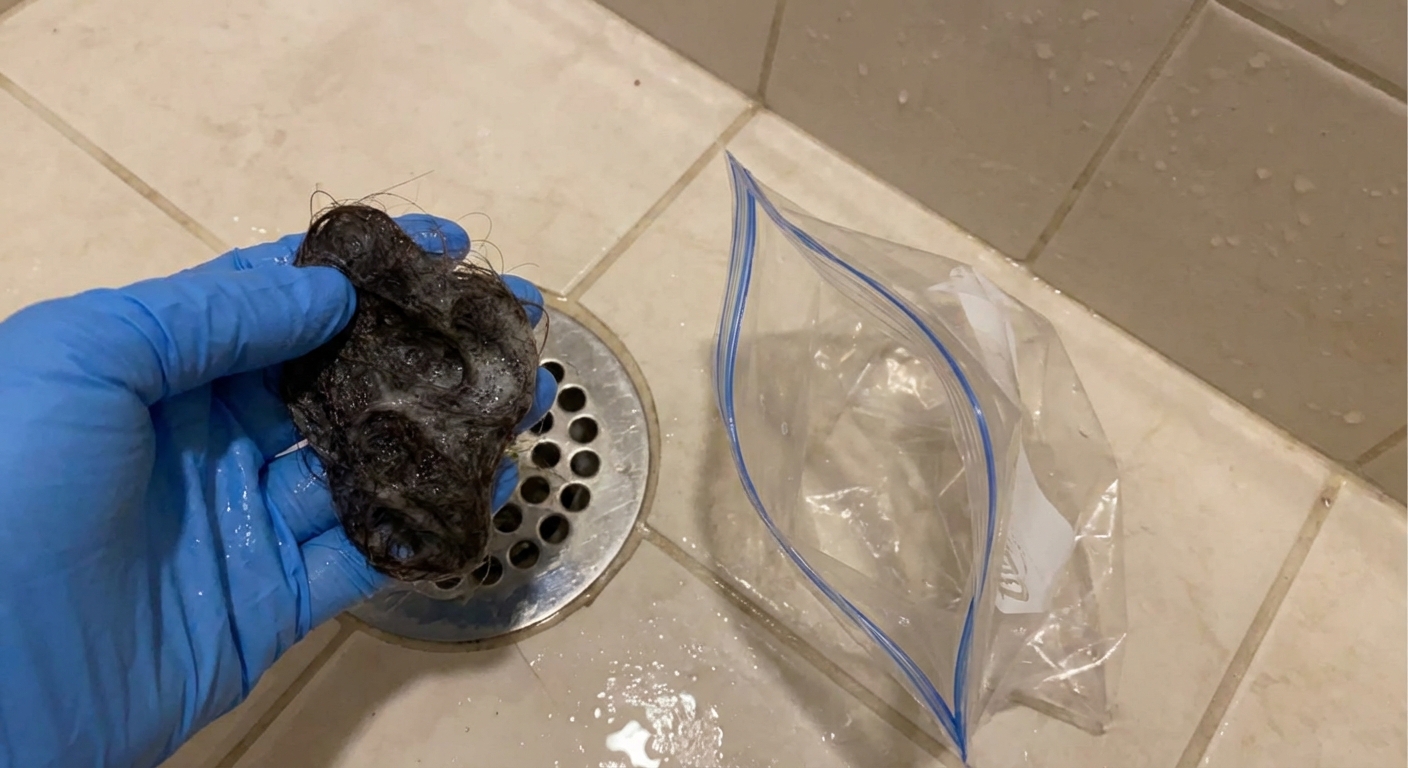
Method 1: Pull the hair clog by hand
Best for: Standing water that appeared suddenly, especially in a household with long hair.
Estimated time: 10 to 20 minutes
Estimated cost: $0 to $10
Steps
- Remove the drain cover. If it has screws, back them out and set them somewhere safe. If it is a snap-in cover, slide a flathead screwdriver under the edge and gently pry up a little at a time around the circle. Wiggle, do not gouge. Avoid prying against a fiberglass or acrylic pan with a lot of force.
- Use a flashlight and look right below the opening. Most hair clogs are sitting in the first few inches.
- Pull gunk out in small bites. Use gloved fingers, needle-nose pliers, or a bent plastic zip tie. Twist as you pull. Hair tends to come out like a rope.
- Wipe the drain rim clean. Soap scum around the opening helps hair catch again.
- Test with water. Run the shower for 15 to 30 seconds. If it drains well, reinstall the cover.
Marcus note: The first time I did this, I pulled out what looked like a wet mouse and then immediately dropped it on the bath mat. Do yourself a favor and keep a grocery bag open next to you as the "collection bin."
Method 2: Use a zip tie or hair removal tool
Best for: Clogs just past your fingers, especially in shallow shower drains.
Estimated time: 10 to 25 minutes
Estimated cost: $1 to $10
Steps
- Make a DIY tool if needed. Take a long plastic zip tie and cut small angled notches along both sides so it can snag hair.
- Feed it into the drain slowly. Keep the tool pressed to the wall of the pipe. You are fishing the sides, not stabbing down the middle.
- Twist and pull. You will feel it catch. Pull it out, wipe it off, repeat.
- Finish with a hot water rinse. Hot tap water usually does the job, and it helps carry away loosened soap scum.
Tip: If you hit a hard stop immediately, you may be running into the crossbars of the drain body. Angle the tool and work around them.
Method 3: Tub stopper and overflow cleanup
Best for: Tub/shower combos where the tub drains slowly and the shower backs up, even if the floor drain looks clean.
Estimated time: 10 to 25 minutes
Estimated cost: $0 to $10
Steps
- Pull the stopper and clean it. Common types:
- Knob style: hold the stopper body and unscrew the knob counter-clockwise, then remove the screw underneath.
- Lift-and-turn: lift it, loosen the little set screw on the side, then pull the stopper off.
- Push-pull: usually unscrews counter-clockwise. If it fights you, look for a tiny set screw.
- Clean hair from the overflow opening. This is the sneaky spot. Run a hair tool or zip tie down through the overflow and pull out the gunk.
- Rinse and reassemble. Run water and make sure everything moves freely.
Tip: If you are going to plunge a tub later, you will want to seal the overflow anyway, so you might as well make sure it is not stuffed with hair first.
Method 4: Baking soda and vinegar (light maintenance)
Best for: A drain that is a little sluggish or funky smelling, not a solid hair plug.
Estimated time: 30 to 60 minutes
Estimated cost: $2 to $5
Steps
- Remove any standing water. Bail it out with a cup or soak it up with a rag so the mixture can work down into the drain.
- Pour in 1/2 cup baking soda. Aim straight into the opening.
- Add 1 cup white vinegar. It will fizz. That is normal.
- Cover the drain for 15 minutes. A rag or drain cover helps keep the action focused downward instead of bubbling up and out.
- Flush with hot tap water. Run hot water for a minute or pour a few cups of hot tap water down the drain.
Reality check: This is not a miracle cure for a wad of hair. Think of it as light deodorizing and maintenance, especially after you have already pulled the worst of the gunk out.
Method 5: Hot water rinse (after you remove hair)
Best for: Finishing the job after you pulled a hair clog, or clearing light soap residue.
Estimated time: 10 minutes
Estimated cost: $0
Steps
- Use hot tap water if you are unsure about your pipes. PVC can soften with high heat, and very hot kettle water can also be rough on acrylic or fiberglass surfaces. If you can control it, aim for roughly 120 to 140 F (49 to 60 C).
- Pour or run water in stages. If you are pouring, add a couple cups, wait 30 seconds, then repeat a few times. If you are using the tap, run hot water for 60 to 90 seconds.
- Test with running water. If it still backs up, move on to plunging or snaking.
Tip: If your shower pan is acrylic or fiberglass, aim any poured hot water straight into the drain opening, not across the surface.
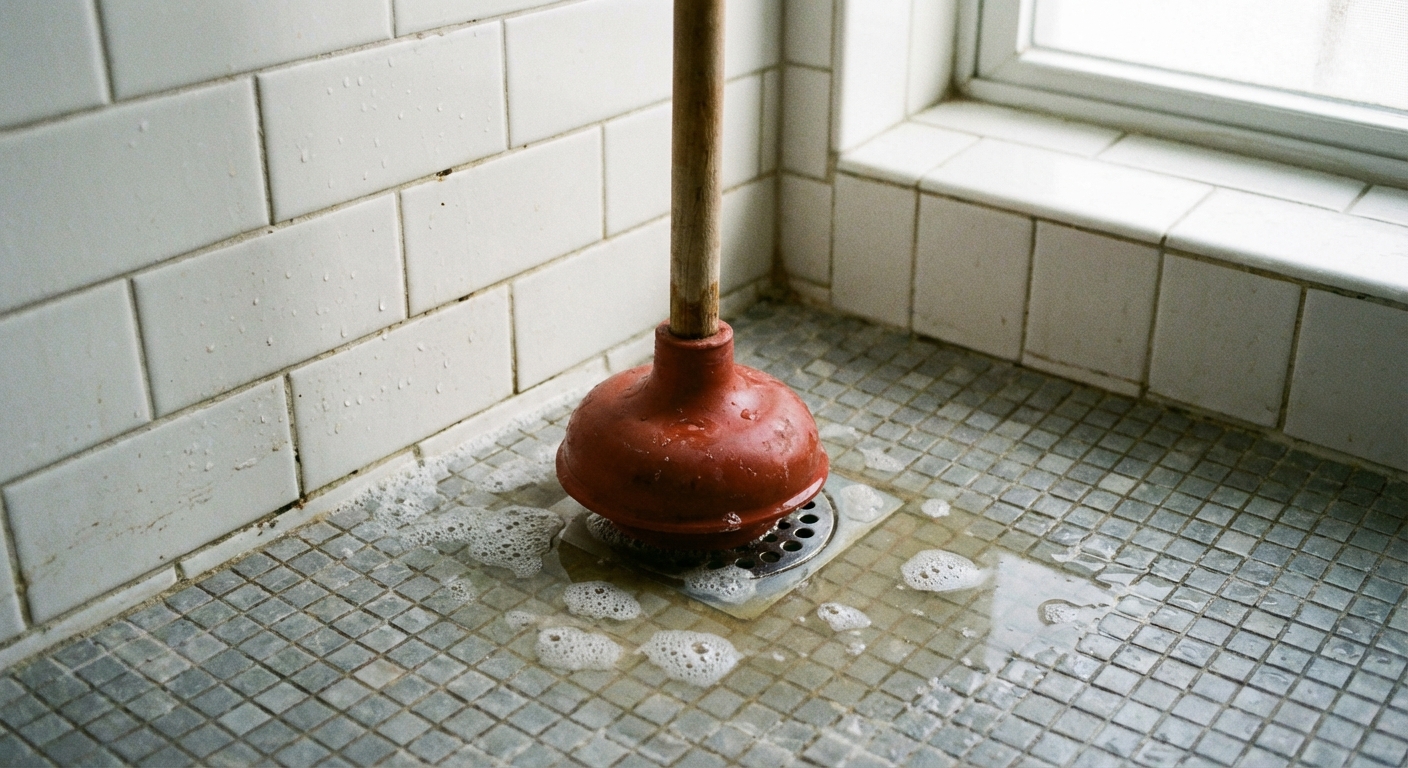
Method 6: Plunge the shower drain
Best for: A clog that is not solid hair at the top, or one that broke loose but is still restricting flow.
Estimated time: 10 to 15 minutes
Estimated cost: $5 to $15
Steps
- Remove the drain cover. You want the plunger directly over the drain opening.
- Add enough water to cover the plunger cup. Plungers need water to maintain a seal and transmit force.
- Seal the overflow if you have a tub/shower combo. Stuff a wet rag into the overflow opening. This keeps pressure focused on the clog.
- Plunge with controlled strokes. 10 to 15 strong pumps, then pull up and listen. You are aiming for the "whoosh" that signals movement.
- Test the drain. Run water. If improved but not perfect, repeat once or twice.
Common mistake: Gentle little taps do not do much. You need a good seal and strong, steady strokes.
Method 7: Snake the drain (hand auger)
Best for: Stubborn clogs beyond arm’s reach, especially in older homes where buildup is deeper in the line.
Estimated time: 20 to 45 minutes
Estimated cost: $15 to $40 (tool purchase)
What type of snake?
- Small hand snake (15 to 25 ft) is usually enough for a shower.
- Drum auger is cleaner to use because the cable stays contained.
Steps
- Remove the drain cover and any hair you can reach. Snaking through a hair mat is messy and less effective.
- Feed the cable slowly. When you feel resistance, stop and rotate the handle clockwise.
- Work the clog. Push a few inches, rotate, pull back a few inches, rotate. You are either grabbing hair or breaking through gunk.
- Pull the cable out carefully. Have paper towels ready. Clean the cable as you retract it.
- Flush with hot tap water. Run water for a full minute. If it drains well, you are done.
Heads-up: If the snake keeps stopping at the same point and you cannot get past it, do not force it like you are trying to win a tug-of-war. You can damage older pipes or dislodge a connection.
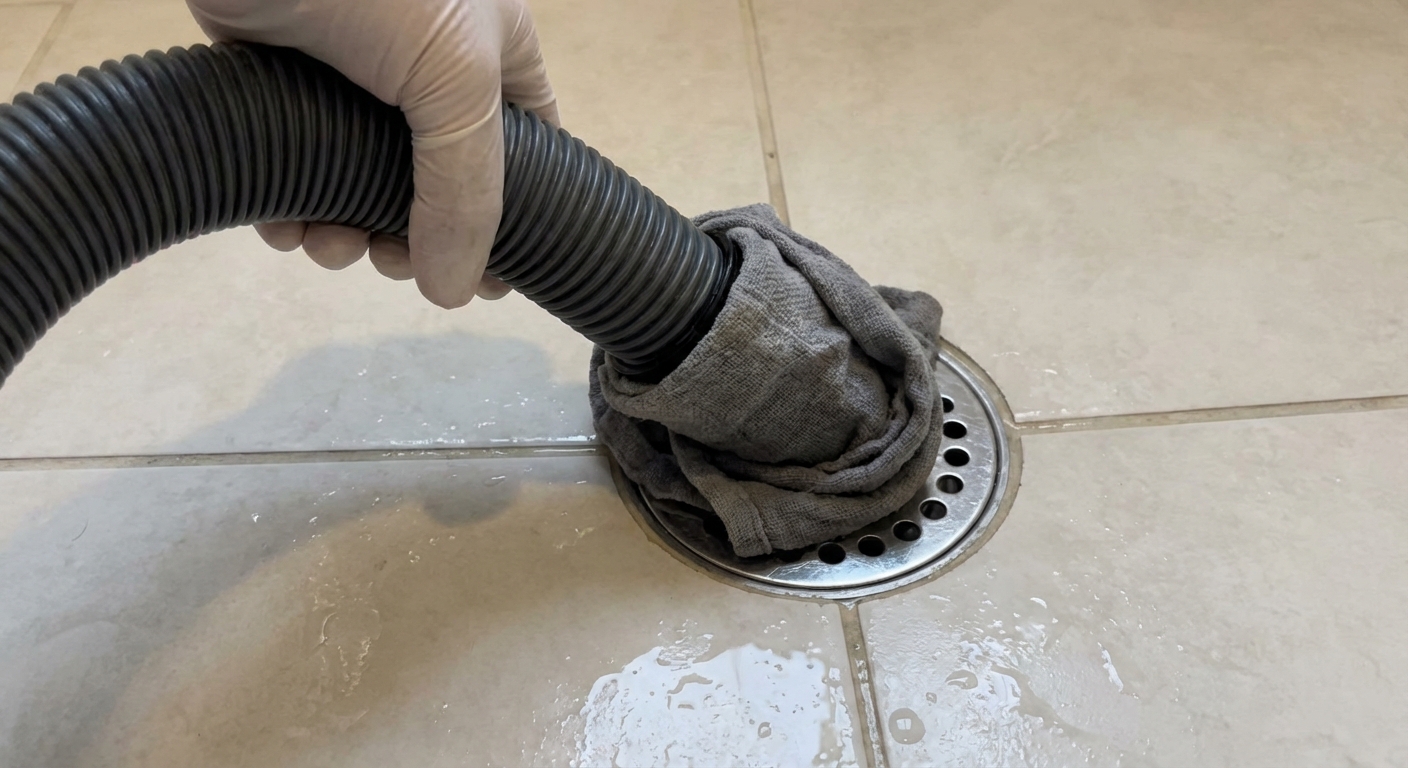
Bonus method: Wet/dry vacuum
Best for: Clumps that are close enough to be sucked back up, especially after you loosen them with a zip tie or snake.
Estimated time: 10 to 20 minutes
Estimated cost: $0 if you own a shop vac, otherwise $50+
Steps
- Set the vac to wet pickup. Remove the filter if your model requires it for wet use.
- Create a seal at the drain. Put the hose directly over the drain opening and use a wet rag around it to seal gaps.
- Vacuum in short bursts. 10 to 15 seconds on, then off. Repeat 3 to 5 times.
- Check the canister. If you pulled debris, you are making progress. Finish with a hot tap water rinse.
Tip: This works better when there is at least a little water in the trap to transmit suction, but not so much that you are vacuuming a small swimming pool.
When to call a plumber
I am all for DIY, but there is a line where you stop fighting the drain and start protecting your home from water damage.
Call a pro if you notice any of these
- Multiple drains are slow at once (shower, sink, toilet). That often points to a main line issue.
- Water backs up in another fixture when the shower runs, like water bubbling up in a nearby toilet.
- Sewage smells that do not go away after cleaning the drain cover and the nearby gunk.
- Repeated clogs every few weeks even after you snake it. That can mean bigger buildup or a damaged pipe.
- Gurgling sounds and slow draining that suggest venting issues. Vent problems are usually not a quick DIY fix.
- Leaks below the shower or water stains on the ceiling under the bathroom. Stop using the shower and get it checked.
- Older homes with fragile piping where you suspect corrosion, collapsed lines, or improper slope.
What to tell the plumber: Mention what you tried (hand removal, plunging, snaking) and whether any other drains are affected. That saves time and usually saves you money.
Keep it from clogging again
- Use a hair catcher. Clean it after every couple of showers. It takes 20 seconds and prevents the whole mess.
- Brush hair before showering if you have long hair. Less shedding in the drain, less "wet mouse" moment later.
- Once a week, run hot water for 30 seconds after your shower to help move soap residue along.
- Monthly maintenance flush: baking soda and vinegar, wait 15 minutes, then hot tap water.
- Consider an enzymatic drain cleaner monthly. It is a pipe-safe option that can help with organic buildup (follow the label).
- Do not let waxy products build up. Shaving cream, heavy body butters, and oils can grab onto soap scum and make hair stick faster.
Quick decision guide
If you just want the fastest path, here is the order I use at my own house:
- Pull hair by hand (most common fix).
- Zip tie or hair tool to reach a little deeper.
- Tub stopper and overflow cleanup if you have a combo tub and shower.
- Plunge if it is still sluggish.
- Snake for anything stubborn or recurring.
- Wet/dry vac as a bonus move if you have one.
- Call a plumber if multiple drains are involved, you suspect venting issues, or you see warning signs.
Once the drain is flowing, add a hair catcher and give yourself a small high-five. This is one of those unglamorous DIY wins that saves real money and keeps your bathroom usable.
About Marcus Vance
Content Creator @ Grit & Home
Marcus Vance is a lifelong DIY enthusiast and self-taught home renovator who has spent the last decade transforming a dilapidated 1970s ranch into his family's dream home. He specializes in budget-friendly carpentry, room-by-room renovations, and demystifying power tools for beginners. Through his writing, Marcus shares practical tutorials and hard-learned lessons to help homeowners tackle their own projects with confidence.