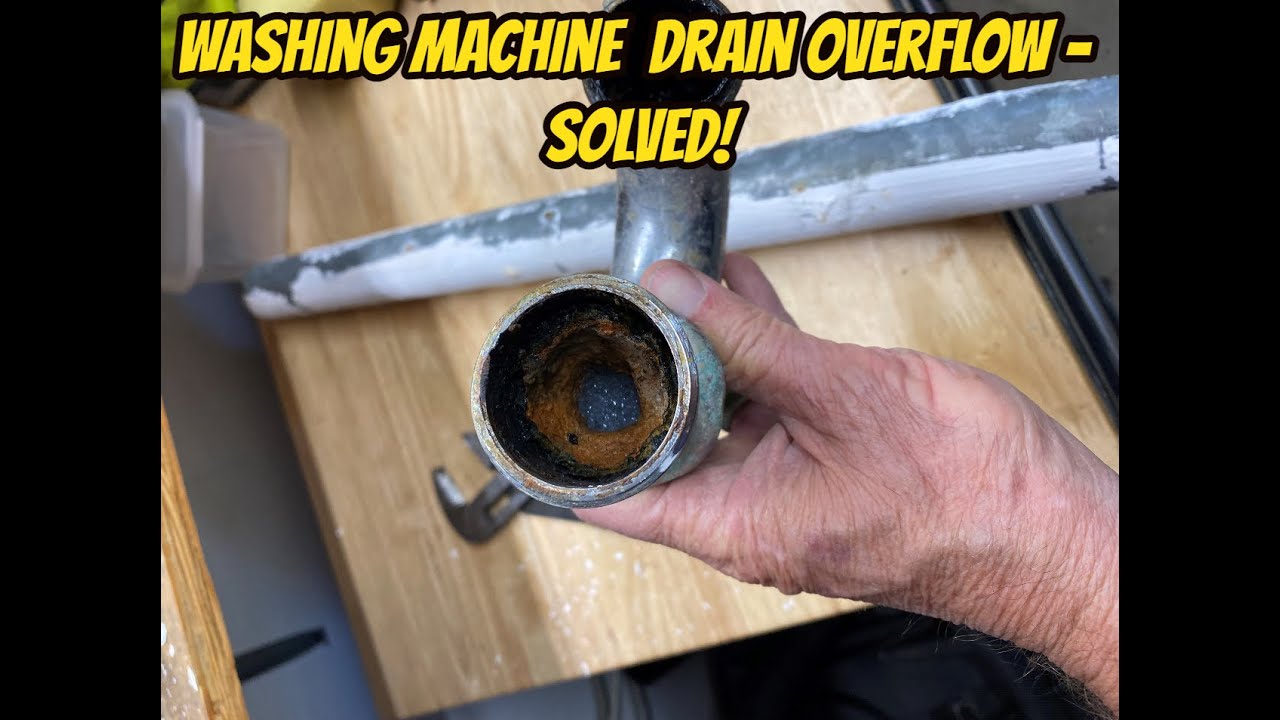
What an overflowing standpipe is telling you
When a washing machine drains, it does not trickle. The pump shoves out several gallons of water quickly. A properly sized, properly vented drain can swallow that surge without drama. When the standpipe overflows, one of these is most often happening:
- The drain is partially clogged downstream, so it cannot keep up with the pump.
- The drain is not vented correctly, so pressure swings and air movement in the piping disrupt flow right when discharge is highest.
- The standpipe or trap setup is off (height, diameter, missing or incorrect trap, hose shoved in too far, or an odd tie-in to a sink).
Less common (but real) causes include a sagging or poorly pitched horizontal run, a developing main line blockage, a collapsed pipe, or septic issues. The good news: you can usually narrow it down in 10 minutes with a couple of simple checks and a bucket.
Safety first (ask me how I know)
I have learned the hard way that laundry room water finds the lowest point in your house. Before you start testing:
- Unplug the washer if water is already spilling.
- Shut off the washer water valves if you need time to work.
- Protect the floor with towels and a shallow pan. Keep a mop and bucket nearby.
- Do not mix chemicals. If you have used a drain opener, do not snake until you know what is in the pipe. Chemical splash-back is no joke.
Quick diagnosis: 4 checks
1) Does it only overflow during pump-out?
If overflow happens only when the washer pumps out (not during fill), you are dealing with a drain capacity issue: clog, venting, or a bad setup. If it overflows even with a steady flow from a bucket, the restriction is usually more severe or farther downstream.
2) Try a bucket test
Pour a 2 to 3 gallon bucket of water into the standpipe quickly (aim to mimic the washer surge, not a slow pour). Watch the water level, and stop if it threatens to crest the rim.
- Rises and drains slowly: classic partial clog.
- Hesitates, surges, or gurgles: venting, siphonage, or a downstream restriction is likely.
- Immediately backs up: likely a more serious blockage or a main or branch line issue.
3) Listen for gurgling nearby
Run the washer drain cycle and listen at nearby fixtures (utility sink, tub, toilet). Gurgling often means the line is fighting pressure changes, is under-vented, or there is a restriction downstream that is making air and water compete for space.
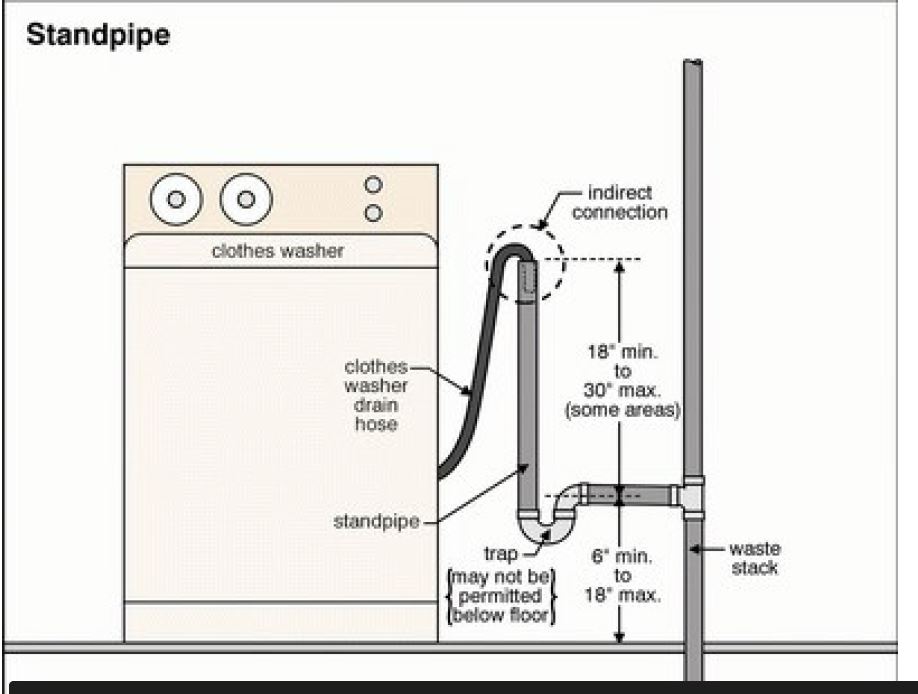
4) Check the basics (height, diameter, hose)
A standpipe setup that is just a little off can overflow even with a clean pipe.
- Standpipe height: Requirements vary by plumbing code and washer manufacturer. In many homes you will see standpipes that land roughly 30 to 48 inches above the floor, and many code families specify the standpipe length (trap weir to opening) within a particular range. Treat any numbers here as common ranges, not a guarantee. If yours is extremely short, it can overflow easily. If it is unusually tall, some pumps struggle and can behave oddly.
- Pipe diameter: A washing machine standpipe is commonly 2-inch. A 1-1/2-inch standpipe is more prone to overflow with newer high-volume pumps.
- Drain hose depth: The washer hose should not be jammed way down the standpipe. Aim for about 4 to 6 inches inserted, leaving an air gap around it. If it is taped airtight or shoved too deep, the drain can siphon, choke, or surge.
Note: Local plumbing codes vary. If you suspect your installation is nonstandard, check your washer manual for hose height requirements and consider a quick call to a licensed plumber. It can save you repeated floods.
Most common cause: partial clogs
Washer drains are magnets for sludge. Lint, pet hair, soap scum, and fabric softener residue build up like felt inside the pipe. The line might handle a slow trickle, but the pump surge overwhelms it.
DIY steps to clear it
- Start with hot water and a rinse cycle: Run the washer on a rinse and spin (no laundry) with the hottest water available. It will not fix a real clog, but it can push a soft buildup through.
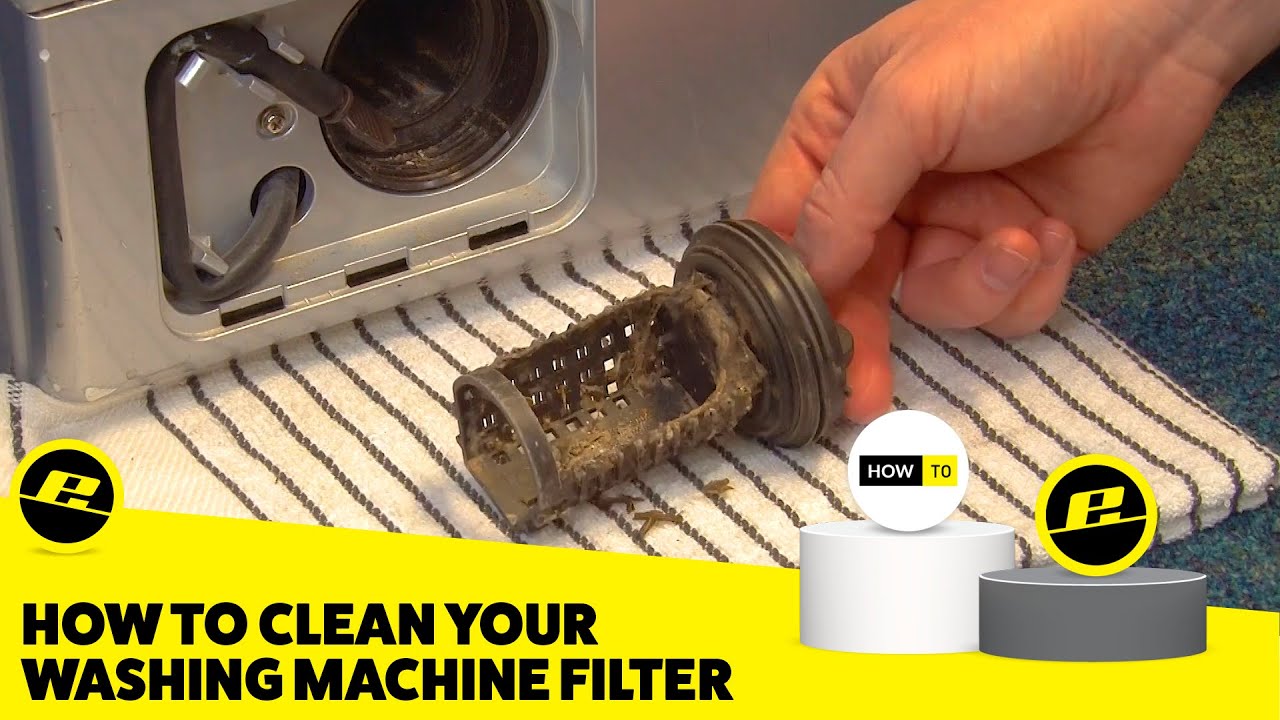
- Clean the washer pump filter (if your model has one): Many front-loaders have a small access panel at the bottom front. A clogged filter can cause slow draining, stopping and starting, or weird drain behavior.
- Check the drain hose: Make sure it is not kinked or pinched behind the machine and that the routing matches the manufacturer guidance.
- Use a hand snake carefully: If you can access a cleanout on the branch line, that is ideal. If not, you may be snaking through the standpipe. Go slow, and expect lint mats, not tree roots.
Safe snaking notes
- Avoid aggressive power augers if you have older pipes, thin-wall plastic, or unknown fittings. It is easy to pop a joint and turn a clog into a leak inside the wall.
- If you used chemical drain opener, do not snake until the line is flushed and safe. Chemical splash can cause serious burns.
- Use the right head: For lint and sludge, a small boring head or retrieval-style tip can work better than a big cutter head.
- Stop if the cable binds hard. That can mean a tight bend, a fitting, or something you do not want to chew through.
If you clear a clog and the standpipe still overflows, do not assume you failed. It often means the restriction is farther downstream in the branch or main line, the horizontal run is sagging or poorly pitched, or venting is the real culprit.
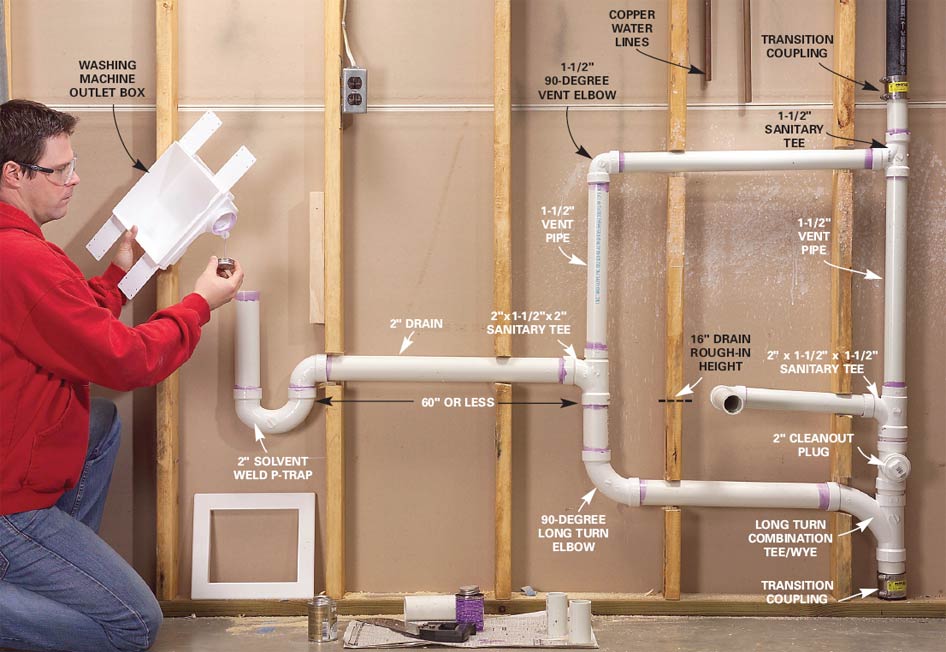
Standpipe and trap setup
I have seen more than one overflow caused by a “close enough” standpipe install or a hose shoved in too deep because someone wanted it to feel secure.
Common setup mistakes
- Hose sealed to the pipe: If you tape it airtight or use a tight rubber coupling, pressure problems and siphonage can slow flow and trigger backup. The standpipe needs air movement.
- Hose inserted too far: This can block the standpipe opening and reduce the effective diameter right where the surge is strongest.
- Missing or wrong trap: A proper P-trap belongs on the laundry standpipe. An S-trap (or no trap) can lead to siphoning, gurgling, sewer odors, and unreliable draining.
- Standpipe too short: A short standpipe gives the water no buffer before it crests and spills.
- Standpipe too small: Newer machines can overwhelm older 1-1/2-inch setups.
Quick fixes
- Pull the hose up so it sits about 4 to 6 inches into the standpipe.
- Use a loose strap or hook to keep it from jumping out, but do not seal the opening airtight.
- If the standpipe is clearly undersized, oddly built, or trap-free, plan for a plumbing correction. That is usually a 2-inch standpipe with a proper trap and vent, tied into the right branch line with the right fittings.
Venting issues
Drain lines work best when air can move through the plumbing system in a controlled way. Without proper venting, or with a vent that is blocked, the drain can gurgle, surge, and slow right when the washer is dumping water. That surge is what pushes water over the top during pump-out.
Signs venting may be the issue
- Gurgling or “glug-glug” sounds when the washer drains
- Nearby traps (sink or tub) lose water or smell sewer-like after laundry
- Overflow is worse when other fixtures are draining at the same time
What you can check
- Roof vent obstruction: In some homes, leaves or a bird nest can partially block the plumbing vent. This is more common than people think, especially after storms.
- Trap and vent layout: If the laundry drain was added later, it might be unvented, over-distance, or tied in incorrectly.
Venting corrections often require opening a wall or accessing the vent system. This is one of those areas where calling a plumber is usually money well spent.
Sink tie-ins and odd hookups
Some laundry rooms route the washer drain into a utility sink, or they tie the sink and washer into the same trap in ways that look tidy but drain poorly.
Common problem setups
- Washer discharging into a sink that shares a small trap: The pump overwhelms the sink drain and it backs up.
- Double fixture on a small branch: Sink and washer on a line that is too small, too long, or under-vented.
- Wrong fitting orientation: A sanitary tee used where a wye or combo fitting should be can slow flow and catch lint.
What to do
- If the sink is backing up too, treat it like a branch line restriction and start with a cleanout if available.
- If the sink gurgles when the washer drains, suspect venting or an undersized shared line.
- If the washer must discharge to a sink, make sure the sink drain path is clear and sized appropriately, and the hose is secured so it cannot whip out.
Washer-side issues
Most overflows are plumbing, but the washer can contribute.
- Clogged pump filter: Can cause slow draining, stopping and starting, or unusual surges.
- Kinked or partially blocked drain hose: Especially if the machine got shoved back and pinched the hose.
- Incorrect hose routing: Some washers specify a minimum and maximum height for the hose loop before it drops into the standpipe.
If your washer recently moved, was replaced, or the overflow started immediately after an install, check the hose routing and filter before you start opening walls.
What not to do
- Do not keep running loads to “push it through.” That is how small overflows turn into soaked subfloors.
- Do not go heavy on chemical drain openers. They can be dangerous, and they do not remove lint mats well.
- Do not remove the trap to improve flow. You will trade a draining problem for sewer gas and odor problems.
When to call a plumber
Call a licensed plumber if any of the following are true:
- The standpipe backs up even with a small bucket test
- You have repeated overflows after snaking
- Multiple fixtures are backing up (sink, tub, toilet), which points to a main line issue
- The laundry is the lowest drain in the house and it is the first thing acting up, which can be an early sign of a developing main or sewer blockage
- You suspect venting problems or an improper standpipe installation (trap issues, S-trap, undersized pipe, wrong fittings)
- There is evidence of leaking inside the wall or ceiling below
What to say on the phone so you get the right help faster:
- “My washing machine standpipe overflows during the pump-out cycle.”
- “A bucket test (does or does not) back up.”
- “Nearby fixtures (do or do not) gurgle when it drains.”
- “The standpipe looks like 1-1/2-inch or 2-inch (if you can tell).”
- “The house has (septic or sewer) and the laundry is on the (basement/lowest level).”
Prevent it from happening again
Once you get it draining properly, a little maintenance goes a long way.
- Go easy on fabric softener. It is a major contributor to gunk buildup in washer drains.
- Run a monthly hot cleaning cycle (machine cleaner tablet or a manufacturer-approved routine).
- Use a lint catcher on the discharge hose only if your setup, washer manufacturer, and local code allow it. Choose a design that does not restrict flow, and clean it often so it does not create the very overflow you are trying to prevent.
- Keep the standpipe air gap. Do not “seal it up” thinking you are preventing odors. A dry trap or vent problem causes odors, not the air gap.
If you are dealing with an older laundry drain that has always been finicky, upgrading to a properly sized standpipe and correctly vented drain is one of those fixes you only cry about once.
Quick checklist
- Overflow only when pumping out: think clog, vent, pitch, or setup.
- Bucket test drains slowly: partial clog likely.
- Gurgling: venting or downstream restriction.
- Hose shoved deep or sealed: adjust for air gap.
- Sink involved: shared line sizing, venting, or blockage.
- Washer recently installed: check hose routing and pump filter.
- Lowest drain in the house acting up: possible developing main line problem.
About Marcus Vance
Content Creator @ Grit & Home
Marcus Vance is a lifelong DIY enthusiast and self-taught home renovator who has spent the last decade transforming a dilapidated 1970s ranch into his family's dream home. He specializes in budget-friendly carpentry, room-by-room renovations, and demystifying power tools for beginners. Through his writing, Marcus shares practical tutorials and hard-learned lessons to help homeowners tackle their own projects with confidence.