🚨 In a DIY emergency or rush?
Skip the details and jump straight to our 30-second cheat sheet for the most crucial info.
A washing machine is one of the few appliances in your house that sits there quietly connected to pressurized water 24/7. When a supply hose fails, it does not “slow leak” like a tired faucet. It can burst, and the washer valves will happily dump water until someone notices or the shutoffs get turned off. That is how a small $15 hose turns into a whole-floor cleanup.
If you have never replaced your washer hoses, or you inherited whatever the previous homeowner installed, this is one of the best low-cost, high-impact DIY upgrades you can do in under an hour.
When to replace washer supply hoses
Rubber hose age limits
Old-school black rubber washer hoses are the ones most likely to fail suddenly. Rubber hardens and cracks over time, and pressure spikes can finish the job.
- If you have rubber hoses: Replace them about every 5 years, sooner if your laundry area is hot, the hoses are kinked, or you do a lot of laundry.
- If you have braided stainless steel hoses: Many homeowners replace them around 8 to 10 years as cheap insurance, even if they look fine.
- Any hose of unknown age: Treat it like it is overdue and replace it now.
Warning signs
Pull the washer forward and do a quick inspection with a flashlight. Here is what I look for.
- Bulging sections in a rubber hose. That is a failure in progress.
- Cracks, checking, or dry rot on rubber.
- Rust, corrosion, or mineral crust at either connection.
- Moisture on the hose ends, even if it is just a “little sweat.”
- Kinks or sharp bends behind the washer.
- Washer moved recently (new flooring, cleaning, appliance swap). Movement can weaken a marginal hose or loosen a fitting.
Why burst hoses flood floors
The supply hoses are on the pressurized side of your plumbing. If a hose bursts or a fitting blows off, the flow rate can be shockingly high. On a second floor laundry, that can mean water in the ceiling below within minutes. Even on a slab, it can run under flooring and into adjacent rooms before you realize what happened.
What to buy
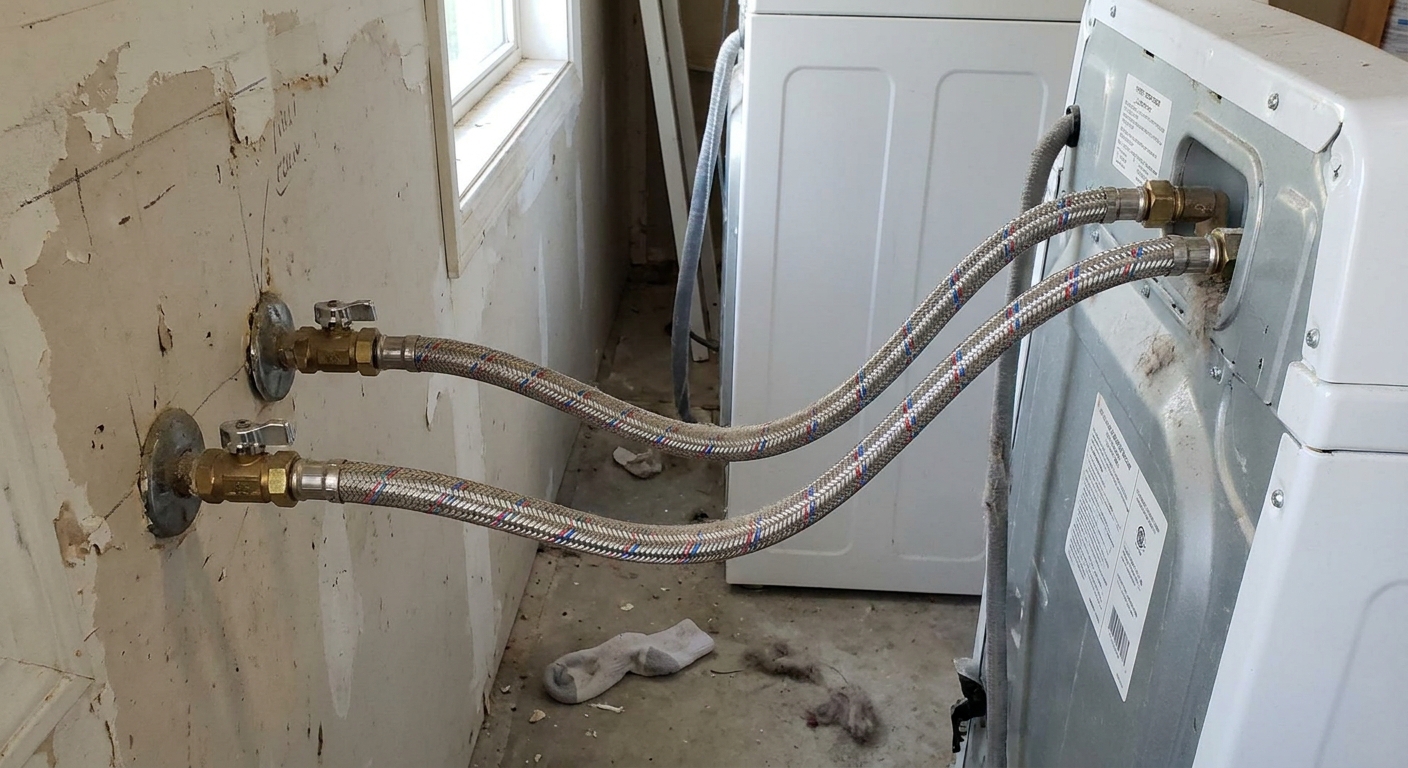
Braided steel hoses
Look for braided stainless steel washer hoses with:
- Correct length so the hoses curve gently without stretching or kinking (most installs use 4 to 6 feet).
- New rubber washers in the hose ends (they usually come installed).
- Clearly labeled hot and cold (red and blue) to reduce mix-ups.
- Optional burst protection (auto shutoff style hoses) if you want extra insurance and your setup allows it.
Skip the cheapest no-name hoses if you can. This is one place where a few extra bucks is worth it.
Thread tape or pipe dope?
Typically, no. Washing machine hoses seal with a rubber washer against a flat surface inside the connection, not with tapered pipe threads. Tape can actually get in the way of a good seal or encourage over-tightening.
Optional upgrades
- Washer drain pan: Great if your washer is on an upper floor or over finished space. A pan only helps if it can drain somewhere safe.
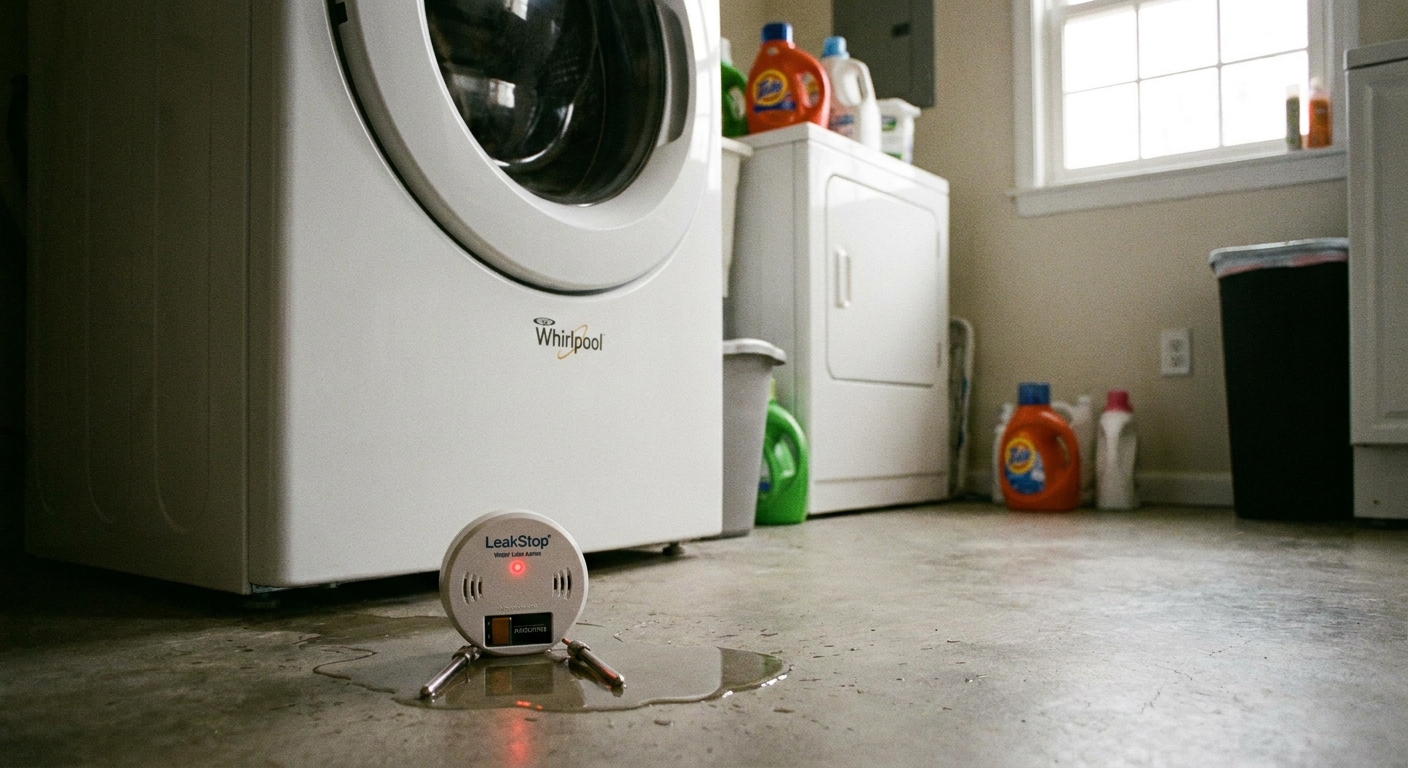
- Water leak alarm: A small battery alarm placed near the washer is cheap and loud. It will not stop water, but it can save your weekend.
- Quarter-turn shutoff valves: If your valves are stiff, crusty, or do not fully shut off, replacing them is a bigger job but a smart upgrade.
Step-by-step: replace washer hoses
Tools and supplies
- 2 new braided stainless steel washer hoses
- Adjustable wrench or channel-lock pliers (often hand-tight is enough)
- Old towel or shallow pan
- Flashlight
- Optional: gloves, small brush for crusty fittings
1) Shut off the water
Turn the hot and cold shutoff valves clockwise until they stop. If the knobs feel like they will snap, stop and consider replacing the valves or calling a plumber. Forcing stuck valves is a classic DIY regret.
2) Relieve pressure
With the water shut off, set the washer to a quick fill or start a cycle for a few seconds, then stop it. This helps relieve pressure in the lines. Some machines make this easy, and some do not. Either way, have a towel handy for the next step.
3) Unplug the washer and give yourself room
Now unplug the washer so you are not working around live power. Carefully pull the washer forward. Move slowly so you do not kink the drain hose or stress old valves.
4) Disconnect the old hoses at the washer first
Place a towel under the connections and loosen the hoses where they connect to the washer. A little water will spill out. This is normal.
How to avoid stripping threads: Use steady pressure and make sure your wrench is seated straight. Do not twist at an angle. If a fitting is stubborn, tighten it a hair first, then loosen. That small “break” often frees mineral buildup.
5) Disconnect the old hoses at the wall valves
Now remove the hose ends from the shutoff valves. Again, expect a small amount of water. Inspect the valve outlets. If they are heavily corroded, take a moment to clean them gently.
6) Install the new braided hoses
Check that each hose has a rubber washer seated inside the female connector. Thread each hose on by hand first. If it does not turn easily, back it off and try again. Cross-threading is how threads get ruined.
- Connect hot to hot (usually left valve, red marking) and cold to cold (usually right valve, blue marking).
- Hand-tighten, then snug an additional quarter turn with a wrench if needed. Do not crank down like you are tightening lug nuts.
- Route hoses with a gentle curve. No sharp bends. No tension.

7) Turn the water back on slowly and check
Open the shutoff valves slowly. Watch both connections at the wall and at the washer. If you see a drip:
- Close the valve.
- Tighten the connection slightly.
- Reopen slowly and recheck.
If you cannot stop a drip with gentle snugging, shut the water off and inspect the rubber washer. A twisted, missing, or damaged washer is a common culprit.
8) Run a fill and drain test
Plug the washer back in, then run it on a short cycle or rinse and spin. While it fills, look for drips at all four connections. While it drains, make sure the standpipe or drain is handling flow and the drain hose is secure.
9) Do the 24-hour drip check
This is my boring-but-effective habit: place a dry paper towel under the hose connections or along the base of the wall box, then check it the next day. A slow weep that is invisible during the first five minutes often shows up overnight.
Washer pan and leak alarm placement
Washer pan basics
A drain pan is helpful, but only if it can actually direct water to a safe drain or a visible spot. If you can add one, do it while the washer is already pulled out.
- Confirm the pan fits your washer footprint.
- Confirm you have a plan for where the pan drains, if it has a drain fitting.
- Keep the pan from pinching the hoses when you slide the washer back.
Leak alarm tips
Place the alarm where water will reach it first, usually near the wall box or just under the hose connections. Test the battery and the alarm sound before you push the washer back into place.
Dryer clearance notes
If you had to move your dryer to access the washer plumbing, keep these quick clearance reminders in mind while you slide everything back into place.
Electric dryer
- Do not crush the power cord behind the dryer.
- Maintain a gentle bend in the vent duct. A smashed vent restricts airflow and increases drying time.
- Keep the vent connection accessible enough to inspect lint buildup periodically.
Gas dryer
- Do not kink or strain the gas connector when moving the dryer back.
- Make sure the shutoff valve remains reachable.
- If you ever disconnect a gas line, use a leak test approved for gas connections and follow local code. If you are unsure, call a pro.
Common mistakes
- Reusing old rubber washers: New hoses come with new washers. Use them.
- Over-tightening: It can deform the washer or damage threads, causing leaks later.
- Cross-threading the valve outlet: Always start by hand. If it resists, stop.
- Too-short hoses: Tension and vibration are not your friend. Buy the next length up if you are between sizes.
- Never touching the shutoffs: Valves that never get exercised tend to seize. Turn them off and on once or twice a year.
Quick FAQ
Turn off washer valves when not in use?
If you will remember to turn them back on, yes, it reduces risk. Realistically, most people leave them on. Installing good valves, quality braided hoses, and a leak alarm gets you most of the safety without relying on habit.
Can braided hoses still fail?
Yes. They are more resistant to bulging and abrasion than rubber, but connections can still leak, washers can degrade, and corrosion happens. That is why the 24-hour drip check and periodic inspection matter.
What if my shutoff valve drips after I touch it?
That is common with older valves. Sometimes gently tightening the packing nut helps, but valve replacement may be the right fix. If the valve will not shut off fully, do not proceed unless you can shut off water to the house.
The 30-Second Cheat Sheet
Essential takeaways for: Washing Machine Supply Hoses: Replace and Install Braided Steel Safely
Replace timeline
- Rubber washer hoses: replace about every 5 years (or immediately if age is unknown).
- Braided stainless hoses: replace around 8 to 10 years as preventative maintenance.
Replace now if you see
- Bulging rubber
- Cracks or dry rot
- Rust or mineral crust at fittings
- Any moisture at hose ends
Install steps (safe and simple)
- Shut off hot and cold valves at the wall.
- Start a quick fill for a few seconds, then stop to relieve pressure.
- Unplug washer and pull it out carefully.
- Disconnect old hoses (washer end first), towel ready.
- Install new braided hoses: start threads by hand, no thread tape.
- Hand-tighten, then snug about 1/4 turn if needed.
- Turn valves on slowly and check all 4 connections.
- Run a quick fill test.
- Do a 24-hour drip check with a dry paper towel.
Cheap flood prevention upgrades
- Leak alarm on the floor near the wall box
- Washer pan if it fits and can drain safely
Dryer clearance reminder
- Electric dryer: do not crush cord or vent duct.
- Gas dryer: do not kink gas connector; keep shutoff reachable. If you disconnect gas, leak-test or call a pro.
💡 Tip: Scroll up to read the full article for detailed, step-by-step instructions.
⬆️ Back to topAbout Marcus Vance
Content Creator @ Grit & Home
Marcus Vance is a lifelong DIY enthusiast and self-taught home renovator who has spent the last decade transforming a dilapidated 1970s ranch into his family's dream home. He specializes in budget-friendly carpentry, room-by-room renovations, and demystifying power tools for beginners. Through his writing, Marcus shares practical tutorials and hard-learned lessons to help homeowners tackle their own projects with confidence.