🚨 In a DIY emergency or rush?
Skip the details and jump straight to our 30-second cheat sheet for the most crucial info.
If your shower starts strong but turns lukewarm way too quickly, you’re not alone. I’ve chased that exact problem thinking I had a bad water heater, only to find out the tank was fine and a cheap plastic tube inside had snapped. That part is the dip tube, and when it fails, it can make a normal-sized tank feel like a tiny one.
In this guide, I’ll show you how dip tube symptoms differ from heating element and thermostat problems, how to run a couple quick tests, and what replacement looks like in plain English. I’ll also point you toward the next steps that matter, like flushing sediment and checking the anode rod, without turning this into a generic no hot water article.
Quick scope note: This guide is for tank-style water heaters. Tankless units, heat pump water heaters, and boilers are a different animal.
What a dip tube does
On most tank-style water heaters, cold water enters the tank through the cold inlet at the top. The dip tube is attached right there. Its job is simple: carry incoming cold water down near the bottom of the tank, away from the hot outlet.
That separation is everything. When cold water is delivered low in the tank, it heats efficiently and doesn’t immediately mix with the hottest water at the top where your hot outlet pulls from.
When it fails
Dip tubes usually fail by cracking, breaking off, or eroding. When the tube is too short or shattered:
- Cold water dumps in near the top of the tank.
- That cold water mixes with the hot water layer you’re trying to use.
- You get lukewarm water quickly, even though the burner or elements may be working.
Think of it like pouring a cup of cold water directly into your coffee mug every time you take a sip.
Dip tube vs element vs thermostat
Here’s the practical, homeowner-level difference. No lab coat required.
Dip tube symptoms
- Hot water starts normal, then goes lukewarm fast (short showers).
- Water doesn’t go truly cold right away, it just fades to warm, because you’re mixing at the top of the tank.
- Recovery seems “okay” if you stop using water for a bit.
- Little white plastic flecks show up in faucet aerators or showerheads. This was especially common on some mid-to-late 1990s models, but any dip tube can deteriorate over time.
Electric element problems (electric water heater)
- Not enough hot water and it may be consistently underheated.
- If the upper element fails, you often get very limited hot water, sometimes just a small amount.
- If the lower element fails, you may get one decent burst of hot water, then it runs out and takes forever to recover.
Element failures tend to affect recovery and overall temperature more than “mixing” behavior.
Thermostat problems (electric water heater)
- Temperature can be inconsistent day to day.
- Water may be too hot or not hot enough, regardless of usage patterns.
- Sometimes one thermostat fails and you get symptoms similar to a failed element, but troubleshooting usually points to control issues rather than mixing.
Gas control problems (gas water heater)
- Water is lukewarm all the time, not just after a few minutes.
- Burner behavior can be odd: short cycling, not staying lit, or not firing when it should.
- You may see error codes or a pilot that won’t stay lit on some models.
If your water heater simply isn’t heating, that’s a different path. Dip tubes are about hot water getting diluted.
Quick tests
You can do a couple safe checks before you buy parts. They’re not perfect, but they’re good indicators.
Test 1: First bucket
Don’t use hot water for at least 1 hour.
Run hot water into a bucket or tub and pay attention to the first minute.
If it starts properly hot, then quickly fades to warm within a short shower length, that supports the dip tube theory.
Why it works: the top of the tank still has hot water. The problem shows up when cold water starts entering and mixing at the top.
Test 2: Check aerators
Remove a faucet aerator (or the showerhead if it’s easy).
Look for tiny white plastic pieces that look like rice or shards.
If you find them, that’s a huge clue. Not every dip tube failure sheds pieces, but when it does, it’s pretty unmistakable.
Test 3: Outlet pipe timing
With caution, feel the hot outlet pipe at the top of the heater during a draw. If it goes from hot to warm suspiciously fast while the tank is still firing normally, that points to mixing.
Note: this is an indicator, not proof. Pipe routing, insulation, and recirculation can skew what you feel.

One note: In homes with a hot water recirculation pump or a tempering valve, symptoms can get confusing. If you’ve got either, keep them in mind during diagnosis.
Rule out look-alikes
1) Crossed mixing valve
A single-handle shower valve, a bad cartridge, or a tempering valve can mix cold into hot and mimic dip tube symptoms. A quick check is to shut off the cold supply to the water heater for a moment and see if a hot faucet still flows.
Important detail: you might get a brief burst from line pressure or water stored in the piping. What you’re looking for is sustained flow. After pressure bleeds off, flow should stop. If it keeps flowing, you likely have a cross-connection somewhere.
2) Heavy sediment
Sediment can reduce capacity and slow heating, especially on electric units where the lower element gets buried. This is where a tank flush comes in. It’s easy to do wrong, and you don’t want to turn a drain valve into a weekend project.
If your heater pops, rumbles, or crackles, sediment climbs the suspect list.
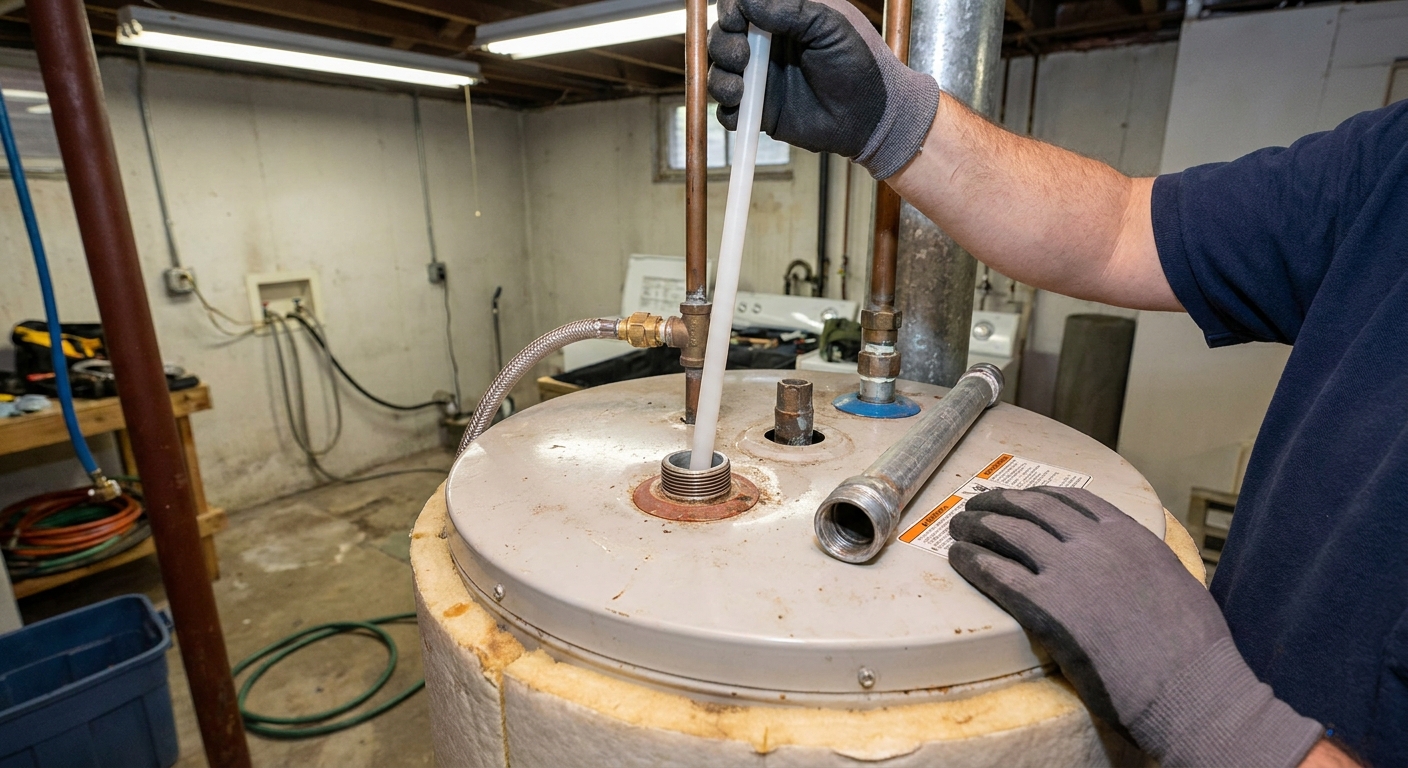
Replacement overview
Dip tubes are inexpensive, and the job is usually straightforward for a careful DIYer. The exact steps vary by heater, but the flow is consistent. Also, some heaters use an integrated heat-trap nipple/dip tube setup, so check your manual and model before you start cranking on fittings.
Tools and supplies
- Replacement dip tube (match length and inlet type for your model)
- Pipe wrench or large adjustable wrench
- Teflon tape or pipe dope approved for potable water
- Garden hose and bucket
- Rags
- Optional: new heat trap nipple or dielectric nipple if yours is damaged
- Optional: non-contact voltage tester (and a multimeter if you know how to use it)
Safety first
- Electric: shut off power at the breaker and verify it’s off.
- Gas: set the control to OFF per manufacturer guidance. If the instructions call for it, close the gas shutoff valve too.
- If you smell gas, stop and follow your utility and manufacturer safety guidance before you do anything else.
- Shut off the cold water supply to the heater.
- Open a hot faucet to relieve pressure.
High-level steps
Drain a few gallons from the tank so the water level drops below the top fittings. You don’t need to empty the whole tank for a dip tube.
Disconnect the cold inlet connection at the top of the heater (the side labeled cold, usually marked with blue).
Pull the old dip tube straight up. Sometimes it comes out in pieces if it broke.
If part of the dip tube fell into the tank: don’t panic. You usually don’t need to fish it out. Install the new dip tube, then do a good flush and clean aerators and showerheads afterward. Most fragments will work their way out over time, and flushing helps speed that up.
Install the new dip tube, making sure it seats fully and points down into the tank.
Reassemble the cold inlet using proper thread sealant.
Refill and purge air: keep a hot faucet open until it runs smoothly without sputtering.
Check for leaks at the cold inlet and any fittings you disturbed.
Restore power or gas only after the tank is completely full.

Two learned-it-the-hard-way tips
- Don’t power an electric heater with an empty tank. Dry firing can destroy elements quickly.
- Go easy on overtightening. Tank fittings can be stubborn, but forcing them can twist connected piping or crack an old nipple.
If your plumbing is rigid copper with no unions or flex connectors, the job may require more disassembly. That’s a good point to pause and decide if you want a plumber for the connection work, especially if fittings are corroded.
Smart add-ons
If you’re already shutting down the heater and draining a bit of water, you’re in the perfect window to knock out two maintenance items that affect performance and tank life.
Flush sediment (and plastic bits)
Even a quick partial drain can stir up gunk. A proper flush can help recovery time and reduce noise. It can also help rinse out broken dip tube fragments if yours shattered.
On older tanks, the drain valve can clog or leak afterward, so it pays to follow a proven process.
Check the anode rod
The anode rod is the sacrificial part that helps keep the tank from rusting out. If it’s spent, the tank itself starts paying the price. When homeowners ask me how to make a water heater last, the anode is always on my short list.
On Grit & Home, I keep separate step-by-step guides for flushing and the anode rod, because each one has its own gotchas. If you want the full process, those pair nicely with a dip tube repair in the same afternoon.
When to stop
A dip tube is a cheap fix, but there are times to stop throwing parts at a tank.
- Tank is near end of life (often 10 to 12 years, sometimes less with hard water).
- Rusty water from the hot side that doesn’t clear, or visible corrosion around fittings.
- Leaks at the tank body or signs of seepage at the bottom seam.
- Repeated failures plus heavy sediment plus a spent anode is usually a sign the heater’s been fighting for a while.
If you’re on the edge, look up the date of manufacture on the rating plate and be honest about what else the heater is doing. I love a thrifty repair, but I love not flooding a basement even more.
Bottom line
If your water heater makes hot water but your showers are short and the temperature fades to lukewarm fast, a failed dip tube should be high on your list. It’s a simple part with an outsized effect, and in many cases it’s a satisfying DIY win that restores normal hot water without replacing the whole heater.
Start with the symptoms and quick tests, rule out mixing valves and heavy sediment, then decide if a dip tube swap makes sense for your tank’s age and condition.
The 30-Second Cheat Sheet
Essential takeaways for: Water Heater Dip Tube Failure: Lukewarm Water and Short Hot Showers
Fast diagnosis
- Most likely dip tube: water starts hot, then turns lukewarm fast, especially in showers.
- More like element or thermostat: water is consistently not hot enough, takes forever to recover, or swings wildly in temperature.
- Big clue: tiny white plastic bits in faucet aerators or showerheads can point to a deteriorated dip tube (common on some mid-to-late 1990s models, but possible on others too).
Quick tests
- First bucket test: after 1 hour of no use, run hot water. If it starts hot and fades quickly once the tank refills, suspect dip tube mixing.
- Aerator check: remove an aerator and look for white plastic flecks trapped in the screen.
- Cross-connection clue: if you shut off cold supply to the heater, hot flow should stop after pressure bleeds off. Sustained flow suggests a cross-connection.
Replacement overview
- Shut off power (electric) at the breaker and verify it is off, or set gas control to OFF per manual. If required, close the gas shutoff valve too.
- Shut off cold supply to the heater and open a hot faucet to relieve pressure.
- Drain a few gallons so the level drops below the top fittings.
- Remove the cold inlet connection and pull the old dip tube.
- If the dip tube snapped and part fell in, do not panic. Install the new tube, then flush the tank and clean aerators to help clear plastic pieces.
- Refill tank and purge air at a hot faucet. Check for leaks at the cold inlet before restoring power or gas.
- Electric: restore power only after the tank is completely full.
Two smart add-ons
- Flush sediment (and plastic bits): helps capacity and efficiency, and it can help rinse out broken dip tube fragments.
- Check the anode rod: key for extending tank life, especially on older heaters.
When to stop repairing
- Tank is near end of life, shows corrosion, or has any tank body leak.
💡 Tip: Scroll up to read the full article for detailed, step-by-step instructions.
⬆️ Back to topAbout Marcus Vance
Content Creator @ Grit & Home
Marcus Vance is a lifelong DIY enthusiast and self-taught home renovator who has spent the last decade transforming a dilapidated 1970s ranch into his family's dream home. He specializes in budget-friendly carpentry, room-by-room renovations, and demystifying power tools for beginners. Through his writing, Marcus shares practical tutorials and hard-learned lessons to help homeowners tackle their own projects with confidence.