A leaking water heater can go from “tiny drip” to “soaked drywall” faster than you would think. The good news is most leaks come from a handful of predictable places.
If you slow down, look carefully, and do a few simple checks, you can usually figure out whether it is a quick tighten-and-replace job or a sign the tank is on its last legs.
I learned this one the hard way: do not assume the tank itself is leaking until you have checked the fittings above it. Water loves to travel along pipes and drip somewhere totally misleading.
First: Safety and quick triage
Know what you have (gas vs electric)
- Electric water heater: No flue pipe on top. Usually has one or two rectangular access panels on the side.
- Gas water heater: Has a metal flue/vent pipe on top and a burner compartment near the bottom. You will see a gas valve and pilot/burner controls.
If you see any of these, stop and call a pro now
- Gas smell near a gas water heater.
- Water near electrical parts, or you see scorched wires.
- Water near the gas burner area or inside the burner compartment on a gas unit.
- Water pouring instead of dripping, and you cannot control it quickly.
- Rusty, bulging tank that looks ready to split.
Shutoff steps (do this before you start poking around)
- Turn off power or gas: For electric units, switch off the breaker labeled “water heater.” For gas units, turn the gas control to OFF (and close the gas shutoff valve if you have one and are comfortable doing it). If you need to relight later, follow your model’s manufacturer relight procedure.
- Turn off cold water supply: Close the valve on the cold line entering the top of the heater (usually a handle valve or a lever ball valve).
- Contain the water: Put down towels, set a shallow pan under the drip, or shop-vac the area if needed.
Tip: After you shut off the cold supply, open a nearby hot faucet for a few seconds. This relieves pressure and helps you confirm whether the leak slows down.
Important for electric heaters: Never turn the breaker back on until the tank is completely full and air is purged from the system (run a hot faucet until the flow is steady with no spurting). Dry-firing an element can ruin it quickly.
How to find where the leak is coming from
Take 5 minutes to play detective. This usually saves you an hour of guessing.
What you need
- Flashlight or headlamp
- Paper towels or dry rag
- Small mirror (optional, great for tight spots)
- Adjustable wrench or channel-lock pliers (for later, if needed)
Simple method
- Dry everything you can reach with a paper towel.
- Start at the top and work down. If water is coming from above, it often runs down the jacket and drips at the bottom, faking a “tank leak.”
- Touch suspected joints with a dry paper towel. The towel tells the truth faster than your eyes.
- Check the floor pattern. A puddle centered under the drain valve area points one direction. A puddle that starts near a wall could be a supply line or another plumbing line nearby.
- Look for nearby suspects: recirculation lines, a mixing valve, a water softener line, or even the HVAC condensate drain. Water from something else can wander over and frame the water heater.
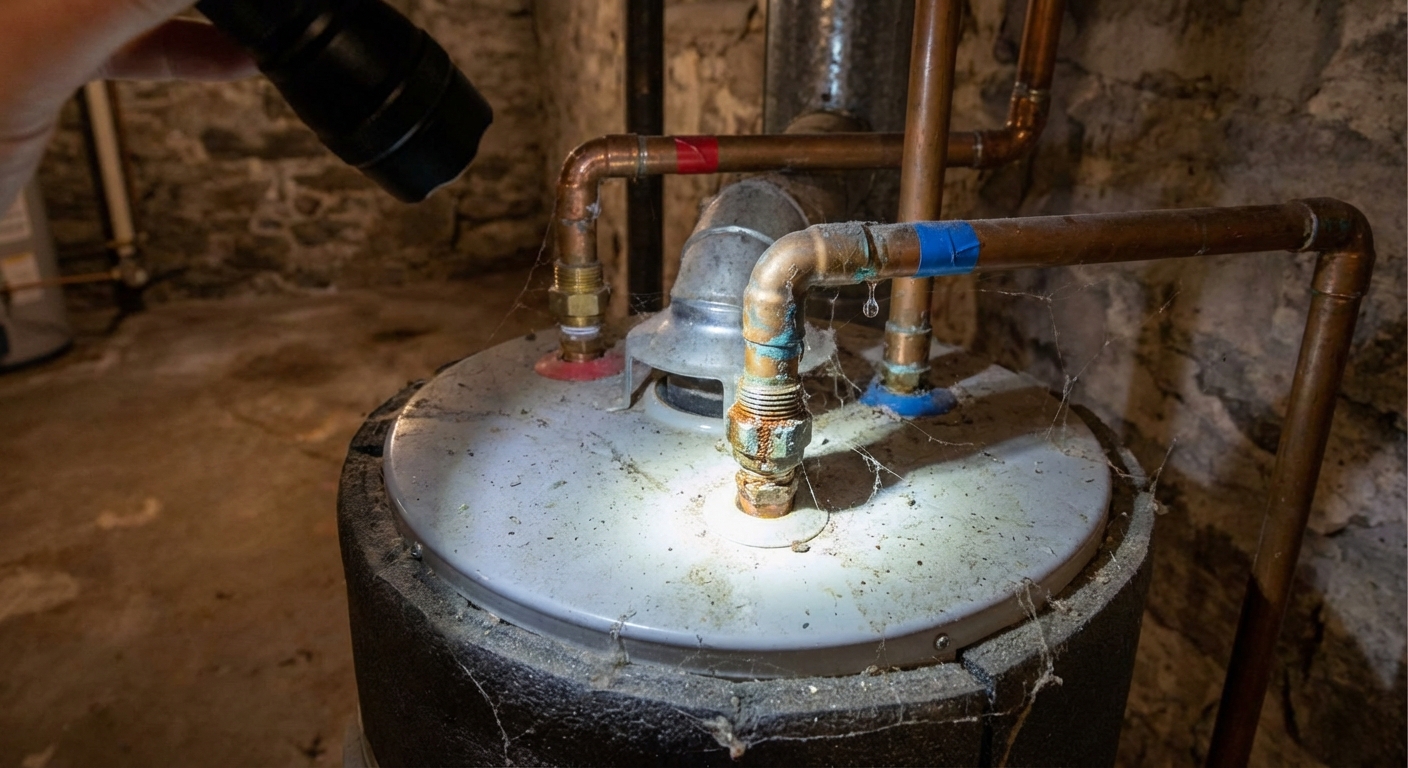
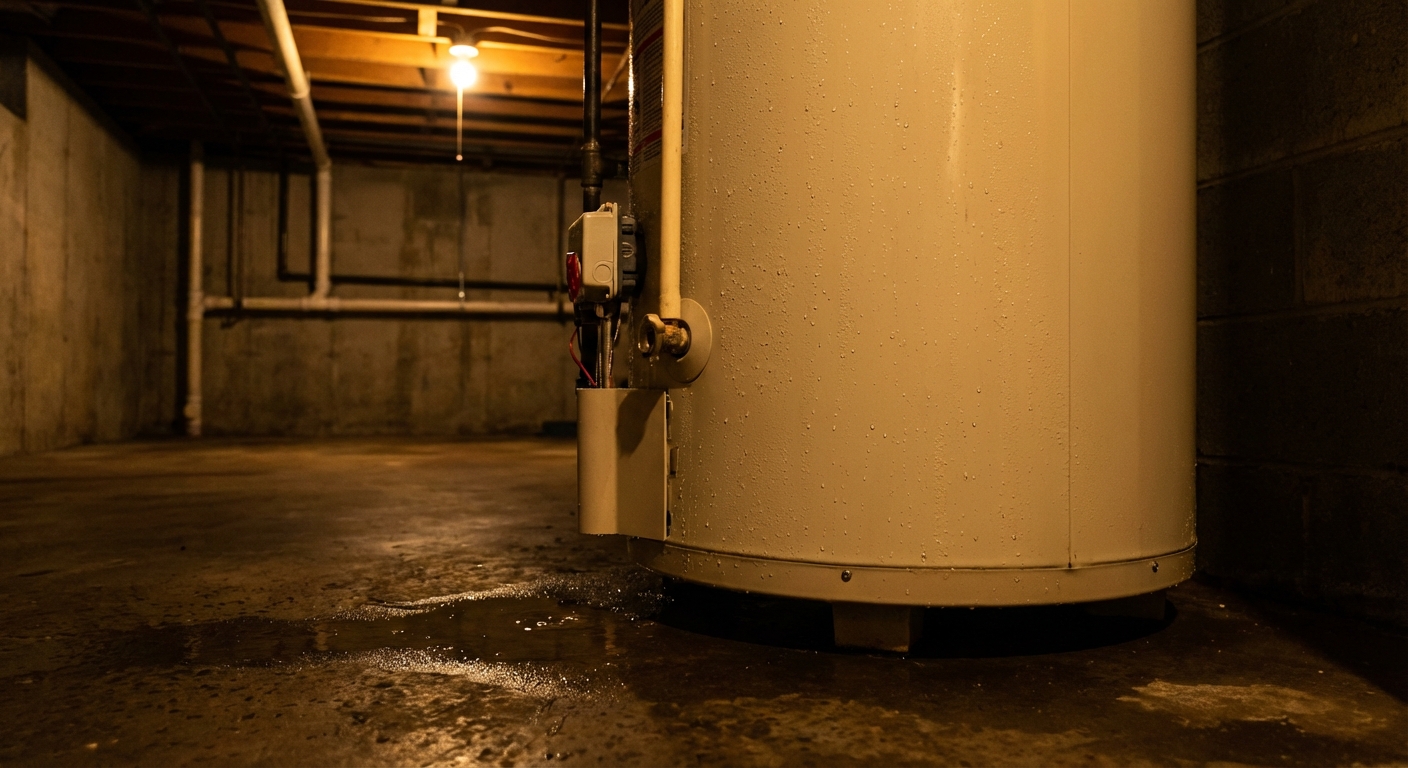
Cause #1: Leaking supply lines (top connections)
What it looks like: Drips around the hot or cold connection on top of the heater, water tracks running down the sides, or moisture around a shutoff valve above the unit.
Common culprits
- Loose threaded connection
- Failing flexible connector hose
- Corroded nipple or dielectric union at the top of the tank
- Leak at the cold water shutoff valve stem or packing nut
- Recirculation line or mixing valve leak (if you have them)
DIY fix
- Confirm the exact joint: Dab each connection with a dry paper towel.
- Tighten gently: Use two tools when possible. One holds the stationary fitting, the other turns the nut. Tighten a little, then re-check. Over-tightening can crack fittings or deform washers.
- If it is a flex connector: If you see bulging, rust, or a persistent leak at the hose, replace the connector. Match the length and diameter, and use the correct gasketed ends or thread sealant as required by the connector style.
- If the shutoff valve leaks at the stem: Try snugging the packing nut (a small turn). If it still weeps, plan to replace the valve when you can schedule a short water shutoff for the house.
When to call a pro
- The top nipples are heavily corroded and look fused to the tank
- You have galvanized piping and everything is rusted tight
- You are not confident sweating copper or transitioning pipe types
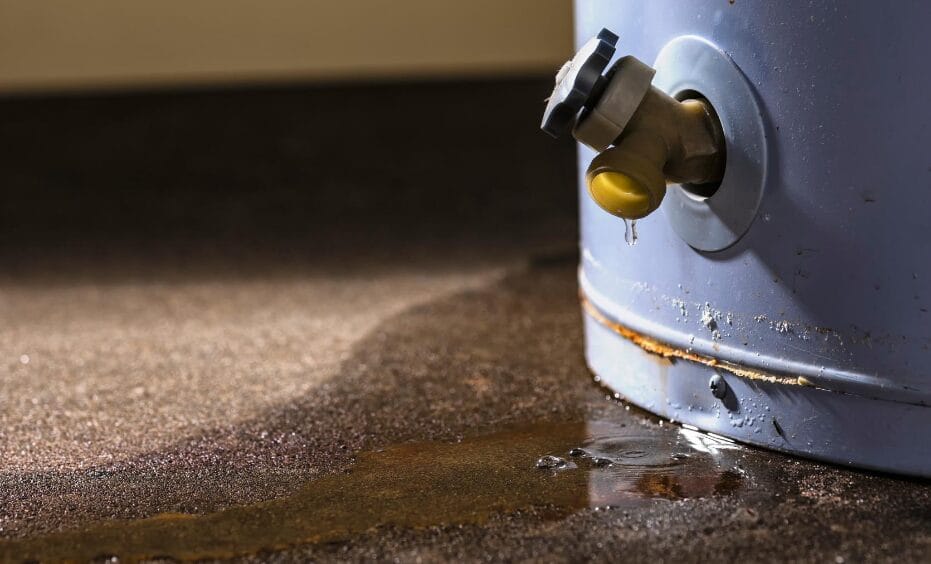
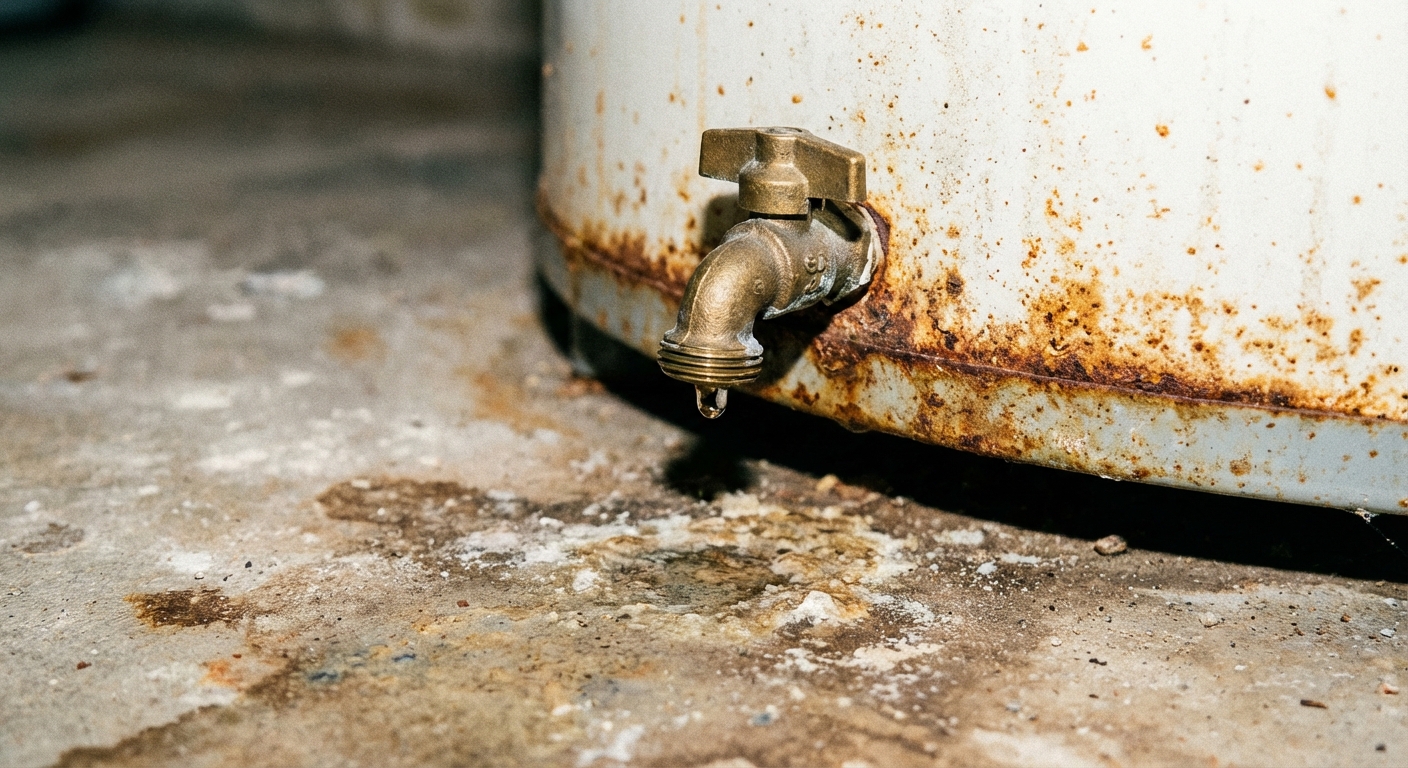
Cause #2: Loose or failing drain valve
What it looks like: Dripping from the spigot near the bottom of the tank, sometimes leaving a little mineral “stalactite” trail.
Drain valves are notorious for a slow weep, especially plastic ones on older budget heaters.
DIY fix
- Try closing it firmly: Turn the handle clockwise until snug. Do not force it.
- Cap it temporarily: A garden hose cap (3/4 inch) with a rubber washer can stop a slow drip as a temporary measure.
- If it still leaks, replace the valve (best long-term fix):
- Turn off power or gas.
- If possible, let the tank cool a bit to reduce scald risk.
- Turn off cold supply.
- Attach a hose and drain a few gallons until the water level is below the valve. If sediment slows draining, you may need patience, a few start-stops, or a different approach.
- Remove the old valve and install a quality brass replacement using thread seal tape or pipe dope (check local practice).
- Refill, purge air at a hot faucet, then restore power (electric) or follow the relight procedure (gas).
My thrifty note: If your valve is plastic and older, just replace it. You can spend an hour trying to persuade it to behave, and it will still betray you at 2 a.m.
When to call a pro
- The drain valve will not stop and you cannot get it capped
- You cannot safely drain the heater due to a bad main shutoff or stuck supply valve
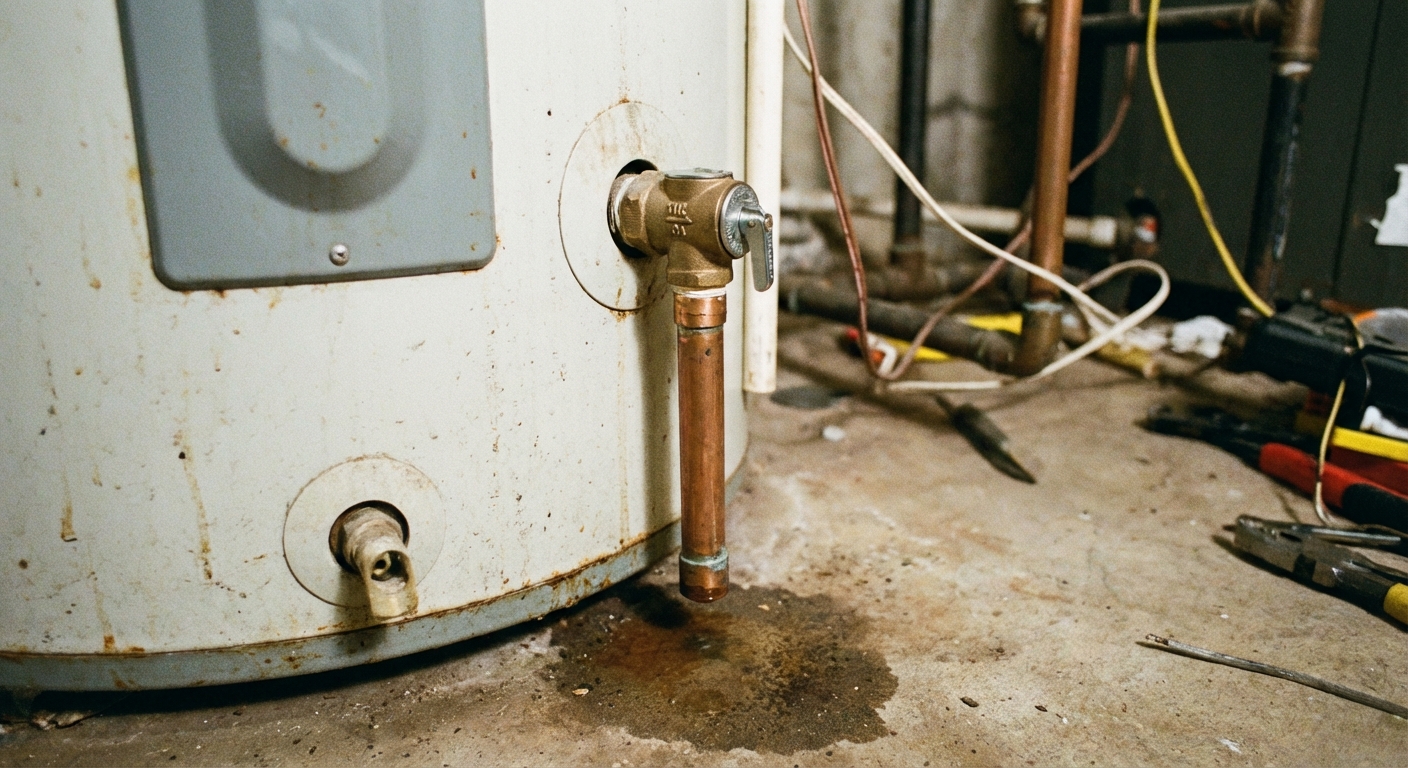
Cause #3: Faulty T&P relief valve
What it looks like: Water dripping from a valve located on the side or top portion of the tank, often connected to a discharge pipe that points down toward the floor. Sometimes the water appears at the end of that discharge pipe.
The T&P valve is a critical safety device. If it is releasing water, it might be doing its job, or it might be failing. Either way, do not ignore it.
Caution: The little test lever can help flush debris, but it can also stick open or fail to reseat, especially on older valves. If you are unsure, skip the lever test and go straight to diagnosing pressure and calling a pro.
Diagnostic steps
- Is the dripping constant or only when heating? Drips during heating cycles can point to excess pressure or thermal expansion.
- Check home water pressure: If you have a pressure gauge that threads onto a hose bib, typical residential pressure is often around 40 to 80 psi. 80 psi is usually the maximum recommended, and many homes aim closer to the 50 to 60 psi range.
- Look for an expansion tank: If your home has a pressure-reducing valve (PRV) or a backflow device, you may need a thermal expansion tank. Whether it is required depends on your plumbing setup and local code. A plumber can confirm.
DIY fixes
- Flush the valve seat (sometimes works): Place a bucket under the discharge pipe. If your manufacturer allows it and the valve is not ancient, carefully lift and release the test lever for a quick burst to clear debris. If it continues to drip afterward, plan on replacement.
- Replace the T&P valve if it will not stop dripping and you have ruled out pressure issues:
- Turn off power or gas.
- Turn off cold supply.
- Open a hot faucet to relieve pressure.
- Drain a few gallons so the water level is below the valve opening.
- Remove and install the new valve with thread sealant. Use the correct temperature and pressure rating for your heater.
- Reconnect the discharge pipe so it terminates safely near the floor and is not capped or blocked.
When to call a pro
- You suspect dangerously high pressure and do not have a PRV or expansion tank set up
- The discharge pipe is improperly installed and needs to be corrected to code
- The valve is discharging a lot of hot water, not just dripping
Cause #4: Condensation (not a true leak)
What it looks like: Moisture beads on the outside of the tank, dampness under the unit, or a small puddle that shows up during heavy hot water use, especially in a humid basement.
This one fools a lot of homeowners. Cold water entering the tank can make the exterior sweat, kind of like an iced drink on a summer day.
How to confirm it is condensation
- Wipe the tank dry, then run a long hot shower or dishwasher cycle.
- If moisture forms broadly over the tank surface (not at one fitting), it is likely condensation.
- Check nearby cold water pipes too. They may be sweating as well.
DIY fixes
- Lower humidity: Run a dehumidifier in basements or damp utility rooms.
- Insulate cold pipes: Foam pipe insulation helps a lot and is cheap.
- Add an insulation blanket (tank-style units): Follow manufacturer guidance and do not cover access panels, controls, or the T&P valve.
- Check for a venting issue on gas units: Poor venting can create unusual moisture patterns. If you notice exhaust smell, soot, or backdrafting, call a pro.
Cause #5: Corroded tank or bottom fittings
What it looks like: Rust streaks, wet insulation around the base, or water that seems to seep from the lower seam. You might also see rusty water, flaking metal, or a damp ring around the bottom.
Most tank-style heaters eventually rust from the inside out. The anode rod is supposed to sacrifice itself to protect the tank. Once that protection is gone, corrosion starts winning.
Two gas-unit clues
- If the tank is leaking, water can sometimes exit through the burner access area or around the bottom cover. If you see water there, shut the unit down and call a pro.
- If anything looks wet near gas controls or the burner compartment, treat it as urgent.
Diagnostic steps
- Check the age: Look for the manufacture date on the rating plate. Many tanks last roughly 8 to 12 years, sometimes more with good water and maintenance.
- Look for rust at the base seam: If water is coming from the actual tank body, repairs are not reliable.
- Rule out fittings: Confirm the water is not running down from supply connections, the T&P valve, or the drain valve.
What you can do
- Plan a replacement: If the tank is corroded and leaking, replacement is the fix. There is no patch that makes a pressurized hot water tank safe long-term.
- Limit damage today: Keep the cold supply off when you are not actively troubleshooting, and place a pan or tray to protect the floor if the leak is slow.
- Consider a drain pan and leak alarm for the next heater, especially if it sits on finished flooring.
Honest DIY moment: I once tried to “buy time” on an old heater with a slow base seep. It bought me exactly one weekend, and then it doubled the puddle. If the tank itself is leaking, spend your energy on replacement planning, not wishful fixing.
Cause #6: Cracked internal tank (sudden failure)
What it looks like: A leak that seems to come from nowhere, often heavier than a drip, sometimes after a loud pop or after the heater has been rumbling for a while. Water may pour from the bottom area even with all valves and fittings dry.
This is the “end of the road” scenario. The internal steel tank can split, and the outer jacket just channels the water down to the floor.
What to do
- Shut off the cold supply to stop feeding the leak.
- Turn off power or gas immediately.
- Drain the tank if you can do so safely to reduce the mess (attach a hose to the drain valve and run it to a floor drain or outside). Watch for hot water and sediment that slows draining.
- Replace the heater. If this is in an attic or finished space, prioritize damage control and consider calling a plumber for an emergency swap.
DIY or pro?
If you are comfortable with plumbing connections, local codes, and safe gas or electrical work, a replacement can be a DIY project. If not, this is a smart time to hire it out. A water heater is one of those appliances where “almost right” can become dangerous.
Quick leak-to-cause cheat sheet
- Drip from top fittings → supply lines, nipples, shutoff valve, recirculation line, or mixing valve.
- Drip at spigot near bottom → drain valve.
- Water from discharge pipe → T&P valve, pressure issue, or expansion issue.
- Moisture all over tank surface → condensation.
- Wet base seam or rusted bottom → corroded or cracked tank.
- Water near burner area (gas) → treat as urgent, shut down, and call a pro.
Prevent leaks (and catch them early)
- Keep pressure in check: If your pressure runs high, address it with a PRV or pressure diagnosis so the T&P is not constantly stressed.
- Test the T&P valve only if your manufacturer allows it and the valve is in good condition. If it will not reseat, replace it.
- Flush a few gallons from the tank periodically to reduce sediment (especially in hard water areas).
- Check the anode rod every few years if you are comfortable doing it. A healthy anode can extend tank life.
- Add a leak alarm on the floor next to the heater. Cheap insurance.
- Install a drain pan piped to a safe drain where allowed, especially on finished floors.
Common questions
Should I turn off the water if my water heater is leaking?
Yes, if you are not actively testing something. Turning off the cold supply stops feeding the tank and often slows or stops many leaks. If the leak continues with the cold supply off, that points to water already in the tank draining out, or a leak path below the waterline.
Is a small water heater leak an emergency?
It can be. A slow drip from a fitting might stay a slow drip for months. A leaking tank can fail fast. If you cannot identify the source quickly, treat it as urgent until proven otherwise.
Can I still use hot water if it is leaking?
I would avoid it until you know the cause. Using hot water triggers heating cycles and pressure changes, which can worsen leaks, especially at the T&P valve or a compromised tank.
About Marcus Vance
Content Creator @ Grit & Home
Marcus Vance is a lifelong DIY enthusiast and self-taught home renovator who has spent the last decade transforming a dilapidated 1970s ranch into his family's dream home. He specializes in budget-friendly carpentry, room-by-room renovations, and demystifying power tools for beginners. Through his writing, Marcus shares practical tutorials and hard-learned lessons to help homeowners tackle their own projects with confidence.