
🚨 In a DIY emergency or rush?
Skip the details and jump straight to our 30-second cheat sheet for the most crucial info.
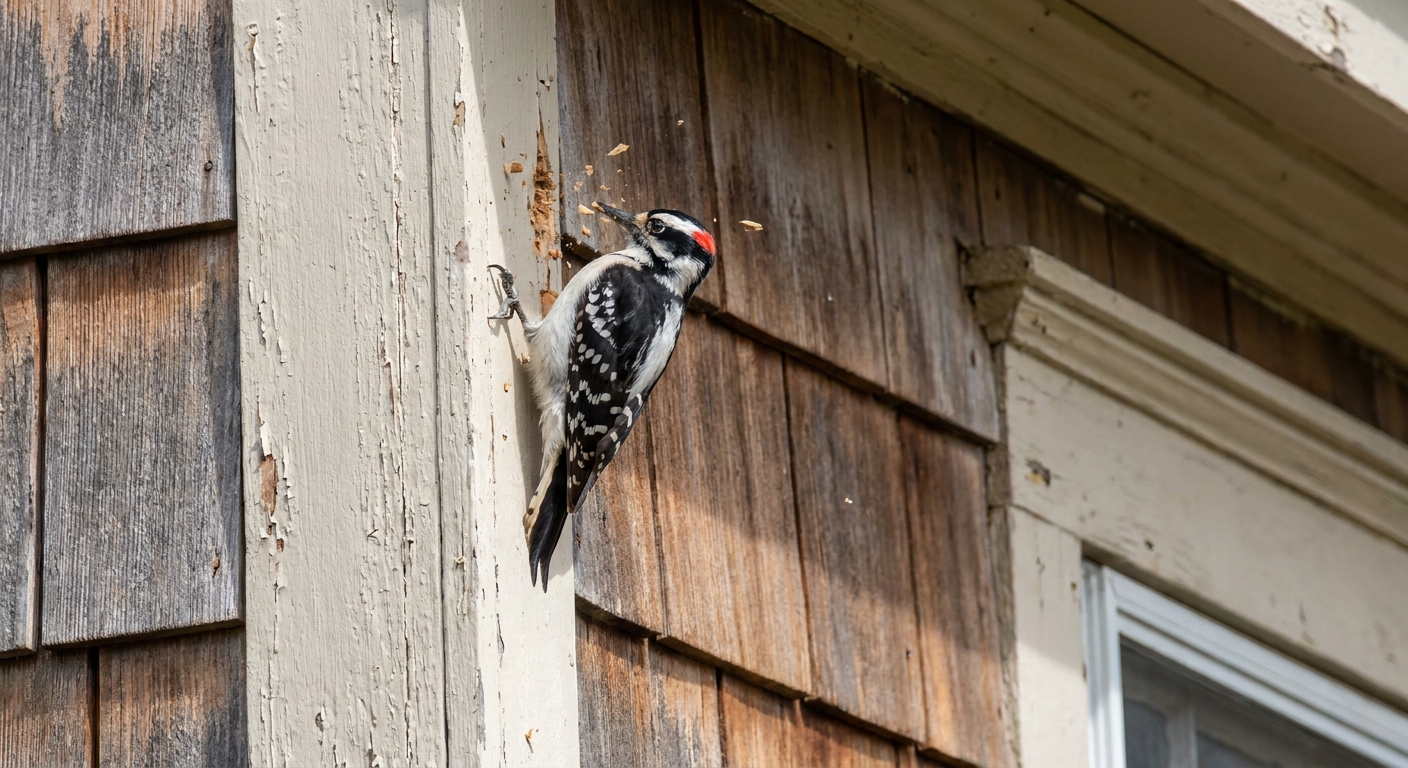
If you have ever been jolted awake by a rapid-fire tap-tap-tap on the side of your house, you already know woodpeckers are not subtle. And when they decide your siding is worth their attention, they can do real damage fast.
I am all for DIY solutions, but this is one of those problems where the best fix is a two-part plan: (1) deter the bird safely and legally, and (2) fix whatever made your house attractive in the first place, often insects, moisture, or workable materials.
Why woodpeckers peck houses
Woodpeckers are not trying to ruin your weekend. They are doing normal woodpecker things, and your home just happens to fit the job.
1) Drumming (territory and mating)
Drumming is basically woodpecker communication. They look for the loudest “instrument” around. Metal gutters, chimney caps, fascia boards, and hollow-sounding siding can all amplify the noise.
- When it happens: commonly spring, but it can pop up other times too.
- What it looks like: lots of noise, little damage at first. You might see shallow divots or repeated peck marks in one spot.
2) Feeding (insects in or behind the wood)
If a woodpecker is feeding, it is not performing. It is working. Sometimes that means your siding, trim, soffit, or a nearby tree has an insect buffet like carpenter ants, termites, beetle larvae, or other wood-destroying pests. Other times they are simply probing for food or taking advantage of soft spots.
- When it happens: anytime insects are active, often summer into fall.
- What it looks like: deeper holes, torn-looking edges, and sometimes multiple exploratory holes across an area.
3) Nesting or roosting (making a cavity)
Some species excavate a cavity to nest (spring and early summer) or to sleep (fall and winter roosting). On houses, this often starts on soft trim, cedar, older wood that has absorbed moisture, or even foam-based exterior systems. Important note: nesting and roosting can happen even without an insect infestation.
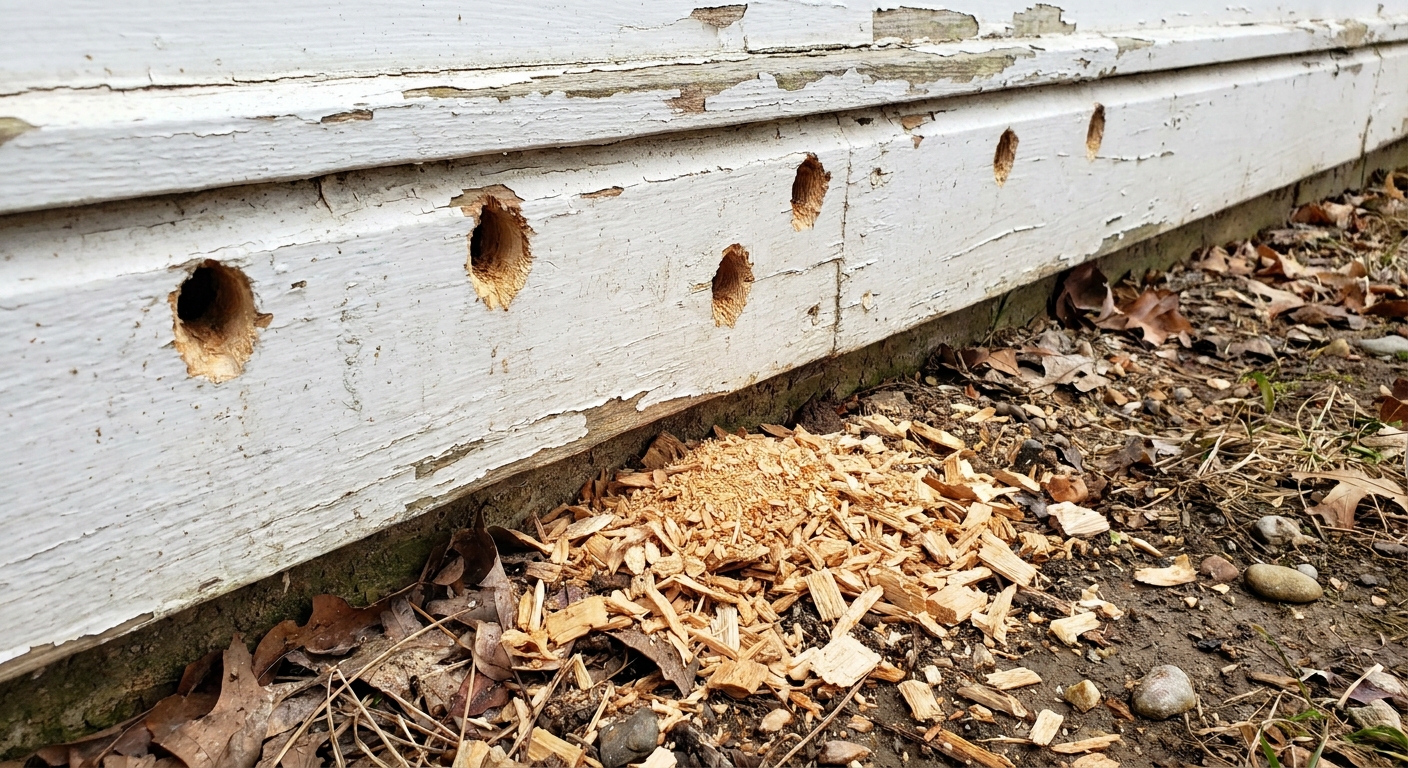
- What it looks like: a larger, more rounded entrance hole that keeps getting refined, plus wood chips below.
Feeding vs drumming: quick ways to tell
You do not need to be a bird expert to make a good call. Use the clues you can see and hear.
Signs it is mostly drumming
- Very loud rapid knocking, often at the same time each morning.
- One “favorite” spot that is especially resonant, like metal flashing or a hollow corner.
- Little debris and only shallow marks for a while.
Signs it could be feeding
- Multiple holes in a general area, including “test” holes.
- Ragged tearing or larger openings as the bird digs deeper.
- Insect evidence like ant trails, frass (fine sawdust), or soft, punky wood.
- Activity all day, not just a morning performance.
Signs it is nesting or roosting
- One main entrance hole that gets bigger and cleaner around the edges.
- Fresh chips piling up beneath that hole.
- Regular visits by one bird or a pair.
If you are unsure: use a simple rule. If damage is deep, expanding, or clustered, investigate for insects and moisture early. If it is loud, repetitive, and not doing much damage yet, start with drumming deterrents and surface changes.
Know the rules: protected birds
In the United States, most native woodpeckers are protected under the Migratory Bird Treaty Act. In plain terms, that usually means you cannot legally harm them, and you should avoid actions that could injure birds or disturb an active nest. There are also state rules, and permits or exceptions may apply in limited situations.
- Do: use non-lethal deterrents, exclusion netting, and repairs.
- Avoid: disturbing active nests or eggs, or blocking an entrance to a cavity that may be in use.
- Best timing: do exclusion and major work before nesting season where you live, or after you confirm the cavity is inactive.
Because legal details and protected species lists vary by region, if you suspect nesting in the structure, contact a licensed wildlife control operator, your state wildlife agency, or the U.S. Fish and Wildlife Service for guidance on timing.
Deterrents that actually work
Woodpeckers are persistent. The trick is to combine visual disruption, physical exclusion, and removal of the reward. Here is what I recommend in order.
Step 1: Reduce the echo and remove the reward
- Fix loose siding and trim so it is not acting like a drum.
- Replace rotted wood. Soft wood is an invitation.
- Seal gaps where insects and moisture get behind siding.
Step 2: Visual deterrents (fast DIY win)
These are inexpensive and worth trying immediately. Place them right where the bird is landing, not 10 feet away.
- Reflective tape or streamers: hang in 12 to 24 inch lengths so they move in the breeze. Replace when they get dull.
- Pinwheels or reflective spinners: best where you have consistent wind and sunlight.
- Temporary shiny objects: aluminum pie pans can work, but they look like pie pans. Use in the back of the house if you care about curb appeal.
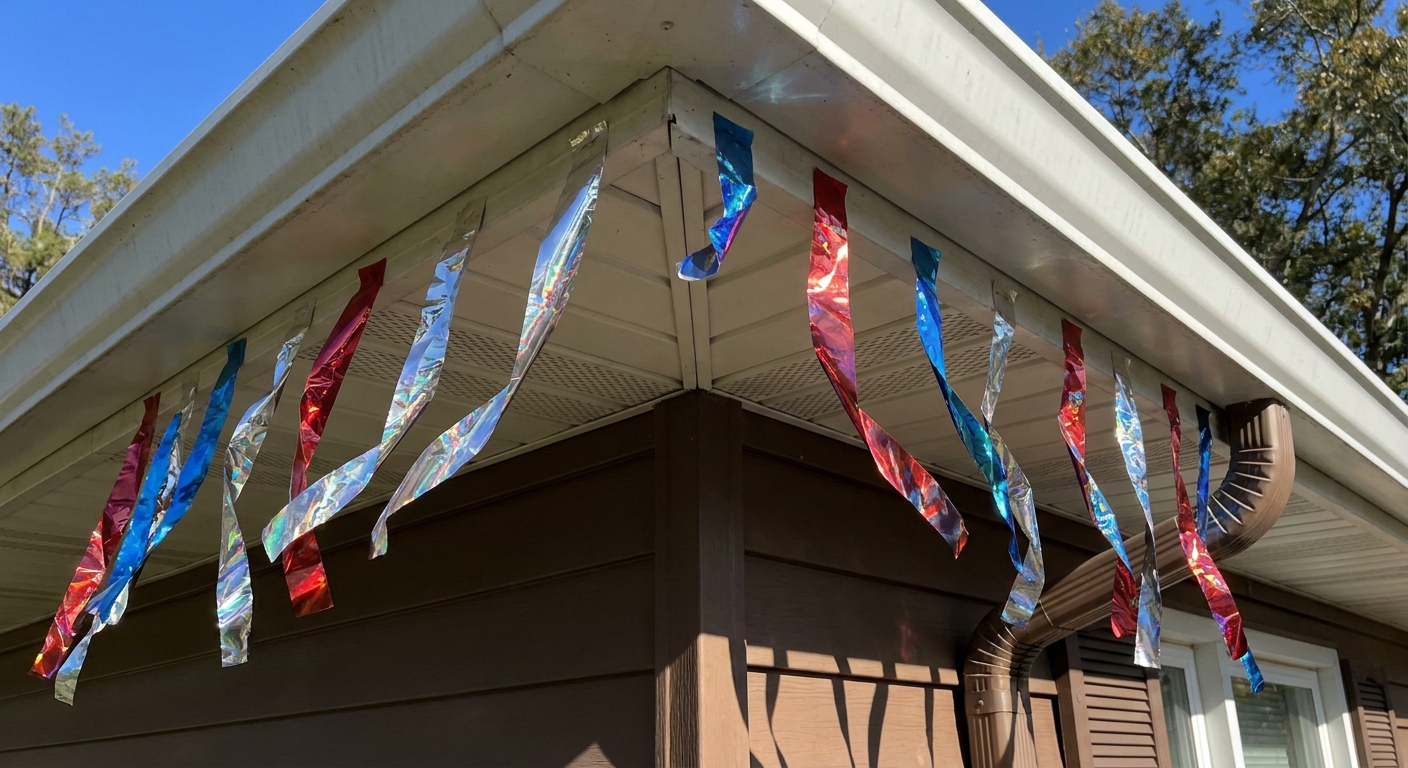
My honest take: visual stuff works best for drumming behavior and early-stage interest. If the bird is actively excavating or feeding, you often need stronger measures.
Step 3: Physical exclusion (best for repeat offenders)
If the woodpecker keeps returning, move to exclusion. This is the most reliable, non-harmful approach.
Netting
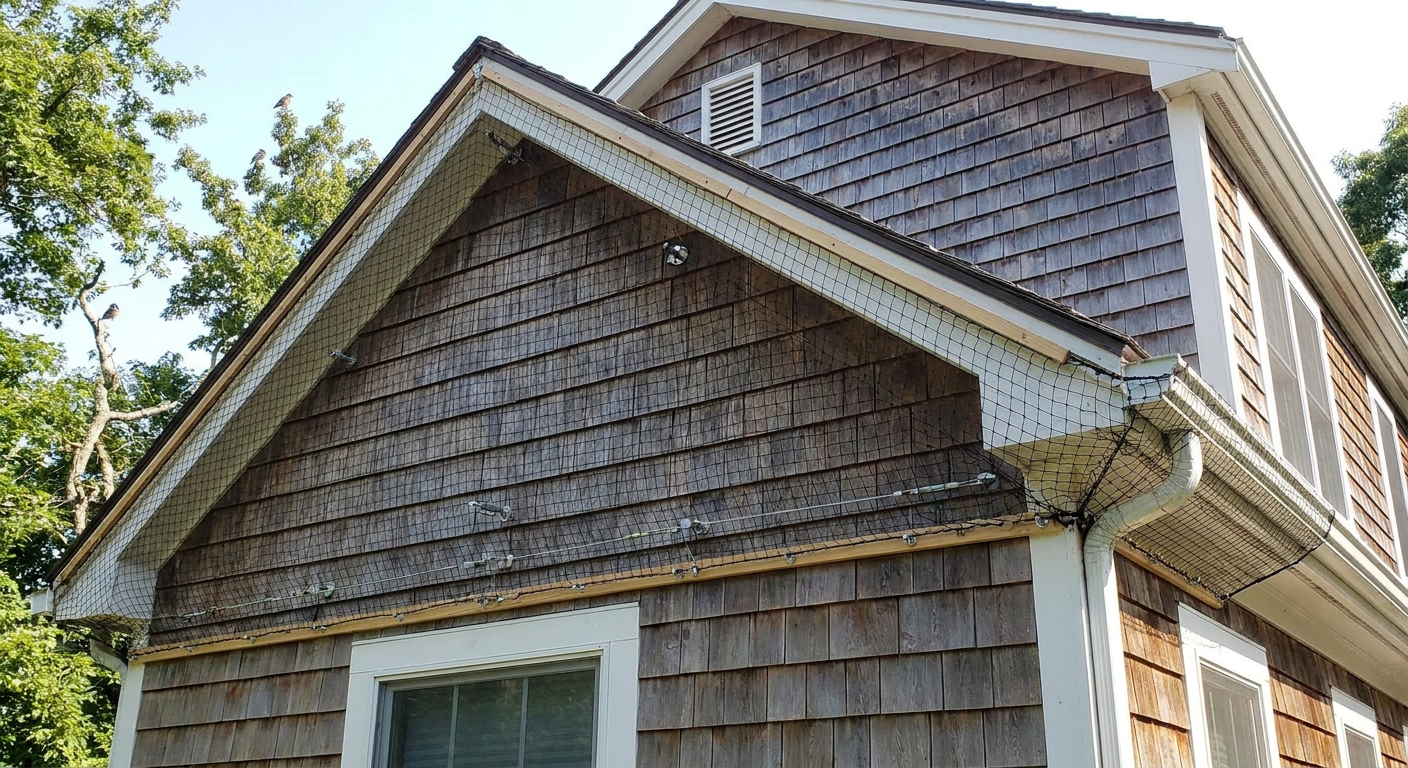
Install bird netting to keep the bird from reaching the surface.
- Stand-off: aim for about 2 to 4 inches so the bird cannot peck through the net. Follow the netting manufacturer’s guidance for spacing and attachment.
- Coverage: extend beyond the damaged area in every direction. If you only cover the exact holes, they will shift 12 inches over and start again.
- Attachment: use exterior-rated staples or screws with washers, depending on the surface. Avoid creating water entry points. For example, do not staple through flashing, and if you must add fasteners to trim, pre-drill where appropriate and seal properly.
Hardware cloth or a temporary barrier board
For small areas, a piece of painted plywood or hardware cloth over the target zone can buy you time while you address moisture, insects, and repairs.
Important: never cover an active or possibly active nest cavity. If you are not sure, pause and get guidance.
Step 4: Sound deterrents (use with care)
Some homeowners have luck with predator calls or noise devices, but results vary and neighbors may not love you for it. If you try sound, use it temporarily and combine it with visual or exclusion methods.
Step 5: Repair fast so the bird does not return
Woodpeckers revisit successful spots. Once you deter them, repair the area so it is not an obvious target.
- Small holes in wood: exterior wood filler or epoxy, sand, prime, paint.
- Match the repair to the material: wood, fiber cement, stucco, EIFS, and vinyl all have different best practices. When in doubt, replace the damaged piece, especially if water got behind it.
- Behind-the-siding voids: check sheathing for damage and moisture staining.
Targets: siding and materials
Woodpeckers are not picky about your remodel budget. They go for what is loud, soft, or workable.
- Cedar, redwood, and pine trim: easier to excavate, especially if weathered or damp.
- Fascia, soffits, and corner boards: common starting points because edges give leverage and can hide insects.
- EIFS and foam-backed systems: can be excavated for roosting or nesting even when there is no bug problem.
- Metal flashing and gutters: prime drumming “instruments” that may not show much damage at first.
If your home has softer materials, skip straight to better exclusion and faster repairs. You are not imagining it. Those surfaces are simply easier for a determined bird to work.
Fix insects and moisture
If pecking is focused on wood (not just metal flashing), I treat it like a warning light. It does not guarantee an infestation, but it is a smart reason to check for insects, moisture, and rot.
What to look for (quick DIY inspection)
- Carpenter ants: ants coming and going, especially at dusk, plus frass that looks like sawdust mixed with insect parts.
- Termites: mud tubes, blistered paint, or hollow-sounding wood.
- Moisture: failed caulk, bad flashing, leaking gutters dumping water on trim, soil touching siding.
- Rot: spongy wood around windows, doors, fascia, and soffits.
If you find clear evidence of termites or widespread carpenter ant activity, it is worth calling a pro. A one-time inspection can save you from chasing woodpeckers forever while the real issue grows behind the scenes.
DIY prevention that helps
- Control moisture: clean gutters, extend downspouts, fix leaks, keep sprinklers off siding.
- Keep wood sealed: repaint peeling areas, caulk smartly (do not trap water), and replace rotted trim.
- Trim back vegetation: reduce bridges for insects and reduce cover for birds.
- Remove dead wood nearby: dead tree limbs can be insect factories that bring woodpeckers close to the house.
Timing and a simple plan
When you are sleep-deprived from drumming, it is tempting to do something dramatic. Here is a calm plan that usually works without escalating into a bigger mess.
Day 1: Confirm the behavior
- Listen and watch if you can. Note the time of day and exact location.
- Look for insect signs, moisture staining, and fresh wood chips.
Days 1 to 3: Start deterrents now
- Hang reflective tape or spinners right at the target spot.
- Reduce the drum: tighten loose trim, reattach any rattling metal, and add temporary padding if needed.
Week 1: Move to exclusion if it continues
- Install netting with 2 to 4 inches of stand-off.
- Confirm inactivity before you block access: watch for repeated adult visits, listen for chicks, and if you are unsure, call for guidance.
Week 1 to 2: Repair and investigate
- Patch or replace damaged materials, then prime and paint.
- Fix moisture entry points and investigate pests if damage is deep or expanding.
My rule of thumb: if you only do deterrents but skip repairs and moisture control, you usually get a short break and then a repeat performance.
Common mistakes
- Waiting too long: shallow marks turn into holes surprisingly fast.
- Using one tactic only: combine visual plus exclusion plus repairs.
- Patching holes without solving moisture: trapped water makes wood softer, which invites insects, which invites more pecking.
- Blocking a cavity that might be active: it can be illegal and it can create a worse situation inside the wall.
- Trying harmful shortcuts: poisons, sticky traps, and shooting can be dangerous, illegal, and often make the problem worse.
When to call a pro
DIY is great, but there are times to bring in help:
- You suspect termites or a large carpenter ant colony.
- The bird appears to be nesting in the structure, or you are not sure if a cavity is active.
- Damage is high up, near rooflines, or requires ladder work you are not comfortable with.
- You have repeated activity despite netting and repairs.
A reputable wildlife control operator should focus on exclusion and habitat changes, not harm. If their first solution is lethal control, keep shopping.
Quick FAQ
Will fake owls or plastic predators work?
Sometimes, briefly. They work better if you move them every day or two. Woodpeckers get used to stationary decoys fast.
Does suet or a feeder help by distracting them?
It can go either way. Sometimes it redirects them, sometimes it increases woodpecker traffic near your house. If your issue is drumming, feeding birds nearby can keep them around longer.
Should I fill holes with spray foam?
I avoid it for exterior woodpecker holes. Foam can trap moisture and it is not a durable exterior repair. Use proper exterior patching or replace the damaged piece when needed.
Do bird repellent sprays work?
Results are mixed outdoors. Many wash off in rain or fade quickly in sun, so I treat sprays as a short-term add-on, not the main solution.
The 30-Second Cheat Sheet
Essential takeaways for: Woodpeckers Pecking Your House? Deter Them Safely
- First, figure out why: Drumming is loud, often one spot, little debris. Feeding often creates deeper holes, ragged damage, multiple spots, and may point to insects in the wood or wall. Nesting/roosting is usually one main entrance hole with fresh chips below.
- Stay legal: Most native woodpeckers are protected. Use non-lethal deterrents. Avoid disturbing active nests or blocking a cavity that may be in use. Permits and state rules can apply in limited cases.
- Fastest DIY deterrent: Hang reflective tape/streamers right where the bird lands. Works best for early-stage drumming.
- Most reliable fix: Install exclusion netting with 2 to 4 inches of stand-off so the bird cannot reach the siding. Extend netting beyond the damaged area.
- Do not skip the root cause: If pecking targets wood, inspect for carpenter ants, termites, beetle larvae, moisture, and rot. Fix moisture issues and address pests if found, or the bird may keep coming back.
- Repair promptly: Patch or replace damaged siding or trim, then prime and paint. A “successful” hole becomes a repeat target.
- Call a pro when: you suspect termites, see widespread insect activity, damage is high on the house, or you believe there is an active nest in the structure.
💡 Tip: Scroll up to read the full article for detailed, step-by-step instructions.
⬆️ Back to top
About Marcus Vance
Content Creator @ Grit & Home
Marcus Vance is a lifelong DIY enthusiast and self-taught home renovator who has spent the last decade transforming a dilapidated 1970s ranch into his family's dream home. He specializes in budget-friendly carpentry, room-by-room renovations, and demystifying power tools for beginners. Through his writing, Marcus shares practical tutorials and hard-learned lessons to help homeowners tackle their own projects with confidence.