
🚨 In a DIY emergency or rush?
Skip the details and jump straight to our 30-second cheat sheet for the most crucial info.
The first time my dishwasher started peppering our clean plates with black specks, I assumed it was old food getting blasted back onto the dishes. Nope. It was a worn plastic part shedding tiny flakes, and the machine was basically recirculating them like a snow globe.
If you are seeing black specks, black flakes, or sandy grit on glasses and plates, the fix is usually less about detergent and more about debris management or a component breaking down. Let’s sort out what you are actually looking at, then walk through the most common sources in the order I would check them at home.
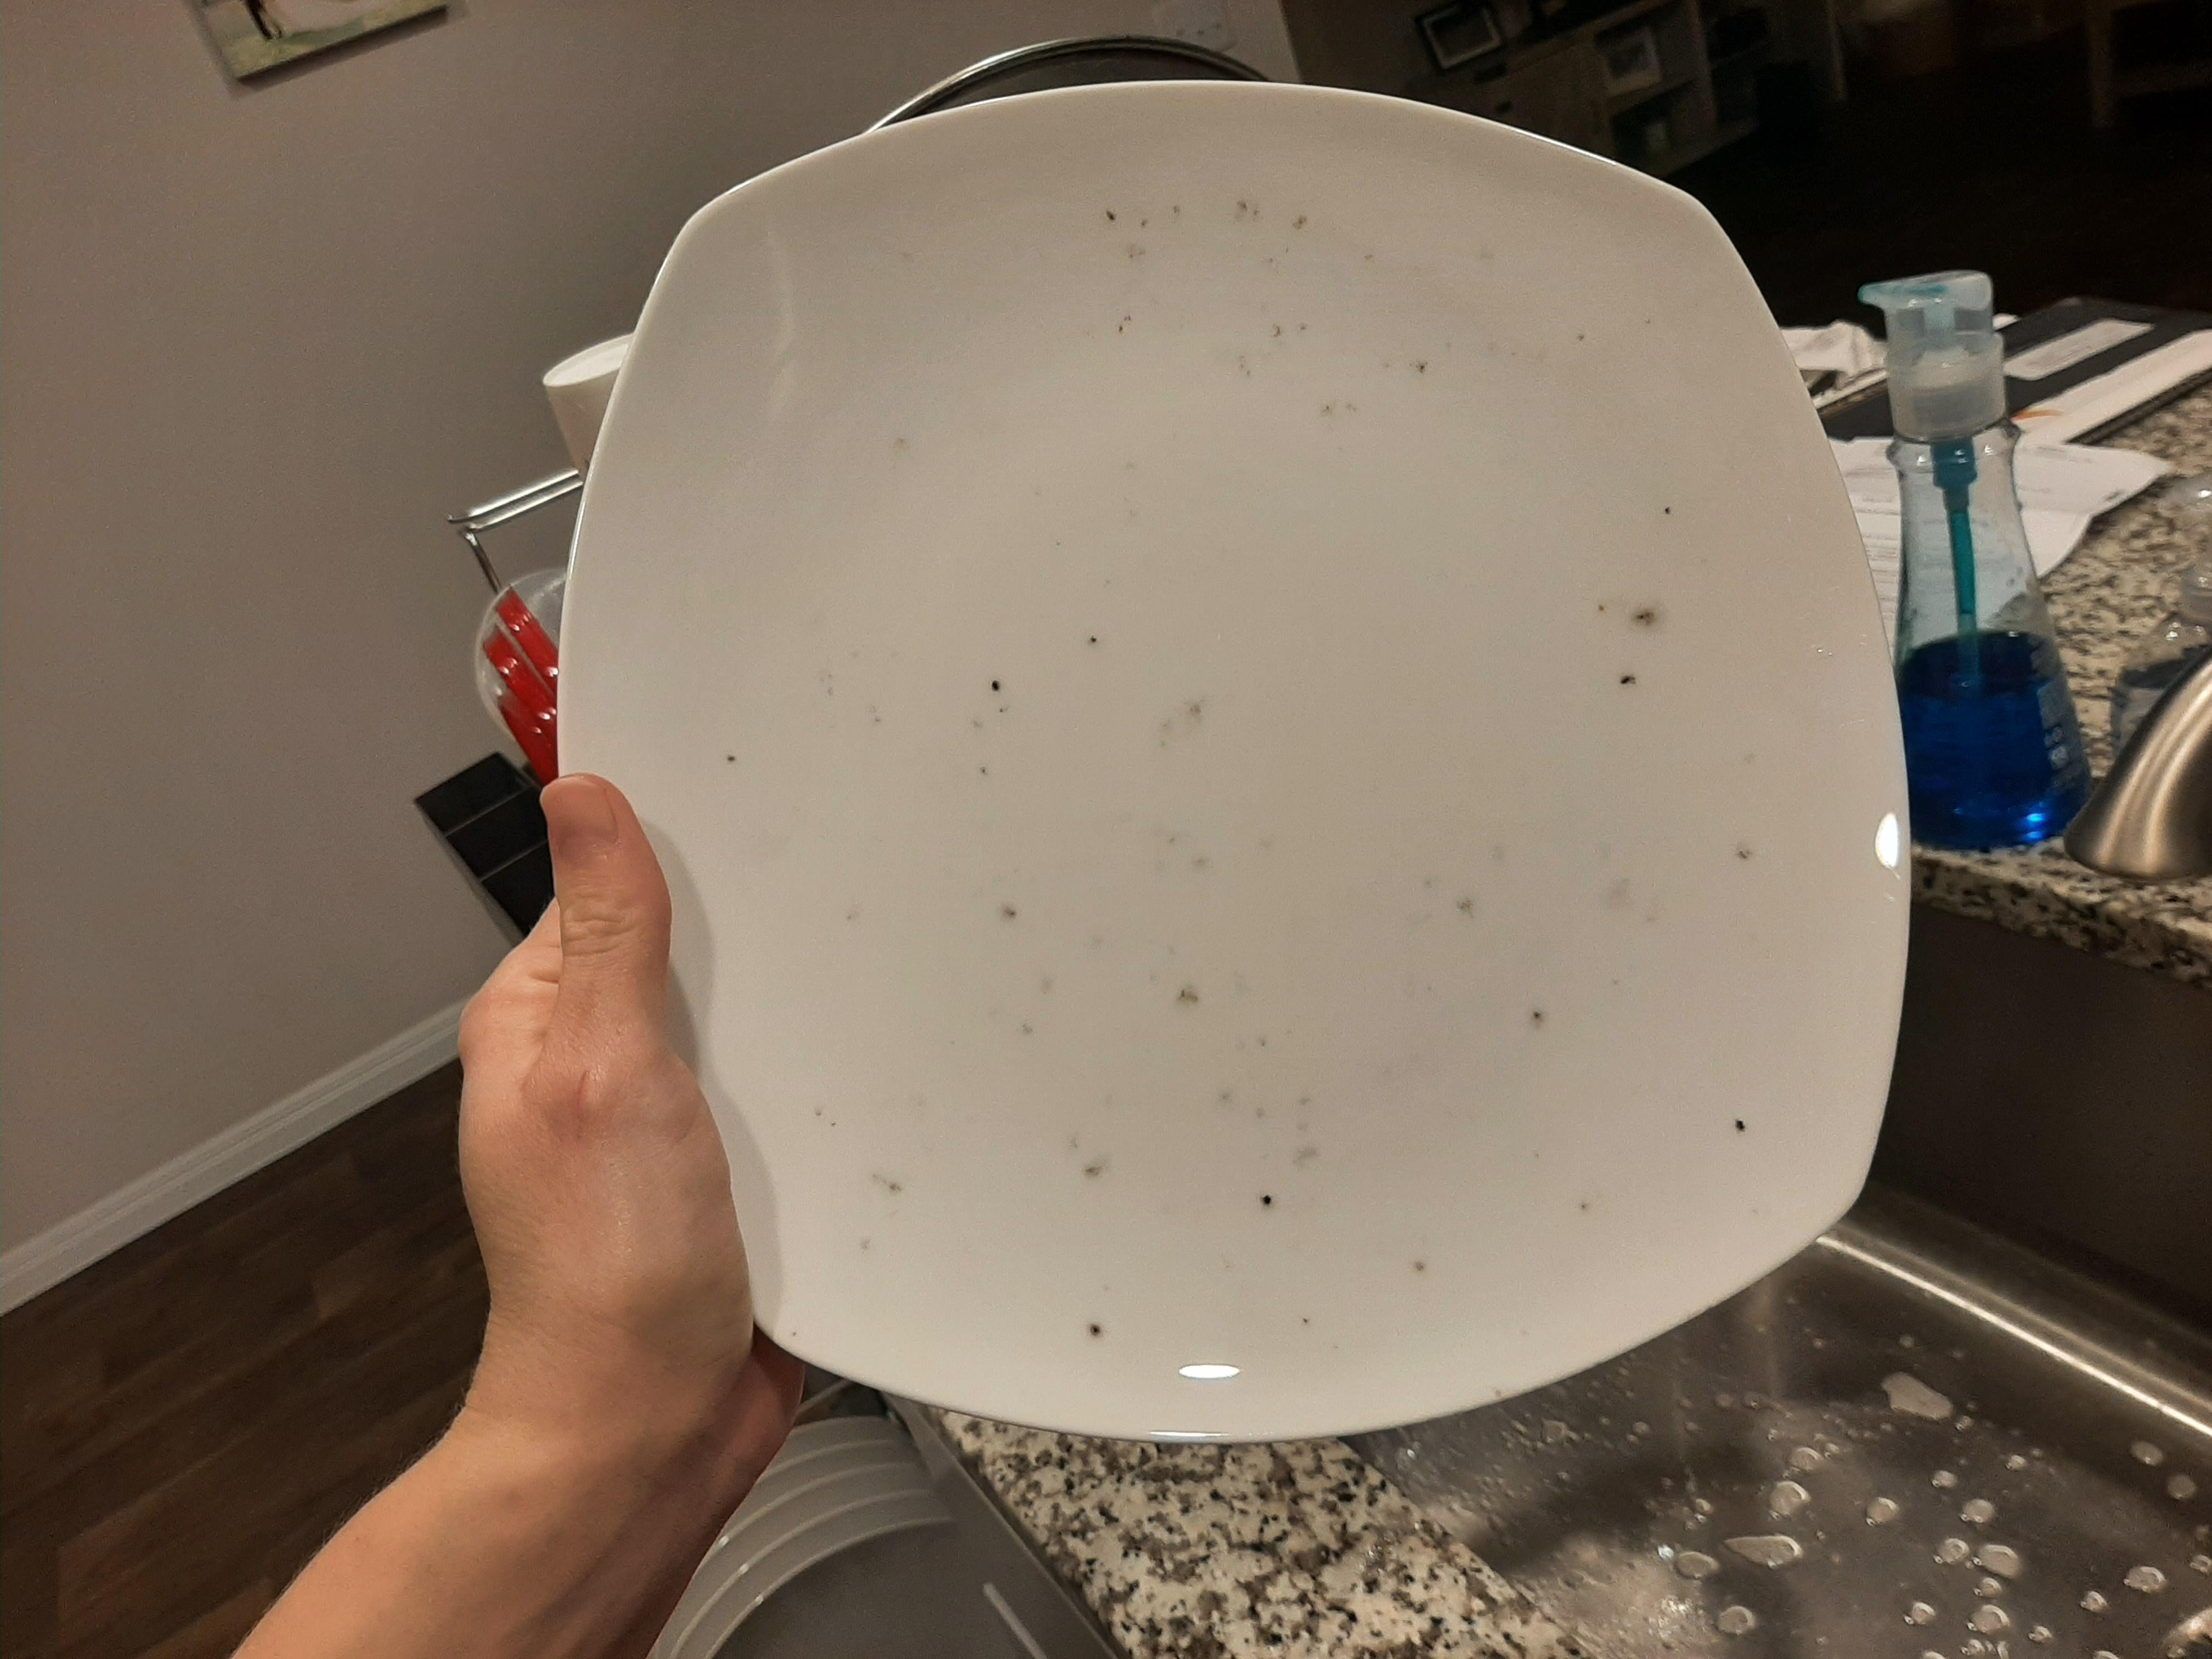
First: identify the residue
Before you take anything apart, do two quick tests. They help you separate black debris from hard-water film and from leftover food, which need totally different fixes.
Quick tests (2 minutes)
- Wipe test: Rub a speck between a damp paper towel and your finger.
- Smears gray or black like pencil: often worn plastic or rubber, sometimes degraded wash arm hub or gasket material.
- Feels like sand and falls off: typically filter debris, seed-like food particles, or mineral grit that got trapped and re-deposited.
- Looks like pepper or coffee grounds: often food debris or chopper or grinder related (if your model uses one).
- Vinegar test on glass: If you also see a cloudy haze, put a little white vinegar on a paper towel and wipe a section.
- Haze improves or disappears: that part is likely mineral film from hard water.
- Haze stays: could be etching or a stubborn residue. Vinegar is a helpful clue for mineral film, but it is not a perfect test for every kind of cloudiness.
If the issue is undissolved pods or detergent residue, that is a different lane than this article. Black specks and grit are usually physical debris being re-circulated.
Start simple: filter and sump
Many modern dishwashers use a filter system designed to catch particles before they get back onto your dishes. Some models instead use a self-cleaning filter and a hard-food disposer. Either way, a clogged filter area or a dirty sump can turn into a debris merry-go-round.
What it looks like
- Gritty particles on the bottom of cups and in concave dishes
- Specks worse on the top rack (water is raining down carrying debris)
- A little pile of grit in the bottom of the tub after the cycle
What to do
- Cut power at the breaker if you will put hands near the sump area.
- Protect your hands if you suspect broken glass. Cut-resistant gloves are worth it, and go slow around sharp edges.
- Pull the bottom rack.
- Remove the filter assembly (typically a twist-lock cylinder and a flat screen).
- Rinse and scrub with a soft brush. Check the mesh for tears and the plastic frame for cracks.
- Look down into the sump and remove any broken glass, labels, seeds, bone fragments, or toothpick bits.
- Reinstall the filter and confirm it seats flat and locks fully.
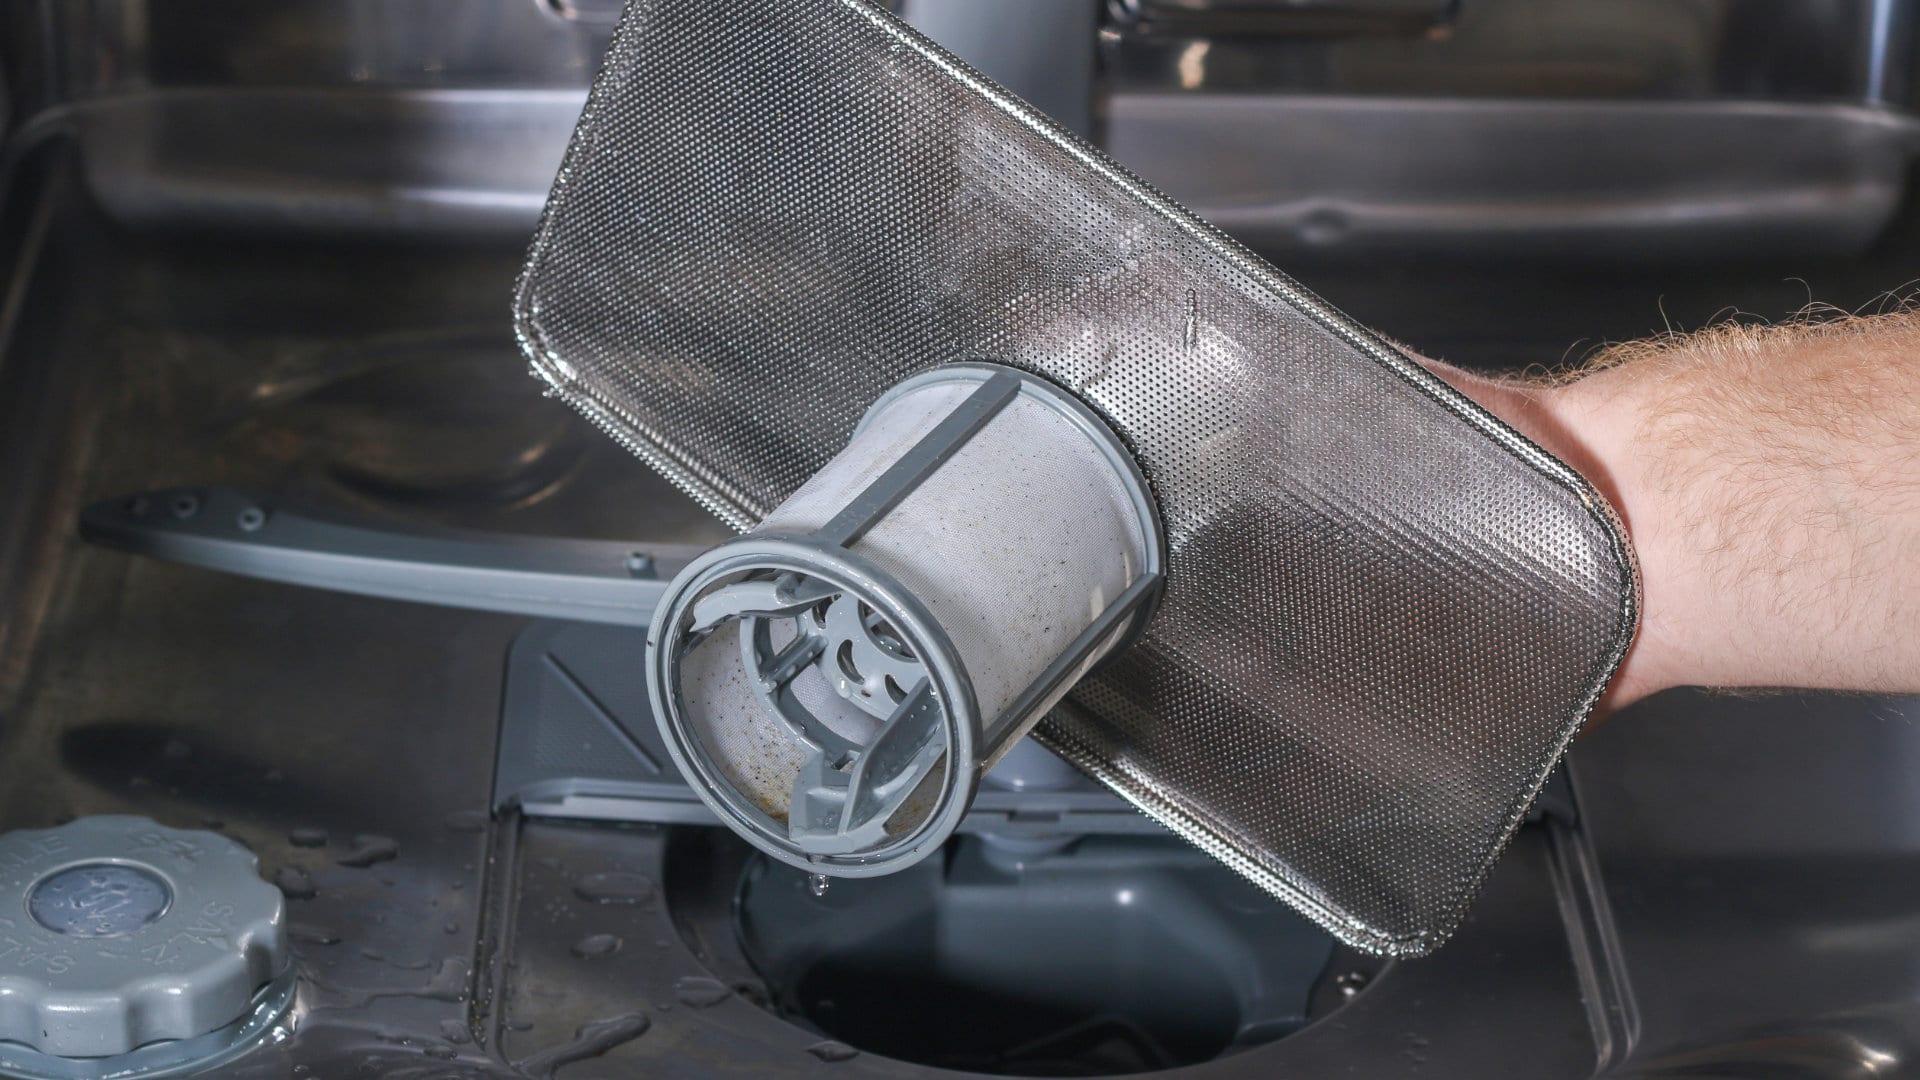
When the filter needs replacement
- The fine mesh has holes or is separating from the frame
- The filter no longer locks in tightly
- You see recurring debris even after cleaning and the sump is clear
Thrifty note: I am all for cleaning first, but a torn filter is like a ripped furnace filter. You do not clean your way out of it.
Check for melted plastic
This one is sneaky because it can look like mystery dirt. A utensil handle, a lid, a measuring spoon, or even a thin cutting board can sag into hot components. The plastic softens, then later breaks into black or dark gray flakes that end up everywhere.
One extra wrinkle: not every dishwasher has an exposed heating element. Some designs hide the heater, route heat through the base, or use a heat pump style setup. Translation: melted plastic can show up on an exposed coil, but it can also bake onto the tub base area, around a vent, or onto parts near the bottom.
Clues it is melted plastic
- Black flakes that are thin, irregular, and slightly flexible
- A burnt smell during or right after the cycle
- Visible drips or shiny smears on the heater area, tub floor, or lower rack
What to do
- Inspect the heater area (if visible) and the tub floor for stuck-on plastic.
- Carefully peel off cooled plastic. For stubborn spots, warm water and a plastic scraper help.
- Run a short rinse cycle empty and see if specks return.
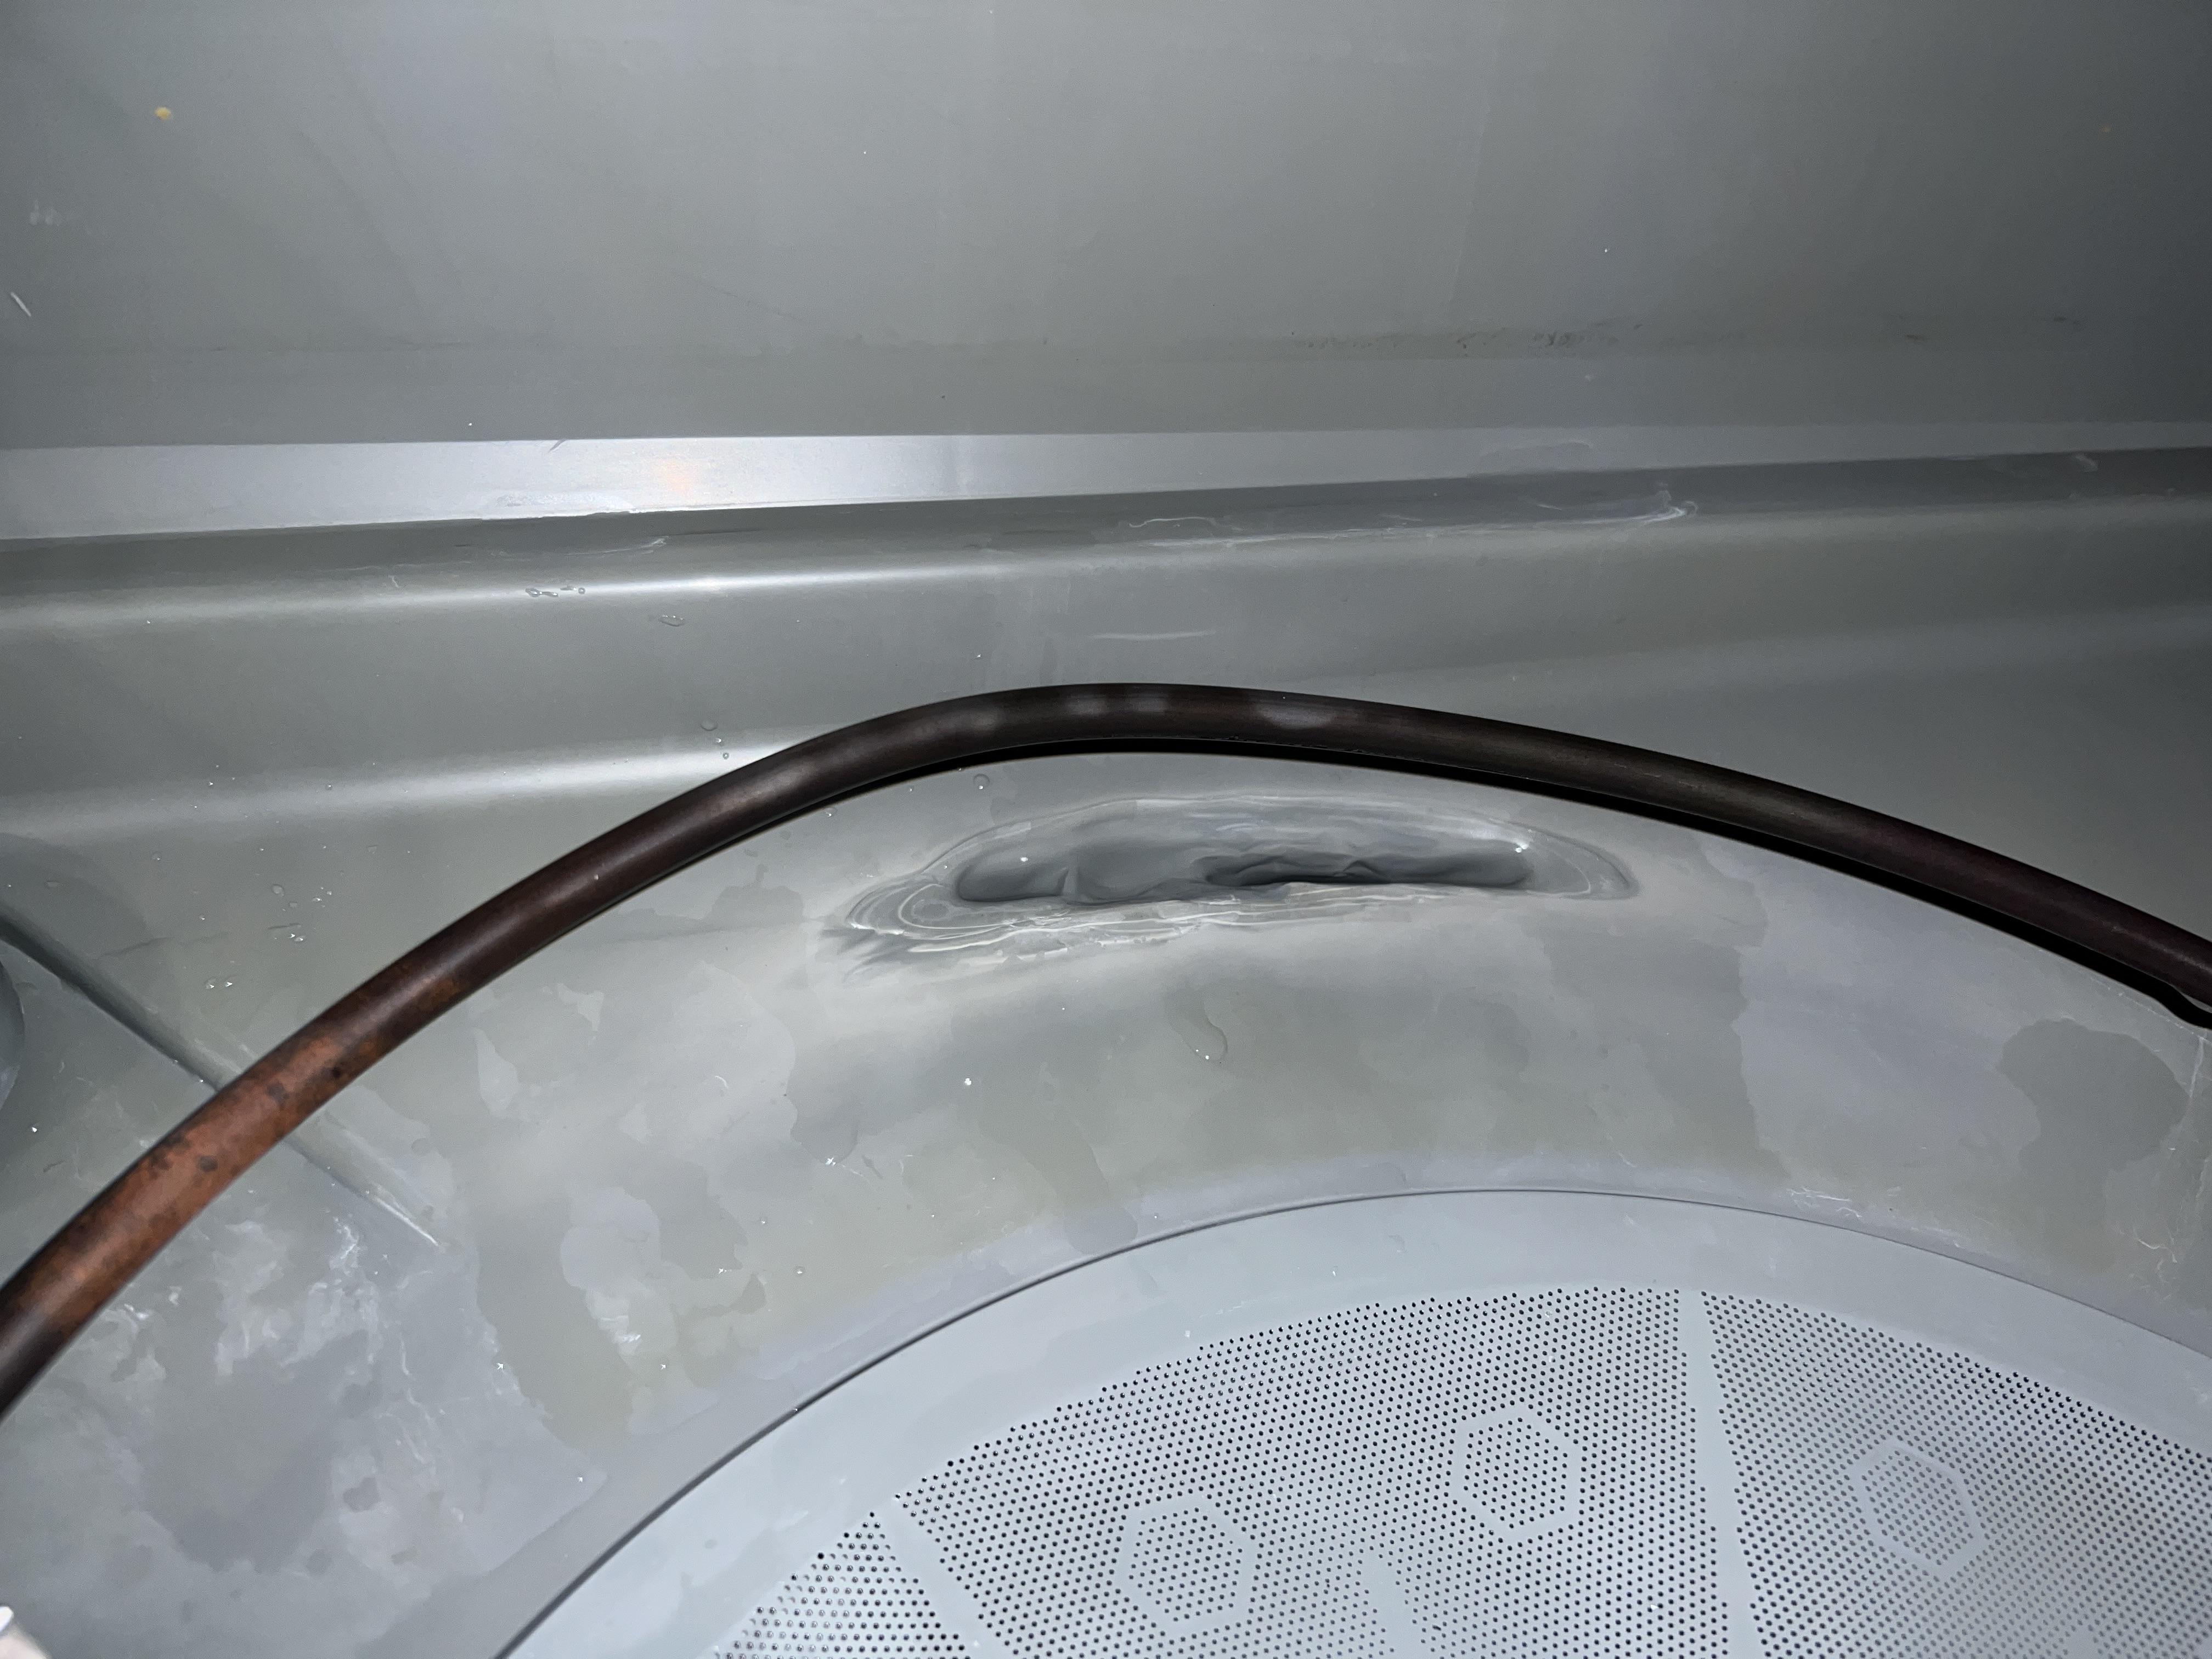
If you keep getting flakes after you remove the obvious melted piece, move on to the wash arms and the other wear items below.
Inspect the spray arms
Spray arms are supposed to shoot clean water through tiny ports. When those ports clog, the arm can stop spinning or it can spit debris out in random bursts. Some arms also use plastic bearings or bushings that can wear and shed.
What to look for
- Seeds, rice, or grit wedged in the spray holes
- Cracks along the seam of the spray arm
- Worn plastic at the hub where the arm spins (looks chewed up or oval)
- Black dust-like residue around the hub
What to do
- Remove the upper and lower spray arms (varies by model, usually a nut, clip, or twist-lock).
- Flush them in the sink. Use a toothpick to clear ports, then rinse again.
- Check the hub or bearing surface. If it is sloppy or visibly worn, it can shed material and reduce pressure.
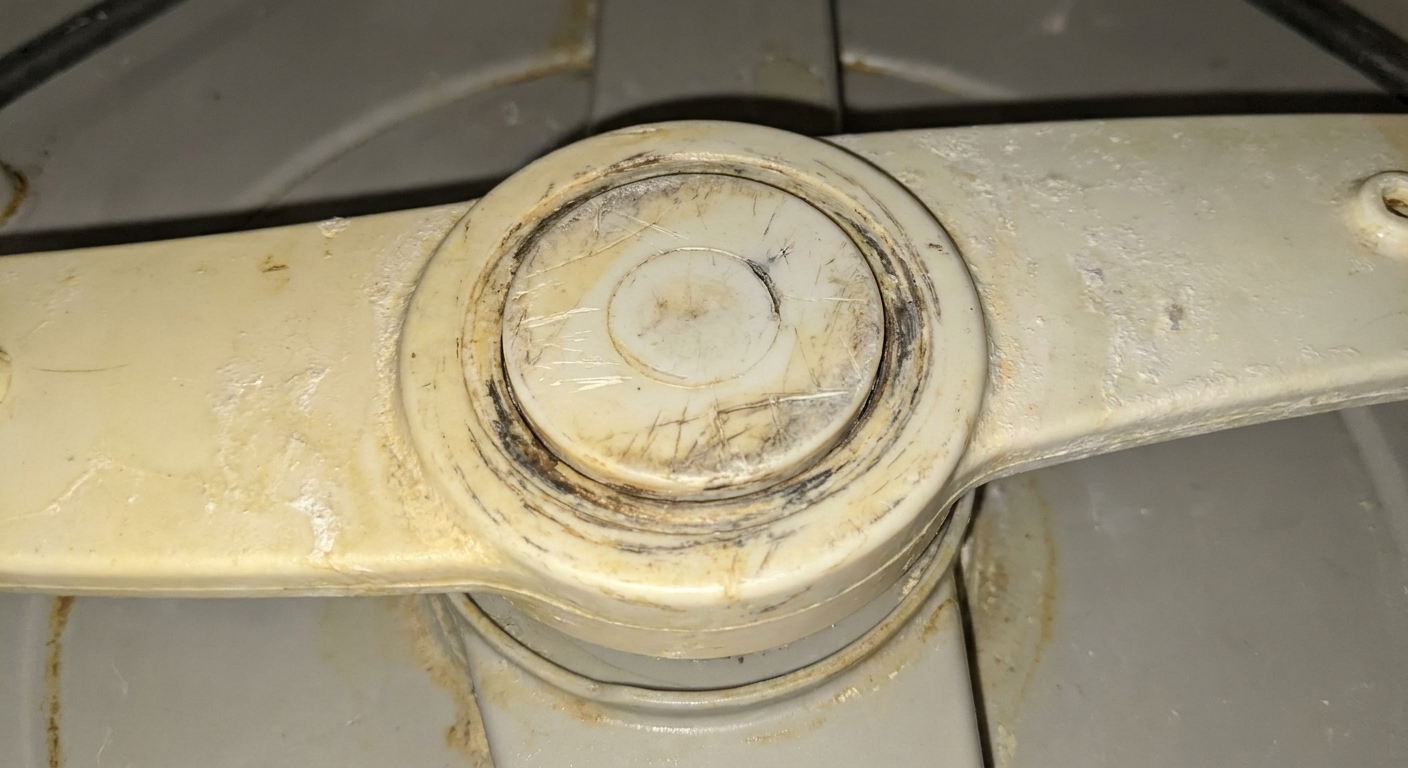
When the spray arm needs replacement
- The hub is worn enough that the arm wobbles or binds
- The arm is cracked, swollen, or separating at the seam
- You clean ports but still get black flecks and poor spray performance
Check rubber and rack coating
If your specks smear like pencil, do not overlook rubber and coatings. Dishwashers have plenty of soft parts that can shed when they age or get nicked, and those bits love to hitch a ride onto clean glassware.
Common culprits
- Rack tine coating: If the coating is peeling, you may see dark flakes. Bonus problem: exposed metal can rust and leave orange stains later.
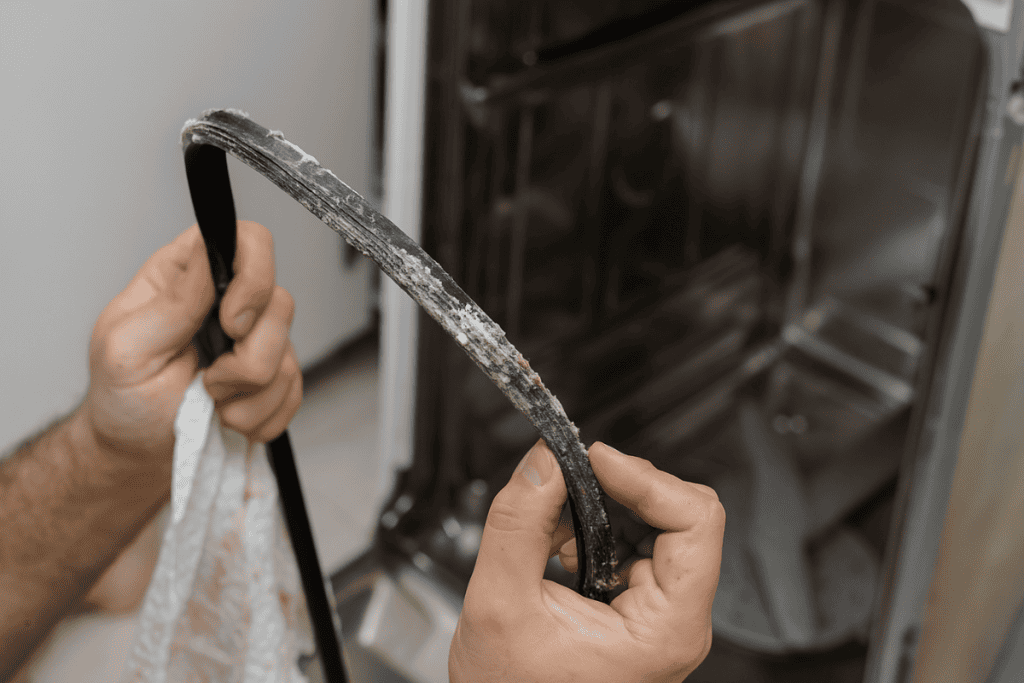
- Door gasket: A torn or deteriorating gasket can shed little dark crumbs, especially if it is rubbing or you are using harsh cleaners.
- Other seals: Depending on design, worn seals around moving parts can also contribute dark residue, especially if you have new leaks or new noises.
What to do
- Run your finger along the rack tines and the door gasket. If you get residue on your finger, you found a likely source.
- Look for fresh rub marks where the rack or spray arm might be contacting something and chewing it up.
- If a gasket is torn or a rack coating is actively flaking, replacement or repair is usually the long-term fix.
Pepper specks and noise: chopper or grinder
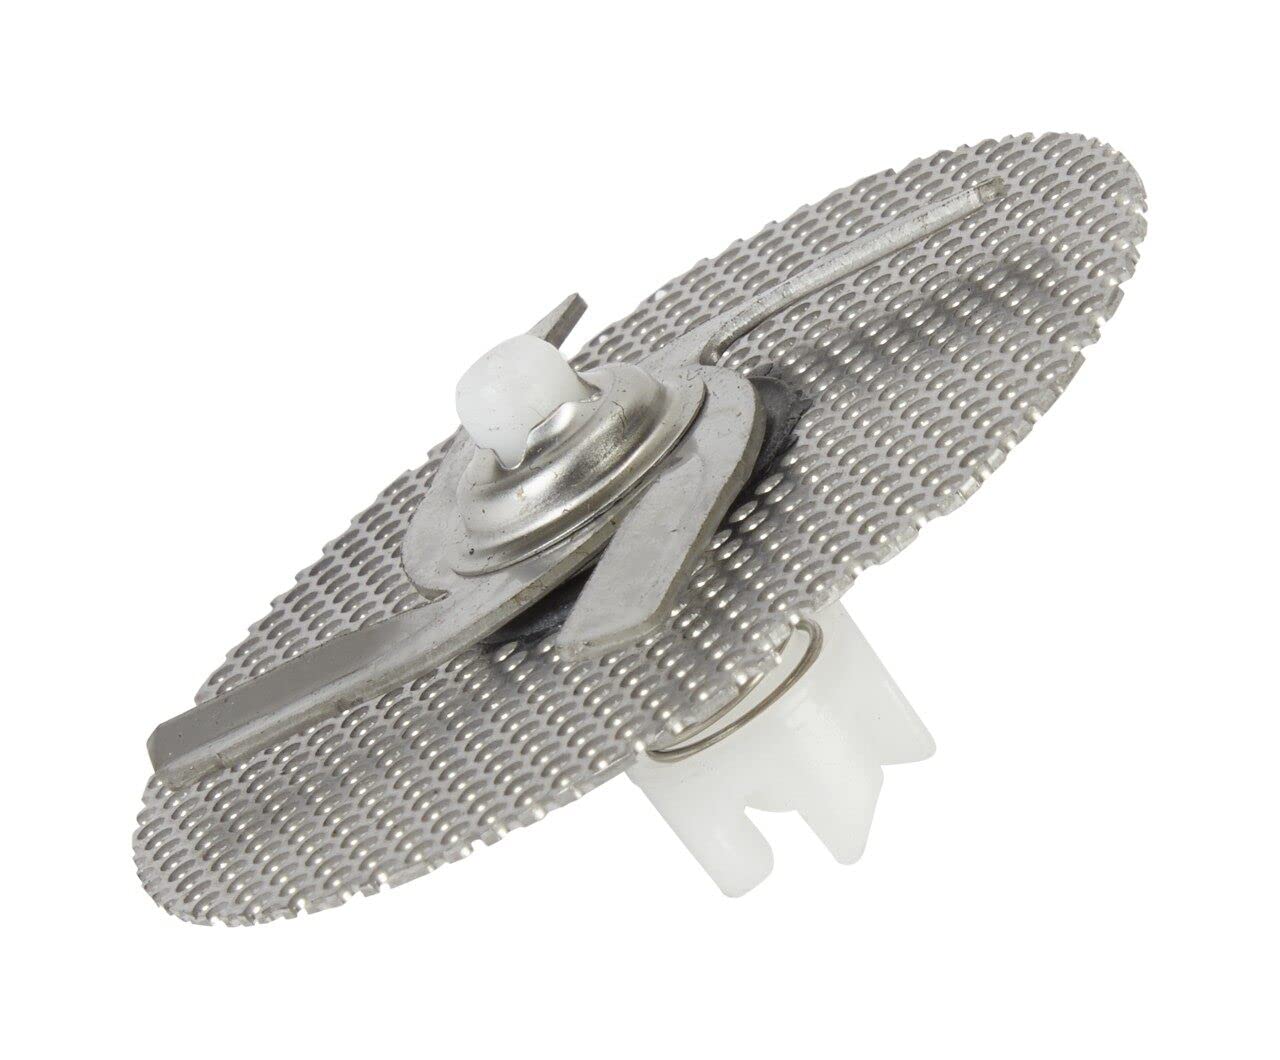
Some dishwashers use a chopper, grinder, or disposer style component near the pump to break up food so it can be pushed out through the drain. Others have moved away from choppers entirely and rely on filtration instead. If yours does have one and that assembly is damaged, you can get a mix of symptoms: gritty debris, pepper specks, and occasional grinding noises.
Common signs
- Black specks that resemble coffee grounds or pepper
- Intermittent noise during wash or drain
- Debris returns quickly even with a clean filter
- Dishes have grit, especially on the top rack
What to check (homeowner level)
Different brands place this in different spots, and some models will not have one at all. If you want to confirm what your machine uses, check your manual or the tech sheet usually tucked behind the toe-kick or along an inside edge.
If your model has an accessible chopper or screen near the sump:
- Look for broken plastic bits, a damaged screen, or a blade area clogged with debris.
- If parts are cracked or pieces are missing, plan on replacement. Once an internal chopper starts shedding fragments, it rarely gets better.
When replacement is the right call
- You find cracked plastic, missing fins, or a damaged screen
- The unit makes grinding noises and you keep seeing black specks
- You have repeated clogs and poor draining alongside the debris
DIY reality check: access ranges from easy Saturday project to why did I start this depending on the model. If you are not comfortable working around pump housings and seals, this is a fair point to call an appliance tech.
Check the drain path
If your dishwasher is not draining well, debris can hang around in the sump and get redeposited. One of the most common install mistakes is leaving the knockout plug inside a new garbage disposal inlet.
Signs of a drain issue
- Standing water in the bottom after a cycle
- Grit and debris collected near the filter area
- Bad smell that returns quickly after cleaning
What to check
- Sink or disposal connection: If the dishwasher hose connects to a disposal, confirm the knockout plug was removed.
- High loop: Make sure the dishwasher drain hose loops up under the sink before going down to the drain connection.
- Hose kinks: Look for a pinched line behind the dishwasher or under the sink.
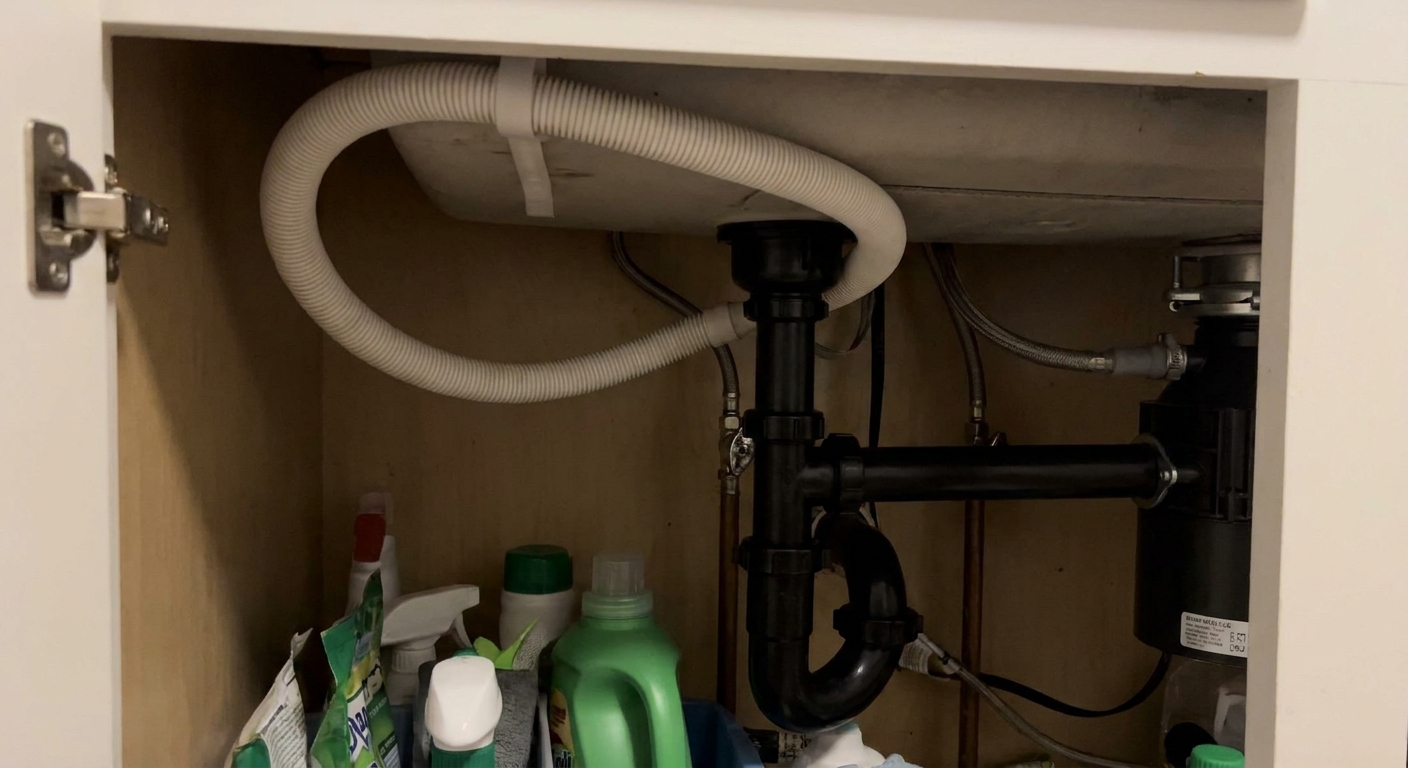
Even with perfect spray, a machine that cannot drain well is going to keep recycling whatever junk is left in the bottom.
Rule out outside grit
If you cleaned the filter, flushed the arms, and you are still seeing grit, it is worth ruling out one less common source: debris coming from your water supply. Aging plumbing, sediment after utility work, or a failing faucet aerator can send dark particles into the line. It is not the usual culprit, but it can keep you chasing your tail.
Quick decision guide
If you just want the fastest path to a diagnosis, here is how I’d triage it.
- Sandy grit plus visible crumbs: Clean filter and sump first. Then flush spray arms.
- Black flakes that are thin and flexible: Look for melted plastic near hot surfaces.
- Black dust near spray arm hub: Inspect hub and bushings. Replace the arm if worn.
- Smearing black specks: Check rack coating and door gasket for shedding.
- Pepper-like specks plus noise: Investigate chopper or grinder area if your model uses one. Replace damaged parts.
- Debris returns plus standing water: Drain path problem. Check hose routing and disposal knockout plug.
How to prevent a repeat
Once you solve the source, a few habits keep it from returning.
- Rinse the filter monthly if you run the dishwasher daily, or every couple months if you run it less.
- Scrape, do not prewash. Big chunks are the enemy. A light scrape is enough.
- Load so nothing blocks the spray arms. If an arm clips a pan handle, it can grind debris and stop spinning.
- Keep lightweight plastics secure. Flipped lids and utensils are the usual suspects for melted plastic.
- Run hot water at the sink first for a few seconds so the cycle starts hot and moves grime out efficiently.
When to call a pro
I’m all for DIY, but I also like sleeping at night. Bring in help if:
- You suspect a pump seal leak or you see water under the machine
- You need to remove major assemblies and you are not confident resealing everything
- The dishwasher is making loud grinding noises and the debris problem persists after filter and spray arm cleaning
FAQ
Why do I get black specks only on the top rack?
The top rack often catches debris that gets lifted and then falls back down. A clogged filter, a dirty spray arm, a worn spray arm hub, or even shedding gasket material can all make the top rack look worse.
Are black specks mold?
Sometimes you can have mildew buildup, but most true specks on dishes problems are physical debris: food, degraded plastic, degraded rubber, or melted plastic flakes. Mold usually shows up as slime, odor, and staining inside the tub and seals, not dry specks on clean plates.
Can hard water cause black grit?
Hard water usually causes white film or chalky scale. It can contribute to grit if mineral particles build up and break loose, but if the specks are truly black, suspect plastic breakdown, rubber shedding, melted plastic, or recirculated debris first.
I cleaned the filter and it still happens. What next?
Move to the spray arms and their hubs, then inspect for melted plastic and shedding rubber or rack coating. If you also have noise or poor drain performance, the chopper or grinder area (if equipped) and the drain path are the next likely stops.
The 30-Second Cheat Sheet
Essential takeaways for: Dishwasher Leaving Black Specks or Grit on Dishes?
What black specks usually mean
- Black specks or flakes are typically physical debris being recirculated: clogged filter debris, worn spray arm hub or bushing material, degraded rubber coating, a failing chopper or grinder (if your model has one), or melted plastic.
- Not the same as hard-water film, which is usually white or cloudy and often wipes off with vinegar.
Fastest checks (in order)
- Clean and reseat the filter and remove debris from the sump.
- Inspect for melted plastic near the heater area or hot tub base (design varies by model).
- Remove and flush spray arms. Check the hub for wear, wobble, or black dust.
- Check rubber and rack coating for flaking (rack tines, door gasket edges).
- If specks look like pepper and there is noise, check the chopper or grinder area if your model has one and it is accessible.
- If draining is poor, check the drain hose high loop and the garbage disposal knockout plug.
When you must replace a part
- Filter: torn mesh, cracked frame, won’t lock in place
- Spray arm: cracked seam, clogged ports you cannot clear, worn hub or bushing causing wobble
- Rack or gasket: peeling rack coating, torn gasket shedding rubber bits
- Chopper components: cracked plastic, missing fins, damaged screen, recurring debris with grinding noise (only if equipped)
Stop doing this
- Do not ignore lightweight plastics that can flip down and melt near hot surfaces.
- Do not keep running cycles with a torn filter or a grinding noise. You can turn a small parts fix into a pump repair.
💡 Tip: Scroll up to read the full article for detailed, step-by-step instructions.
⬆️ Back to top
About Marcus Vance
Content Creator @ Grit & Home
Marcus Vance is a lifelong DIY enthusiast and self-taught home renovator who has spent the last decade transforming a dilapidated 1970s ranch into his family's dream home. He specializes in budget-friendly carpentry, room-by-room renovations, and demystifying power tools for beginners. Through his writing, Marcus shares practical tutorials and hard-learned lessons to help homeowners tackle their own projects with confidence.