🚨 In a DIY emergency or rush?
Skip the details and jump straight to our 30-second cheat sheet for the most crucial info.
If you have an expanding brown ring on the ceiling near a bathroom, laundry, or kitchen, I want you to check one very specific culprit before you start blaming the whole roof: the plumbing vent pipe boot (also called a stack boot or stack collar).
On my 1970s ranch, I chased a “mystery roof leak” for two rainy weekends. Turns out the shingles were fine. The rubber boot around the vent pipe had cracked like an old garden hose, and every hard rain was funneling water straight into the attic.
This is a very common roof leak on older asphalt shingle roofs, and it is usually very fixable. You just need to confirm it’s really the boot and then replace it the right way so it sheds water, not catches it.
Vent boot leak or something else?
Vent boot leaks have a few tells. The goal is to trace the water path from inside first, then confirm outside.
Clues inside
- Stain location: Often near a bathroom, laundry, or kitchen because that is where vent stacks typically run.
- Timing: Stains get worse after wind-driven rain, heavy downpours, or after snow melt cycles.
- Shape: A ring stain or a stain that “blooms” wider over time, rather than a straight line.
Rule out condensation first
In bathrooms and laundries, not every brown ceiling stain is a roof leak. Before you climb on the roof, do a quick condensation check in the attic.
- Bathroom fan duct: Make sure it is connected, insulated in cold climates, and venting outdoors (not into the attic).
- Frosty nails or damp roof deck in cold snaps: That can be attic condensation that later drips and stains.
- Stain shows up without rain: Another condensation clue.
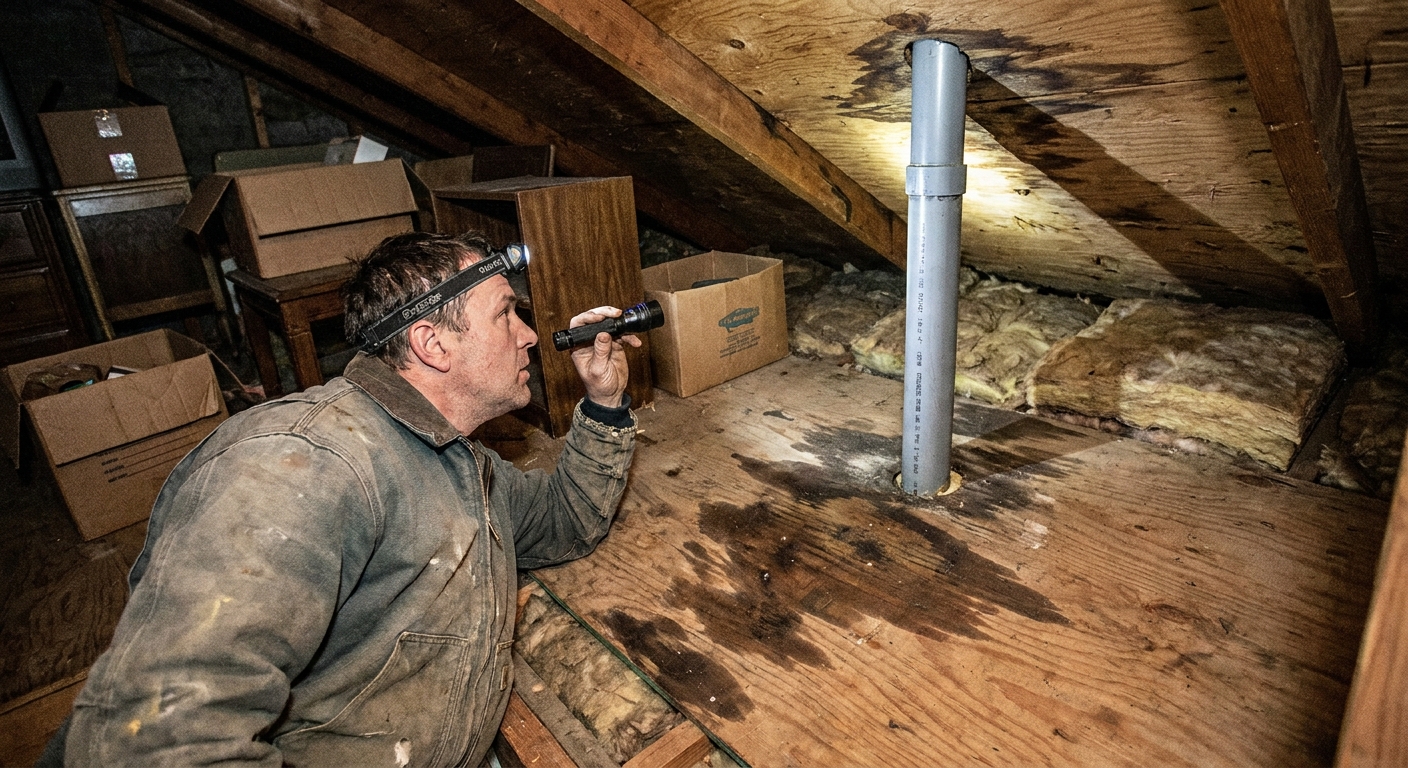
What to look for in the attic
Go up with a bright flashlight when the roof is dry. If you can time it during or right after rain, even better. Stay on framing and avoid stepping on drywall.
- Find the vent pipe. It is usually a black ABS or white PVC pipe running up through the roof deck.
- Look for darkened roof sheathing, damp insulation, or water tracks on the pipe itself.
- Check for rusty-looking nail tips nearby. That often means repeated wetting.
- Confirm the water path: if the wet area is centered around the pipe penetration, the boot jumps to the top of the suspect list.
Quick rooftop confirmation
If you can safely access the roof (more on safety below), inspect the boot where the vent exits through the shingles.
- Cracked rubber: The collar splits around the pipe, especially on the sunny side.
- Loose fit: The boot no longer hugs the pipe tightly.
- UV damage and brittleness: Rubber feels hard and flaky instead of flexible.
- Improper sealant blobs: Big gobs of caulk on top are a red flag. Caulk is not a long-term flashing strategy.
If the shingles around the pipe look decent and the collar is visibly cracked, you’ve likely found your leak.
Why vent boots fail
The boot’s job is simple: keep water out while the pipe expands, contracts, and wiggles slightly over time.
- UV exposure: Sunlight bakes rubber until it cracks.
- Thermal movement: Roofs and pipes move with temperature swings, stressing the collar.
- Improper install: Flashing not tucked correctly, nails placed poorly, or shingles cut too tight can all invite water.
- Age: Standard neoprene boots can last a long time, but lifespan varies a lot by sun exposure, climate, and material quality. Plan on inspecting them regularly, especially once the roof is older.
If your roof is older and you have one boot failing, check the others while you’re up there.
Tools and materials
What you need
- Replacement vent pipe boot (correct pipe size, roof type, and ideally compatible with your roof pitch)
- Flat pry bar
- Hammer
- Utility knife with sharp blades
- Roofing nails (galvanized)
- Roofing cement (as needed)
- Polyurethane or roofing sealant (for targeted spots only, not as the “main plan”)
- Optional but handy: a few drops of dish soap, soapy water in a spray bottle, or glass cleaner to help the new collar slide
Picking the right boot
Most homes have 2 inch vents, with 3 inch or 4 inch often used for the main stack. Measure the pipe diameter in the attic or at the roof so you buy the right size.
- Rubber (neoprene) boots: Common and affordable.
- Silicone boots: Better in high-UV areas and stays flexible longer.
- Lead boots: Long-lasting but more expensive and not always preferred in every area.
Also match the base to your roof. Asphalt shingles are most common, but metal roofs use different boots and fastener patterns. If your vent is surrounded by ice-and-water shield or other membrane, work carefully and avoid tearing it.
Roof safety rules
I love DIY, but roofs are where I get strict. A $20 part is not worth a hospital bill.
- Only work on a dry roof. Morning dew is enough to turn shingles into a slip-and-slide.
- Avoid high wind. Wind makes ladders and footing unpredictable.
- Know your pitch limit. If the roof feels steep to stand on, it is steep enough to hire out.
- Use a properly set ladder. Stable base, correct angle, extend above the eave.
- Wear grippy shoes and gloves.
If you are uncomfortable at any point, this is a perfectly reasonable job for a roofer or handyman.
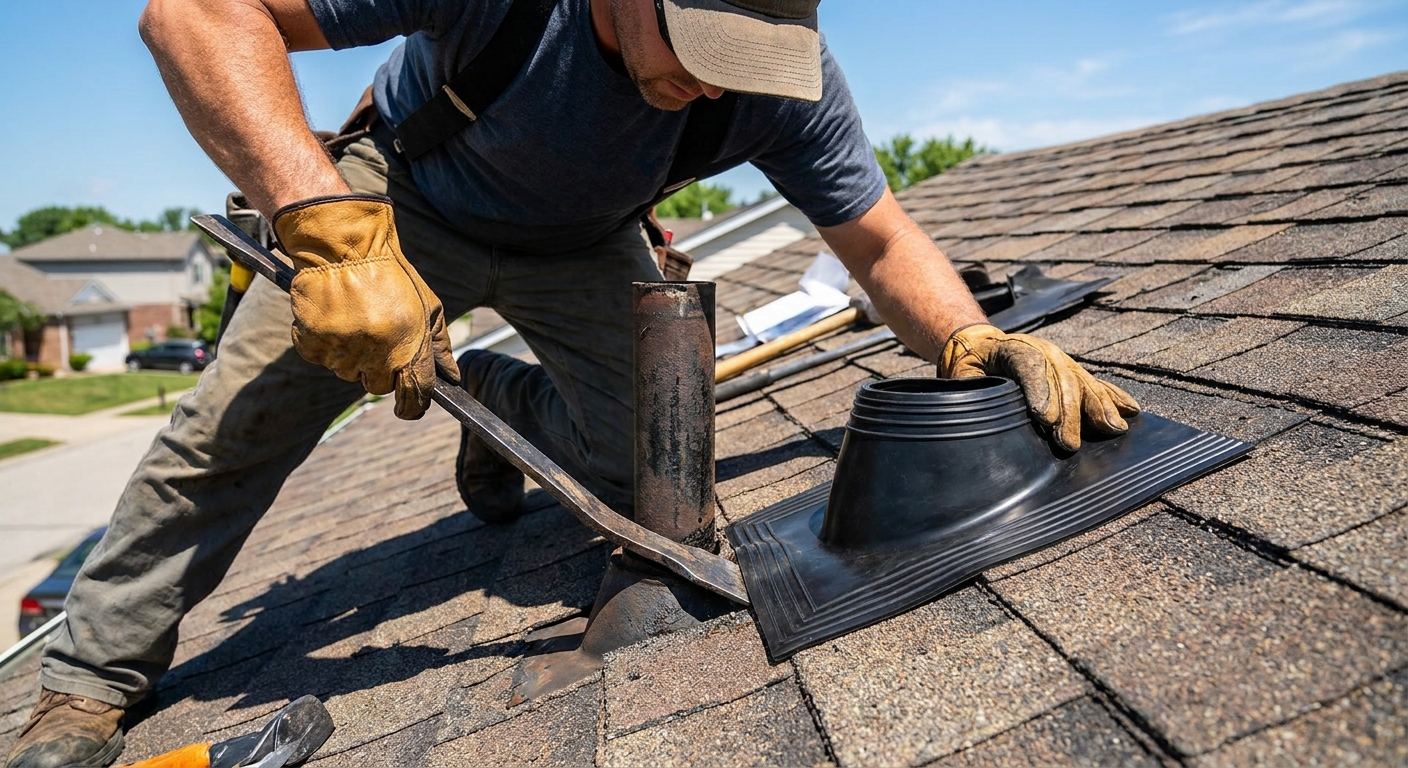
Step-by-step: Replace a vent boot
What you are doing is swapping the old flashing boot for a new one and integrating it under the shingles so water naturally runs over the flashing, not under it.
1) Find the boot and study the overlap
Look at how the shingles overlap above and beside the pipe. You will need to lift shingles to remove nails and slide the old flashing out.
2) Loosen the shingles carefully
- Use a flat pry bar to break the seal gently.
- Lift the shingle tabs enough to access the nails holding the flashing.
- Go slow. Warm shingles are more flexible than cold ones.
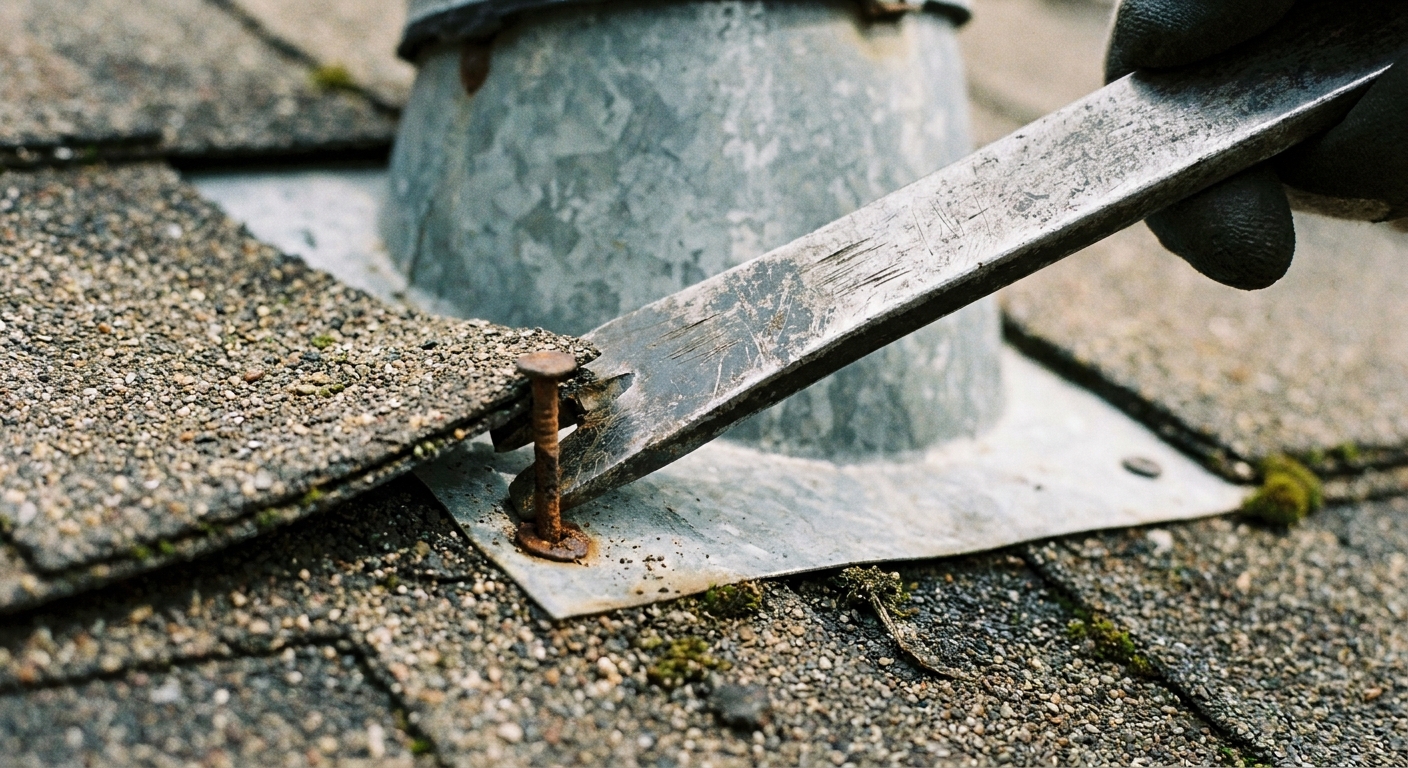
3) Remove nails and pull the old boot
Many flashing boots have nails that end up hidden under the overlapping shingle course above. Slide the pry bar up under the shingle tab, hook the nail, then pop it out gently so you do not tear the mat.
- Remove nails holding the flashing base, including any nails hidden under the shingle above.
- Slide the flashing down and off the pipe.
- If the rubber is fused to the pipe, slice the collar off with a utility knife, but do not nick the pipe and do not cut the surrounding shingles or underlayment.
4) Prep the pipe and dry-fit the new boot
Before nailing anything, slide the new boot over the pipe and ensure it sits flat on the roof.
- Pro tip: If you are installing a rubber collar on PVC or ABS, a light mist of soapy water or glass cleaner on the pipe helps the boot slide down without grabbing and tearing.
- Do not over-stretch the collar. If it feels like you have to force it, double-check the size.
5) Install and integrate the flashing
The key detail is shingle integration. Think like water.
- Top and side edges of the flashing go under the shingles above and beside the pipe.
- Bottom edge stays on top of the shingles below so water sheds out.
- If you encounter ice-and-water shield or other membrane, keep it intact and work the flashing into place without tearing the seal.
6) Nail it the right way
- Tuck the flashing into its final position.
- Nail per the manufacturer instructions for your specific boot. Nail locations vary by product, and the goal is always the same: secure it while keeping fasteners out of the main water path.
7) Re-seal shingles and spot-seal fasteners
This is where people either do it clean or create a future mess.
- If you broke old shingle sealant strips, add small dabs of roofing cement under the tabs you lifted.
- Seal any exposed nail heads with a small amount of roofing cement.
- Avoid smearing sealant across the whole flashing. It often cracks, looks bad, and traps debris.
8) Final checks
- Make sure the collar hugs the pipe evenly with no splits or gaps.
- Confirm the top and sides are tucked under shingles and the bottom edge is exposed to shed water.
- Look for any torn shingles you might need to repair or replace.
When a collar swap is not enough
Some products allow you to replace just the collar, but many standard boots are a one-piece flashing and collar assembly. If your flashing is corroded, bent, or improperly integrated, replace the whole boot.
Also consider calling a pro if:
- The roof is steep, high, or difficult to access safely.
- You see widespread water staining not centered on the vent penetration.
- You have multiple penetrations leaking or shingles that are brittle and cracking when lifted.
How to confirm the fix
After the repair, you can do a controlled hose test if conditions are safe.
- Have one person inside the attic watching the area with a flashlight.
- Have another person outside run water on the roof above the vent, letting it flow down naturally.
- Do not blast water upward under shingles. That is not how rain behaves and can create false leaks.
If everything stays dry, you likely nailed it.
Related reading
If the boot looks fine or you still have staining after replacement, you may be dealing with a different roof penetration, flashing issue, condensation, or a general roof leak pattern.
The 30-Second Cheat Sheet
Essential takeaways for: Roof Vent Pipe Boot Leaking? Replace the Stack Boot to Stop Attic Stains
Fast diagnosis
- Likely vent boot leak if the attic wet spot is centered on the plumbing vent pipe penetration and the collar on the roof is cracked, brittle, or loose.
- Less likely if staining is far from any vent stack, or the sheathing is wet along a long seam, valley, or around a different penetration.
- Also rule out condensation if the “leak” shows up in cold weather, you see frost on nails, or the bathroom fan duct is loose, uninsulated, or dumping humid air into the attic.
What usually fails
- The rubber collar gets UV-degraded and splits around the pipe.
- Bad prior repairs: caulk blobs instead of proper shingle and flashing overlap.
Fix in a nutshell
- Work only on a dry, calm day.
- Lift shingles carefully, remove nails (often hidden under the shingle above), slide old boot off the pipe.
- Pro tip: mist the pipe with soapy water or glass cleaner so the new rubber collar slides without tearing.
- Slide new boot on and integrate it correctly: top and sides under upper shingles, bottom over lower shingles.
- Nail per manufacturer instructions and seal exposed nail heads with roofing cement.
- Re-seal lifted shingle tabs with small dabs of roofing cement.
Don’t do this
- Do not rely on caulk alone as the main waterproofing method.
- Do not work on wet shingles or in windy conditions.
- Do not hose water upward under shingles to “test” the repair.
When to call a pro
- Steep or high roof, brittle shingles that crack when lifted, or staining not centered on the vent pipe.
💡 Tip: Scroll up to read the full article for detailed, step-by-step instructions.
⬆️ Back to topAbout Marcus Vance
Content Creator @ Grit & Home
Marcus Vance is a lifelong DIY enthusiast and self-taught home renovator who has spent the last decade transforming a dilapidated 1970s ranch into his family's dream home. He specializes in budget-friendly carpentry, room-by-room renovations, and demystifying power tools for beginners. Through his writing, Marcus shares practical tutorials and hard-learned lessons to help homeowners tackle their own projects with confidence.